AR – AR Inquiry Form (101-ar-frm-001)

Accounts Receivable (A/R) Inquiry

Overview

The Accounts Receivable Inquiry form displays transaction details on the selected account, including historical data. This form is linked to the master file of each subsystem so that you can access all the A/R information available on a given property or taxpayer name and address record.

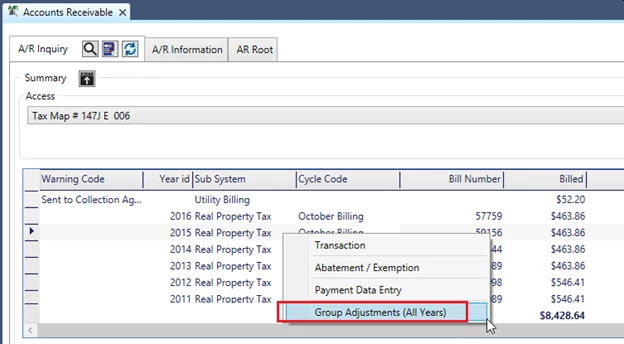
The Accounts Receivable Inquiry form includes a Summary and a Detail section. The Summary section lists the Accounts Receivable transactions for the selected record. The Detail section displays transaction details on each entry selected in the Summary section.

The Detail section has three tabs:

  • A/R Detail providing details about the transaction selected in the Summary tab
  • Notes For entering notes or comments and additional information about the selected transaction
  • Payment Plan for entering payment plan information.

See Also Paid Under Protest in the Govern A/R User Guide.
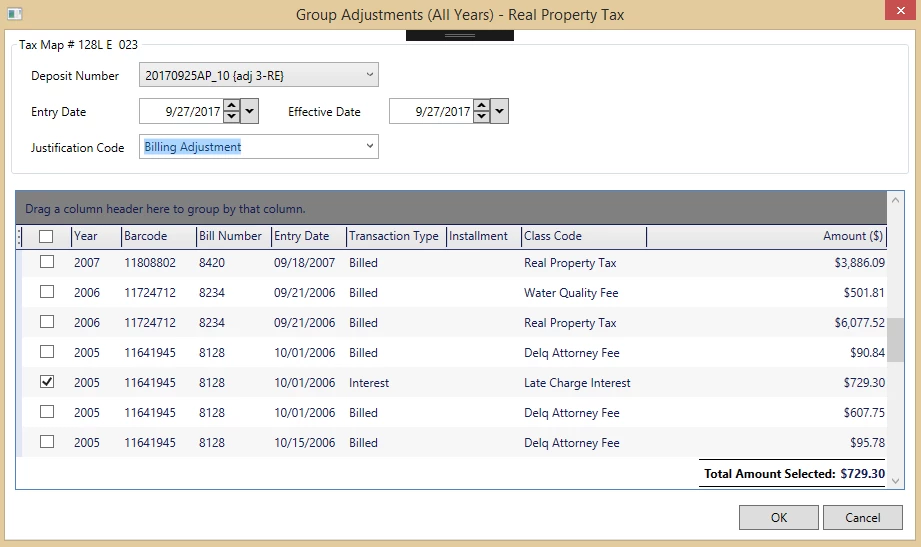
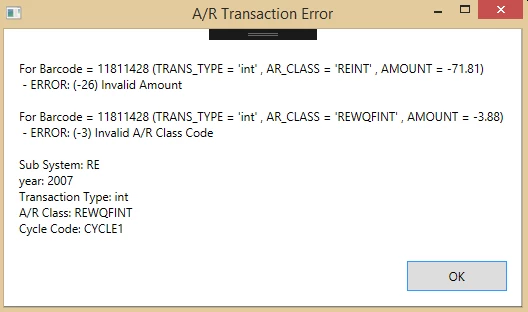
Read More...

Documentation

For the complete reference guide, see Govern Accounts Receivable.
For the A/R Transaction Rules, see A/R Transaction Rules.

The following forms are opened in secondary windows from the A/R Inquiry form:

Payment Data Entry

The Payment Data Entry form is used for accepting and processing payments at the counter, by cash, check, credit card, debit card, or by any other user-defined method. The current owner of the account is automatically defined as the payer. A currently existing function, in the Payment Data Entry or in Cash Collection, is the ability for users to create a deposit on one or multiple A/R Accounts.
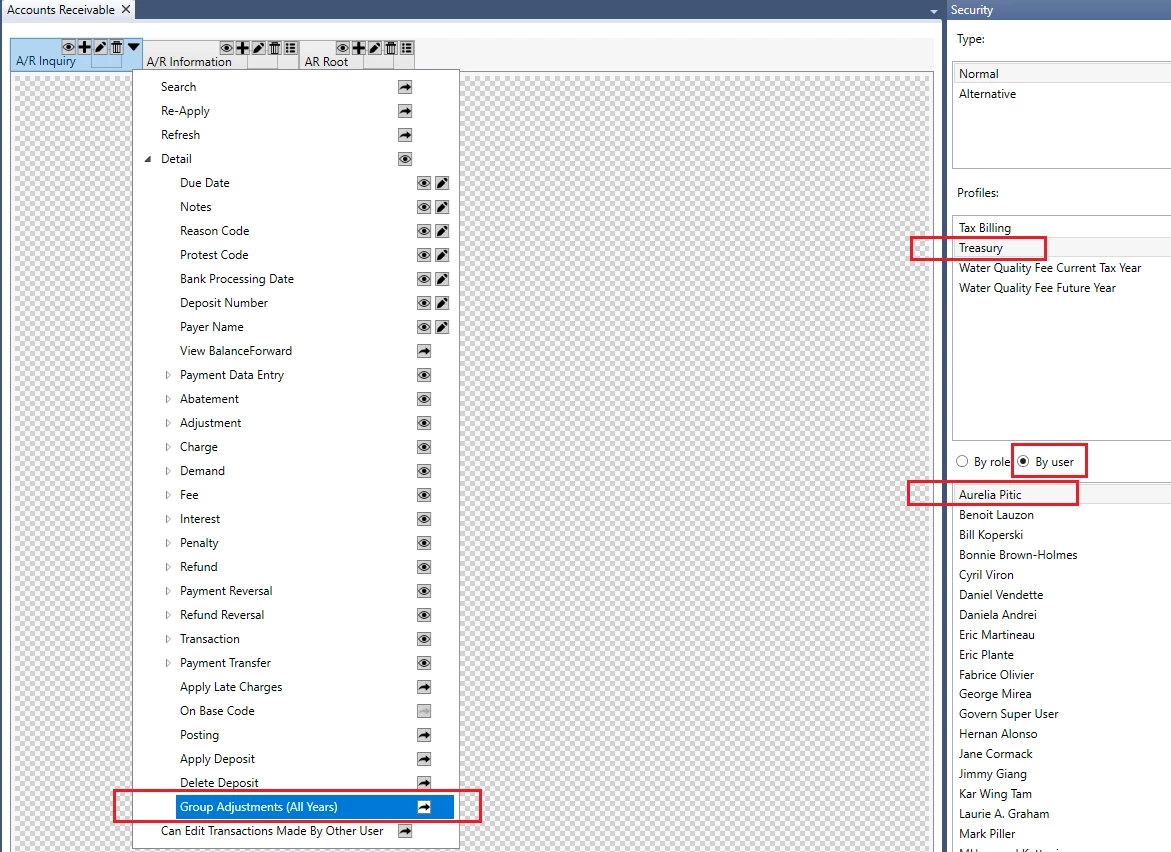
The feature also allows users to, Create a Deposit, Apply the Deposit, and Delete the Applied Deposit as needed. This feature is securable through the OpenForms Designer (OFD). See Securing Apply or Delete Applied Deposit in the Security section below.

A/R Transaction

The A/R Transaction form is used for a number of Accounts/Receivable transaction types, including abatements, charges, fees, and duplicate payments. It is used for viewing existing transactions, creating new ones, and for applying modifications to an account or bill. See A/R Transactions.

Abatements and Exemptions

Abatements are applied to reduce the amount owed on an account or to exempt an amount from payment. Typically, they are used to decrease property taxes and are applied after the real property tax assessment and levies are calculated.

Adjustments

The A/R Adjustment form is used to apply modifications to an account or bill and can be used to either increase or decrease the balance due on an account.

Charge, Demand, Fee, Interest, and Penalty Transactions

The transaction types in this section follow the same form as the A/R Adjustments. Select the applicable form for the transaction type. Then follow the procedures described under A/R Adjustments.

Refunds

The section describes the Refund transaction data entry form. Typically, refunds are used for over-payments and duplicate payments.

Payment Reversal

The section describes the Payment Reversal transaction data entry form. Typically, payment reversals are used for Non-Sufficient Funds (NSF) checks.

Payment Transfer

The section describes the Payment Transfer transaction data entry form. Payment transfers are used to transfer posted payments from one account to another. They can be used to correct payments that were posted to the wrong account. They can be made on posted payments only.

Deposit Management

Deposit Management is required in Govern OpenForms(TM). You can use either auto-assigned deposit numbers or create them manually on the Deposit Management form. Note that there are two Deposit Management forms, one for users with Full Access Rights who need to see the deposit number of all users. When creating the Profile, select the applicable form.

Functionality

Note that the function to apply a Deposit existed in Govern for Windows, but was not implemented in Govern for .NET. The Batch Process to apply a deposit was implemented in Govern for .NET, but the functionality was not added to the A/R Inquiry.

Creating a Deposit

  1. In the A/R Inquiry form, right click in the lower grid and select Accounts Receivable – Payment Data Entry.
  2. In the Accounts Receivable – Payment Data Entry form, select a Deposit Number and Transaction Type. (Set both to deposits)
  3. In the Detail group in the lower part of the form, set the type of deposit, e.g. Check.
  4. Click Save

When saving, both a Deposit, and a Payment will be saved in the account; this is to avoid changing the balance of the account because the deposit has not been applied yet; this is an old functionality.

  1. Apply the deposit on the account, this is done by posting the deposit. This is done through the Cash Collection Posting form. (Don’t forget to hit the refresh)
  2. Run the batch process to post the payment.
  3. Return to the A/R Inquiry form and Refresh.

The entry should be recorded as posted; look under the Posted column in the bottom grid.

  1. In the lower grid, right click on the entry and select the new Accounts Receivable – Apply Deposit function from the menu.

Selecting the Accounts Receivable – Apply Deposit will apply the deposit, if there are any interests or penalties, they will be also be applied, e.g. Late Charges.

NOTE: When selecting the Accounts Receivable – Apply Deposit function, posting does not occur immediately.

After applying the deposit, another deposit is created that pays the balance. Any Interests or Penalties are also applied.
At this point, an adjustment posting batch process can be run to post the entries, or a right click on the deposit displays the Accounts Receivable – Delete Deposit option. When selected, the deposit that was created will be deleted. The same behavior is observed in the Cash Collection form.

Self Reported Tax Subsystem Users
For the Self Reported Tax subsystem, the Govern system will only create a deposit on a Period, i.e. ST_ID, not on the account otherwise the system is not able to Apply it.

Security

Securing Apply or Delete an Applied Deposit

This feature in the Accounts Receivable form can be secured through the OpenForm Designer (OFD).
To secure the feature in the OFD…

  1. Open the Accounts Receivable form.
  2. Click to select the A/R Inquiry tab.
  3. Locate and click on the Padlock icon to to change to the Security Mode.
  4. Under the security pane, select the security By User radio button.

On the A/R Inquiry tab, click the black downwards pointing arrowhead to select the options for Apply Deposit and Delete Deposit.
For full details about using the Security Mode in the OFD, refer to the OFD user guide.

In the A/R Inquiry form, the system will display the Penalty and the Interest by installment for each A/R record. In (Table: AR_SUMMARY), 2 fields have been added.
· LATE_PENALTY
· LATE_INTEREST
These fields are updated based upon the Penalty or the Interest; note that this is the same process as the one that currently exists with a difference, the system now calculates late charges up to the installment, and then updates the LATE_CHARGE field. In addition, the system will also update the 2 new LATE_PENALTY and LATE_INTEREST fields.

What’s New!

Change Payer Name in AR Inquiry

NEW! There are two ways to change the payer name in AR Inquiry; Payment Data Entry, a double click on the Payer Name row and column in Cash Flow. See Change Payer Name in AR Inquiry for details.

A/R Class Codes Included in Balance Forward

After using the Govern Data Extraction Tool (DET),  a situation can result with the imports when there are multiple Class Codes. Imports into the same A/R Class can result in the same descriptions being used for different codes. As a result, the same A/R Class code would be added for different descriptions; currently there is no way to differentiate between records with the same description, but with multiple A/R Classes. See AR Class Code Included in Balance Forward for details.

For new features and functionalities in the Accounts Receivable module, see the A/R What’s New page.

Related Topics

Accounts Receivable (A/R) – Payment Transfer Data Entry

Accounts Receivable (AR) – What’s New


101-ar-frm-001


0 votes, average: 0.00 out of 50 votes, average: 0.00 out of 50 votes, average: 0.00 out of 50 votes, average: 0.00 out of 50 votes, average: 0.00 out of 5 (0 votes, average: 0.00 out of 5)
You need to be a registered member to rate this.
Loading...

AR – Group Adjustments (101-ar-fea-020)

A/R Group Adjustments (All Years)

Version 6.0 | Version 6.1 Scheduled Release GA 1706

Overview

Transaction reversals, can be made to a parcel as required in the Govern system. When multiple reversals are required, there is a functionality in the Govern A/R Inquiry form that allows the user to reverse for a parcel, multiple transactions for multiple years with a single process. As an example, this feature may be used to zero out, i.e. set all special assessments for a parcel to zero.

Functionality

To perform actions on line items in the Details grid, a right-click on the selected item will display a context specific sub-menu. In the Details grid of the A/R Inquiry Summary group, there is a sub-menu item called Group Adjustments (All Years). The sub-menu is accessible when you right-click on a parcel based account in the details grid.
When the Group Adjustments (All Years) menu option is selected, a form containing the transactions from all years for the parcel and subsystem of the selected account will be displayed. It is through this form that you will be allowed to select multiple transactions. Once selected, an adjustment can be performed on the transactions as a group. The result will be an automatic reversal of their original transactions.

NOTE: Prior to opening the form, you will be required to create an Adjustment Deposit Number for the selected subsystem.


Read More...


The Group Adjustments (All Years) form will display all Posted transactions, with the exception of the following transaction types:

Code Transaction Type Description
dep Deposit An amount of money placed in a bank.
dup Duplicate Payment A second payment made to cover an amount already paid.
och Open Cash Credit A credit generated from a cash payment.
ocr Open Credit A credit generated from an adjustment.
ovr Overpayment An adjustment generated from an overpayment on installment. This is specific to the Real Property Tax Assessment & Billing module. It is only used in that module only.
Note: The Over, Short, and Duplicate Method option must be selected on the A/R General Parameters form in GNA.
pdt Postdated Payment A payment dated later than the current date.
pmt Payment An amount of money given in exchange for goods or services.
rev Payment Reversal A transaction made to correct a payment made in error that is posted or a Not Sufficient Funds (NSF) check hat is processed.
rf Refund An amount of money returned when an overpayment is made.
trp Payment Transfer When you create a Payment Transfer in Govern OpenForms, a Payment Transfer (trp) transaction is automatically created in the account to which the payment is transferred; i.e., the payment is added to this account. At the same time, a Payment Transfer Reversal is created in the account from which the payment is transferred.
trr Payment Transfer Reversal When you create a Payment Transfer in Govern OpenForms, a Payment Transfer Reversal (trr) transaction is automatically created in the account from which the payment is transferred; i.e., the original payment is removed from this account. At the same time, a Payment Transfer is created in the account to which the payment is transferred.
vp Voluntary Payment (Advance Payment) An amount that is paid before a bill is received. For example, a taxpayer may forward a payment to cover bills during a planned absence.
Note: If you select Voluntary Payment, as the transaction type, on the Payment Data Entry form, an AR_ID must already exist for the person or property associated with the payment.

Refer to the Accounts Receivable guide for a List of All A/R Transaction Types
The user must select the following:

  • Deposit Number
  • Entry Date
  • Effective Date
  • Justification Code (optional)

There is also a possibility of grouping or filtering on any column heading in the grid. In addition, the form will display the Total Amount Selected.
Upon selecting the transactions to be reversed; click OK.

A pop-up will be displayed to confirm whether you would like to proceed with the transaction reversal. There is a possibility of one of two (2) messages being displayed. The first message is the standard default. The second message is conditional upon the presence of a CC_ID; this will indicate whether there are charges resulting from Payment transactions.

Message 1:
All selected transactions will be reversed. Do you want to proceed?OR… (CC_ID present)Message 2:
All selected transactions will be reversed. Selected transactions include charges resulting from Payment transactions. After this process those payments will not be reversible. Do you want to proceed?

Govern will automatically create transaction reversals for each of the selected items:

  • The same Transaction Type, Class Code and Amount is used in the reversal entry. Selected Entry Dates and Effective Dates are used along with the Justification code.

When there is more than one transaction type with the same class code in the same AR_ID, they will be summed up with only one transaction being created. An audit trail is created for each reversed transaction created, i.e. one record will be recorded in (Table USR_AUDIT_TRAIL). The Transaction Reversals created will be flagged with a status of UNPOSTED. Users will need to use the A/R Posting – A/R Transaction Batch Process to post the transactions.


Enhanced Functionality

Availability: Release 6.1.1707.0308 and greater.

NEW! The A/R Group Adjustments (All Years) feature has been enhanced.  The functionality in AR Inquiry now allows users to reverse multiple transactions for a parcel, for multiple years all at once.

Modifications to User Interface (UI)

To accommodate this enhancement, a new sub-menu titled Group Adjustments, can be accessed through the AR Inquiry form. This sub-menu is displayed by performing a right-click in the Summary on an AR account based on a parcel. Note that prior to opening the form, the users will need to create an Adjustment Deposit Number for the selected subsystem.

The Group Adjustments form will display all Posted transactions with the exception of the following transaction types:

Posted Transaction Types that will not display

  • pmt
  • rev
  • rf
  • vp
  • trr
  • trp
  • dep
  • och
  • ocr
  • ovr
  • dup
  • pdt

Users must select the Deposit Number, the Entry and Effective Date and select an optional Justification Code.

He will have the possibility to group or filter by any field into the grid. The form will also display the Total Amount Selected.

WARNING: If any charges generated by a Payment Transaction are reversed, those particular payments can no longer be reversed!

Upon selecting the transactions to be reversed, the user will click OK, then a pop-up will ask the user whether or not to proceed with reversing the transactions:

Otherwise, if one of the selected item in the grid have any charge generated by a payment transaction, the following message confirmation will show up:

Govern will automatically create reversing transactions for each of the selected items:

  • Using the same transaction type (except ‘inv’ and ‘ajb’), class code, installment and amount is used in the reversing entry. Selected Entry and Effective Dates are used along with the Justification code.
    • ‘inv’ and ‘ajb’ transactions will be adjusted using ‘adj’ transaction type like the base rule does when adjusting single transactions.
  • If there are more than one of the same transaction type, same class code and same installment in the same AR_ID, they will be summed together and only one transaction created.
  • An audit trail is created for each reversed transaction created (one record into the table USR_AUDIT_TRAIL)
  • The reversing transactions created are in an Unposted status.
  • The user will then need to use the AR Posting – AR Transaction batch process to post the transactions.

If there are any errors in A/R, the details are displayed (as below) and all the reversed transactions are canceled.

To select the Group Adjustment

A/R Error Handling

Transaction errors that are generated in the A/R will be detailed in the A/R Transaction Error screen. All reversed transactions will be canceled.

Security

The security for this feature is configurable in the OpenForms Designer (OFD).

  1. Open the Account Receivable form (AR008)
  2. Switch to Security Mode.
  3. In the Security pane on the Right Hand Side (RHS), select the required Type and Profile.
  4. Select the By user option.
  5. On the A/R Inquiry tab click the downward arrow [v]; select the node for Group Adjustment (All Years).

Refer to the OFD for full security adjustment details.


Documentation

See the user documentation below for details.

NOTE: New enhancement description is only described above under Enhanced Functionality on this page.

101-ar-fea-020-Group Adjustments All Years.pdf


Related Topics

Self-Reported Tax Module

Tax Account Maintenance
Tax Filing Occasional
Tax Name & Address Mailing Index (101-na-frm-002)
Business License to Name (101-pm-frm-016)

Module Overview


101-ar-fea-020


0 votes, average: 0.00 out of 50 votes, average: 0.00 out of 50 votes, average: 0.00 out of 50 votes, average: 0.00 out of 50 votes, average: 0.00 out of 5 (0 votes, average: 0.00 out of 5)
You need to be a registered member to rate this.
Loading...

Transfer Credit from One Year to Another Batch Process (101-ar-bp-013)

Transfer Credit from One Year to Another Batch Process

Overview

The Transfer Credit from One Year to another batch process is run to adjust accounts by removing credits from one year and applying them to another. This is useful if you prefer to credit accounts at year end, rather than providing refunds for overpayments.

Transfer Credits from One Year to Another new parameters

 Availability: Release6.1.1707.1303 | 6.1.1811 | 6.1.1911 | 6.1.1912

NEW! The following new option parameters are an enhancement to the existing batch process for A/R – Transfer Credits from One Year to Another.

The new modifications will allow users to…:

  • Enable a minimum/maximum value to transfer
  • Introduce the ability to select from a saved dataset

In addition to the above modifications, users can exclude any properties which have a credit over a specific amount, and have had an owner transfer as of Department As of Date of the current year.

The transferring of Open Credits (OCR) is now optional; a flag in the system registry will display or hide the Open Credit section of the Batch Process.

Users no longer have to select a Batch Number for the payments and reversals transactions, they will be auto-created as needed.

If the batch Process needs to auto-generate a RECEIPT_NO, it no longer uses (Table: usr_key_receipt), it now uses (Table: usr_key_dynamic) where the key_name is RECEIPT_NO[<alias_id>] where <alias_id> comes from (Table:usr_key_receipt.alias_id) and the key format (key_format) is “{0:D8}“, the same as it was formatted before. A verify database process will transfer necessary keys and drop (Table: usr_key_receipt) afterwards.


Read More...


Govern New Administration (GNA)

There are changes in the GNA General Settings Editor to accommodate the above described options.

To locate these parameters in GNA…

  1. On the GNA ribbon select Parameters (tab) > System Parameters (group) > General Settings Editor
  2. In the OpenForms General Setting form, in the Registry Filter parameter, select Batch Process.
  3. Under the A/R Transfer Credits section you will note two (2) parameters: Allow transfer of Open Credits from one year to another, and Real Property – Maximum Credit Owner Transfer.

OpenForms General Settings – A/R Transfer Credits (section)

Allow transfer of Open Credits from one year to another – Select this option to allow the transfer of Open Credits from one year to another.

Real Property – Maximum Credit Owner Transfer – This parameter is used only for the Real Property Tax subsystem. This enhancement will look at the property owner to determine if the effective date of ownership is as of Department As of Date of the current calendar year that the batch process is being run in.

DEV NOTE: The query used to check the owner transfer is:

SELECT * FROM pc_owner 
   WITH (NOLOCK) 
   WHERE p_id=@p_id 
      AND status = 'O' 
      AND seq_priority = 1 
      AND as_of_date>=@department_as_of_date;

If the balance of the credit is above the amount set, then the transfer is not completed. Any amount equal to or below the amount set will be transferred. The transfer will proceed even if it is outside of the Minimum / Maximum threshold.

Batch Process parameters

In the Govern batch process, there are parameters in the Criteria Selection (group). They are as follows:

Transfer Credits from One Year to Another batch process parameter

  • Saved Dataset: This dropdown selection will enable you to select from a predefined dataset built in Govern.
    • It is enabled for all subsystems
    • The dataset is a selection of P_ID-s, except for the subsystems which work by name (AC, BR, BT, MB, MV, ST). In instances where the subsystem is AC/BR/BT/MB/MV/ST, the dataset will be a selection of NA_ID’s.
  • Minimum / Maximum Amount: new options to select a range of amounts to include in the process.
    • This parameter is enabled for all subsystems. When an Minimum Amount entered, values less than the entered amount will not be processed. (i.e., Input as a Positive Value).
    • If an amount is entered into the Maximum Amount parameter, anything greater than the entered amount will not be processed. (i.e., Input as a Positive Value)
    • If the parameters are empty, all amounts will be processed.


Related Topics

Accounts Receivable (A/R Module)


101-ar-bp-013


0 votes, average: 0.00 out of 50 votes, average: 0.00 out of 50 votes, average: 0.00 out of 50 votes, average: 0.00 out of 50 votes, average: 0.00 out of 5 (0 votes, average: 0.00 out of 5)
You need to be a registered member to rate this.
Loading...

MB – Creating New Accounts Receivables (101-mb-frm-001-fea-003)

Miscellaneous Billing (MB) – Creating New Accounts Receivables (AR)

Overview

Update PendingChange of product code as the same controller will be used throughout the modules applications.

This action button is used to Create A/R to generate an Accounts / Receivable ID for new accounts, directly from the Account Maintenance form.


NOTE: You need to save the record to the database before you can create an A/R ID. This button is disabled once the ID is created.


Creating New Accounts

The Create A/R button is only available after the MB Account is created when there is no AR associated to the account
Click on the Create A/R to create an AR_MASTER record with the next AR_ID and populate it with the NA_ID and MB_ID from the MB Account.
Once the Create A/R has been done, the button becomes disabled.


101-mb-frm-001-fea-003


0 votes, average: 0.00 out of 50 votes, average: 0.00 out of 50 votes, average: 0.00 out of 50 votes, average: 0.00 out of 50 votes, average: 0.00 out of 5 (0 votes, average: 0.00 out of 5)
You need to be a registered member to rate this.
Loading...

AR – Delinquency Collection Batch Processes

Delinquency Collection Batch Processes

Overview

The Delinquency & Collections modules includes the following batch processes.
  • Transfer A/R to Delinquency
  • Delinquency Posting

Prerequisites

Before running the batch processes for Delinquency & Cash Collection, verify the following:

  • All A/R records to be transferred to Delinquency must be associated with a Delinquency A/R Class Code.

Defining Security Permissions for the Delinquency & Collections Batch Processes

Security for all batch processes in Govern OpenForms are defined in the Govern Security Manager (GSM) as follows:
To define security permissions for a batch process:

  1. Launch the Govern Security Manager (GSM).
  2. Expand Applications > Govern > Profiles > <name of the Profile> Batch Processes <name of the batch process>.
  3. Right-click on the batch process.
  4. Select Edit.
  5. Assign permissions by role.
  6. Select Exclusions.
  7. Define the exceptions.
  8. Click Save.

Transfer A/R to Delinquency

The Transfer A/R to Delinquency batch process is run in order to automate the process of transferring delinquent A/R records to the Delinquency and Collections module. It performs the same tasks as transferring individual records one by one on the Delinquency form.

Only records that are associated with an A/R Class Code that is linked to a Delinquency Collection A/R Class Code can be included in the process.

There are two procedures contained on this batch process.

  • Process Delinquent A/R: This is the first step. Run this procedure to transfer the delinquent A/R records to Delinquency and Collections.
  • Finalize Delinquent A/R: This is the second step. Run this procedure to finalize the A/R records.

A separate batch process is required in order to post the delinquent records that were included in the two Transfer A/R to Delinquency batch process procedures.
Posting to A/R: Once records are finalized, you can run the Posting to A/R batch process. This procedure is described in the following section.

Running the Process Delinquent A/R Procedure

To run the Process Delinquent A/R batch process from Govern:

  1. Launch Govern.
  2. Open a Profile that contains the Transfer A/R to Delinquency and Collections process.
  3. Select the Batch Processing Explorer.
  4. Select the Transfer A/R to Delinquency and Collections* batch process.*
    The name of the batch process can vary according to the administrative setup.
  5. Select the subsystem under which the delinquent A/R records are saved from the Subsystem drop-down list.
  6. Select a Cycle Code from the A/R Cycle drop-down list.
    The A/R Cycle parameter appears only for the Real Property and Personal Property Tax subsystems.
  7. Select the Process Delinquent A/R option.
  8. Enter a range of years in the From Year and To Year parameters.
    Only the records within the selected range are processed.
    The range of years appears for year-based subsystems only.
    It is used to ensure that the current bills are not accidentally transferred to Delinquency & Collections.
  9. Select a department from the Department drop-down list.The fiscal year from this department is displayed in the Fiscal Year parameter.
    This year is used to create the Delinquency account in the table AR_MASTER. It is also used for all records in AR_DETAIL.
  10. Select a date from the Filing Date drop-down list.
    This is the date of the transfer (Table: DC_MASTER.FILING_DATE)
  11. Enter a unique number in the Claim Number parameter.
    The claim number is applied on all records included in the batch process.
    It is a required field on the Delinquency & Collections user form, as well as on the Transfer A/R to Delinquency & Collections batch process form.
    This Claim Number is selected when you run the process to finalize the records.
  12. Select a warning flag in the Exclude A/R Warning Flag list box if you want to exclude certain records from the batch process.
    Records with the selected warning flag are excluded from the process.
    For example, you may want to exclude all records that are included in the Bankruptcy module from the process.
  13. Enter the minimum balance due on the records that you are transferring to Delinquency in the Minimum Balance Due field.
    Only the records that are greater than or equal to the Minimum Balance Due are transferred.
  14. Select an A/R Reason Code from the drop-down list (Table: VT_USER.TABLE_NAME = ‘ARREASON’)
    The A/R Reason Code is displayed by long description.This reason code is associated with the original record by AR_ID.
    For the delinquency record, it is used for informational purposes only.
  15. Click Execute.

If you are running the batch process from Govern, the status of the process is displayed in the Processing tab. If errors or warnings occur, messages are displayed.
You can run the batch process again in order to include records not included in the first claim. For example, if records are not associated with an A/R Class Code that is linked to a Delinquency A/R Class Code, they are not transferred to Delinquency.

Running the Finalize Delinquent A/R Batch Process

The Finalize Delinquent A/R Batch Process sets all records with the selected Claim Number to Finalized.
Once records are finalized, you can run the Posting to A/R batch process.

To run the Process Delinquent A/R batch process from Govern:

  1. Launch Govern.
  2. Open a Profile that contains the Transfer A/R to Delinquency and Collections process.
  3. Select the Batch Processing Explorer.
  4. Select the Transfer A/R to Delinquency and Collections* batch process.*
    The name of the batch process can vary according to the administrative setup.
  5. Select the subsystem under which the delinquent A/R records are saved from the Subsystem drop-down list.
  6. Select Cycle Code from the A/R Cycle drop-down list.
  7. Select the Finalize Delinquent A/R option.
  8. Select a claim number for the Claim Number drop-down list.
  9. Only the claim numbers that contain records that are not finalized appear in the list.
  10. Click Execute.

Transfer A/R to Delinquency Log Files

The log files for the Transfer A/R to Delinquency batch processes includes the following information:

  • Start and End time of the process
  • List AR_ID and balances being transferred
  • Sum of each class code being transferred to DC
  • Count of AR_ID being transferred to DC

Delinquency Posting

The Delinquency Posting batch process posts the delinquency records to the Govern Accounts/Receivable subsystem.
You can run this process at any time from Govern or create a schedule and run it at a later time or on a regular basis. For details about scheduling batch processes, refer to the Govern Scheduler guide.

The Delinquency Posting form has two sections.
The top section lists all the delinquency records with deposit numbers, by deposit number and A/R balance. The lower section provides the following details about those records:

  • Delinquency Claim Number
  • Balance
  • Finalized status: If the record is finalized, the check box is selected.

Only the Delinquency and Collection records that are Finalized can be posted to A/R.

To run the batch process from Govern:

  1. Launch Govern.
  2. Open a Profile that contains the Delinquency Posting batch process.
  3. Select the Batch Processing Explorer.
  4. Select the Delinquency Posting* batch process.*
    The name of the batch process can vary according to the administrative setup.
  5. Select the record or records that you want to post in the top section of the form.
  6. Click Execute.

If you are running the batch process from Govern, the status of the process is displayed in the Processing tab. If errors or warnings occur, messages are displayed.

Viewing Posted Delinquency and Collection Records

The posted Delinquency and Collection records are displayed in the Balance Forward Detail grid on the A/R Inquiry form.

Refer to the Govern Accounts Receivable documentation for details about the A/R Inquiry form.

Troubleshooting

You can only run the Delinquency Posting process on records that are finalized.
In the following screen shot, some of the records under the selected deposit number are not finalized. Therefore, you cannot run the batch process on this deposit number until you finalize the records.

Documentation

To view the documentation for this feature, click on this link to https://kb.harrisgovern.com/101-ar-bp-039/.

Related Topics

0 votes, average: 0.00 out of 50 votes, average: 0.00 out of 50 votes, average: 0.00 out of 50 votes, average: 0.00 out of 50 votes, average: 0.00 out of 5 (0 votes, average: 0.00 out of 5)
You need to be a registered member to rate this.
Loading...


AR / CC – API Web service

Accounts Receivable (A/R) & Cash Collection (CC) API WEB Service

Overview

The Govern Payment Notification Web Service service is mainly used when cash is collected via a 3rd party software.

Installation and Setup

In Deploy-EZ:

  • Download the Binaries for the required release (4.7, 5.1, 6.0., 6.1…)
  • Deploy and Install the Govern WCF Service (Standard bundle with PC&GIS, AR&CC) for each deployment

For more information, see Download and Install on Govern API and Services main page.

What’s New!

AR Web Service for Key Bank (TM)

Key Bank’s web-based CSR Application (Payment Center) is used to process credit card transactions from cashiering stations. Govern provides a Payment Notification Web Service that can be utilized by Key Bank’s payment processing applications; Govern is used for Cash/Check transactions. In order to accommodate this process, a new method (AR_ExecutePaymentKeyBank) was added to the Govern A/R Web Service to support the Key Bank payment notification. This method uses key-value pairs as input parameters. For method details, refer to the updated Govern Accounts Receivable and Cash Collection API Web Service document. See Documentation section below.

Documentation


402-arccservice


0 votes, average: 0.00 out of 50 votes, average: 0.00 out of 50 votes, average: 0.00 out of 50 votes, average: 0.00 out of 50 votes, average: 0.00 out of 5 (0 votes, average: 0.00 out of 5)
You need to be a registered member to rate this.
Loading...

AR – Class Code Included in Balance Forward

Accounts Receivable (AR) Class Code Included in Balance Forward

Overview

The A/R Inquiry Custom Control is used to display, create and maintain all transactions linked to an Account Receivable. In situations where there are multiple Class Codes, a situation can result with imports after using the Govern Data Extraction Tool (DET). This would be an import into the same A/R Class that would result in the same descriptions being used for different codes. As a result, the same A/R Class code would be added for different descriptions; currently there is no way to differentiate between the same descriptions, but with multiple A/R Classes.

In Govern, on the Accounts Receivable > A/R Inquiry sub tab, two (2) grids are present. In the lower grid. A click on Balance Forward Detail, will display the following:

User Interface

A new Column titled AR Class Code is now present in the A/R Inquiry Detail grid. There is now an A/R Class, and a Description column

This feature will be present when the following display options are selected:

  • Balance Forward Detail
  • Applied Records

Functionalities

The AR Inquiry form is made up of two principal areas, a Summary grid, and a Detail grid. Additional details of this form may be found in the A/R Inquiry form documentation. For this feature, the new columns, A/R Class Code and Description, are available when selecting the Balance Forward Detail, or the balance forward Applied Records.

NOTE: The columns are not available in the Balance Forward because this information is broken down by installment and transaction type. As a result there will be no information in the Class Code column, the breakdown is only by transaction type.


101-ar-fea-011


0 votes, average: 0.00 out of 50 votes, average: 0.00 out of 50 votes, average: 0.00 out of 50 votes, average: 0.00 out of 50 votes, average: 0.00 out of 5 (0 votes, average: 0.00 out of 5)
You need to be a registered member to rate this.
Loading...