AR – Transaction Type Rules

A/R – Transaction Type Rules

This table lists the business rules and behavior by transaction type. Click here for the printable FULL format spreadsheet.

Trans Type +/- Sign Reversal Class Code Req’d a/i Affected Column G/L Account DEBIT G/L Account CREDIT Notes
Inv + Yes Yes a Principal A/R Def. revenue or Revenue of trans code
Yes Yes i Credited Def. revenue or Revenue of trans code A/R Trans code
Adj Mcr Td Tt Ttx + Yes Yes a Adj A/R Def. revenue or Revenue of trans code
i Credited Def. revenue or Revenue of trans code A/R of applied record
Ab + Yes Yes a Applied amount in Abated Def.Revenue or Revenue and A/R of trans code A/R of applied record and Revenue of Trans code
Yes i Subtract from Abated A/R and Revenue Def. revenue or Revenue of applied record and A/R of Trans Code Amt. must be ≤ previously entered abatement
Chg Dmd Fee Int Pen Tri, Tti, Ttp + Yes Yes a Charge Demand Fee Interest Penalty Part of Cash Transaction: Cash Otherwise: A/R Part of Cash Transaction: Revenue of trans code. Otherwise: Def. revenue or Revenue of trans code
i Credited_ I Def. revenue or Revenue of trans code A/R of applied record Amt. must be the balance due for the Trans Code Class and Category
The Amt in Paid_I is moved to Credited_I and Paid_I is applied following the rules for a cash transaction.
Pmt Vp + Yes i Paid Cash or Deferred revenue A/R or Revenue of applied record Amount must be zero or positive.
N/A
Pdt + Yes i None None None On the postdated date, a negative pdt and a pmt are created.
i None None None
Dct + Yes i Discount Discount or Deferred revenue A/R or Revenue of applied record Amt. must be ≤ the Principal Balance Due
i Subtract from Discount A/R or Revenue of applied record Discount or Deferred revenue Must be ≤ the total discounted for the specified class.
Dep + Yes Yes a Deposit Cash Revenue of trans code
Yes i None Def. revenue or Revenue of trans code A/R or Revenue of applied record Must equal previously entered deposit
Dup Ovr + Yes Yes a Adj A/R Def. revenue or Revenue of trans code Trans code is system generated
i Credited Def. revenue or Revenue of trans code A/R of applied record Trans code is system generated
Ocr + No a Credited none none Trans code is system generated
Och + No a Paid Cash A/R of Trans code Trans code is system generated
Rev + Negative CC Trans i Subtract from Paid A/R or Revenue of applied record Cash or Deferred Revenue
i Paid Cash or Def revenue A/R or Revenue of applied record Can reverse a rev trans only.
Negative CC Trans Yes i Subtract from Refund Cash A/R of Trans code
Sht + Yes i Credited Def. revenue or Revenue of trans code A/R of applied record Trans code is system generated
a Adj A/R Def. Revenue or Revenue of Trans code Trans code is system generated
Tx1 Tx2 + Yes a Tax1 or Tax2 A/R Def. revenue or Revenue of trans code
Yes i Subtract from Tax1 or Tax2 Def. revenue or Revenue of trans code A/R of Trans code Amt. must be ≤ the previously charged taxes.
Ajb + Yes Yes a Adjusted_Bill_D A/R Def. revenue or Revenue of trans code Trans code is system generated
Yes i Adjusted_Bill_C Def. revenue or Revenue of trans code A/R of applied record Trans code is system generated
lcr + Yes Yes a Applied Amount in Credited Def. revenue or Revenue of trans code A/R of applied record and Revenue of trans code Trans code is system generated
Yes i Subtract from Credited A/R and Revenue Def revenue or Revenue of applied record and A/R of Trans code Trans code is system generated


Transaction Type with Optional A/R Class Code Rules

The following rules apply to all transaction types with an optional A/R Class Code:

  • If an A/R Class Code is entered, only the record for that specific class is credited or updated.
  • If the A/R Class Code parameter is left blank, the records for all A/R Class Codes are updated.
  • If the A/R Class Code parameter is left blank, the entered amount must be less than or equal to the balance due for the transaction code and category.


101-ar-ref-TransactionRules


0 votes, average: 0.00 out of 50 votes, average: 0.00 out of 50 votes, average: 0.00 out of 50 votes, average: 0.00 out of 50 votes, average: 0.00 out of 5 (0 votes, average: 0.00 out of 5)
You need to be a registered member to rate this.
Loading...

AR – Cash Balancing Report

Accounts Receivable (A/R) – Cash Balancing Report

Overview

The report code for the Cash Balancing report is: ar-rpt-004.rpt

CashBalancingReport

Click to enlarge.


101-ar-rpt-004-CashBalancingReport


0 votes, average: 0.00 out of 50 votes, average: 0.00 out of 50 votes, average: 0.00 out of 50 votes, average: 0.00 out of 50 votes, average: 0.00 out of 5 (0 votes, average: 0.00 out of 5)
You need to be a registered member to rate this.
Loading...

Standard A/R Controller Configuration (101-ar-fea-022-ofr)

Standard Accounts Receivable (A/R) Controller – Create A/R (Configuration)

Overview

This standard OpenForms Controller can be added to a form to provide an Action Button to create Accounts Receivable for new accounts.
This controller is available in GA Release 1606

  • For more information on the functionality, see Product Information (101-ar-fea-022).

Configuration

Prerequisites

The following conditions are required in order to enable the Controller in OpenForms Designer Setup

Action Button Controller Properties

Read More...

Profile Security

  • The organization is licensed for the Accounts Receivable Sub-System to setup
  • The configuration for the Accounts Receivable has been completed
  • The Form’s ID Setters Properties must contain the …
  • The Govern ID must be …
  • The user must have security access (GSM) to the profile’s form.

Controller Setup

Adding a Custom Control to a Form

  • In OFD, drag the Action Button Control Icon to the Account Entity Tab on the form.

Custom Control Form Configuration

Once the Custom Control is displayed on the form, click on the object to configure the:

  • Assembly Name = Msgovern.OpenForms.CustomControls.dll (by default)
  • Class Name = AR_CreateARMaster_Action

User Interface (UI)

  • Icon
  • Is enable: An expression can be added to control the enabling (Can be executed) of the button.

Controller Properties

The following controller properties need to be set:

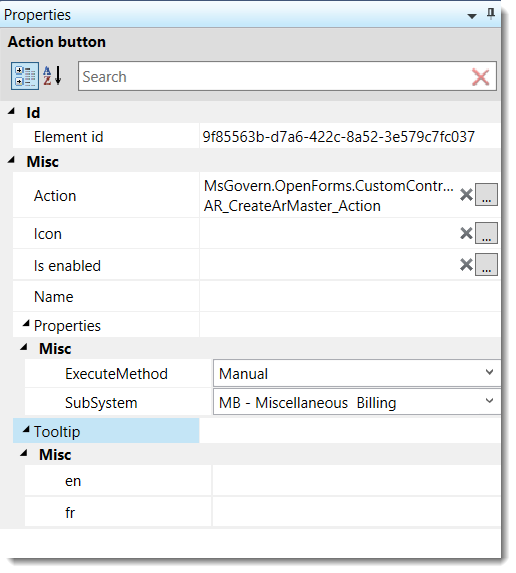
Execute Method

There is 2 options for the Action Button Controller

  • Manual: The user will need to click on the button
  • After Save: As soon as the record is saved, the A/R will be created automatically

Sub-System

  • Select the sub-system for which the A/R Summary Record needs to be created.

Related Topics

For more information, see:

Troubleshooting

  • The Organization must be a licensed user of the A/R Sub-System selected.


101-ar-fea-022-ofr


0 votes, average: 0.00 out of 50 votes, average: 0.00 out of 50 votes, average: 0.00 out of 50 votes, average: 0.00 out of 50 votes, average: 0.00 out of 5 (0 votes, average: 0.00 out of 5)
You need to be a registered member to rate this.
Loading...

AR – Refunds Data Entry Form

Refunds Data Entry Form

Overview

Typically, refunds are created when there is an overpayment or duplicate payment. The Refunds screen includes the following sections:
General Information: showing the subsystem, fiscal year, bill, invoice, and check number
Detail: for the entry date, effective date, A/R Class code, installment, amount and discount date
Comment: for the justification code and any notes applicable to the adjustment.
Payer Information: displaying the name of the taxpayer and a code to identify the type of letter to be sent.

Accessing the Refunds User Form

To access the Refunds form.

  1. Launch Govern.
  2. Open a Profile that includes the A/R Inquiry.
  3. Open the A/R Inquiry form.
  4. Perform a search and select the required record.
  5. Right-click on the required record in the Summary section.
  6. Select Refunds from the drop-down list
    The Refund Selection form opens.
  7. Select the record you are refunding and click OK.
    If the record is for an overpayment, a message appears:
  8. Click Yes to display only the overpaid portion in the Amount text box.
    Click No to display the full amount of the payment.
    The Refunds form appears:

Icons

Save: Click Save to save a new or modified adjustment record.

Cancel / Exit: Click Cancel or Exit to close the form. A confirmation message is displayed.

Click Yes to save your changes. Click No to close the form without saving your changes. Click Cancel to stay on the form.

General Information

Subsystem: This field displays the subsystem for the record selected on the A/R Inquiry form.
Year: This field displays the fiscal year of the transaction.
Bill Number: The bill number for the selected A/R Inquiry record.
Invoice No.: Enter an invoice number for the adjustment.
Check No.: Enter the check number for the refund.

Check numbers for refunds can be created in any of the following ways:

  • Generated by the Generate Refund Check Numbers batch process
  • Automatically generated when a new refund transaction is saved in Govern
  • Manually entered when a new refund transaction is created in Govern

The Check No. field is displayed if the check number is created either automatically or manually from the Govern user form.
You can enter a check number in this field or leave it blank. If it is left blank, this field is automatically populated when the record is saved.

The Check No. field is not displayed if you are using the Generate Refund Check Numbers batch process to create numbers for refunds. In this case, you must run the Generate Refund Check Numbers batch process in order to create check numbers for your refunds. A setup is required if you are using the batch process. See Generate Refund Check Numbers.

If the check number is created automatically either when the record is saved or when the batch process is run, it comprises the previous check number and the cycle. To create a new check number, one is added to the previous number.

Cycle Code: The Cycle Code associated with the record (Table: VT_USR_ ARCYCLE).

It is mandatory to create A/R Cycle Codes for Real Property and Personal Property tax billing. This is used for tax billing cycles and is linked to the A/R Class Code in GNA. You need to set up at least one Cycle Code, but you can create multiple codes. For example, you could have one cycle for municipal tax and a second for school tax.

Frozen IDs are created for cycle billing. A new Frozen ID is assigned when you run the Posting to A/R batch process. This is called a Certified Record. It is displayed in the Govern History Panel with the Cycle Code. The first Certified Record is assigned Frozen ID -1, the second -2, the third is assigned -3, and so on if there are multiple cycle codes.

A new Tax Audit record is created for all the parcels included in the batch process. The Entry Code for these records is set to Original. The Frozen ID is updated and a new entry is listed in the History Panel. For further details, refer to the Govern Real Property Tax documentation.

Detail

Date: The entry date for the refund. By default, this is the current date. To change the date, click the calendar beside this field and select a new date.
Effective On: The date the refund becomes effective. To enter a date, click the calendar beside the field and select a new date.
Amount: Enter the value of the refund.
If the refund is for an overpayment, this field displays either the overpaid portion or the entire payment, depending on the option selected on the initial screen
Interest: This field displays interest accumulated on the amount.
Total to Refund: This field displays the total amount to refund. By default, it displays the value in the Amount field. Enter a new value if required.
Class Code: Select an A/R Class Code from the drop-down list (Table: VT_ USR_AR_CLASS).
From Installment Number: Select the installment period for the refund: first, second, third, fourth installment or total (Table: VT_SY_ INSTALL).
Due Date: Click the calendar icon beside the Due Date field and select the date the refund is due, if applicable.
Discount Date: Click the calendar icon beside the Discount Date field and select the final date for a discount on the refund.

Comment

Justification Code: Select the Justification Code to explain the reason for the refund(Table: VT_USR_ARREASON).
Deposit Number: Depending on the options selected in GNA, deposit numbers can be automatically generated or user-defined.

Automatically generated deposit numbers are composed of one or two of the following fields: date, last deposit, and user ID. This number can be modified if security permissions allow.

If Deposit Management is activated, a drop-down list is added to the Deposit Information parameter. This is populated by the deposit numbers created in the Deposit Management form. See Deposit Management.
Do one of the following:

  • Enter a new deposit number required.
  • Select a deposit number from the drop-down list.

Notes

Enter any notes or comments applicable to the adjustment.

Payer Information

By default, the Payer information fields display the name of the taxpayer and a code that identifies the type of letter to be issued with the bill.
To modify the payer information:

  1. Click C beside the Payer information field to change the name. This displays the Search screen with the following options: By Name ID, By Tax Payer Account Number, By Name, By Phone Number, From NA_External
  2. Enter the required information on the search screen. Then select the applicable record.
  3. Select a code from the Letter Code field to identify the type of letter the payer receives, such as, duplicate payment, over payment or payment reversal (Table: VT_USR_LETER_C).
  4. Click Save.

A/R Inquiry for Refund

The record is displayed on the A/R Inquiry form when the transaction is complete.
The Amount and Payer Name fields under Cash Flow displays further details when you hover the mouse over a specific transaction:


101-ar-frm-025


0 votes, average: 0.00 out of 50 votes, average: 0.00 out of 50 votes, average: 0.00 out of 50 votes, average: 0.00 out of 50 votes, average: 0.00 out of 5 (0 votes, average: 0.00 out of 5)
You need to be a registered member to rate this.
Loading...

Standard AR Controller – Create A/R (101-ar-fea-022)

Standard Accounts Receivable (A/R) Controller – Create A/R

Overview

This new standard controller can be setup on different Account Forms (Real Property, Misc. Billing, Self-Reported Tax…) in order to provide the user with an Action Button to create an A/R summary record on demand. With the A/R record, it will be possible for the users to enter deposits or voluntary payments against this Account.

  • The Create A/R button can be used for all Sub-Systems (Real Property, Self-Reported Tax, Personal Property, Miscellaneous Billing, etc.)
  • The Create A/R button is only available after an Account is created and saved where no A/R records associated to the account exists.
  • Once the Create A/R action has been executed, the button becomes disabled.
  • The A/R record created will match the System Registry A/R Sub-System rules (by name, by parcel, by year), etc. as configured in the A/R General Parameters Sub-System parameters.
  • This action button can be secured by profile user and role.

Configuration

This controller is used in different standard Forms distributed with the system. It can also be added and configured on a customized form.
To add or configure this controller on a form click below:


Related Topics

Standard A/R Controller Configuration (101-ar-fea-022-ofr)

Accounts Receivable Parameters (103-ar-parm-General)


101-ar-fea-022


0 votes, average: 0.00 out of 50 votes, average: 0.00 out of 50 votes, average: 0.00 out of 50 votes, average: 0.00 out of 50 votes, average: 0.00 out of 5 (0 votes, average: 0.00 out of 5)
You need to be a registered member to rate this.
Loading...

AR – Controller Config – Create AR Payment

Standard Accounts Receivable (A/R) Controller – Create A/R Payment (Configuration)

Overview

This standard OpenForms Action Button controller can be added to a form to provide an Action Button to create the Accounts Receivable payment.

This controller is available in GA Release 1706

  • For more information on the functionality, see Product Information (101-ar-fea-024).

Prerequisites

The following conditions are required in order to enable the Controller in OpenForms Designer Setup

  • The organization is licensed for the Accounts Receivable Sub-System to setup
  • The configuration for the Accounts Receivable has been completed
  • The Form’s ID Setters Properties must contain the …
  • The Govern ID must be …

Profile Security

  • The user must have security access (GSM) to the profile’s form.


101-ar-fea-022-ofr-UI.png
Action Button Controller Properties


Controller Setup

Adding a Custom Control to a Form

  • In OFD, drag the Action Button Control Icon to the Account Entity Tab on the form.

Custom Control Form Configuration

Once the Custom Control is displayed on the form, click on the object to configure the:

  • Assembly Name = Msgovern.OpenForms.CustomControls.dll (by default)
  • Class Name = AR_CreateARMaster_Action

User Interface (UI)

  • Icon
  • Is enable: An expression can be added to control the enabling (Can be executed) of the button.

Controller Properties

The following controller properties need to be set:

Sub-System

  • Select the sub-system for which the A/R Summary Record needs to be created.

Related Topics

For more information, see:

Troubleshooting

  • The Organization must be a licensed user of the A/R Sub-System selected.


101-ar-fea-024-ofr


0 votes, average: 0.00 out of 50 votes, average: 0.00 out of 50 votes, average: 0.00 out of 50 votes, average: 0.00 out of 50 votes, average: 0.00 out of 5 (0 votes, average: 0.00 out of 5)
You need to be a registered member to rate this.
Loading...


Standard AR Controller – Create AR Payment Action Button (101-ar-fea-024)

Standard AR Controller – Create A/R Payment Action Button

Overview

NOTE: The following specifications will change due to enhancements, and as such may change.

This standard controller can be setup on different Account Forms (Real Property, Misc. Billing, Self-Reported Tax…) in order to provide the user with an Action Button to create an A/R payment for the users to enter payments, deposits or voluntary payments against this Account.

  • The Create A/R Payment button can be used for all Sub-Systems (Real Property, Self-Reported Tax, Personal Property, Miscellaneous Billing, etc.)
  • The AR Record to pay is determined by the action button controller setup….
  • This action button can be secured by profile user and role.

Functionality

This controller is used in different standard Forms distributed with the system. It can also be added and configured on a customized form.

NEW! The action button will open a Cash Collection Form in a modal window. When the form is opened, the focus will be on the Cash Collection tab. Next, a new Data Payment Entry record is created. The Subsystem and Transaction Type will be set to the ones specified in the action button properties. Note that these fields will be disabled in the Cash Collection form. If there are any ID’s, or a payer name is specified, they will be auto-loaded and set. When the payment is saved, the AR Detail links will be added if needed. At the end of the process, if required, the Cash Collection is closed.

Configuration

To add or configure this controller on a a form see below:


Read More...


Govern New Administration (GNA)

To configure in GNA…

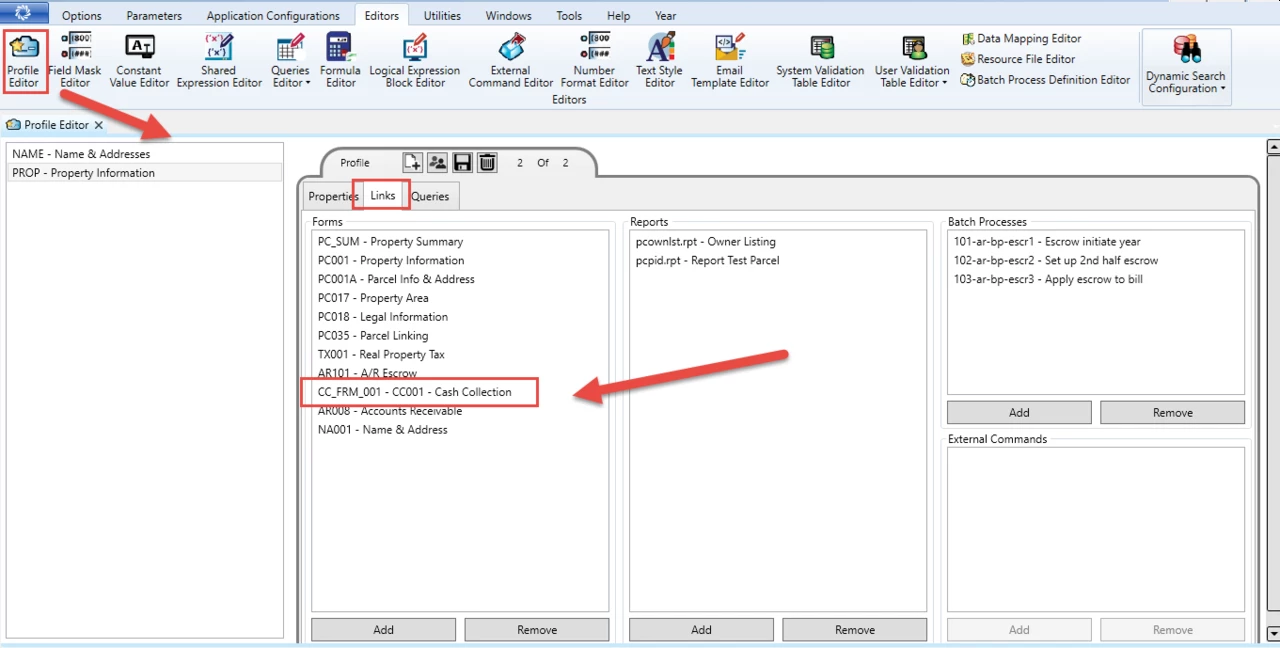
  1. On the GNA ribbon select Editors (tab) > Editors (group) > Profile Editor.
  2. In the Profile Editor, ensure that you have linked the cash collection form that will be opened by the AR Create Payment action button.

OpenForms Designer (OFD)

In the OFD, follow these steps…

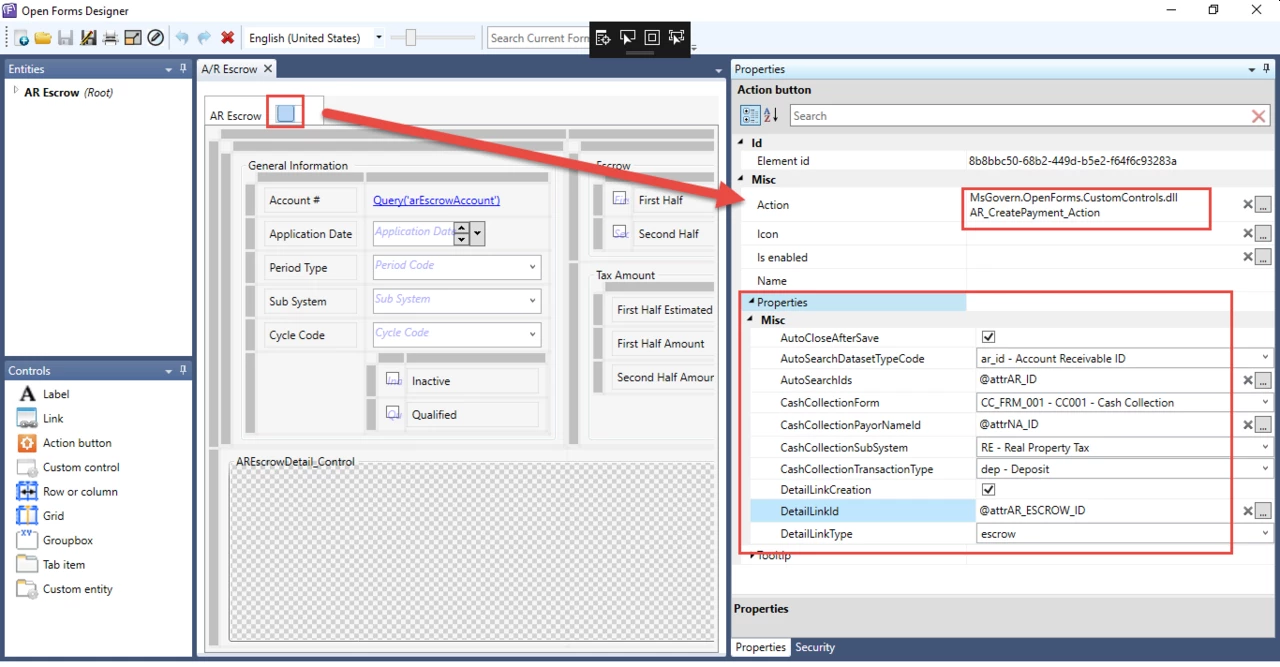
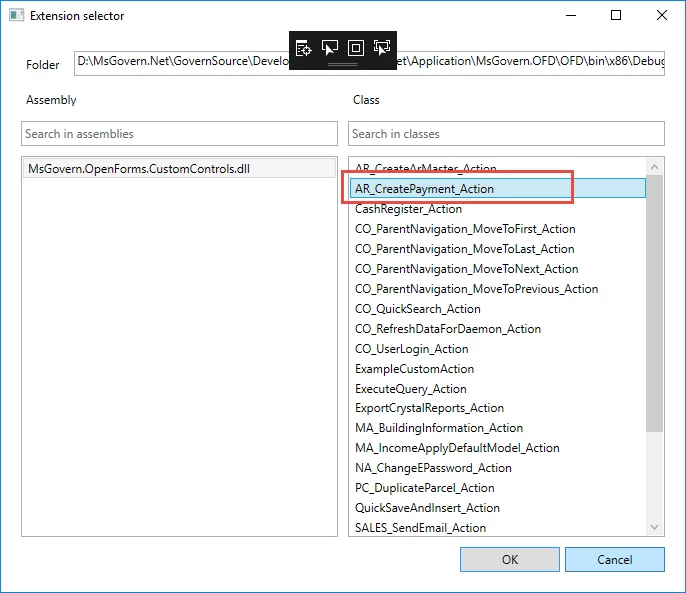
  1. Select the action for action button, i.e., the Ar_CreatePayment_Action.

The following are the available properties with their associated descriptions.

  1. AutoCloseAfterSave : When checked, the modal window in which the cash collection form was opened will be closed after the completion of the payment.
  2. AutoSearchDatasetTypeCode : Chose the Dataset Type code that defines the ids that you want to auto load (e.g ar_id, p_id)
    • If this is not set the Auto load will not function properly
  3. AutoSearchIds : An expression that returns a list of ids seperated by “;” that you want to load in the cash collection form automatically
    • E.g of a the output of a the expression = “10;30;100” or “20”
    • If this is not set the Auto load will not function properly
  4. CashCollectionForm : The form that you want to open for the payment.
    • This must be a form that is linked to the current profile
  5. CashCollectionPayorNameId : An expression that returns a na_id that you want to set as the default payor for the payment
  6. CashCollectionSubSystem : The subsystem for the payment transaction.
  7. CashCollectionTransactionType : The transaction type for the payment transaction (Note: The transaction field on the cash collection form will be disabled so you should use this property to set the correct transactiontype)
  8. DetailLinkCreation : If checked, a detail link will be created for all the Ar Details that are created for the payment transaction.
  9. DetailLinkId : An expression that returns the link id that will be inserted for the new ar details links (AR_DETAIL_LINK.LINK_ID)
    • If this is not set, no detail link will be created even if the DetailLinkCreation property was set to true.
  10. DetailLInkType : The type for the new detail links (AR_DETAIL_LINK.LINK_TYPE)
    • If this is not set, no detail link will be created even if the DetailLinkCreation property was set to true.


Contact your System Administrator or Business Analyst for more information on this feature implementation in OpenForms.


Related Topics


101-ar-fea-024


0 votes, average: 0.00 out of 50 votes, average: 0.00 out of 50 votes, average: 0.00 out of 50 votes, average: 0.00 out of 50 votes, average: 0.00 out of 5 (0 votes, average: 0.00 out of 5)
You need to be a registered member to rate this.
Loading...