Installation Scripts

Installation Scripts

Overview

The following is a list of scripts designed to be executed in MS SQL SERVER.
Intended for Administrators.

Table Change Event Script

Script Name: CreateCleanupJobForRecentTableChanges
Version 6.0 and Version 6.1
System Administrator Rights are needed
Will be launched during the Verify Database Process. An error will be displayed if the user does not have SysAdmin rights in SQL Server.

Read More...

Script Name: CreateCleanupJobForRecentTableChanges:
IF EXISTS (SELECT job_id
FROM msdb.dbo.sysjobs_view
WHERE name = N’GV_CLEANUP_RECENT_TBL_CHANGES’)
EXEC msdb.dbo.sp_delete_job @job_name=N’GV_CLEANUP_RECENT_TBL_CHANGES’; DECLARE @dbName as sysname;

DECLARE @jobName as varchar(100);
DECLARE @scheduleName as varchar(100);
SET @dbName = db_name();
SET @jobName = N’GV_CLEANUP_RECENT_TBL_CHANGES_’ + @dbName;
SET @scheduleName = N’GV_CLEANUP_RECENT_TBL_CHANGES_EVERY_HOUR_’ + @dbName;

IF EXISTS (SELECT job_id
FROM msdb.dbo.sysjobs_view
WHERE name = @jobName)
EXEC msdb.dbo.sp_delete_job @job_name = @jobName;

EXEC msdb.dbo.sp_add_job
@job_name = @jobName,
@description = N’Govern job to cleanup the table USR_RECENT_TBL_CHANGE.’ ;

EXEC msdb.dbo.sp_add_jobstep
@job_name = @jobName,
@step_name = N’Delete records older than 1 hour.’,
@database_name = @dbName,
@command = N’DELETE FROM usr_recent_tbl_change WHERE change_date < GETDATE() – (1.0/24)’;

EXEC msdb.dbo.sp_add_schedule
@schedule_name = @scheduleName,
@freq_interval = 1,
@freq_type = 4,
@freq_subday_type = 8,
@freq_subday_interval = 1;

EXEC msdb.dbo.sp_attach_schedule
@job_name = @jobName,
@schedule_name = @scheduleName;

EXEC msdb.dbo.sp_add_jobserver
@job_name = @jobName;


100-Installation-Scripts


0 votes, average: 0.00 out of 50 votes, average: 0.00 out of 50 votes, average: 0.00 out of 50 votes, average: 0.00 out of 50 votes, average: 0.00 out of 5 (0 votes, average: 0.00 out of 5)
You need to be a registered member to rate this.
Loading...

WM – Error & Warning UI Messages

Workflow Management – Error & Warning UI Messages

Version 6.1 (In Development)

User Interface Messaging

The following codes and messages are used in the Workflow Management module. The list includes the message Code, Standard Text Resource, Expected behavior and Condition(Reason). Related information include:
System Text Resources … Module Business Rules … Business Entity Validation

Error Messages

Code Message Text Behavior Condition (Reason)
ex wm-e99 This xxxx already exits. Please …. Message is displayed
User can click on cancel
User can type in a new xxxx
xxxx does not allow duplicates. Unique key
wm-e01
wm-e02
wm-e03
wm-e04
wm-e05
wm-e06
wm-e07
wm-e08
wm-e09
wm-e10
wm-e11
wm-e12
wm-e13

Warning Messaging

Code Message Text Expected User Behavior Condition (Reason)
ex wm-w99 Date entered is invalid. On save, user gets message
User can click on cancel or re-enter a new xxxx
Any date entered must be within the 1600 to 2100 range
wm-w01
wm-w02
wm-w03
wm-w04
wm-w05
wm-w06
wm-w07
wm-w08
wm-w09
wm-w10
wm-w11
wm-w12
wm-w13


101-wm-ui-ress


0 votes, average: 0.00 out of 50 votes, average: 0.00 out of 50 votes, average: 0.00 out of 50 votes, average: 0.00 out of 50 votes, average: 0.00 out of 5 (0 votes, average: 0.00 out of 5)
You need to be a registered member to rate this.
Loading...

WM – Activity/Step ACTION – Execute a Query

Workflow Activity/Step ACTION – Execute a Query

Version 6.1 (In Development)

Actions

Within an Activity, multiple Actions can be performed based upon the completion status of the activity. Actions that are linked to Activities are saved in (Table: WM_PARM_ACTIVITY_LK_ACTION)

Actions tab

The Actions tab is linked to each activity under the Activities tab. When a base activity has been created, Actions can be added to it. To add an action to an activity…

  1. Click to select the activity under the Activities tab.
  2. On the right hand side is an Actions tab; click Add Action [ + ] to add a new action.

Actions that are linked to Activities are saved in (Table: WM_PARM_ACTIVITY_LK_ACTION)

Execute a Query

This query executes the following three (3) types of action queries

  • Update (U)
  • Insert (I)
  • Delete (D)

Select from a list of configured queries. All queries that are accessible through the Govern Action Queries editor are presented by their Long Descriptions.

BUSINESS RULES (…for Action Queries)

The Execute a Query option adheres to the following Business Rules:

  • The selected query must exist in (Table: USR_QUERY) and (Table: USR_QUERY_VALUE).
  • Queries must be created prior creating any actions in Workflow Department Editor.
  • When a Query is added after the Workflow – Department editor has been opened, it will not be refreshed in the Workflow – Department editor combo box.

Other Action Options

To view available Workflow Actions, click here for the complete Workflow Actions list.

Multiple Actions

It is possible to have multiple actions on an Activity. For example you can set a Completion Status 2 – Set the Permit on hold, and Completion Status 1 – Generate the permit number.

Saving Actions

Saves are made with the Save icon at the top of the interface.
After configuring multiple actions, when a save is made, the results that are presented in the Actions grid will be sorted on the contents of the Trigger column.

See Also


103-wm-parm-Action06-ActionQuery


0 votes, average: 0.00 out of 50 votes, average: 0.00 out of 50 votes, average: 0.00 out of 50 votes, average: 0.00 out of 50 votes, average: 0.00 out of 5 (0 votes, average: 0.00 out of 5)
You need to be a registered member to rate this.
Loading...

WM – ACTION – Add Links from Query or Dataset

Workflow Activity/Step ACTION – Add Links from Query or Dataset

Version 6.1

Actions

This action will allow users to add links to an existing workflow from records that are the result of the execution of a query, or the content of a saved dataset. This is a non-generic action that can only be invoked in the context of a workflow. This action may also be invoked via an action button.

NOTE: This action is only applicable at the STEPS level, not the ACTIVITIES level. Actions may also be invoked via an Action button. See Action Button Configuration in the section below.

Functionality

Link Functionality (Automatic bidirectional Workflow Links)

NEW!The functionality to link a workflow type has always existed in prior versions of Govern for OpenForms. The main characteristic was that when a link was established, it was unidirectional in nature. For example, when Workflow A is linked to workflow B, and Workflow B is linked to workflow A, because of the unidirectional nature of the feature, when the Workflow A link to Workflow B is deleted, the link from Workflow B to Workflow A was not automatically deleted. This may also be referred to as two (2) way linking.

This new enhancement to the linking feature is a change to the unidirectional functionality of the Workflow Link. When a link is deleted on one side, the corresponding link will also be deleted.

Required Settings

In order to establish the link, when a link is selected, the system will take the default type that has been selected in the Default type for incoming links parameter of the Kind and Categories form in GNA.
Location: In GNA select Application Configurations > Workflow group > Workflow Management > Kind and Categories > Categories tab > General sub-tab

NOTE: As a result of this change, a default type must always be selected from the Default type for incoming links parameter. This parameter is now required. As links are established in a bidirectional manner, when they are deleted, the deletion is also bidirectional.


NOTE: When used, this action creates records in (Table: WM_LINKED_IDS).

Release Version

This feature is available for the following version: 6.1.1702.0652

GNA Default Link Type of Category Overridden by Type

NEW! Looking at the two way Workflow, i.e. a workflow wherein one workflow is linked to another workflow. Then the other Workflow links back to the first Workflow with the link type of the category in the Default type for incoming links parameter set in the Workflow Kind and Categories > Workflow – Kind > Categories (tab) > General (sub tab). Now one is able to use the incoming link type of the type for the Workflow.
When a Work Flow is created as a result of a Batch Process that imports the payments, the system will also create the other links in the opposite direction with a custom link type. But when the action does the same as the batch process, we use the default that was set on the category.
When users are on a particular Work Flow and you have a step with an action generating other Work Flows, you have an option when you’re picking the type to link back to the master Workflow. Instead of going with the default, you can specify a different type link.

Business Rules

This functionality adheres to the following business rules:

  • Users cannot create or delete Departments so both are disabled.
  • When a modification is cancelled the record will revert to its original value if one was present, if not the field will remain empty.
  • Saved changes create or update a record in (Table: WM_PARM_DEPARTMENT)
  • Overriding the dynamic keys will create or update the following three (3) key names in (Table: USR_KEY_DYNAMIC) :
    • APPLICATION[DEPARTMENT:<CODE>]
    • NUMBER[DEPARTMENT:<CODE>]
    • CERTIFICATE[DEPARTMENT:<CODE>]
NOTE: Otherwise, the keys are deleted from the table.

For additional configuration details, refer to the Technical Documentation in Confluence (RESTRICTED LINK)
Release Version
This feature is available for the following version: 6.1.1706

Configuration

OpenForms Designer (OFD)

Action Button

The action button can be configured in the OpenForms Design (OFD). As an example we will place the action button on the OpenForm tab.

  1. Open your target form in the OFD.
  2. Locate and click to select the tab that the action button will configured on.
  3. In the OFD > Controls pane, drag the action button to the tab.
  4. Select the action button and look at the Properties tab on the right hand side (RHS)

Configure the Button as follows:

  • AssemblyMsGovern.OpenForms.CustomControls.dll
  • ClassWM_LinkToWorkflow_Action
  • Icon – [Select an icon]
  • NameAdd Link
  • TooltipAdd Links from Query/Dataset
  1. Click Save to save the configuration.
NOTE: After saving the configuration, it will be necessary to click Refresh in Govern, or close and reopen the application

Govern New Administration (GNA)

Configuration in the GNA is the same as configuring any other Action. When configuring, the Link Type that is supported by the corresponding category defined in the Kind and Categories editor.

  1. In the GNA ribbon, select Application Configurations (tab) > Workflow (group) > Workflow Management > Department.
  2. In the Workflow Department form, on the left hand side (LHS) pane click to select a department.
  3. In the center pane, click the Types tab.
  4. Click the Steps button on the tab.
  5. On the Steps form, click to add a new action.
  6. In the Add a new action form select the Add Links from Query/Dataset action.
  7. In the Options group, select a Link Type.
NOTE: If at some point, the category defined in the action is not one of the supported links, as indicated in the Workflow – Kind form > Categories (tab) > Supported Link (group), the system will not immediately display a warning in Govern, or display an error in the GNA.

In Govern when the link selected is not part of the list of supported links in GNA, an error message will be displayed the next time you execute the action step in Govern. For example the warning will display as follows:
Step {stepNumber}
Error while executing the action {Add Links from Query/Dataset}:
The link type {Contact} is not supported by the category {Building Permit}

In the above Error example, the link category called CONTACT, was removed as a supported link, after the step action had been defined. If the Query option is required, a query will need to be selected.

NOTE: When selecting a query for the From Query parameter, the ellipsis […] button will be enabled to allow the configuration of a defined query.

Tables

The following is a list of table(s) that have been modified to enable this action.
This action creates records in the following table(s):

  • WM_LINKED_IDS

Documentation

Click below to view the current documentation.
101-wm-fea-108_Activity_Action08.pdf

Related Topics

Workflow Management Actions
What’s New in Workflow Management
Main Workflow form
Workflow Management Overview
Workflow Management Installation
OpenForms Reference (Configuration) Setup Information
Workflow Management – Workflow Form Controller & Workflow Type Custom Control
Workflow Management – Additional Types
Workflow Management OpenForms Reference
Workflow Management Business Rules
Workflow Management Wiki Map


103-wm-parm-Action08-CreateWorkflowLinks


0 votes, average: 0.00 out of 50 votes, average: 0.00 out of 50 votes, average: 0.00 out of 50 votes, average: 0.00 out of 50 votes, average: 0.00 out of 5 (0 votes, average: 0.00 out of 5)
You need to be a registered member to rate this.
Loading...

WM Activity/Step ACTION – Perform a Validation

Workflow Activity/Step ACTION – Perform a Validation

Version 6.1 (In Development)

Actions

Within an Activity, multiple Actions can be performed based upon the completion status of the activity. Actions that are linked to Activities are saved in (Table: WM_PARM_ACTIVITY_LK_ACTION)

Actions tab

The Actions tab is linked to each activity under the Activities tab. When a base activity has been created, Actions can be added to it. To add an action to an activity…

  1. Click to select the activity under the Activities tab.
  2. On the right hand side is an Actions tab; click Add Action [ + ] to add a new action.

Actions that are linked to Activities are saved in (Table: WM_PARM_ACTIVITY_LK_ACTION)

Perform a Validation

The following action, when triggered will display either a Warning or an Error message. In order to do this, you must create an Expression for the business rule or the condition you want to validate.

Configuration

Create / Select Expression

Configure an Expression that is to be used for validation. When selecting this action, you must create an Expression that returns either TRUE or FALSE.
You can also choose a SHARED EXPRESSION.

Show Warning

The message will be displayed and the user will be able to proceed.

Show Error

The message will be displayed and the user will not be able to proceed until the condition returns true. – to be verified

Message Box

Type in the message that should be displayed to the user once it is triggered.
The message box has built-in spelling and allows formatting …. (to be verified)

Other Action Options

To view available Workflow Actions, click here for the complete Workflow Actions list.

Multiple Actions

It is possible to have multiple actions on an Activity. For example you can set a Completion Status 2 – Set the Permit on hold, and Completion Status 1 – Generate the permit number.

Saving Actions

Saves are made with the Save icon at the top of the interface.
After configuring multiple actions, when a save is made, the results that are presented in the Actions grid will be sorted on the contents of the Trigger column.

See Also


103-wm-parm-Action09-BusinessRules


0 votes, average: 0.00 out of 50 votes, average: 0.00 out of 50 votes, average: 0.00 out of 50 votes, average: 0.00 out of 50 votes, average: 0.00 out of 5 (0 votes, average: 0.00 out of 5)
You need to be a registered member to rate this.
Loading...

101-wm-frm-003

Workflow Management Form – Activities

Version 6.1 In Development

Overview

The Activities tab of the Workflow – Department form is used for creating the procedural steps that can be selected by a department when defining items such as permits, offenses and other workflow processes. Activities are the various stages in a workflow process. For example, in a permit certification process, the user could define the following steps, (1) Application demand, (2) Information Verification, (3) Acceptance of the Application, and finally (4) Plan Review, as preliminary required activities. Activities can be set to be generated automatically, based on the outcome of precursor activities; e.g., if the Application Verification was completed successfully, the application is automatically accepted and a Plan Review may be initiated. If not successfully completed, a request for more information can be sent out. Activities are recorded by Department and Kind.

Activities may also be set to trigger other events or actions based on the completion status of the activity. These can include a notification, a request for multimedia documents, the generation of a report, the execution of a business rule, the scheduling of an inspection or hearing, time cost code generation, or permit certification, or license registration and expiration. When an activity has been re-assigned to a user, the option exists to send an e-mail notification to the user with details of the activity step. In addition, action queries in activity steps you may also use SQL business rule for validations. In addition the Activity Workflow in Govern also has the ability to add Multimedia attachments and relevant notes to initiated, or completed steps. When an action is initiated under the Activities tab, users are able to add a Multimedia document, or append a note to the step.

NEW! Added to the Activities sub tab is a new tab called Used In. Listed under this tab is a listing of where an activity is being used. When the tab is selected, users will be presented with a list of all Steps, Category, and Description of where the Activity is being used. See Activities – Used In sub tab in the Documentation section on this page below.

Activity Triggers

The following triggers are available:

  • Initiation
  • Completion Status 1 to 4
  • Completion All Status
  • On Request

On Request Completion indicator for triggers

Triggers that were configured to be executed as “On Request” will be presented in Govern as links on the right hand side (RHS) Available Actions group under the Activities tab. These links will be displayed in the Available Actions group, in the order that the actions were entered. Available Actions that correspond to each step can be viewed with a click on the step; they will be presented in the group. When the action has been completed, a green check is displayed to the immediate right of the action link.

When a Workflow Activity configured with the On Request option has been executed, users can see an indication of completion in the form of a green non-persistent check mark that will appear beside the On Request action link.

Actions and Activities

The following actions can be setup and will be launched based on the trigger selected:

  • Change the Status of a Workflow
  • Set the date of Workflow
  • Execute a Query
  • Generate a Report
  • Validation (Expression that returns true or false based on a user generated condition)
  • Set the date of Workflow
  • Message (This can be used to validate an action by displaying a message)
  • Generate Multimedia
  • Send Email / Send Email to Linked Names
  • more…

Create, Update or Remove Actions

For information regarding the creation, update, or removal of Actions, refer to the Workflow Management Actions page on this site.
Click here to go to the General Workflow Management form. For more information, see the Workflow Management System Configuration page.

Adding Workflow Activity Full Descriptions

The Workflow Activity FULL Description parameter, when set, can be used to provide an exhaustive description of an activity step. The Full Description is presented as a resizable modal window. The text can be presented as plain text without any additional formatting. See the Documentation section below for the Workflow Activity Full Description feature.

Adding Multimedia Documents and Notes
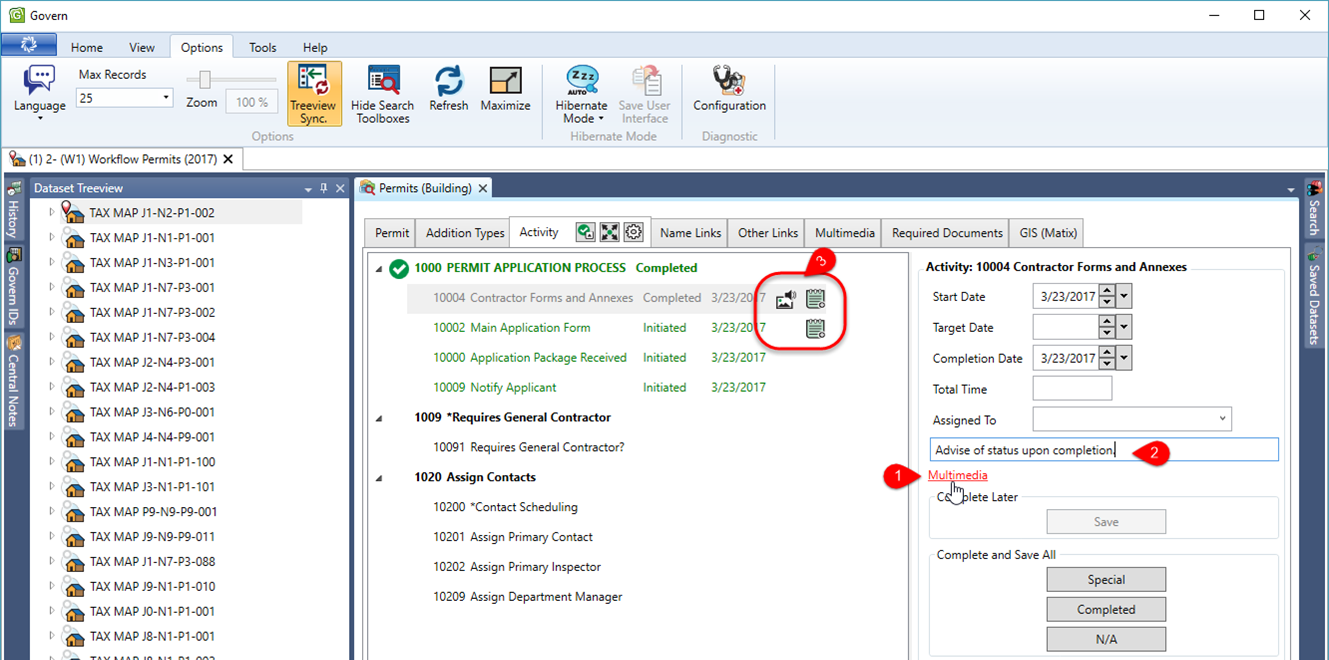
101-wm-frm-003_WorkflowActivityNotes&Multimedia.png
Click on the image to display it at full size.

Multimedia attachments are added through a form that is displayed from a link on the RHS of the interface (1). Notes are added with a click in the Notes field (2).The presence of Notes and Multimedia Attachments are indicated to users via icons that appear beside the activity step that they are associated with (3). For complete documentation see Workflow Activity Notes & Multimedia below.

Documentation

Activities – Used In sub tab

NEW!Click to view the documentation for the Activity – Used In sub tab feature
101-wm-frm-003_WM Activities-Used_In_tab.pdf

Workflow Activity FULL Description feature

Click to view the documentation for the Workflow Activity FULL Description feature
101-wm-Display Workflow Activity FULL Description.pdf

Workflow Activity Notes & Multimedia

Click to view the documentation for Workflow Activity Notes & Multimedia
101-wm-frm-003 Workflow Activity Notes and Multimedia.pdf

See Also

Workflow Management


101-wm-frm-003


0 votes, average: 0.00 out of 50 votes, average: 0.00 out of 50 votes, average: 0.00 out of 50 votes, average: 0.00 out of 50 votes, average: 0.00 out of 5 (0 votes, average: 0.00 out of 5)
You need to be a registered member to rate this.
Loading...

101-wm-frm-007-ofr

Workflow Form Inspections – Setup

Version 6.1 (In Development)

Overview

This form (WM007) is standard and can be imported via the GNA Import/Export.
Functionalities include:

  • Allow a user to create/update/delete Inspections.
  • Allow the user to associate an inspector to an inspection.
  • Allow the user to associate inspection types to an inspection.

Form Configuration

The form can be configured to show inspections by:

  • Parcel
  • Workflow to be validated
  • Name to be validated
  • Department to be validated

The form model (WM INSPECTION) contains the following business entities:

  • Inspection
  • Inspection Types
  • Inspection Links
  • Inspection Multimedia to be validated if standard


101-wm-frm-007-ofr


0 votes, average: 0.00 out of 50 votes, average: 0.00 out of 50 votes, average: 0.00 out of 50 votes, average: 0.00 out of 50 votes, average: 0.00 out of 5 (0 votes, average: 0.00 out of 5)
You need to be a registered member to rate this.
Loading...