Dataset Treeview Temporary Records

Dataset Treeview Feature – Temporary Records

Overview

The Dataset Treeview Panel contains a list of record keys that, when selected, will send the information to OpenForms which, in turn, will load records accordingly.

Temporary Records

Normally, a user simply searches for record keys and navigates through them to work but some features can load their keys internally without being linked to the Record Keys from the Tree View, for example AR Inquiry and Cash Collection forms. The side effect is that any information normally available outside the form are not refreshed because they are triggered only by a selection in the Tree View, this is the case with Tiles. In order to resolve this issue, these keys are sent to the Tree View but are flagged as “Temporary”. Only one of these keys can appear in the Tree View. The keys are replaced when a new one is introduced; this approach is used so as not to clutter the Tree View with keys that are not part of the user’s workload. In addition these keys can also quickly increase disproportionately. These keys are also not retained when the application is closed.

Business Rules

In order to trigger as many features as possible, the key will be filled with as many ID’s obtained from the database, based on available and missing ID’s from the Temporary Key.

  • First we check to see if we can find IDs from AR_MASTER based on an ordered list of specific ID Types that we get from the Temporary Key. These keys are the same that are needed to add to the Temporary Key afterwards from AR_MASTER.

    From AR_MASTER
    • The ordered ID types are: AR_ID, PP_ID, ST_ACCT_ID, UB_ID, MB_ID,  BR_ID, DC_ID, BT_ID, MV_ID, AC_ID, P_ID, NA_ID 
      • This means that as soon as one key returns records, we stop and take the most recent one.
  • If no AR_MASTER records are found directly, we try to find an AR_MASTER record linked to AR_DETAIL based on specific ordered field types from AR_DETAIL, noting that the IDs taken from AR_MASTER will still be the same as before.

    From AR_DETAIL Expand source
    • the ordered AR_DETAIL Field Types are: ST_ID, INVOICE_NO, PRJ_ID, PM_ID
      • This means that as soon as one key returns records, we stop and take the most recent one.
      • In version 6.1, the content of PM_ID will be a Workflow ID
  • If no NA_ID is found after that for the Real Estate Sub-System, we’ll try to get it from the primary NA_MAILING_INDEX if a P_ID was previously found.

    From NA_MAILING_INDEX

The Temporary Key will be inserted at the top of the Tree View with an Orange background. For example:

  • It is possible that the Temporary Key contains an ID that matches the Profile’s Key Type at this point, but its current Main ID Type is not the same. In that case, we will make this ID Type the main one so as to see the correct description in the Tree View.

Duplicate of an Existing Key

It is possible that after the work is done, the Temporary Key’s main ID exists in the Tree View. If that’s the case, it won’t be added to the Tree View like a Temporary Key, although the ID’s of both will be merged together, it will only be selected.

Context Menu

In the Dataset Treeview, a right click on an item will display and a menu with 3 options:

  1. Remove the current selected item
  2. Remove All items from the Dataset Treeview
  3. Remove All the items except the item where we did a right click on it

If we decide to right click on the panel, only 1 option will show up, allowing the removal of all items from the Dataset Treeview:

Remove

  • The item which we made a right click on will be removed from the Dataset Treeview.
  • If “Dirty”, a confirmation will show up asking you to save the data first.
    • Yes: Save the data and remove the item
      • If there is a validation error on saving, the item will not be removed and the item will remain “dirty”
    • No: Cancels the change and remove the item
    • Cancel: Not remove the item and the item is still “dirty”

Remove All

  • All the items will be removed from the Dataset Treeview.
  • If “Dirty”, a confirmation is displayed asking you to save the data first.
    • Yes: Save the data and remove all the items
      • If validation error on saving, the items will not be removed and the changed item remains “dirty”
    • No: Cancel the change and remove all the items
    • Cancel: Will not remove the items; the item is still “dirty”

DEV NOTE: Currently there is a bug in the techno and the message is displayed twice (2 times).

Remove All But This

  • All items will be removed except the item which we did a right click on in the Dataset Treeview.
  • If “Dirty”, a confirmation will show up asking you to save the data first.
    • Yes: Save the data and remove all the items except the item which we did a right click on it
      • If validation error on saving, the items will not be remove and the changed item is still dirty
    • No: Cancel the change and remove all the items except the item which we did a right click on it
    • Cancel: Will not remove the items and the item remains “dirty”

DEV NOTE: Currently there is a bug in the techno and the message is displayed twice (2 times).


Related Topics

Dataset Treeview

Forms Explorer
Reports Explorer


101-std-fea-049


0 votes, average: 0.00 out of 50 votes, average: 0.00 out of 50 votes, average: 0.00 out of 50 votes, average: 0.00 out of 50 votes, average: 0.00 out of 5 (0 votes, average: 0.00 out of 5)
You need to be a registered member to rate this.
Loading...


MA – CAMA Drawing (non-Apex)

CAMA Drawing (non-apex)

[ Deprecated]

Overview

The function has been replace with the APEX building drawing feature.


101-ma-frm-004


0 votes, average: 0.00 out of 50 votes, average: 0.00 out of 50 votes, average: 0.00 out of 50 votes, average: 0.00 out of 50 votes, average: 0.00 out of 5 (0 votes, average: 0.00 out of 5)
You need to be a registered member to rate this.
Loading...

Standard Feature – Sequential Batch Process

Standard Feature – Sequential Batch Process

Version 6.0 and Version 6.1

Overview

Available in Release 6.0 and 6.1

A standard feature that is available in version 6.0 and 6.1 of the Scheduler Console is sequential batch process scheduling. This feature may be configured to allow users to execute multiple batch processes without human interaction. This feature is convenient for launching batch processes during periods where there is less impact on users accessing the network. As an example, these sequenced batch processes could be initiated and set to run overnight, over a weekend, or through the extended periods of a holiday.

The Sequential Batch Process feature allows users to configure a list of Schedules in order to create a linked sequence of Batch Processes in the Govern New Administration (GNA). As each batch process is successfully completed, i.e. no errors generated, it will automatically initiate the next pre-configured batch process in the user defined sequence.

NOTE: Sequential Batch Processes are initiated, and monitored in the Govern Scheduler (SC). The status of the execution of each batch process is displayed through the console of the Govern Batch Scheduler application.

Example of a Sequential Batch Process

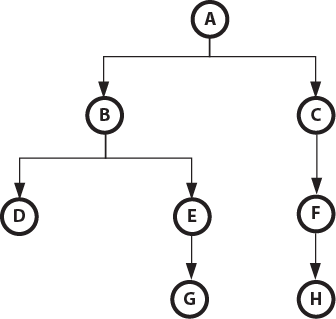
The following is an example of a possible Sequential Batch Process. The example will demonstrate a basic batch process that, upon successful completion, will initiate two (2) child batch processes. Each of the two child processes will in turn trigger other processes, and so on. Refer to the example below.

Example

  1. Batch process A is configured to run daily.
  2. When Batch process A ends it will initiate batch processes B and C
  3. Batch process B initiates batch processes D and E
  4. Batch process E initiates batch process G
  5. Batch process C initiates batch process F
  6. Batch process F initiates batch process H

All batch processes B, C, D, E, and F are configured to be triggered upon successful completion.

https://kb.harrisgovern.com/wp-content/uploads/2019/01/Sequential_Flowchart00.png

Configuration

Read More...

Sequential batch processes are configured in the Govern New Administration (GNA). Preview and execution of the batch processes are presented in the Govern Scheduler.

For further detail Govern batch process scheduling, refer to the Govern Schedule user guide for details (106-gs-all-GovernScheduler.60.pdf).


https://kb.harrisgovern.com/wp-content/uploads/2019/01/Sequential_Flowchart01.png

Govern New Administration (GNA)

To configure Sequential Batch processes it will be necessary to first create a new batch process or use an existing one. You would next need to create a schedule for that Batch Process. This batch process will then be configured to, upon completion, trigger the next batch process in the sequence.

TIP: When planning sequential batch processes, it is recommended that a flowchart of sorts is sketched out to use as a guide to visualize your setup. In addition, as each schedule is associated with a batch process, the batch process used should also be noted.


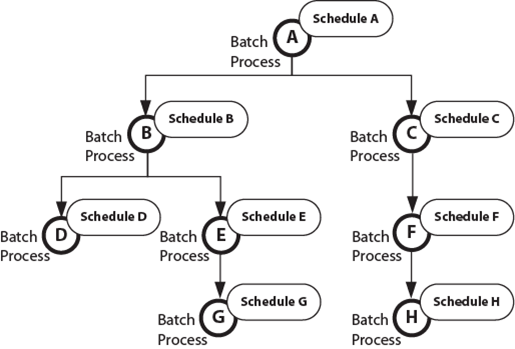
Using the example flowchart of schedules, i.e. A, B, C, D, E, and F, we will say that Batch Process A is associated with Schedule A.  Batch Process B will be associated with Schedule B, and so on.

Parent Schedule

With our flowchart drawn out for our example, we will say that the Batch Process A schedule will be called Schedule_A. Schedule A is also the parent batch process that will trigger all subsequent processes. As the parent process its configuration is different from all subsequent processes.

Creating the Parent Schedule

To create the first schedule called Schedule A in the GNA…

  1. On the GNA ribbon, click Editors (tab) > Batch Process Definition Editor.
  2. In the Batch Process Definition Editor select the batch process that will be the parent.
  3. On the Batch Process Definition tab, either select an existing batch process, or click Create a new item to create a batch process.
  4. Click to select the Scheduling sub tab.
  5. Click Add.
  6. The form to configure the schedule is displayed.
NOTE: If the batch process requires parameters to be configured, this must be completed first. The save action is required before you can schedule the batch process.
  1. Click to select the Schedule
  2. Enter a Name, and a Description.
NOTE: Name and Description are required parameters; you will not be able to save without completing them.
  1. In the Settings group below, set a frequency for the schedule; select One time, Day, Week, or Month. Additional settings allow you to specify a Start Date, and expiration date, i.e. Expires on:. For our example, this will be a one time schedule so select One time.
NOTE: As this is the first batch process, the option for Triggered should not be selected.
  1. Click Save Changes on the Schedule.
  2. Click the Close button [X] in the upper right hand corner to close the form.

Creating the Child Schedule

Configuring B and C

Referring back to our flowchart, we see that the Children batch processes, B, and C, are at the same level and are triggered by batch process A. We will need to configure Schedule B to trigger batch process D, and E. Batch process C will trigger batch process F. As batch processes B and C are both at the same level, they will be run simultaneously.

To create any Children schedules, e.g. Schedule B, C, and all other subsequent processes…

  1. On the GNA Batch Process Definition Editor, click to select the batch process that will be designated as Schedule B.
  2. On the Batch Process Definition tab, click to select the Scheduling sub tab.
  3. Click Add to display the Schedule
  4. If the batch process requires parameters to be configured, this must be completed first. The save action is required before you can schedule the batch process.
  5. Select the Schedule
  6. Enter a Name and a Description for the schedule; for our example we will use Schedule B, and “Schedule B triggered by Schedule A” for the Name and Description:

We now need to specify that Schedule B is to be triggered by the successful completion of the batch process that is attached to Schedule A.

  1. In the Settings group, click the Triggered radio button.
  2. In the Parent group, select the batch process for Schedule A from the combo box, i.e. Batch Process A.
  3. Select the Schedule; the combo box will display Schedule A.
NOTE: If the batch process is also associated with other schedules, they will also be listed. It is important that you select the correct schedule.
  1. On the Schedule tab, click Save Changes, to save the setup.
  2. Click the [X] in the upper left hand of the form to close the form.

Configuring Sequential Schedules D and E

Referring back to the workflow sketch, we see that Schedule C / Batch Process C is at the same level as Schedule B, it will be necessary to select the batch process that will be associated with Schedule C. For the Parent you will specify Schedule A. For the configuration, it will be necessary to repeat all steps for configuring a Child Schedule; see above steps. Schedule D / Batch Process D and Schedule E / Batch Process E are triggered by Batch Process B, and should be configured accordingly.

Govern Scheduler Console Preview and Execution

Viewing the setup in Govern Scheduler

When complete the final sequential batch processes can be seen in the Govern Scheduler group of the Govern Scheduler console. Looking at the interface, we can see that Schedule A is at the top of the list as the parent process. Schedule B and Schedule C are at the same level, both have their sub processes which they will trigger. Schedule D and Schedule E will be triggered by Schedule B, and Schedule F is triggered by Schedule C. Finally Schedule G is triggered by Schedule E, and Schedule F triggers Schedule H.

If a Batch Process fails…

During execution of the batch processes, if a batch process in the sequence fails, all subsequent children processes in that chain will not be executed. For example, if Batch Process B for Schedule B fails to execute, it will need to be corrected. After rectifying the error with the process, it will be necessary to execute Batch Process B again. After which all subsequent processes will then be triggered. It is not necessary to execute the entire process flow again, i.e. Schedule A.

Executing the Batch Process

To execute the Batch Processes in the Scheduler Console

  1. Click to select the process in the console.
  2. Click Execute.
NOTE: Refer to the Govern Scheduler user guide for additional configuration details, and running Batch Processes.

Business Rules

Deletions of Processes in Batch Scheduler and GNA

In the Batch Scheduler or in GNA, trying to delete a schedule with Child schedules will generate an error message. This message will indicate that in order to proceed, you must first delete the child schedules before you can delete the parent.

Deleting Parent Schedules in the Batch Scheduler

An error will be generated when attempting to delete parent schedules that are linked to sub schedules, i.e. schedules that they trigger.

Documentation

Click to view the .PDF document detailing this feature. (101-std-fea-046_SequentialBatchProcesses.pdf)


101-std-fea-046


0 votes, average: 0.00 out of 50 votes, average: 0.00 out of 50 votes, average: 0.00 out of 50 votes, average: 0.00 out of 50 votes, average: 0.00 out of 5 (0 votes, average: 0.00 out of 5)
You need to be a registered member to rate this.
Loading...

AR – Class Code Included in Balance Forward

Accounts Receivable (AR) Class Code Included in Balance Forward

Overview

The A/R Inquiry Custom Control is used to display, create and maintain all transactions linked to an Account Receivable. In situations where there are multiple Class Codes, a situation can result with imports after using the Govern Data Extraction Tool (DET). This would be an import into the same A/R Class that would result in the same descriptions being used for different codes. As a result, the same A/R Class code would be added for different descriptions; currently there is no way to differentiate between the same descriptions, but with multiple A/R Classes.

In Govern, on the Accounts Receivable > A/R Inquiry sub tab, two (2) grids are present. In the lower grid. A click on Balance Forward Detail, will display the following:

User Interface

A new Column titled AR Class Code is now present in the A/R Inquiry Detail grid. There is now an A/R Class, and a Description column

This feature will be present when the following display options are selected:

  • Balance Forward Detail
  • Applied Records

Functionalities

The AR Inquiry form is made up of two principal areas, a Summary grid, and a Detail grid. Additional details of this form may be found in the A/R Inquiry form documentation. For this feature, the new columns, A/R Class Code and Description, are available when selecting the Balance Forward Detail, or the balance forward Applied Records.

NOTE: The columns are not available in the Balance Forward because this information is broken down by installment and transaction type. As a result there will be no information in the Class Code column, the breakdown is only by transaction type.


101-ar-fea-011


0 votes, average: 0.00 out of 50 votes, average: 0.00 out of 50 votes, average: 0.00 out of 50 votes, average: 0.00 out of 50 votes, average: 0.00 out of 5 (0 votes, average: 0.00 out of 5)
You need to be a registered member to rate this.
Loading...


103-sy-008

Govern Standard Feature – User System Settings Action Button

Overview

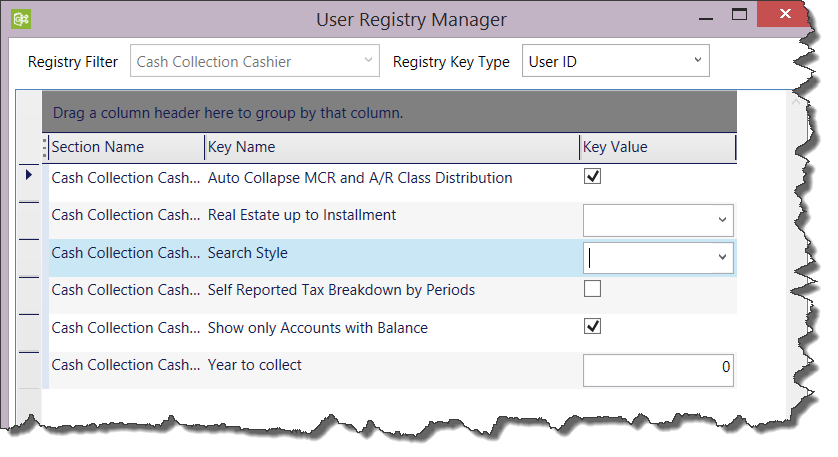
The following USER or CASHIER registry parameters are accessible on the active OpenForms by Registry SECTION. The following sections are available to use.

103-cc-parm-User-ui-button.png

103-cc-parm-User-ui-form.png
Click to enlarge

Cash Collection Cashier

The following parameters are available by User ID for the Cash Collection
Section name: [Cash Collection Cashier]
  • Auto-Collapse MCR and Payment Distribution by A/R Detail (Class Code)
  • Show only Accounts with Balance
  • Year to Collect

To be added (see roadmap)

  • Default Real Estate Up to Installment
  • Default Self Reported Tax Period
  • Default Search Style
  • Default Payment Collection Type (cctype) – check, credit …) – CURRENTLY setup in General User Parameters.

Matix Integration

The following parameters are available by User ID to change Application Browser Defaults.


103-sy-008


0 votes, average: 0.00 out of 50 votes, average: 0.00 out of 50 votes, average: 0.00 out of 50 votes, average: 0.00 out of 50 votes, average: 0.00 out of 5 (0 votes, average: 0.00 out of 5)
You need to be a registered member to rate this.
Loading...


GNA Conversion MA Parameters

GNA Conversion – Mass Appraisal Parameters

Overview

[In Development] Because of the changes introduced in Mass Appraisal 6.1, table and parameter conversion is mandatory. This GNA function converts the Mass Appraisal (ma) Parameter Tables to OF version 6.1 format.

Process Steps

  • Backup COPY of all MA_PARM tables created AUTOMATICALLY to MA_PARM_xxx_BACKUP
    • When?: 1st Database Verification or … to be verified … would be nice to refresh backup
  • CONVERT (Start Process button) – change button label to CONVERT..
    • ALL (or selected) TABLES
    • ALL (or selected) YEAR
  • DELETE MA_PARM_xxx Backup copies – change Start Process button to DELETE –

User Options (UI)

Selection

  • Tables ALL or selected (clicked) Table(s) –RIGHT Bar
  • Year ALL or One 1 selected year

Process Action Button

  • Convert
  • Delete

Recommendations

  • UI Button resources change to CONVERT and DELETE instead of START PROCESS
  • First Time Converters – Try a small sample of tables and only 1 year … quick environment validation … if all is well, select all tables and all years


103-ma-cvt-001

0 votes, average: 0.00 out of 50 votes, average: 0.00 out of 50 votes, average: 0.00 out of 50 votes, average: 0.00 out of 50 votes, average: 0.00 out of 5 (0 votes, average: 0.00 out of 5)
You need to be a registered member to rate this.
Loading...

100-Email-Notification

Notifications in OpenForms

Version 6.0 and Version 6.1 GA 6.1.1706 (Ongoing Development)

Overview

The following reviews the general email and notification features in OpenForms.
You can add automatic e-mailing to your batch processes in order to send out messages when the batch process is completed.

Prerequisites

Before sending an e-mail, ensure that the SMTP parameters are defined.
Note: Under the following conditions, the Roll Back if One Transaction
Failed option is not available and Break if One Transaction Failed becomes the default.

NOTE: During the installation procedure of the Scheduler Service, you can set up automatic e-mailing for alerts. These e-mails are only sent when there is a fatal error and are intended to alert the system administrators. They are separate from the e-mails configured in this section.

Email Options

Send e-mail on batch completion
Select this option if you want to send an e-mail each time the batch process is completed. Selecting this option enables the e-mail configuration parameters.
Subject
Enter a subject for the e-mail, such as the name of the batch process.
Message
Enter a descriptive message for the e-mail.
You can add the following placeholders in the message. When the process is run, the required information is entered in place of the placeholder.
For example, if you enter the {Name} placeholder in the body of the e-mail message, the name of the batch process appears in the e-mail message, such as Deposit Posting. The curly brackets are part of the placeholder and are required.
Placeholders

  • {ID}: This is the Code defined for the batch process at the top of the Batch Process Definition form.
  • {Name}: This is the name of the batch process entered in the Name field at the top of the form.
  • {Start} / {End}: These are the dates and times the batch process was started and completed.
  • {Originator}: This is the user name of the user logged in to GNA.
  • {Errors}: This is the list of errors generated by the batch process.
  • {Warnings}: This is the list of warnings generated by the batch process.
  • {Attachments}: This is the list of files, such as reports, generated by the batch process.
  • {Schedule}: This is the schedule information associated with the batch process.

You can view a list of the placeholders. To view the list, hover the mouse over the information icon beside the e-mail Message field.
Sender: Enter the e-mail address of the sender. This is displayed in the From field of the e-mail sent by the batch process.
Send a copy of e-mail to sender: Select this option to send the e-mail to the Sender’s e-mail inbox.
Include attachments in e-mail: Select this option to include the attachments, such as reports, generated by the batch processes.
Available: This list box displays the users in the USR_USERFILE database table, where the EMAIL field includes an e-mail address.
Recipients: This list box displays the users who will receive an e-mail when the batch process is run. Select the users in the Available list box and drag them to the Recipients list box. This is a required field.
Recipients (if errors arise): This list box displays the users who will receive an e-mail when errors are generated from the batch process. Select the users in the Available list box and drag them to the Recipients list box. This is a required field.

See Also


100-Email-Notification


0 votes, average: 0.00 out of 50 votes, average: 0.00 out of 50 votes, average: 0.00 out of 50 votes, average: 0.00 out of 50 votes, average: 0.00 out of 5 (0 votes, average: 0.00 out of 5)
You need to be a registered member to rate this.
Loading...