Profile Visual Queries

Profile Visual Queries

Overview

The Govern Visual Query is a visualization of query results. This visual representation can be in the form of Pie Charts, Graphs of Data, or Data grids. When a dataset is retrieved, the impact upon the end user is increased significantly when the data is presented in a format that is easy for the viewer to visualize. The visual query is presented as icons that are displayed on the Govern Release 6.0 ribbon. When the user clicks the icon that is used to represent the Visual Query, the query result is displayed. Optionally after the data is displayed, the resulting chart may also be configured to display a report when the user clicks on the image of the chart.

Display of Data Query Controls

Query data, when compatible, can be presented in any of the following supported controls:

Control Name Description
Label Displays a user-defined text label in
the Govern ribbon.
Large Label Unlike the text label, a large text label
icon is displayed in the Govern ribbon.
Picture This is a picture icon that will display
a thumbnail representation of the
selected image.
Pie Chart Displays a Pie Chart graphical
representation of the data.
Column Chart Data will be displayed as a column chart.
Line Chart A Line Chart representation of the data
is displayed.


What’s New!

Export to Excel Option

NEW! The functionality that has been added to this feature is the ability to conveniently export the View Query result as a Microsoft Excel file. This is export is carried out from the result grid. See below to review the details of this feature.
View_Query_Export_to_Excel_Option.pdf

Configuring the Visual Query

Prior to configuring the control in the OpenForms Designer (OFD), it will be necessary to design queries to retrieve the data that will then be presented. In addition users must approach this process with the understanding that units that are being retrieved must also be formatted for use in the control.

Queries Tab

The parameters under the Queries tab are used to configure the profiles with queries.

Profile Editor – Queries tab command buttons

  • Add a New Query: Click this button to add a new Query to the current profile.
  • Remove Selected Query: To remove the currently selected query from the profile, click Remove Selected Query.
NOTE: You are able to make multiple or extended selections using the Ctrl or Shift keys in this list.

Profile Editor – Queries tab parameters

Control Type

Select one of the control types for your query from the drop down menu.

Query

This list will display the English Long Name of the available queries. When the Open icon is clicked , the SQL Query editor is launched to create a new query; when a query is already configured in the parameter, it will be displayed. Refer to SQL Query Editor on page 245 for information about creating queries with the Govern SQL Query Editor.

Tool Tip

Enter the text for a Tool Tip that is displayed when the user pointer is hovered over the ribbon icon. This parameter has 3 possible states that can be selected.

  • Fix – Select this option to display the current text string as a fixed text description, i.e. tool tip.
  • Query – When selected, the parameter will change to a drop down list of queries. The result of the queries can then be used to determine whether the tool tip is displayed.
  • Logical Expression – Select this option to display a list of Logical Expressions that can be used to determine whether the tool tip is displayed.

Visibility

This is a flag that is set to indicate that the icon will be displayed in the Govern Ribbon.

  • Fix – Select this option to display the icon as a fixed image.
  • Query – When selected, the parameter will change to a drop down list of queries. The result of the queries can then be used to determine whether the icon is displayed. Refer to SQL Query Editor on page 245 for information about creating queries with the Govern SQL Query Editor.
  • Logical Expression – Select this option to display a list of Logical Expressions; the visibility of the controls icon will be based upon the result of the expression. Refer to Logical Expression Editor on page 186 for information about creating Logical Expressions with the Govern Logical Expression Editor.

On Click group

The options in the On Click group when selected will determine what action occurs when the selected query item is clicked in the ribbon. The options are as follows:

None

Selecting None is an indication that no action will be performed when the query item is clicked

Open Form

When selected, you will have the option to indicate which is to be opened when the user clicks on the query.

Open Report

Click to select the option to choose a report that will be displayed.

Open View Query

Select the Open View Query option to open a selected View Query.

Execute Command

To execute a command, click this option; available commands can be selected from the list.

Open GIS

When selected, this option will open a window with an embedded GIS output screen.

Open Query Tool

Selecting this option will open the Govern Query Tool (QT).

Open Batch Process

To configure the query to load a batch process, select this option.

NOTE: Multiple or extended selections using the Ctrl or Shift keys are not allowed in this list.

Security

For more information, see 102-Govern Security Manager (GSM) OpenForms System Suite.

Best Practices

As a Best Practice, users should ensure that their queries have been optimized, as they will be executed at the time Govern is loaded.

How to Set up a Visual Query

Click for detailed steps to setup Profile Queries.


101-std-fea-003


0 votes, average: 0.00 out of 50 votes, average: 0.00 out of 50 votes, average: 0.00 out of 50 votes, average: 0.00 out of 50 votes, average: 0.00 out of 5 (0 votes, average: 0.00 out of 5)
You need to be a registered member to rate this.
Loading...


Standard Feature – Saved Datasets

Saved Datasets

Overview

Govern Saved DatasetsThe Govern Saved Dataset pane is standard in release 6.0 and higher. This pane will allow users to load, save, and delete saved datasets. All saved datasets for the current user, excluding datasets that are present prior to the hibernate process.
In addition, users are able to create new datasets from a search result, append to an existing dataset, load, edit, or delete one or multiple datasets.

What’s New

When applicable, new features, or new ways of performing an old function in Govern will be listed below. Version Numbers and sections will be indicated in the list.

Saved Datasets Interface

The interface is an auto-hide pane. This pane appears with a click on the Saved Datasets icon on the Ribbon, or by hovering the mouse pointer over the tab.

Saved Dataset Grid Behavior

The Saved Dataset grid allows for creation and maintenance of user saved datasets.

Select all saved datasets in the list…

Click on the check box of the first header column to select all items in the grid.

Sort Grid by Headers…

As is standard with Govern grids, a click on a column header will sort the list in ascending or descending order. Ascending or Descending order is determined by the direction of the triangle that appears in the column heading. Typically the list is sorted by the name or the date.

Restoring the default Sort Order

Click the header until the arrowhead indicating the direction of the sort disappears.

Quickly Load a Saved Dataset to the Treeview…

When you want to quickly load a dataset to the treeview pane, double click on a row to clear the Dataset Treeview and load all selected dataset to the tree view.

Grouping by Columns…

The Governs interface drag and drop features allow for additional possibilities in the grid. The space above the columns is referred to as the Grouping Area. When possible, this space expands to accommodate column names when they can be added.
To group according to a column…

  1. Click and drag the column head to the space marked “Drag a column header here to group by that column“.
  2. Release the Column header in the area.
  3. Repeat the drag and drop action for additional required columns.

Removing Column Groupings…

To remove column groupings…

  1. With the mouse pointer, click and drag the column heading from the grouping area.
  2. When your cursor is outside the grouping area, the cursor will change to a large “X”.
  3. Release the cursor; the grouping will be removed.

Command Buttons

The Saved Datasets pane can be displayed by hovering over the auto-hide tab. When you want the pane to display permanently without sliding back, click the Auto-Hide pin icon. The pane will remained fixed in the interface until the Auto-Hide button is re-selected.

Load to Treeview

Click Load to Treeview to load a dataset to the Treeview. The feature is enabled only if at least one item is checked. When clicked, the action will clear the dataset treeview and load all selected datasets to the treeview.

Append to TreeView

To append to the records that are in the treeview, click Append to Treeview. This button will only be active when one or more datasets have been selected in the Saved Datasets grid. When the append action is performed, all records from the selected datasets will be appended to the treeview.

Add / Replace Dataset

Toggle button between add and replace dataset. If at least one item is selected, replace the items in the selected dataset, otherwise create new dataset by showing the Save dataset window.
This button is always visible. When the user selects the Add a New Dataset button, they will be prompted with the Create New Dataset screen. Enter a name and click Save.

Append Dataset

Append Dataset will append all items from the tree view to any selected datasets in the list of saved datasets. This button is only active when one or more saved datasets has been selected in the list.

Delete Dataset

This button is used to delete saved datasets. To delete one or more dataset from the list, select the datasets that are to be deleted, and click Delete Dataset.

Share Dataset

Users that are members of other roles may share their Saved Datasets. This is done through Share Dataset feature.
To share saved datasets…

  1. Select the check box for the dataset that you would like to share.
  2. Click Share Dataset.
  3. In the Share Dataset window, enter a name for the shared dataset.
  4. Select the Roles and or Users that you are a member of, and would like to share the dataset with.
  5. Save the change with a click on the Share button.
NOTES: Saved Dataset names can be up to 50 characters including spaces. The datasets that are displayed are only for current ID’s, as an example if the open profile is based upon a P_ID, then only saved datasets that have a Reference Type of P_ID are displayed.

Video

NOTE: There are no Training Videos available


101-std-fea-006


0 votes, average: 0.00 out of 50 votes, average: 0.00 out of 50 votes, average: 0.00 out of 50 votes, average: 0.00 out of 50 votes, average: 0.00 out of 5 (0 votes, average: 0.00 out of 5)
You need to be a registered member to rate this.
Loading...

Roll Forward Business Rules

Roll Forward

Overview

Frozen ID

For property base information, the system works internally with a PARCEL ID (parcel number), YEAR ID and FROZEN ID. Frozen ID is used in the MASS APPRAISAL as well as in the TAX ASSESSMENT.

The FROZEN ID coding system:


FROZEN ID Description
0 This is the CURRENT record for the year id
1, 2, 3, 4, 5, 6, etc. Frozen Sale information. Each time a sale is entered in a year, the ID will increment by 1
-1 This is to protect the ORIGINAL CERTIFIED value prior to any changes made in the year
-2, -3, -4, -5, -6, etc. These records are created when an audit is finalized
-32766 These records are properties that were cancelled / inactivated through the split merge function
-32765 These records are What If data
32767 These records are simulation data


NOTE: No frozen ID record -1 will be created for a year where a split merge is created and not finalized. No message is displayed. However, the Roll forward will apply.


Value Computation

ONLY the characteristic changes of properties are rolled forward. Since it is likely that these changes would contribute to valuation changes, all records for all years affected by the roll forward are sent to the Daemon for value computation.

Audit

Frozen ID’s are used in Appraisal and Tax to freeze a record after a change. It is then possible to see what has changed during a specific time in a year. The first audit will create frozen id -2 and will be incremented by -1 for the subsequent changes.
Please note that prior to any changes made, once the YEAR has been CLOSED (History = -1 in MA _ MASTER) a record of -1 will be created to record the original state before saving any changes.
The entry date will also play a role in the process.

Sale

Frozen ID’s are used to freeze information when there is a sale, so that it is possible to view and modify the property characteristics as they were at the time of the sale. For each year (fiscal year or role year, the Frozen id will start at 1 and increment by 1 for each sale.
In order to record what the Tax information was at the time of the sale, the same FROZEN ID will be used for Mass Appraisal and Tax as well as PC Area and Legal Information.

Roll Forward

The Roll Forward feature (parameter) is used to duplicate the creation of records, deletion of records and changes made to existing records for future years that are already initialized…

The best example is a situation where the current year is 2012 and 2013 year data has been initialized to start preparing for next year assessment or tax roll. In the event of an appeal in 2012, any changed made will be rolled forward to 2013 if answered yes when prompted by the system to roll forward this change. It is important to know that only the CHANGE will be brought forward.

Roll Forward Business Rules

If an organization has Property Control, Mass Appraisal and Tax Billing and a change is made to Mass Appraisal, roll forward of all MA tables and PC tables will occur up to the last year recorded in MA MASTER (Property Info). If a change is made to Real Estate, the roll forward will occur for RE and PC up to the last year recorded in RE_MASTER (Tax Master). If a change occurs only in PC, there will be no roll forward as Property Control is not year based.

Roll forward by type of record (Regular, Sale and Audit)

Regular mode

In this example, the property was created in 2009, adjusted mid-year 2009, and sold in 2009.
The sale has created a frozen id of 1, changes to the property characteristics created minus 1 (-1) records and audits created -2.

If the user makes a change in 2009 Frozen Id 0, it will roll forward to current year records (frozen 0) ONLY. If the change should be applied to sales (frozen 1,2,3 and on), the user should make the change in Sale Mode.

Year and (Frozen Id)

2009 (-1) 2009 (-2) 2009 (0) 2009 (1) 2010(-1) 2010(0) 2011(-2) 2011(-1) 2011(0)
X No update No update à No update No Update à

Update future years where frozen_id = 0

Sale mode
In this example, the property sold in 2007, 2009, and 2012. This has created a frozen id of 1 for each year there was a sale. If the user makes a change in 2009 Frozen Id 1, it will roll forward to 2009 current (frozen 0), 2010, 2011, 2012 Frozen ID 1 and 2012 current record.

Year and (Frozen Id)

2007 (1) 2007(0) 2009(1) 2009 (2) 2009 (0) 2010(-2) 2011 (-1) 2010 (0) 2012 (0)
X à à No update No update à à

Update future years where frozen_id > = 0
Update current years all frozen_Id > the current frozen sale
Update current year Frozen_id = 0

Audit mode

This option is mostly used to correct USER ENTRY errors. The Roll Forward is used to bring forth the correction made in an historical year. Creating an Audit record will not generate frozen ID records.
Example
In this example, there are 2 audit record in 2011 and 1 audit record in 2012. Note that the (-1) is not created by the audit record, but prior to making a change in different functions impacted by the roll forward. Also, the Frozen Audits are recorded only after the Audit record has been finalized and saved.
Please note that in some cases, the Entry date of MA and TX AUDIT will be used to see if the data should be rolled forward.

In this example, the land value had to be modified because of a change made for an appeal and recorded under 2011 frozen (-2).

2011(-1) 2011(-2) 2011(-3) 2011(0) 2012(-2) 2012(-3) 2012(0)
X à à à à à à à à à à à à à à

Update future years only where frozen_id >= 0 (Regular data and Frozen sales)
Update future years only where frozen_id < -1 and (Audit Data) MA_AUDIT_INFO.ENTRY_DATE (CAMA) or TX_AUDIT_INFO.ENTRY_DATE (Tax) >= the one for the current frozen_id

Update all sales for the current year , frozen_id > 0 (Sales Record)

Roll forward to current year data, frozen_id = 0

Note: In addition to the ROLL FORWARD message, you will be asked if you want to roll forward to the sales information for the current year. If you click YES, the change is added to all sales records in the current year as well as to all sales in future years if they exist.

The current year could include sales records that were created before the change was made as well as after. The change is applied to all records.

Roll forward versus Certified Original (Frozen -1)

In the event there was no FROZEN -1 for a year, because no change had been made after the Close MA Year Batch Certification that sets the flag HISTORY_ONLY to yes in MA_MASTER and/or in TX_RE_ASSESSMENT, a FROZEN -1 will be created prior to Rolling (updating) current information.
Note: At this time, only the Close MA Year process is available.

The General Tables Impacted by the Roll Forward

The following tables are impacted by the roll forward on SAVE, MODIFY and DELETE.

Data Tables
Property Area PC_AREA
Legal Information PC_LEGAL_INFO
Tax Real Estate Assessment TX_RE_ASSESSMENT
Tax MV-PP-BT-AC Assessment AC_ASSESSMENT, BT, PP, MV …
Tax Exemptions TX_EXEMPTIONS
Tax Levy Master TX_LEVY_MASTER
Appraisal Property Information
Appraisal data
MA_MASTER
Building Drawing MA_DRAWING (new)
Building Area MA_BLDG_AREA
Building Structural Elements MA_BUILDINGS ….
Income MA_INCOME
Land MA_LAND
MRA MA_MRA
Site Information MA_SITE
Miscellaneous Structures MA_MISC_STRUCTURES
Condo Appraisal Linking MA_LINKS_PERCENT


NOTE: Please note that for the table MA_DRAWING (Building Drawing), the whole command line will be rolled forward as it is impossible to add just the change.

Detail Table

Mass Appraisal
MA Land MA_LAND
MA_LAND_1 to MA_LAND_9
MA_LD_INFO
MA Property Info MA_MASTER
MA Value Override MA_VALUES_TABLE
MA Override MA_OVERRIDE
MA Building Structural Element MA_BUILDINGS
MA_BUILDINGS_1 to MA_BUILDINGS_9
MA_BLDG_DRAWING
MA_BLDG_INFO
MA_BLDG_AREA
MA Building Drawing MA_BLDG_AREA
MA Misc Structure MA_MISC_STRUCTURES
MA Site MA_SITE
MA MRA MA_MRA
MA_MRA_1 to MA_MRA_9
MA Income MA_INCOME
MA_INCOME_1 to MA_INCOME_9
MA_LK_INC_FIELD
MA_INC_INFO
MA_INC_SIMULATIONOnly Create and delete mode MA_INCOME_DETAIL
MA Link Percent MA_LINKS_PERCENT


PROPERTY CONTROL
PC Legal Info PC_LEGAL_INFO
PC Area PC_AREA


TAX REAL ESTATE
TX Assessment TX_RE_ASSESSMENT
TX_LEVY_MASTER
TX_EXEMPTIONS
TX_LK_LEVY_EXEMPT
TX Levy TX_LEVY_MASTER
TX_LK_LEVY_EXEMPT
TX Exemption TX_EXEMPTIONS
TX_LK_LEVY_EXEMPT


TAX – Aircraft and Personal Property
Replace XX with SUB SYSTEM
AC & PP Assessment XX_RE_ASSESSMENT
XX_LEVY_MASTER
XX_EXEMPTIONS
XX_LK_LEVY_EXEMPT
XX_ASSESSMENT_DET
AC & PP Levy XX_LEVY_MASTER
XX_LK_LEVY_EXEMPT
AC & PP Exemption XX_EXEMPTIONS
XX_LK_LEVY_EXEMPT

How to access history records

You can either use the HISTORY PANEL available as a side panel or though the View Menu.
Double-Click on a Year and Frozen ID entry; right click on the entry, and select Set Year and Frozen ID; or click the first button (Set year and Frozen ID) to select the frozen mode.
To return to the regular mode, use the second button (Reset).

Alternate Security

Once in frozen mode, the alternate security will be used. For more information refer to the Govern Security Manager (GSM) guide.

SPECIAL CONSIDERATIONS

Mass Appraisal Building Area

  • Roll Forward if Allow override or not
  • ex: If year 1 (override yes) if year 2 (override no) if year 3 (override yes)

BASIC ROLL FORWARD RULES SUMMARY

When you save a change, create or delete a record with Frozen ID = 0 (Regular data)

  • Roll forward will update future years only where frozen_id >= 0 (Regular data and Frozen sales)

When you save a change, create or delete a record with Frozen ID < -1 (Audit Data)

  • Roll forward will update future years only where frozen_id >= 0 (Regular data and Frozen sales)
  • Roll forward will update future years only where frozen_id < -1 and (Audit Data) MA_AUDIT_INFO.ENTRY_DATE (CAMA) or TX_AUDIT_INFO.ENTRY_DATE (Tax) >= the one for the current frozen_id
  • Roll forward to all sales record for the current year , frozen_id > 0 (Sales Record)
  • Roll forward to current year data, frozen_id = 0

When you save a change, create or delete a record with Frozen_id > 0 (Frozen Data)

  • Roll forward to future year only where frozen_id >= 0 (Current Data and Frozen Sales Data)
  • Roll forward sales data in current year with frozen_id > the current frozen ID
  • Roll forward to current year data, frozen_id = 0

No changes will be made to Frozen ID -1 / No Roll forward (This is the Original Certified Record.)
Note: This is the default setting. If you want to change the Frozen ID -1 record, you can change the security setting in the Govern Security Manager (GSM).

Document Audit

v 1.0 2013-04-14 Original Document (Author Michelle Gagné Q&A)
V1.2 2015-09-16 Moved to the wiki (Approx. Date)
v1.3 2016-06-05 Added Document Audit
v1.4 2016-09-28 Added the What IF frozen code
v1.5 2017-11-30 Change the What IF frozen code to a negative


Govern Standard Batch Programs

Govern Standard Module – Batch Processes

Overview

Batch processes are used to calculate and update multiple records at the same time, to post records to the General Ledger accounts, to delete records that are not posted, to apply pending amounts and penalties, to extract or compute amounts for a specific date, and to close a fiscal period or year. This page provides general information on batch processes that applies to all modules.

Prerequisites

  • Each batch process must be defined in GNA, Batch Process Editor.
  • It must be linked to a Profile and accessed through a Profile.
  • Access permissions must be provided by role and user.

Accessing the Batch Processes

To access a batch process:

  1. Launch Govern.
  2. Select Batch Process in the View menu if the Batch Processes explorer is not displayed.
  3. Open the Batch Processes explorer.
  4. Select the process that you want to view.
  5. Running Batch Processes
  6. Open the batch process and enter the optional and required information, such as selecting a deposit number or numbers, entering a range of dates or tax map numbers, selecting a department, subsystem, and cycle code. You can do any of the following:
  • Execute or run the process immediately.
  • Schedule the process to run at a later date or on a recurring basis, at regular intervals, such as daily, weekly, hourly, etc.
  • Create and save a schedule for a batch process. Then, deselect the Activate button until you are ready to put the schedule into place. Select Activate when you are ready to run the process at regular intervals.

For further details about running and scheduling batch processes, refer to the Govern Scheduler documentation.

General Guidelines

This section provides a few rules and tips about batch processes.

Optional Fields

If a field is optional, you can enter the required criteria or leave it blank to process all records that meet the other criteria on the form. For example, if a date field if optional, leave it blank to process records from all dates.

Fiscal Year

The Fiscal Year displayed in the Home menu in Govern Ribbon is not applicable to the batch processes. When the fiscal year is required for the batch process, you need to enter it on the batch process form. On some batch processes, you may need to enter an effective year or entry year as well as the fiscal year.

Posted Records

When you run the Account Receivable batch processes, records are saved to the following tables: AR_MASTER, A/R_SUMMARY, and AR_DETAIL.

Once A/R records are posted, they cannot be modified or deleted. Therefore, it is important to verify all records before posting them.

Deposit Management

Deposit Management is integrated with Accounts Receivable in Govern OpenForms. All Payment Data Entry transactions require a deposit number. Depending on the setup in GNA, the deposit numbers can be automatically-generated or you can create them manually in the Deposit Management form.

Viewing Reports and Verifying the Status of Batch Processes

When you run a batch processes in Govern, the status of the process is indicated by the progress bar. Green indicates success, yellow a warning, and red an error. Information, warning, and error messages are displayed below the bar.

If you click on a message, you can view it in a message box.

You can also click on the Copy button and copy all messages to a separate file.

Viewing Reports and Attachments

Reports and attachments can be linked to a batch process in GNA. For example, a csv file, containing information about accounts with an overdue balance, could be generated at the end of a batch process. A report could be generated as a pdf.

If a report or attachment has been generated by the batch process, you can view it by clicking the icon that appears beside the progress bar when the process is successfully completed.

NOTE: You can also view reports generated from scheduled batch processes in the Govern Scheduler. Refer to the Govern Scheduler documentation for details.


To view a report or attachment:

  1. Launch Govern and run the batch process.
  2. When the process is complete, a message is displayed on the progress bar in the Batch Processes Explorer.
  3. An attachment icon is displayed in the list box under the Progress Bar.
  4. Click on the Attachment icon .
  5. The report or attachment opens in the application in which it was created.

See Also

Govern Batch Scheduler and Installing the Batch Scheduler Service
General Batch Process OpenForms Standards (100-batchprocess)


101-std-fea-014


0 votes, average: 0.00 out of 50 votes, average: 0.00 out of 50 votes, average: 0.00 out of 50 votes, average: 0.00 out of 50 votes, average: 0.00 out of 5 (0 votes, average: 0.00 out of 5)
You need to be a registered member to rate this.
Loading...

CC – Misc. Cash Receipt Feature

Cash Collection (CC) Form – Misc. Cash Receipt Feature

Version 6.0 | Version 6.1

Overview

The following is a feature of the Cash Collection Form.

Miscellaneous Cash Collection

A Miscellaneous Cash Receipt (MCR), is a receipt of cash that is paid as a penalty or a fee, that is not covered by other categories.

This payment can be applied toward a customer’s balance or an individual invoice.
An example of an MCR might be a fee for an Non Sufficient Fund (NSF) check, an administrative handling charge, a vehicle rental surcharge, a late return fee, a report charge, etc.

Expand the MCR section of the form to create a new Miscellaneous Cash Receipt entry.

  • Class Code: This field allows the User to select a Class Code for a miscellaneous cash receipt item (Table: VT_USR_AR_CLASS).
  • Class Amount: Enter the miscellaneous cash receipt value to be added to the payment.
    • Note: Depending on the Class Code selected and the Transaction Type associated with it, there may be a Default Amount displayed.
      The Default Amount is used in combination with only two of the Transaction Types: Blank or Adjustments. (Miscellaneous Cash Receipt type to be verified)

Configuration

The following information needs to be con figured in order to use Miscellaneous Cash Receipt:

Miscellaneous A/R Class Codes Groups
To speed up data entry, it is possible to add a group of miscellaneous cash receipt charges.
The groups are setup in a user validation table (Table MCR_GRP).
The A/R Class Codes are then linked to this group in the A/R Class parameters.

A/R Class Codes
The class codes must be defined by year with a transaction type of Miscellaneous Cash Receipts. à
General Ledger distribution accounts are linked to the A/R class.


101-cc-frm-008


0 votes, average: 0.00 out of 50 votes, average: 0.00 out of 50 votes, average: 0.00 out of 50 votes, average: 0.00 out of 50 votes, average: 0.00 out of 5 (0 votes, average: 0.00 out of 5)
You need to be a registered member to rate this.
Loading...

CC – Point-of-Sale (POS) Simulation Form

Centralized Cash Collection Form – Point-of-Sale (POS) Simulation

Overview

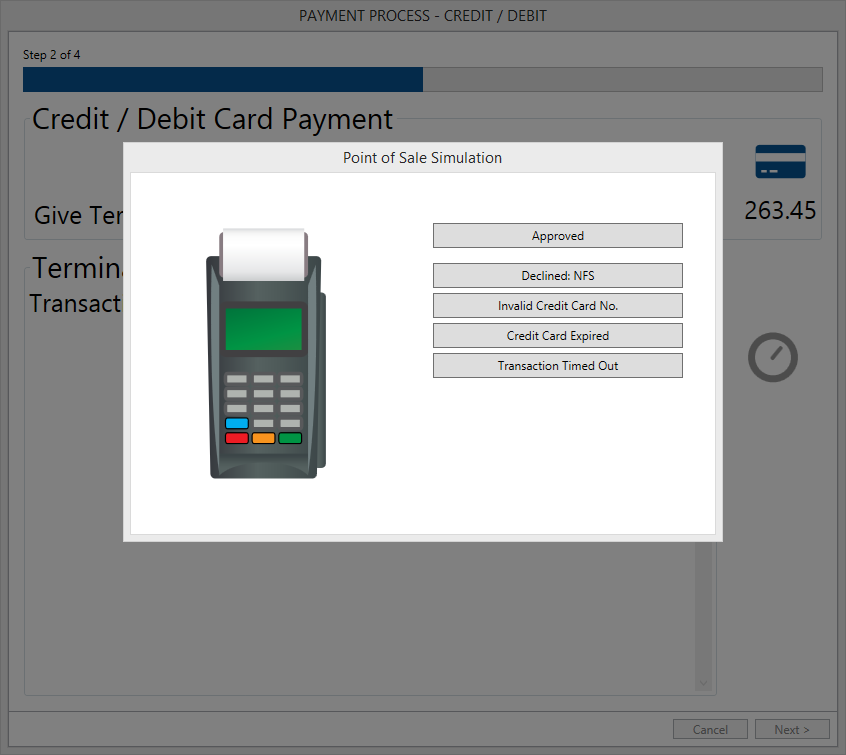
When demonstrating features of the Cash Collection Point of Sale (POS) payment process, there is a need to simulate the responses provided by the POS terminal. The reason for the simulation is that development will need to proceed in the absence of a physical POS terminal. The function of the simulator is to provide the responses that would be generated by a physical terminal.


101-cc-frm-030-(ui)-1.png

Requirement

Through the Govern New Administration (GNA) the system will be configured to function in a “Virtual POS Simulation” mode of sorts. The principal interface for configuration is the Govern System Registry.

Documentation

To view or download the document for this form, click the link below.
101-cc-frm-030_POS_Simulation.pdf


101-cc-frm-030


0 votes, average: 0.00 out of 50 votes, average: 0.00 out of 50 votes, average: 0.00 out of 50 votes, average: 0.00 out of 50 votes, average: 0.00 out of 5 (0 votes, average: 0.00 out of 5)
You need to be a registered member to rate this.
Loading...