101-std-fea-031-ofr

101-std-fea-031-ofr #stdfea #std

Administrator Login Feature OpenForms Reference Setup
Govern Standard Module Overview, Configuration, OpenForms Reference, What’s New, wiki Module Map …. Last Modified Feb. 9th 2016
VERSION 6.0 | VERSION 6.1

Overview

This standard feature purpose is to change the permissions of a form by allowing the administrator or manager to log in to override the current user security permissions.

Feature Documentation Resources include:101-std-fea-031-ui-2.png

OpenForms Designer Setup

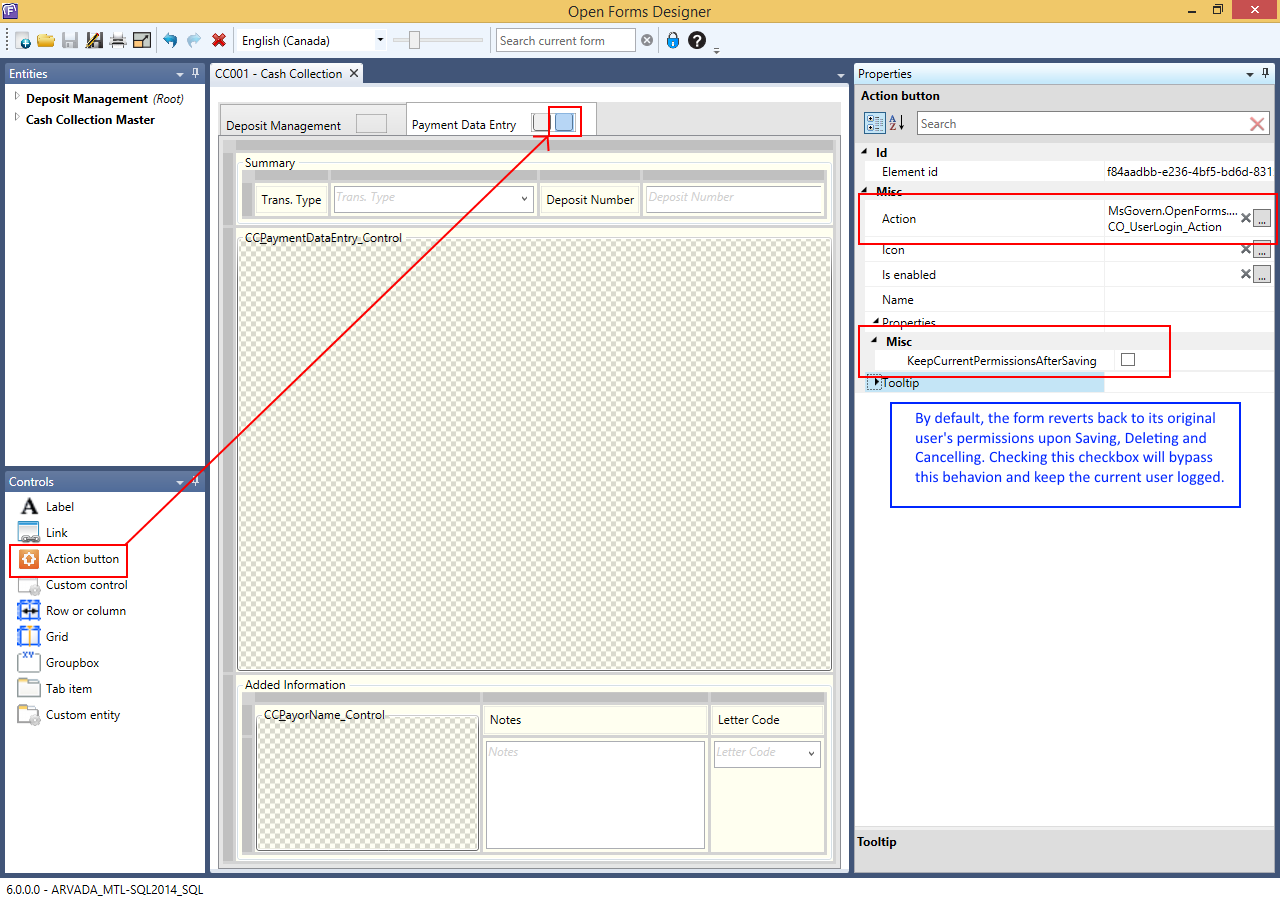
The Action Button is setup in OpenForms Designer.

Action Button Control

Class Name: CO_USER_LOGIN_ACTION
Misc. Properties:

  • KeepCurrentPermissionsAfterSaveActive
    • By default, this property is unchecked so that the form reverts back to the original user permissions.

101-std-fea-031

101-std-fea-031 #stdfea #std

Login as Administrator Feature
Govern Standard Module Overview, Configuration, Installation, OpenForms Reference, What’s New | Module STD Wiki Map, CC Wiki Map | Last updated February 9th 2016

Table of Contents

Overview
Specification
User Interface
Setup
Form Security

Feature Option – Keep Current Permissions
OpenForms Reference (OFR)

VERSION 6.0 / VERSION 6.1 (under review)

Overview

This action button allows for an Administrator or another user to login during a payment data entry transaction.
Cashiers may not have the security to change/override some of the collection fields such as interest, charges, etc.
With this feature, the Administrator can login in order to apply its own security access and allow the cashier to make the changes.

Currently, the following feature is used in the Cash Collection Form as a default but can also be used on any form
Available in General Availability Release 1603.
For more information on the cash collection module:

.

Specification

Features and specifications:

101-std-fea-031-ui-1.png
Click to Enlarge

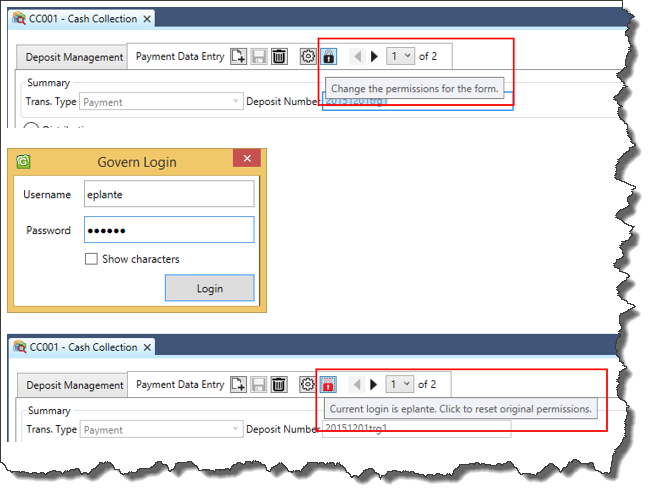
  • The action button is available ONLY when the cashier has initiated (ADD) a payment transaction.
  • On click of the action button, a user-password login popup window appears.
  • On a successful Log-In, the new user’s security is applicable and the action button turns to red banner is displayed to recognized the fact that the new security is in use.

Options:

  • On save, normally when a transaction is completed, the security permissions can either:
    • Revert back to the original user permissions, or
    • Stay active until the form is closed, refreshed, or when the security is reset by clicking on the action button again (toggle set/reset).

Authentication:

  • If the Authentication Type is MSAD, the password comes from the Domain (Microsoft Active Directory)
  • if it is GOVERN, it comes from the table USR_USERFILE table

Permissions:

  • IMPORTANT: The new security is applicable to ALL tabs, sections and information available in the Cash Collection Form.

User Interface

The action button is used to set and reset the form permissions.
Depending on the state, it will be:

  • Grey: when the normal user security permissions are in used
  • Red: when the log-in user (administrator) permissions are in used

Setup

Form Security

This action button can be configured (secured) like any other button by profile, user and role in OpenForms Designer (OFD).
Cash Collection (standard button)
In OFD > open or select CC001 Cash Collection > click on the Payment Distribution Tab, Click on the Custom Control- to be documented

Feature Option – Keep Current Permissions

The feature custom control can be configured to automatically revert back to the original user permissions after a save is made.
This property used: ‘KeepCurrentPermissionsAfterSaving’
If uncheck will revert back to the user original permissions.

OpenForms Reference (OFR)

This Action Button Login Feature is a standard feature and can be configured on most standard OpenForms – to be validated
It is configured in the Standard Govern Cash Collection Form, distributed with the application.
See Standard Feature OpenForms Reference Setup for more information.

101-std-fea-032

101-std-fea-032 #stdfea #std

Cash Collection – Open Cash Register Feature
Module Overview, CC Configuration, OpenForms Reference, What’s New, R&D wiki, wiki Module Map …Last update Jan 25th 2016

Table of Contents

Overview
Open Cash Register
Setup

VERSION 6.0 / VERSION 6.1 (under construction)

Overview

The following is a feature of the Cash Collection Form.

Open Cash Register

The following option is used to send a control to the cash register to open it on demand.

Note: When the payment transaction is saved, the cash register will open by default.

Setup

To setup the correct code that will be used to open the register:

Govern Administrator

Developer Information
101-std-fea-032 – Cash Register Action Button.docx

101-std-fea-035

101-std-fea-035 #stdfea #std

Business Tax – Transfer Filing
VERSION 6.0.1605 / VERSION 6.1.1605

Overview

When completing an ST filing, users may erroneously select the wrong period. It is often only after entering the required information that they realize that their entry was made in the wrong period. For example, after making an entry for the second quarterly filing, there is a realization that it should actually be for the third quarter. As a result of this error, it becomes necessary to transfer the filing.

In the past

Previously, correcting this error was not altogether straightforward. The workaround for this type of error would have been to first transfer the filing to another account, then a transfer back to the original account would have been needed to complete the process. A more streamline process was required to easily transfer a filing to a new period.
In the past, the Govern system would limit the user to being able to transfer a filing from one account to another account only under the following conditions:

  • If the Category, Period, or Period Type are the same for the filing account and the destination account.
  • If the Filing is flagged as Unposted.

With this enhancement, the Govern system will now allow a transfer to any Unfiled Filing Period with the same Category. This is a feature of the Self Reported Tax Filing Form.

The Business Tax transfer filing enhancement allows the transfer of a filing entry to any Unfiled Filing Period with the same Category.

Configuration

NOTE: Users with administrator access that have NOT updated to the latest Govern Reference File will need to manually configure this feature. Refer to the current manual for this feature in the documentation section below. A Manual Configuration Guide has been prepared for administrators that have not updated their Govern Reference file.

No user configuration is required for this enhancement. In order to implement the Transfer Filing enhancement, the following are required to be updated to Release 6.0.1605 / 6.1.1605 or greater:

  1. The latest version of the OpenForms Reference file (FormReference.XML)
  2. A current version of the Dynamic Search Reference file (DynamicSearchReference.XML)

These updates are performed in the Govern New Administration (GNA) using the Import Data from File utility in the Import / Export Tools group.

Documentation

The following is the user documentation for the enhancement:

User Guide

101-st-fea-035_BusinessTax_Transfer_Filing.pdf

Manual Configuration

101-st-fea-035_BusinessTax_Transfer_Filing_MANUAL_CONFIG.pdf

Dynamic Search Style Query

Below is the Dynamic Search Style query that is used when performing a manual configuration of the Business Tax Transfer Filing feature. Refer to the above Manual Configuration instructions for details.

— START —

SELECT NA_NAMES.NAME_INDEX,ST_MASTER.ACCOUNT_NO, ST_FILING_MASTER.YEAR_ID,ST_FILING_MASTER.dept AS DEPT_ID,ST_MASTER.CATEGORY_CODE,ST_FILING_MASTER.PERIOD_CODE , ST_FILING_MASTER.PERIOD_NB, ST_FILING_MASTER.ST_ACCT_ID,ST_FILING_MASTER.ST_ID, ST_MASTER.NA_ID FROM ST_FILING_MASTER INNER JOIN ST_MASTER ON ST_MASTER.ST_ACCT_ID = ST_FILING_MASTER.ST_ACCT_ID AND ST_FILING_MASTER.UNFILED = – 1 INNER JOIN NA_NAMES ON ST_FILING_MASTER.NA_ID = NA_NAMES.NA_ID WHERE ST_FILING_MASTER.DEPT = Department AND ST_MASTER.ACCOUNT_NO LIKE @staccountnb_0 and year_id = Year ID ORDER BY NA_NAMES.NAME_INDEX, ST_MASTER.ACCOUNT_NO, ST_FILING_MASTER.YEAR_ID, ST_FILING_MASTER.DEPT, ST_MASTER.CATEGORY_CODE, ST_FILING_MASTER.PERIOD_CODE, ST_FILING_MASTER.PERIOD_NB

— STOP —

Style Editor (Technical Specification)

Style Editor – Technical Specification

Version 6.0 (In Development)

Overview

Examples of how the style editor can be used withing expressions.

Here are some examples of the expressions for the new Text Style property in the OFD:

  • In this case, the style with ‘Header’ is always applied:

‘Header’

  • This expression applies the Style ‘Recent’ for properties built after 2000, ‘Normal’ for properties built after 1980 and the style ‘Old’ in the rest of cases:

Case(True,
@ attrYear_Built > 2000, ‘Recent’,
@attrYear_Built > 1980, ‘Normal’,
‘Old’)

  • This expression applies the style ‘Level1’ when the attribute Level=1, and the style ‘Level2’ when the attribute Level=2.

‘Level’ + Str(@attrLevel)


101-std-fea-037-spec


0 votes, average: 0.00 out of 50 votes, average: 0.00 out of 50 votes, average: 0.00 out of 50 votes, average: 0.00 out of 50 votes, average: 0.00 out of 5 (0 votes, average: 0.00 out of 5)
You need to be a registered member to rate this.
Loading...

Text Style Editor

Text Style Editor

Version 6.1

Overview

Adding Text and Foreground / Background Styles to User Forms

Use the Text Style Editor in GNA to create styles for the text that appears on your forms as headings or labels, and to create foreground and background colors. These are applied to the elements on the user form in the OpenForms Designer (OFD). The following chart lists the elements and the corresponding styles they support:

TextStyleChart.png

Read More...

Documentation

To read or download this information as a pdf, cick on the following link:
101-std-fea-037-TestStyleEditor.pdf


Accessing the Text Style Editor

To access the Text Style Editor:

  1. Launch GNA.
  2. Select Editors > Text Style Editor.

The styles that are already created are listed in the tree view on the left.

Creating a New Text Style

To create a new Text Style:

  1. Click New on the Text Style Editor.
  2. Enter a unique code in the Code field.
    The Code is required in the expression that you use to apply the style.
  3. Enter short and long descriptions in the English and French Short and Long Description fields.
    The descriptions make it easier for users to search through existing styles.
  4. Select a font and font size from the Font drop-down lists.
  5. Select the Bold, Italic, Underline, or Strikethrough buttons to apply character styling.
  6. Select a color from the Foreground drop-down list.
    The foreground color is applied as follows.

    • Labels, Attributes: To the text in the label
    • Groupbox or Tab control: All the text, for example all the labels, within the groupbox, tab, or other item
  7. Select a color from the Background drop-down list.
    The background color is applied as follows.

    • Labels, Attributes: To the area behind the text.
    • Groupbox or Tab Control, Custom Controls: To the area within the item, excluding the attributes
      Note:Background color can be applied to attributes separately.
    • Rows, Columns, Grids, Tab Items, Custom Entities: No background color is applied to these items.
  8. Click Save.

Applying the Text Styles

To apply a Text Style, add an expression to the Text Property in the Open Forms Designer, as described in the following procedure.
To apply a Text Style:

  1. Launch the Govern OpenForms Designer (OFD).
  2. Open the applicable form.
  3. Select the entity.
  4. Select the item to which you want to apply the text style.
  5. Select the Text Style property in the Property Explorer on the right.
  6. Click the ellipsis button to open the Expression Selector.
  7. Enter the expression in the Expression text box.
    The simplest expression is the code for the text style within single quotation marks, such as ‘Header’ to apply the Text Style identified by the Code Header. You can make the expression more complex in order to apply a text style only under a certain condition.
    For example, you could highlight parameters that a user needs to update based on the current data input.
  8. Click OK on the Expression Selector.
  9. Click Save on the OFD form.

Scenario: Applying a Text Style to a Heading

You can apply a Text Style in order to create a Heading that stand out above a groupbox or gird.
To apply a text style to a heading:

  1. Launch the Govern OpenForms Designer (OFD).
  2. Open the form on which you want to add the heading.
  3. Select the entity.
  4. Select the Label in the Controls list box.
  5. Drag it above the groupbox or grid.
  6. Select the label.
  7. Enter a name for the label in the Text property.
  8. Select the Text Style property in the Property Explorer on the right.
  9. Click the ellipsis button to open the Expression Selector.
  10. Enter the code for the heading surrounded by single quotation marks, or apostrophes, as in the following example:
    BoldHeading
  11. Click OK on the Expression Selector.
  12. Click Save on the OFD form.

The same procedure can be used to add a text style to any item on the form.

Scenario: Applying a Text Style Based on a Condition

You can add a Text Style to any expression in order to apply a text style under a condition. For example, you could use a text style to highlight a group box that contains fields that need to be filled only under certain conditions.
In the following example, the Correlated Values group box is highlighted when the Correlated Values method is selected on the CAMA Property Information form.
To apply a text style under a condition:

  1. Launch the Govern OpenForms Designer (OFD).
  2. Open the form on which you want to add the heading.
  3. Select the entity.
  4. Select the Correlated Values groupbox.
  5. Select the Text Style property in the Property Explorer on the right.
  6. Click the ellipsis button to open the Expression Selector.
  7. Enter the following expression:
    If(@attrMETHOD_IN_USE=5, ‘YellowBack’, ‘’)’
  8. This expression is added to a Case statement.
    The code for the text style is enclosed in single quotation marks.
    It is applied if the Correlated Values method, Code 5, is selected.
  9. Click OK on the Expression Selector.
  10. Click Save on the OFD form.

Scenario: Applying Different Text Styles Under Different Conditions

This scenario is the same as the previous one, except that different text styles are applied according to the method selected.
The expression for this is as follows:

Case(True,@attrMETHOD_IN_USE=1,’BlueBackground’,@attrMETHOD_IN_USE=2,’RedBackground’,@attrMETHOD_IN_USE=3,’GreenBackground’)

This expression applies the following backgrounds, or highlights, to items in a groupbox according to the method selected:

  • Appraisal Cost: Blue Background
  • Comparable Sales: Red Background
  • Income DIR: Green Background

What’s New

In the OpenForms Designer (OFD), you can work in Preview Mode to see how styles are applied on the user form, as you work.


101-std-fea-037


0 votes, average: 0.00 out of 50 votes, average: 0.00 out of 50 votes, average: 0.00 out of 50 votes, average: 0.00 out of 50 votes, average: 0.00 out of 5 (0 votes, average: 0.00 out of 5)
You need to be a registered member to rate this.
Loading...


Govern System Dictionary (SY_DICT_DESC)

System Dictionary (SY_DICT_DESC)

Version 6.0

Overview

The system dictionary tables (Table: SY_DICT_XXXX), have historically been used to manage and maintain form descriptions in the Govern database.
There are four SY_DICT_XXXX tables in the Govern database. They are as follows:

  • SY_DICT_DATANAMES – Legacy table from Govern for Windows; this table is still maintained during Verify DB process to keep track of structure and for indexing. (May be dropped in OpenForms Release 6.1)
  • SY_DICT_DESC – Active table that is used to maintain descriptions. Refer to process to generate missing dictionary entries.
  • SY_DICT_TABLES – Legacy table from Govern for Windows; this table is still maintained during Verify DB process to keep track of structure and for indexing. (May be dropped in OpenForms Release 6.1)
  • SY_DICT_VIEW – Legacy table from Govern for Windows; table is still maintained during Verify DB process to keep track of structure and for indexing. (May be dropped in OpenForms Release 6.1)

Of the four (4) databases, there is only one table that is relevant to OpenForms, (Table: SY_DICT_DESC). The three remaining tables are only relevant to Govern for Windows, and may be, at some point eliminated in later version 6.1 releases.

Maintenance Process

As indicated above, in OpenForms, the SY_DICT_DESC table is used to manage and maintain form descriptions through the Verify Database process in the Govern New Administrator (GNA).

Verify Database

The following is a description of the DB Verification actions that directly impact the collection of SY_DICT_XXXX tables. The action is used to generate Missing Dictionary Entries. This is an explanation of the process.
During the Check Column process, Govern manages the description of the fields in the SY_DICT_DESC Table.

  1. The Database Verification file, MSGDatabaseStructMods.xml is read.
  2. The content of the SY_DICT_DESC table is read, the columns of each table are reviewed, and the SY_DICT_DESC.DESCRIPTION (ENG / FRA) is verified as to whether it exists.
  3. If an entry does not exist, it will need to be created, i.e. (ADD), or removed (DROP); in cases when a complete removal of a table is required, any description that is connected to it is also removed.

Only the following columns in (Table: SY_DICT_DESC) are updated:

  • LANGUAGE
  • TABLE_NAME
  • FIELD_NAME
  • DESCRIPTION – There is a 50 character limitation, i.e. all characters after the 50th are truncated.
  • DETAIL – Uses the ‘DESCRIPTION’ property.

Generate Missing Dictionary Entries

Select this option to update the dictionary. This populates (Table: SY_DICT_DESC) with data from the user validation tables; i.e., the tables beginning with VT_USR.

Recommended Use

This process should be run under the following conditions:

  • When configuring the system for the first time
  • After updating the database
  • Anytime that data is missing from user forms.

Modification of process starting from the following release:

  • 6.0.1603.0410 / 6.0.1606.0010 / 6.0.1608.0006
  • 6.1.1603.0481 / 6.1.1606.0021 / 6.1.1608.0016

Custom Entities

Users that create their own custom entities should note that the Verify Database process will not overwrite their descriptions. If there are two entities with the same table/column, the SY_DICT_DESC.DESCRIPTION will be taken from the last label entered. As long as modifications are only made to the custom entities that were created there will be no issues will descriptions being overwritten.


101-std-fea-038


0 votes, average: 0.00 out of 50 votes, average: 0.00 out of 50 votes, average: 0.00 out of 50 votes, average: 0.00 out of 50 votes, average: 0.00 out of 5 (0 votes, average: 0.00 out of 5)
You need to be a registered member to rate this.
Loading...