User Interface
Govern
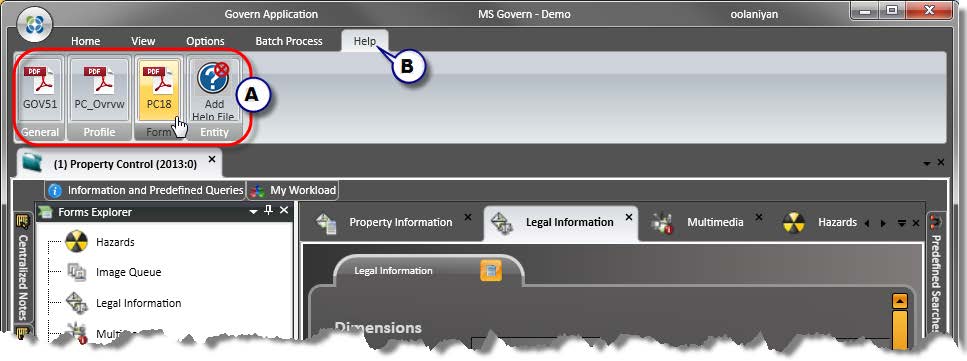
For a user to open the Help file within the Govern application, they will need to select the Help tab in the ribbon of the Govern application (A). Under the ribbon, the help content which corresponds to the Application, the Profile, the displayed Open Form, and the Entity is displayed (B).
- Applications – Content corresponding to the suite Application; the General group
- Profile – Help content for the Profile
- Form – The help content for the displayed Open Form
- Entity – Help content related to the Entity
- Report – This is the Report associated with the form or entity.
The Help button displays information for the main application, and the OpenForm Help will display Help content that is related to the active OpenForm.
Missing / Unavailable Help Content
When content is not present the broken help link icon is displayed. This icon is an indication that there is an issue with accessing the Help file(s). Issues can be anything from the files not being present or incorrect directory structure due to a change in the Open Forms General Settings form in GNA; the Help Folder Structure Type parameter may have been changed.To correct this situation, users will need to either:
- Place the required content in the appropriate directory
OR
- Verify that the Help Folder Structure Type parameter setting in the Open Forms General Settings form in GNA is set to the correct Help folder structure.
Help Content Directory Structure
Open Form Hierarchy
The Open Forms hierarchy is as follows with order of precedence decreasing from left to right.
The above hierarchy is reflected in the structure of the Help directories and subdirectories.
Order of Precedence for Help files Directories
When a user calls the help file, the Govern system first checks in the Custom folder. If the requested file is not found, it will default to the Standard folder to display the file. The Custom folder is reserved for users that want to generate their own custom PDF help files.
Directory Structure
As illustrated in the grid illustration, the structure of the Help directory is multi-leveled. The <HELP ROOT> refers to the root level of the help directory, and not the actual deployment installation of the Deploy EZ application.
Grid illustration examples:
- Standard (same level option)
- The versionNum directory will be a version number, i.e. 5.1, 5.2, 6.0,…
- Custom (same level option)
- The structure for the Custom directory is nearly identical to that of the Standard directory.
- The exception is that the Version directory is not present at Level 1. All sub-directories are shifted up by one level.
- Custom (profile option)
- Different profiles will require the same report. When the Profile option is selected in the System Registry, the different profiles will be using the same report.Copies of the same report are placed in the different Profile directory.
![101-std-fea-002-GOV60-(UI HelpStruct-StdDir-SameLvl)-[v6.0].png](https://kb.harrisgovern.com/wp-content/uploads/2018/09/101-std-fea-002-GOV60-UI-HelpStruct-StdDir-SameLvl-v6.0.png "101-std-fea-002-GOV60-(UI HelpStruct-StdDir-SameLvl)-[v6.0].png") |
| STANDARD – SAME LEVEL option |
![101-std-fea-002-GOV60-(UI HelpStruct-CustDir-SameLvl)-[v6.0].png](https://kb.harrisgovern.com/wp-content/uploads/2018/09/101-std-fea-002-GOV60-UI-HelpStruct-CustDir-SameLvl-v6.0.png "101-std-fea-002-GOV60-(UI HelpStruct-CustDir-SameLvl)-[v6.0].png") |
| CUSTOM – SAME LEVEL option |
![101-std-fea-002-GOV60-(UI HelpStruct-CustDir-ProflOptn)-[v6.0].png](https://kb.harrisgovern.com/wp-content/uploads/2018/09/101-std-fea-002-GOV60-UI-HelpStruct-CustDir-ProflOptn-v6.0.png "101-std-fea-002-GOV60-(UI HelpStruct-CustDir-ProflOptn)-[v6.0].png") |
| CUSTOM – PROFILE option |
Click the diagram to enlarge and open in a new window
Setup
GNA – System Registry (xxx)
Default folders & options
The directory structure, as in previous releases, has two (2) principal subdirectories, Standard, and Custom. Both the Standard and Custom directory structures are set by the system and should not be modified by the user. The structure, and how the system will access the Custom directory can be determined by the user through settings in the Govern New Administration (GNA). There are two (2) options to choose from in the form. [to be verified]
To open the form, in the GNA, select System Parameters > General Settings Editor…
In the Open Forms General Settings editor, select the following:
- Under the Registry Filter, select General.
- Locate the General Section Name, available options are Profile or Same Level.
- The selection of Profile or Same Level, are dependent upon user requirements.
Same Level option
Users that are content with the Property Control (PC) profile that is the system default should use the Same Level option. The same profile will be used by all departments, i.e. the same Open Forms will be accessible to all users. All users will be viewing the same help content for the active forms.
| NOTE: The Same Level option is the system default. |
Profile option
In situations when different profiles are required for the same, or different departments customized profiles will need to be designed. For example, a PC profile that is created for the Assessors department may not necessarily be the same one used by the Public Works department. As the Profiles and Forms are different, the Help content may not be the same. Some confusion regarding functionality may arise unless specific instructions are provided. In this situation, the option for Profile should be selected. With the Profile option, content is placed in a separate directory that corresponds to each customized profile.
| NOTE: Changing the parameter after the directory structure has been established is not destructive to the custom help content, but it will no longer be available until the settings are restored. |
![101-std-fea-002-GOV60-(UI HelpStruct-Schema)-[v6.0].png](https://kb.harrisgovern.com/wp-content/uploads/2018/09/101-std-fea-002-GOV60-UI-HelpStruct-Schema-v6.0.png "101-std-fea-002-GOV60-(UI HelpStruct-Schema)-[v6.0].png") |
| Help Content Directory Structure – Click image to open in new window. |
GSM – Security & Custom Folders
There is no security imposed on the Custom Help directories. This is the default setting for the installation. Administrators that wish to limit user access to these directories will have to do so using Windows security. Security settings will also need to be done on a user by user basis.
Custom HELP Directories
Security
There is no security imposed on the Custom Help directories. This is the default setting for the installation. Administrators that wish to limit user access to these directories will have to do so using Windows security. Security settings will also need to be done on a user by user basis.
Security Best Practices
BEST PRACTICES – SECURITY
The recommended security setting for administrators that require user restriction to directories, is as follows:
- All top level Help directories should be set to READ ONLY. for the Custom folder.
- In order for users to be able to add or update custom content, sub-directories of the top level Custom folder should be made accessible, i.e. READ / WRITE for users. This will allow them to place help in the directories when required.*
|
| NOTE: The structure of default Standard, and Custom folders should not be modified. |
Users are not required to create directories for the Custom Help folder; the structure established during installation must be kept in order for the content to be available.
| NOTE: Unless additional files are required, the help content are in PDF format. Any additional formats that are mentioned above are files that are supplemental to the PDF with the main help content. |
| NOTE: When including any supplemental content, users must ensure that the file format is supported by the end-users system; e.g. if a MicroSoft Office PowerPoint document is to be one of the supplemental files, a PowerPoint viewer or a fully licensed version must be installed on the installation computer. |
Note: Network traffic …
Custom HELP Content Nomenclature
CUSTOM HELP CONTENT NOMENCLATURE
- Lower case names should be used.
- Users should try to limit filenames of help content to no more than 12 characters because the group will expand to accommodate the name. See image below
- Limit the length of directory names directories; try not to exceed 12 characters
- Use the underscore character “_” in place of spaces. Ex. parcel_asmnt
- Ensure that the extension of the file is supported by the end-user’s system that the content will be viewed on.
- As a result of the brevity required for the filename, a detailed description of the Help Content can be entered using the Resource File editor in GNA. The node that contains this information is located in the WD module, CustomHelp function. The Keys for tool tips will be appended with an _TT in the names.
|
Refer to the Govern New Administration (GNA) Resource File editor. <LINK>
Help files Administration
Downloading
Deploy EZ option
Creating
The Govern application is designed to be flexible, with the understanding that users are able to design forms and reports. It is therefore expected that they may have a requirement to customize their Help files contents. When users customize Govern, supplementary help content can be created in one of two (2) ways.
- Annotate existing system Help files
- Generate new content with new PDF files
Annotating System Help Files
Users may annotate, i.e. add Notes, to existing system PDF files that correspond to the modules. Although system files should not be modified, there are steps that can be taken to ensure that system integrity is maintained.
Annotation Best Practices
BEST PRACTICES – ANNOTATING SYSTEM FILES
When annotating system PDF files, users should make a complete back up of the installed files. Only the copied files should be annotated and placed in the Custom folder. Original system files will remain in the Standard folder. |
Generating PDF Help Files
When generating a PDF file with custom content, in order for the system to recognize the custom PDF file, it must have the same name as the one that is used in the Govern application or module.
For example, the Hazards (PC24) OpenForm in the Property Control module has been customized. A new PDF file is made containing custom instructions. In order for it to be accessible, the new PDF file should have the same name as the system default Help file. For Hazards the file is PC24.pdf; when this file is created, it should then be placed in the appropriate subdirectory in the Custom folder.
| NOTE: When a custom PDF is placed in the Custom folder, it is not necessary to remove the system default help file in the Standard folder. System files should never be modified. |
Adding or Replacing Help Content
There are two zones to the Help content ribbon in Govern. Zone 1 which contains the icon for the help content file is the area to click when you need to access the content. Zone 2, when selected, will give access to the directory that the content is located in.
| NOTE: In instances where there is no help content and the broken help link icon is displayed, a click on the link will also display the directory. |
The directories at the custom content is to be placed in is easily accessible with a click on the icon under the Help tab in the Govern ribbon.
Upgrades
The subject of upgrades is undergoing validation. News will be forthcoming.


 Loading...
![101-std-fea-002-GOV60-(UI HelpStruct-StdDir-SameLvl)-[v6.0].png](https://kb.harrisgovern.com/wp-content/uploads/2018/11/101-std-fea-002-GOV60-UI-HelpStruct-StdDir-SameLvl-v6.0.png "101-std-fea-002-GOV60-(UI HelpStruct-StdDir-SameLvl)-[v6.0].png")
![101-std-fea-002-GOV60-(UI HelpStruct-CustDir-SameLvl)-[v6.0].png](https://kb.harrisgovern.com/wp-content/uploads/2018/11/101-std-fea-002-GOV60-UI-HelpStruct-CustDir-SameLvl-v6.0.png "101-std-fea-002-GOV60-(UI HelpStruct-CustDir-SameLvl)-[v6.0].png")
![101-std-fea-002-GOV60-(UI HelpStruct-CustDir-ProflOptn)-[v6.0].png](https://kb.harrisgovern.com/wp-content/uploads/2018/11/101-std-fea-002-GOV60-UI-HelpStruct-CustDir-ProflOptn-v6.0.png "101-std-fea-002-GOV60-(UI HelpStruct-CustDir-ProflOptn)-[v6.0].png")
![101-std-fea-002-GOV60-(UI HelpStruct-Schema)-[v6.0].png](https://kb.harrisgovern.com/wp-content/uploads/2018/11/101-std-fea-002-GOV60-UI-HelpStruct-Schema-v6.0.png "101-std-fea-002-GOV60-(UI HelpStruct-Schema)-[v6.0].png")