Govern Ribbon Search

Standard Feature – Ribbon Search

Release 6.0.1903.0374 (Govern only) | 6.0.1904.0515 (Govern only)
Release 6.1.1911.0497 (All applications) | 6.1.1912.0513 (All applications)

Overview

The Govern Knowledge Base (KB) Search has been incorporated into the Govern Ribbon as part of the Help online help feature. This KB Search field is visible over all Govern suite applications for release 6.1. In addition, the display of the search field is persistent even if the ribbon is minimized.

NOTE: Users must ensure that they have internet access, a compatible browser, and an active account to access to the Knowledge Base.

Configuration

Govern New Administration (GNA)

In order to display the Ribbon Search field, it is necessary for an Administrator to run the Verify Database process in the Govern New Administration (GNA).

Security Manager (SM)

It will then be necessary to have the Security option in GSM configured to allow the user to see the KB Search in the ribbon.

The security applied is the same for all applications, except for the OpenForms Designer (OFD) which does not offer a securable node.

Presentation

This KB Search is available in the following applications (for the versions 6.1.1911 and 6.1.1912 only):

  • Govern (Ribbon)
  • GNA (Ribbon)
  • GSM (Ribbon)
  • QT (Ribbon)
  • BED (ToolBar)
  • BSC (ToolBar)
  • OFD (ToolBar) – Note that the presentation of the KB Search field is slightly different in the OFD. The text label appears as KB Search in comparison to the other suite applications where the field label reads as Knowledge Base. The behavior is the same in all applications

Using the Knowledge Base (KB) Search

The steps to use the KB Search are as follows:

  1. Enter a keyword in the Search field located at the upper right-hand side of the ribbon.
  2. Press Enter or if you are using version 6.1, click on the magnifier icon.

Your default browser is launched and you will be transferred to the search page of the Govern Knowledge Base website (https://kb.harrisgovern.com/), the results of the keyword(s) you have searched for are displayed in your browser.

NOTE: This Help search field is placed at the top level of the ribbon, and it is visible when any of the top-level tabs are selected, e.g. Home, View, Options, and so on.

Related Topics

Govern Search
Govern Quick Search
Quick Search Index Group Editor
Govern Search Technical Specifications

Saved Datasets
Dynamic Search Objects
Dynamic Search Styles
Dynamic Search Groups

Govern New Administration (GNA)


101-std-fea-047


0 votes, average: 0.00 out of 50 votes, average: 0.00 out of 50 votes, average: 0.00 out of 50 votes, average: 0.00 out of 50 votes, average: 0.00 out of 5 (0 votes, average: 0.00 out of 5)
You need to be a registered member to rate this.
Loading...

Expressions

Expressions

Overview

Expressions are used in Govern OpenForms, version 6.0 and above to perform a wide variety of tasks within a Govern entity, such as:

  • Performing a validation
  • Performing a mathematical operation
  • Performing a computation
  • Executing a selection query
  • Displaying the value of an unselected attribute on a form
  • Attaching a condition to an entity or control; i.e., enabling it or making it visible only if a certain condition is met

Where to Add Expressions

Read More...

Expressions can be added at the entity level and on most controls in the OFD.

They can also be associated with a calculated value for an attribute or a validation rule in the Business Entity Designer. Expressions that are added to the OFD are not saved in the database.

The correct syntax must be applied as described in the following table as well as the document available from the following link. The following topics are described in the document:

  • General Procedures for Adding Expressions
  • Deleting an Expression
  • Types of Expressions
  • Adding an Expression to a Govern Form
  • Adding an Expression at the Entity Level
  • Adding an Expression to a Control
  • Applying Formatting to Expressions
  • Adding Text in an Expression
  • Displaying the Field Description
  • For Further Reference

Documentation

To view or download this information as a pdf, click on the following links:

About Expressions

Expressions.pdf

Expression Reference

ExpressionReference.pdf

Notes

  • Expression evaluation. We can test the expressions in the Expression Selector editor, before adding it to user or administrative form. When you enter your expression, the required parameters, including those inside queries, appear in a list. Enter applicable values to test the validity of the expression.
  • Convert null parameters to default values. By default, all parameters that have a null value will now be converted to a default value (0 for numeric, empty string for strings, 01/01/0001 for dates). This means that you no longer need to use IsNull( ) around all your parameters. However, if you need the old behavior (to use different default values, for example) you just have to uncheck the “Convert null parameters to default values” option.

What’s New

  • Variable: You can use a variable in an expression.


Expressions

Expressions are used throughout Govern OpenForms. They are created in the Expression Selector, available in various administrative forms in GNA, in the Business Entity Designer (BED) and in the OpenForms Designer (OFD). For detailed information, see OpenForms Designer and the Business Entity Designer (BED).

Expression Description Example / Syntax Result
Abs Returns the absolute value of a specified number.
Acos Returns the angle whose cosine is the specified number. Acos(1) 0
Asin Returns the angle whose sine is the specified number. Asin(0) 0
Atan Returns the angle whose tangent is the specified number. Atan(0) 0
Case Evaluates the first parameter in the function and returns the first value that matches in the following list of options. Case(@attrID, when @attrID = 2 this returns ‘two’
1, ‘One’,
2, ‘two’,
3, ‘three’)
Ceiling Returns the smallest integer greater than or equal to the specified number. Ceiling(1.5) 2
Cos Returns the cosine of the specified angle. Cos(0) 1
Date Returns the current date or the date part of a given date and time. Date() Returns the current date.
Date(@attrDATE) Returns the date part of an associated attribute.
Date(#‎11/‎26/‎2014 3:34:05 PM#) Returns 11/26/2014
DateAdd Adds to the current date and time the given number of years, quarters, months, weeks, etc. (either positive or negative). DateAdd(‘year’, 2) Returns the current date and time + 2 years.
The list of available date parts is {Day, DayOfYear, Hour, Minute, Month, Quarter, Second, Weekday, WeekOfYear, Year}. The case is insensitive. DateAdd(‘year’, 2, @attrDATE) =>. Returns the date and time of the attribute + 2 years
DateAdd(‘month’, -2) => Returns the current date and time – 2 months.
DateAdd(‘year’, 2, @attrDATE) => Returns the given date and time + 2 years.
DateAdd(‘month’, -2) => Returns the current date and time – 2 months.
DateDiff Calculates the difference between two given dates and times (either positive or negative). DateDiff(‘year’, @attrDATE1, @attrDATE2) Returns the number of years between the dates and times of two associated attributes.
The list of available date parts is {Day, DayOfYear, Hour, Minute, Month, Quarter, Second, Weekday, WeekOfYear, Year}.
These are case-insensitive.
DateDiff(‘week’, @attrDATE1, @attrDATE2) Returns the number of weeks between the dates and times of two associated attributes.
See https://msdn.microsoft.com/en-us/library/microsoft.visualbasic.dateinterval(v=vs.110).aspx for more details about
this list.
DateDiff(‘minute’, @attrDATE1, @attrDATE2) Returns the number of minutes between the dates and times of two associated attributes.
Day Returns the current day or the day part of a given date. Day() Returns the current day
Day(@attrDATE) Returns the day part associated with an associated attribute.
Day(#11/‎26/‎2014 3:34:05 PM#) 26
Day(#11/‎26/‎2014#) 26
Display Returns a string representation of the attribute value. ‘Land Use Code: ‘ + @attrLUSE_CODE.Display Returns the item selected from the Land Use Code drop-down list.
Double Returns the double representation, or a copy, of the value. Double(“7”) 7
Exp Returns e raised to the specified power. Exp(0) 1
Floor Returns the largest integer less than or equal to the specified number. Floor(1.5) 1
Floor(3.5) 3
Floor(-3.5) -4
Format Formats the first parameter using the style defined in the second parameter. Format(@attrAMOUNT, ‘c’) Returns the value in the attribute AMOUNT formatted as currency.
Format(123.45, ‘0000.0’) Returns 0123.5
HasValue If the field contains a value, the expression returns True. Returns False if the parameter is Null or empty. HasValue(@attrBLDG_VALUE) Returns True if a value is entered in the Building Value field. If the field is empty or Null, returns False.
IEEERemainder Returns the remainder resulting from the division of a specified number by another specified number. IEEERemainder(3, 2) -1
If Returns a value based on a condition. If(4/2 = 2, ‘abc’, ‘def’) ‘abc’
In Returns true if an element is in a set of values. In(@attrId, 4, 5, 6) true when @attrId is 4, 5 or 6
IsNull If the parameter is Null, the expression returns the second parameter. Otherwise the first parameter is returned. IsNull(@attrID, 0) If @attrID is Null, a 0 is returned.
IsNullOrEmpty ( ) If the parameter is Null or Empty, the expression returns the second parameter. Otherwise the first parameter is returned. IfNullOrEmpty(@attrID, 0) If @attrID is null or Empty a 0 is returned
IsNullOrWhiteSpace ( ) If the parameter is null Or Empty Or White Spaces, it returns the second parameter. Otherwise the first parameter is returned. IfNullOrWhiteSpace(@attrID, 0) If @attrID is NULL or Empty or White Spaces, a 0 is returned
Len Returns the length of the specified string. Len(‘Main Street’) Returns 11
Note that characters in the length are counted from one, starting index one. Use the Evaluate feature of the Expression Editor to test this.
Ln(e) Ln(e) returns 1.
Log Returns the logarithm of a specified number. Log(1, 10) 0
Log10 Returns the base 10 logarithm of a specified number. Log10(1) 0
Lower Converts all letters in the specified string to lowercase. Lower(‘Main Street’) Returns main street.
Max Returns the larger of two specified numbers. Max(1, 2) 2
Min Returns the smaller of two numbers. Min(1, 2) 1
Month Returns the current month or the month part of a given date. Month() Returns the current month.
Month(@attrDATE) Returns the month part of an associated attribute.
Month(#11/‎26/‎2014 3:34:05 PM#) 11
Month(#11/‎26/‎2014#) 11
Now Returns the current date and time. Now() 11/‎26/‎2014 3:34:05 p.m.
Pow Returns a specified number raised to the specified power. Pow(3, 2) 9
Query Executes a query and returns the first value in the first row. Syntax: Returns the result from GetParcelName.
Note: As a best practice, write queries that return only one row and one column. Query(‘QueryName’)
Example 1: Query(‘GetParcelName’)
Syntax: Returns the result from GetQuantity with a maximum cache of 2 minutes.
Query(‘QueryName’, n)
Example 2: Query(‘GetQuantity’, 2)
Syntax: Returns the tax map number from the first row of the results.
Query(‘QueryName’, ‘ColumnName’)
Example 3:
Query(‘GET_P_ID’, ‘Tax_Map’)
Syntax: Returns the tax map number from the first row of the results, with a maximum cache of two minutes.
Query(‘QueryName’, ‘ColumnName’, n)
Example 4:
Query(‘GET_PARCEL_ID’, ‘Tax_Map’, 2)
Round Rounds a value to the nearest integer or specified number of decimal places. The mid number behavior can be changed by using EvaluateOption.RoundAwayFromZero during construction of the Expression object. Round(15.5,0) Round(3.2222, 2) 3.22
Round 0 Use the zero (0) to rounds to 0 decimal places using banker’s rounding: The value is rounded to the nearest even number. Round(16.5,0) 16
Sign Returns a value indicating the sign of a number. Sign(-12) -1
Sin Returns the sine of the specified angle. Sin(0) 0
Sqrt Returns the square root of a specified number. Sqrt(4) 2
Str Returns the string representation of a value. Str(5) ‘5’
Substr Returns a substring of the first parameter from the x-th character defined by the second parameter on a length defined by the third parameter. Substr(‘abcdef’, 2, 3) ‘cde’
Note that characters in the substring are counted from zero, starting index zero. You can use the Evaluate feature on the Expression Editor to see how the characters are counted.
Tan Returns the tangent of the specified angle. Tan(0) 0
Truncate Calculates the integral part of a number. No rounding is applied. Truncate(1.7) 1
Upper Converts all letters in the specified string to uppercase. Upper(‘Main Street’) Returns MAIN STREET
Variable Creates a variable that can be added to an e-mail, for example. {
Name = ‘Govern’;
Amount = Query(‘getAmount’) + 500;
Tax = Amount * .15;
}
Establishes variables for e-mails, etc.
Year Returns the year part of a date. Year() Returns the current year.
Year(@attrDATE) Returns the year part of an associated attribute.
Year(#‎11/‎26/‎2014 3:34:05 PM#) 2014
Year(#‎11/‎26/‎2014#) 2014


Allowed Expressions

This section lists the expressions that are allowed in Govern OpenForms. The same interface is used for adding expressions throughout the Govern OpenForms Product Suite.
The list of expressions is available if you open the Expression Selector and hit [Ctrl] + the space bar. When you begin typing the first couple of letters of a syntax, a tooltip appears. The tooltip provides the same information as the following list.

For Further Reference

For further reference, refer to the following:
Numeric Formats
For numeric formats, see https://msdn.microsoft.com/en-us/library/y006s0cz(v=vs.90).aspx or https://msdn.microsoft.com/en-us/library/4fb56f4y(v=vs.90).aspx
Date Formats
For date formats, see https://msdn.microsoft.com/en-us/library/362btx8f(v=vs.90).aspx or https://msdn.microsoft.com/en-us/library/73ctwf33(v=vs.90).aspx
Dates and Date Parts
For dates and date parts, see https://msdn.microsoft.com/en-us/library/microsoft.visualbasic.dateinterval(v=vs.110).aspx for more details about this list.

Where to Add an Expression

The table on the following page lists the levels (form, entity, and attribute), and the controls (label, link, action button, groupbox, tab, etc.) and shows where you can add an expression for the user forms. Detailed information and examples are provided in the Govern OpenForms Designer and Business Entity Designer guides. This section provides a brief overview:

  • Form / Business Model: Govern user forms are based on the business models created in the Business Entity Designer (BED). Expressions cannot be added to a business model or a user form (OFD form). They can be added to a business entity – a divider within a form – and to most controls.
  • Business Entity: Business Entities are created in the Business Entity Designer (BED). They must be added to business models. You can add an expression as a validation rule in the BED, or the Record Description or the enabling or visibility properties in the OpenForms Designer (OFD).
  • Custom Entity: Custom Entities are created in the OpenForms Designer (OFD) in order to add specialized controls or code to the form. You cannot add an expression to a Custom Entity. However, the custom entities must be added to a form with a root entity. You can add expressions to the root entity of the form.
  • Attribute: Attributes are the data entry fields on a user form. They are created in the BED and added to business entities. They are mapped to database columns or can be stand alone. You can add an expression to an attribute as a default value, a calculated value, or as a validation rule in the BED, or the enabling or visibility properties in the OFD. If you want to perform a calculation that is not saved to the database, but is displayed on a form, you can create a stand-alone attribute or add a label to the form and add an expression to the label.
  • Controls: Expressions can be added to the enabling or visibility properties of labels, links, action buttons, custom controls, groupboxes or tabs. They cannot be added to grids, rows, columns, or to custom entities. For further information, see the Govern OpenForms Designer and Business Entity Designer guides.
Level Application Type
Form OFD N/A
BED N/A
Entity OFD Allow Save, Allow Delete Allow Update Record Description
BED Validation Rule
Attribute OFD IsEnabled IsVisible
BED Validation Rule Default Value Calculated Value
Label OFD IsEnabled IsVisible Expression (Any)
BED N/A
Link OFD IsEnabled IsVisible
BED N/A
Action Button OFD IsEnabled
BED N/A
Custom Control OFD IsEnabled IsVisible
BED N/A
Row or Column OFD N/A
BED N/A
Grid OFD N/A
BED N/A
Groupbox OFD IsEnabled IsVisible
BED N/A
Tab OFD IsEnabled IsVisible
BED N/A
Custom Entity OFD N/A
BED N/A

Examples

Expressions are used throughout Govern for different. Click on the Examples list to see different examples on how they can be used.

System Type Applicable to Description Examples
BED Validation Rule Entities and Attributes Business Rules on Save bed01
Calculation & Formatting Numeric and Text Attributes Saved Attributes and Calculated Fields definition bed02
Properties (True/False) Business Entities and Attributes Sets properties (Is required / is audit / is central notes allowed … ) bed03
OFD On/Off (True/False) Visibility Set properties (Is enabled / Is visible for labels, fields, action buttons…) ofd01
On/Off (True/False) Security Set properties for (Allow delete / insert / save action buttons ….) ofd02
Entity Record Selector Defines Record selector (mini browse) info to display ofd03
GNA Profile Query (Coolbar) Coolbar Info Used to set conditional labels, action items, icons, links, etc. gna01


Videos

Click to link to a video preview of Using Expressions in Govern.
Click to see the “Become an Expressions Ninja” Video

See Also

In addition to the expression elements and functions developed by Govern, the Microsoft Codeplex Librairies Open Source project was integrated. An expression has access to the FORMS Attributes and Govern IDs. The expressions are binded to the form entity and are executed as soon as a change is detected. Logical Operands can be used and Govern Queries can be executed.


100-Expressions


0 votes, average: 0.00 out of 50 votes, average: 0.00 out of 50 votes, average: 0.00 out of 50 votes, average: 0.00 out of 50 votes, average: 0.00 out of 5 (0 votes, average: 0.00 out of 5)
You need to be a registered member to rate this.
Loading...

101-std-fea-024-ofr

OpenForms Standard Feature – Form Generic Link Controller Setup

Version 6.0 / Version 6.1

Overview

This standard OpenForms Controller can be added to a form to provide a Link to another Form. Two (2) versions of the controller exists, depending on the underlying business rules and whether it is allowed to delete a link once it has been established.

  1. Without Delete Capabilities (CO_GenericLink_Control)
  2. With Delete Capabilities (CO_GenericLinkWithDelete_Control)

Prerequisites

The following conditions are required for form setup in order to enable the Controller.OpenForms Designer Setup:

  1. The Form’s ID Setters Properties must contain the Linked to Form Govern ID (i.e. NA_ID, P_ID, ST_ID, AR_ID, and so on…)
  • The Govern ID must be displayed in the search GRID used for the Linked Form

Profile Security

  • The Linked to Form must be available in the profile (GNA)
  • The user must have security access (GSM) to the profile’s form.

Configuration

Configuration of this controller occurs in the Govern OpenForms Designer (OFD) application. Two (2) versions of the controller exist. The version used will be dependent on the underlying business rules required; i.e. whether once the link has been established, will be allowed to be deleted.

Control to use

Link without Delete

  • Without delete capabilities (CO_GenericLink_Control)

Link with Delete

  • With delete capabilities (CO_GenericLinkWithDelete_Control)

For more information, refer to the following:

OpenForms Designer (OFD)

Controller Setup

Adding a Custom Control to a Form

To add the Custom Control…
1. In the OpenForms Designer (OFD), drag the Custom Control Icon to the desired area (row or column, group.. ) on the form.
Custom Control Form Configuration
2. Once the Custom Control is displayed on the form, click on the inserted control object to configure it. The following parameters are to be completed:
Layout

  • Height
  • Horizontal alignment
  • Margin
  • Text style
  • Vertical alignment
  • Width

Action

  • Assembly Name = Msgovern.OpenForms.CustomControls.dll (by default)
  • Class Name = CO_GenericLink_Control OR CO_GenericLinkWithDelete_Control

Custom Control Properties

  • Allows the selection of current ID (Will automatically show the current Govern ID item and the user will be allowed to select it)
  • Current ID Description
  • Header Override
  • Selected Description
  • Selected Form Name
  • Selected ID Code (na_id, pid, …)
  • Selected Search Group
  • Selected Search Style
PROPERTIES Setting Description
ID
Element ID N/A (set by system) System generated information
Layout
Height Height of the form
Horizontal alignment Stretch Aligns the text at the top and left of the cell. Increases the width
of the column if the text is long and requires more space.
Margin 7,3,7,3 Margins are used to ensure that there is space between
items on the user forms. Defaults are for the right, top, left,
and bottom margins.
Text style Expression to specify the text style
Vertical alignment Stretch Aligns the text at the top and left of the cell. Increases the
width of the column if the text is long and requires more
space.
Width If required, enter a value for the width of the label inside
the cell in the Width text box.
Misc
Action MsGovern.OpenForms.CustomControls.dll
CO_GenericLink_Control
Is enabled Hidden on load Hidden on Load hides the Browse screen from view when the
record is loaded to the form.
Is tab stop Checkbox is selected if a tab sequence number is entered.
If deselected the tab sequence number is removed.
Is visible Selected Select the checkbox
Name CO_GenericLink_Control
Properties
AlternateAttributeName This is optional. By default, we use an attribute with the same
name as SelectedIdCode to get the id we want to link to. If we
want to use a different attribute we can set it here. For example,
if we want to use the attribute REF_ID.
NEW!AutoCloseModalWindowExpression This will allow the setup of an expression that can automatically
close the modal
window when clicking on: Save button or Cancel button
CurrentIdDescriptionQueryName This query gives the description to use for the CurrentId option
when using AllowSelectCurrentId.
DefaultSelection
FastNameCreation
HeaderOverride This is optional. It sets the control header.
NEW! OpenFormAsModal Opens the link as a modal window. When using this, a new
instance of GovernIds is used so that the current profile
GovernIds won’t be affected by the modal form when open.
QuickSearchIndexGroup
SelectedDescriptionQueryName Description that is displayed for the selected ID.
SelectedFormNameInProfile Form to open.
SelectedIdCode The Govern ID that is set when the link is clicked.
SelectedSearchGroup Search group
SelectedSearchStyle Search style
SuggestedLinksQueryName Select a query for the description (Optional)
Tab sequence number


Specific Configurations

In the OFD, depending on the controller use, configure the target form as illustrated below.

Generic Link Controller

PROPERTIES Information
Browse
Columns Click to edit
Hidden on load
Show on left
Size 150
Controller
Controller MsGovern.OpenForms.CustomControls.dll
CO_GenericLink_Controller
Controller properties
Misc
SelectedIdCode na_id – name id
SelectedSearchGroup
SelectedSearchStyle stAccountByName – Retrieve ST Account

Linked to Name Controller

PROPERTIES Information
Browse
Columns Click to edit
Hidden on load
Show on left
Size 150
Controller
Controller MsGovern.OpenForms.CustomControls.dll
LinkedToName_Controller
Controller properties
Misc
SelectedSearchGroup naName – Name Search
SelectedSearchStyle

Linked to Self-Reported Tax Controller

PROPERTIES Information
Browse
Columns Click to edit
Hidden on load
Show on left
Size 150
Controller
Controller MsGovern.OpenForms.CustomControls.dll
LinkedToSelfReportTax_Controller
Controller properties
Misc
SelectedSearchGroup
SelectedSearchStyle stAccountByName – Retrieve ST Account

Troubleshooting

The following are some issues that may arise during configuration, their possible resolution.

Issue: Form was designed for a different Govern ID access (P_ID, NA_ID), but the setup is the same.
Possible Resolution:

  • The ID Setters properties for the entity must be configured.
  • The Govern ID must be displayed in the GRID

Issue: The form does not work.
Possible Resolution:

  • Form was designed for a different Govern ID access (PID_ NA_ID, and so on…) than the controller property.
  • The form’s ID Setters properties must be configured on the form

Issue: Cannot select existing name or property
Possible Resolution:

  • The select existing feature requires to have the Govern ID displayed in the GRID of the search result


Related Topics

Govern OFD MANUAL Govern OpenForms Designer, version 6.1 see Chapter 3 – Links
Standard Feature Overview


101-std-fea-024-ofr


0 votes, average: 0.00 out of 50 votes, average: 0.00 out of 50 votes, average: 0.00 out of 50 votes, average: 0.00 out of 50 votes, average: 0.00 out of 5 (0 votes, average: 0.00 out of 5)
You need to be a registered member to rate this.
Loading...

OF Std. Feature – Form Generic Link Controller

OpenForms Standard Feature – Form Generic Link Controller

Version 6.0 | Version 6.1

Overview

Generic Links is a custom control that manage adding links to a related parent item. For example, it may be used to link an owner to a property name and address. The Generic Link Controller (CO_GenericLink_Controller) is attached to a form that allows users to retrieve a Govern ID attribute from the result of an eSearch query. The resulting ID can then be added to a form to provide a link to a name or property.

NOTE: There are two (2) controllers that inherit from it, linked to Name and ST, and both are used in the License to Name feature.

Functionality

An existing key will display the description with a link that will display a configured form. It is critical that this form is in the same profile.
Non-existent keys will be displayed as Radio Buttons. Upon saving the form, a new key and a new record will be displayed in the corresponding table. This will feed the entity attribute that is mapped to the key. When the Radio Button is selected, there will be a search for an existing key. this key will feed the entity attribute mapped to the key.
The controller will search for a Govern ID that will be sent to a corresponding attribute. The LinkedToName_Controller specifies an NA_ID as its Govern ID and the LinkedToSelfReportTax_Controller specifies an ST_ACCT_ID; both are then used by the License to individual Form. The CO_GenericLink_Controller can be setup on any form that…:

  • Does not have a controller already installed.
  • Contains a Govern ID attribute that matches the ID name that the controller has been configured with.

Configuration

Configuration of this controller occurs in the Govern OpenForms Designer (OFD) application.
Refer to the Form General Link Setup page for details.

What’s New

Related Topics

Form General Link Controller Setup
Standard Form General Link Controller Overview
Govern OpenForms Designer V6.1 User Manual – See Chapter 3 – Links


101-std-fea-024


0 votes, average: 0.00 out of 50 votes, average: 0.00 out of 50 votes, average: 0.00 out of 50 votes, average: 0.00 out of 50 votes, average: 0.00 out of 5 (0 votes, average: 0.00 out of 5)
You need to be a registered member to rate this.
Loading...

Record Selector Feature

Standard Feature – Record Selector (aka ‘Mini Browse’)

Overview

When a sales tax record has multiple accounts, users can browse these accounts with navigation arrows located on the tab, or the drop down menu of the Record Selector.
By default additional accounts with the record are numbered, but we can further customize this dropdown menu with information that is relevant to the account. This is done through the OpenForms Designer (OFD). The Record Selector can be looked upon as a sort of “Mini Browser” to quickly view the individual accounts with a Self-Reported Business Tax record. Browsing can be enhanced with customization of the record information that is displayed.

Customization

In the OFD the Record Selector is customized with the “Record description” property. To customize the information displayed in the Record Selector display…

  1. Open the OFD.
  2. Click the icon to open the form to be modified; e.g. Business Tax (ST007).
  3. Select the tab that contains the Record Selector; for ST the Tax Account tab.
  4. On the Right-Hand Side (RHS), locate the Record description property.
  5. Click the ellipses button to display the Expression Selector form.
  6. In the Expression Selector form enter you statements in SQL format.
NOTE: The parameters that are to be displayed in the Record Selector, as in SQL, are concatenated with a “+“. Requested attributes are preceded with “@attr“. As there is real-time validation in this editor. Only valid attributes are displayed, any errors with your statements are displayed.

In the Expression Selector, the Evaluate group can be used to preview your result.
To test your statements…

  1. In the Evaluate group, enter values for the requested attributes in the fields that are displayed; these fields correspond with those requested in your SQL statement.
  2. Click Execute to display a preview of the results. If any errors are displayed, review your statements for correctness.
  3. After testing, click OK.
  4. Back in the OFD, click Save to save your changes.

Viewing a Customization in GNA

To view the results of a customization, click Options (tab) > Refresh.
Ensure that you are viewing the Record Selector on the tab that you have modified. Each tab with a Record Selector must be modified individually.

Related Topics

Govern Standard features.


101-std-fea-028


0 votes, average: 0.00 out of 50 votes, average: 0.00 out of 50 votes, average: 0.00 out of 50 votes, average: 0.00 out of 50 votes, average: 0.00 out of 5 (0 votes, average: 0.00 out of 5)
You need to be a registered member to rate this.
Loading...

OFD – Main Browse Feature

Standard Feature – Main Browse

Overview

The browse feature is available to all standard OpenForms in most Govern module applications. The attributes and their position in the data grid can be customized and totals can be added to the list.
For instance, the Self-Reported Business Tax Main Browse allows users to quickly browse filing records in an easily hidden pane within the form; previously the Browse would open in a separate window, this has now been incorporated into the main form as an expandable window.

Configuring the Main Browse

Read More...

The Main Browse is customized in the OpenForms Designer (OFD) using the parameters found under the Browse property. In the OFD, open the form and select the tab to be configured. on the right hand side expand the Browse property to display configurable parameters such as:

  • Columns – Select the columns to be displayed. Columns are configured by a “drag & drop” from the Available column to the Selected column.
    NOTE: If no columns have been configured to be displayed, the Main Browse icon will not appear on the OpenForm tab.
  • Hidden on load – Displayed when the form is opened, otherwise opened with a click on the icon. Select Hidden on Load to hide the Browse screen when the record is loaded to the form. The Browse screen can be opened at any time with a click on the Browse button.
  • Show on left – Display the pane vertically on the left of the pane, otherwise horizontally
  • Size – Specify the width (if vertical) or height (if horizontal)

When all selections have been made, click OK to accept the choices. Click Save to accept any changes that have been made to the form.

Viewing the Customization

To view the changes to the form that were made in the OFD, on the Govern ribbon, either select Options (tab) > Refresh, or close, then reopen the application. When enabled, the Main Browse is accessed through an icon that appears beside the Record Selector on the form tab. The button functions as a “toggle” that displays/hides the browse screen.

Searching in the Browse Data Grid

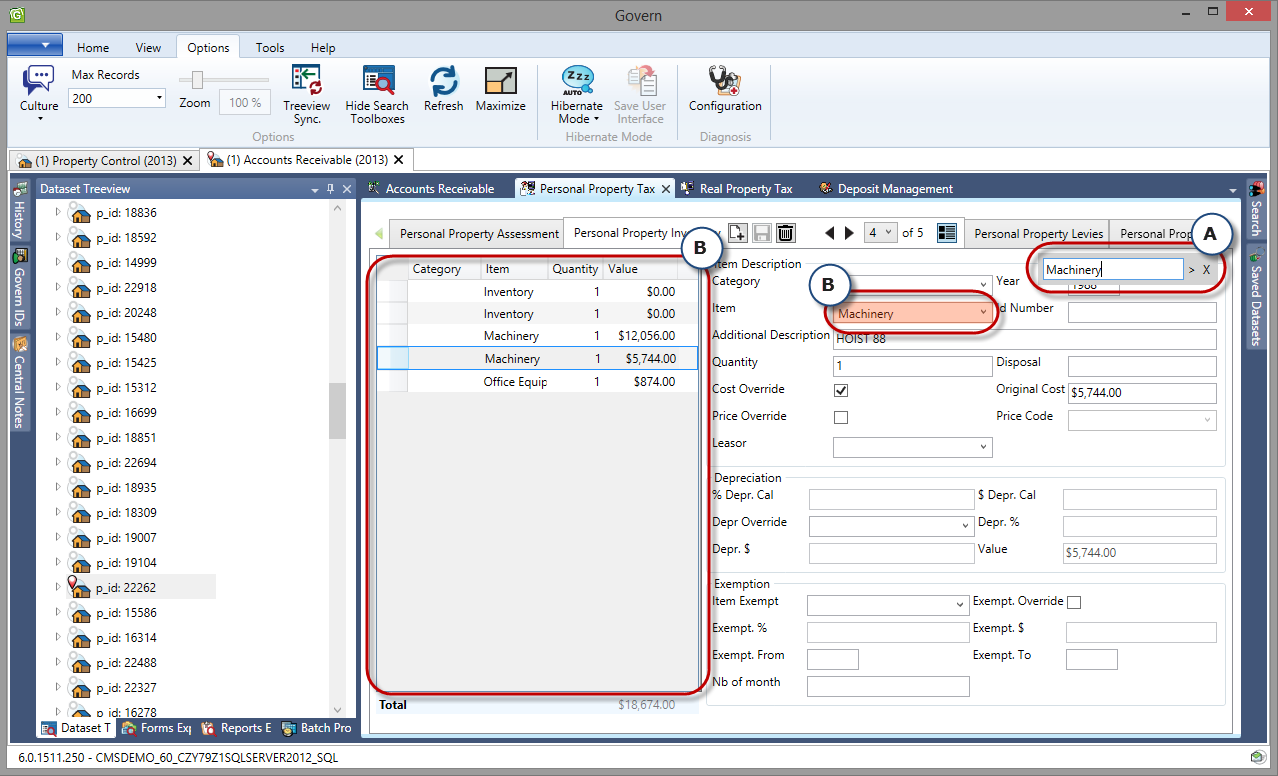
As a default, the Browse datagrid screen associated with the Personal Property Detail form is docked on the left side of the Govern user interface. When listed, should the number of records retrieved in a search exceed the size of the results display area, it becomes difficult to locate and select specific records. For example when there are 100 or more records retrieved in a search, it can be a challenge to select a single record at a glance. Currently the Govern UI has a Ctrl + F keyboard command to search the content of an OpenForm; this search is also applied to the Browse datagrid.

The User Interface (UI)

The search user interface consists of single line parameter (A) that is invoked with a Ctrl + F keyboard combination.

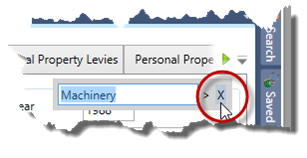
Closing the Field

When no longer required, placing a cursor in the search field to activate, followed by a click on Escape (Esc) will close the field. Alternatively, the Search field may also be closed with a click on the “x” on the right hand side of the field.
101-std-fea-029_MainBrowse01.png

Performing a Search

To perform a search of the Browse datagrid pane…

  1. Click on the form to focus on it.
  2. Press the Ctrl + F key combination.
  3. Type the required value in the parameter and press enter.

101-std-fea-029_MainBrowse02.png

If the item required is available within the OpenForm or in the Browse data grid pane (B), the Ctrl + F will locate it. The located result will be highlighted. When there are multiple entries with the same search value, pressing enter repeatedly will cycle through all valid results (B).

Configuration

To implement the search feature, no additional configuration is required by an administrator or the end-user.

Related Topic(s)

Govern Standard features.


What’s New

[6.0] New User Interface
[6.0] As of GA release 1511, a Search Feature was implemented within the Browse Data Grid

Standard AR Controller – Create AR Payment Action Button (101-ar-fea-024)

Standard AR Controller – Create A/R Payment Action Button

Overview

NOTE: The following specifications will change due to enhancements, and as such may change.

This standard controller can be setup on different Account Forms (Real Property, Misc. Billing, Self-Reported Tax…) in order to provide the user with an Action Button to create an A/R payment for the users to enter payments, deposits or voluntary payments against this Account.

  • The Create A/R Payment button can be used for all Sub-Systems (Real Property, Self-Reported Tax, Personal Property, Miscellaneous Billing, etc.)
  • The AR Record to pay is determined by the action button controller setup….
  • This action button can be secured by profile user and role.

Functionality

This controller is used in different standard Forms distributed with the system. It can also be added and configured on a customized form.

NEW! The action button will open a Cash Collection Form in a modal window. When the form is opened, the focus will be on the Cash Collection tab. Next, a new Data Payment Entry record is created. The Subsystem and Transaction Type will be set to the ones specified in the action button properties. Note that these fields will be disabled in the Cash Collection form. If there are any ID’s, or a payer name is specified, they will be auto-loaded and set. When the payment is saved, the AR Detail links will be added if needed. At the end of the process, if required, the Cash Collection is closed.

Configuration

To add or configure this controller on a a form see below:


Read More...


Govern New Administration (GNA)

To configure in GNA…

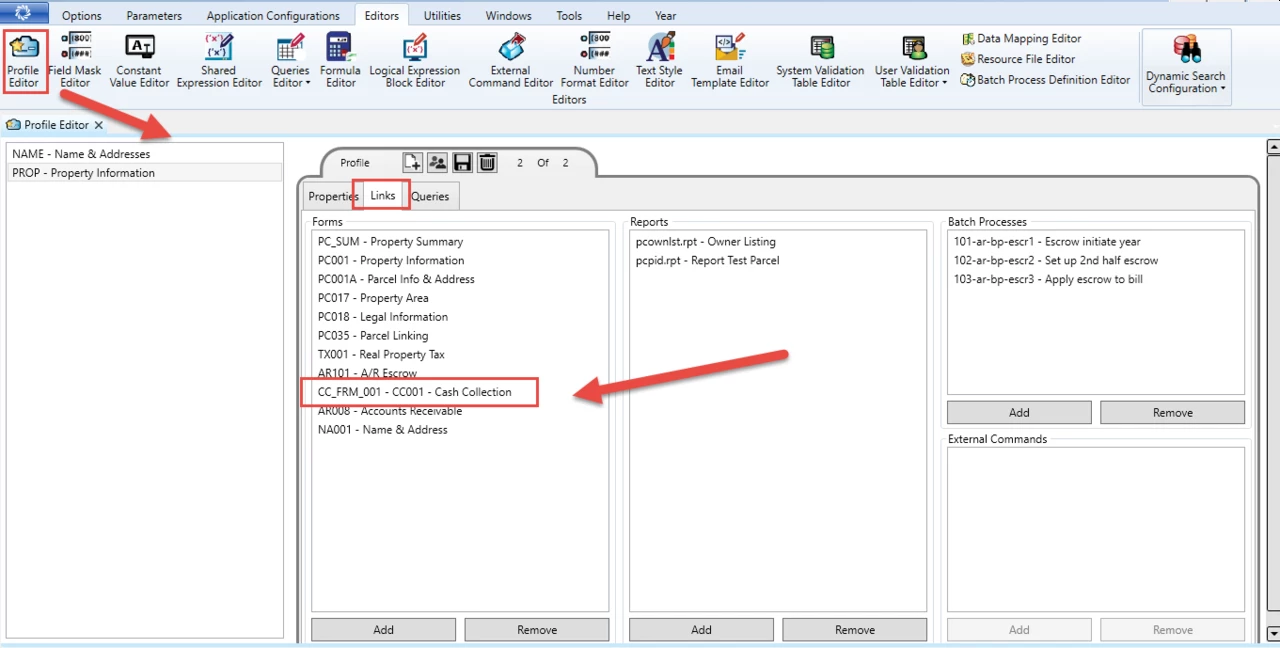
  1. On the GNA ribbon select Editors (tab) > Editors (group) > Profile Editor.
  2. In the Profile Editor, ensure that you have linked the cash collection form that will be opened by the AR Create Payment action button.

OpenForms Designer (OFD)

In the OFD, follow these steps…

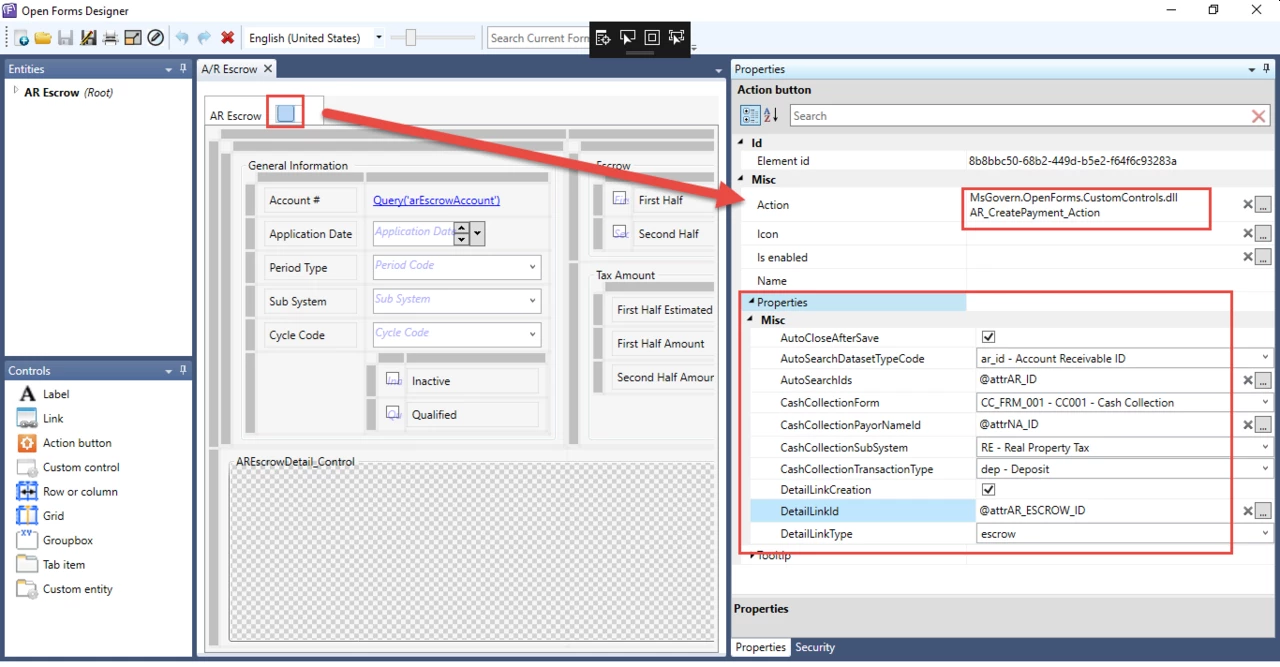
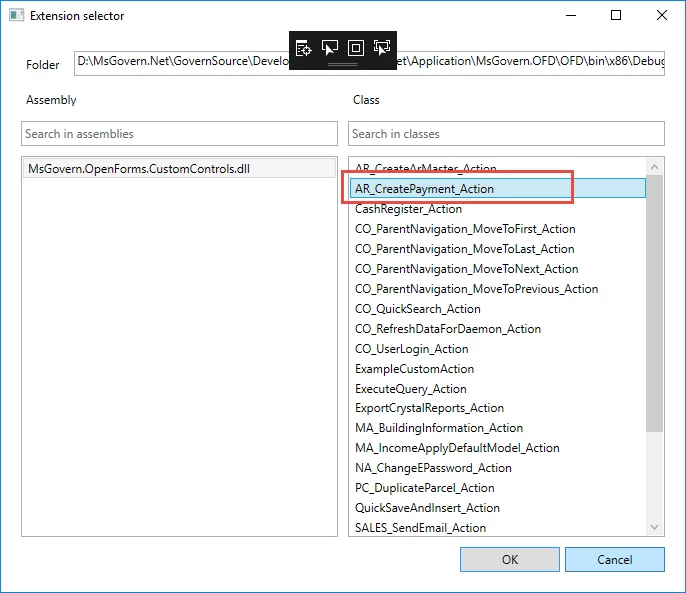
  1. Select the action for action button, i.e., the Ar_CreatePayment_Action.

The following are the available properties with their associated descriptions.

  1. AutoCloseAfterSave : When checked, the modal window in which the cash collection form was opened will be closed after the completion of the payment.
  2. AutoSearchDatasetTypeCode : Chose the Dataset Type code that defines the ids that you want to auto load (e.g ar_id, p_id)
    • If this is not set the Auto load will not function properly
  3. AutoSearchIds : An expression that returns a list of ids seperated by “;” that you want to load in the cash collection form automatically
    • E.g of a the output of a the expression = “10;30;100” or “20”
    • If this is not set the Auto load will not function properly
  4. CashCollectionForm : The form that you want to open for the payment.
    • This must be a form that is linked to the current profile
  5. CashCollectionPayorNameId : An expression that returns a na_id that you want to set as the default payor for the payment
  6. CashCollectionSubSystem : The subsystem for the payment transaction.
  7. CashCollectionTransactionType : The transaction type for the payment transaction (Note: The transaction field on the cash collection form will be disabled so you should use this property to set the correct transactiontype)
  8. DetailLinkCreation : If checked, a detail link will be created for all the Ar Details that are created for the payment transaction.
  9. DetailLinkId : An expression that returns the link id that will be inserted for the new ar details links (AR_DETAIL_LINK.LINK_ID)
    • If this is not set, no detail link will be created even if the DetailLinkCreation property was set to true.
  10. DetailLInkType : The type for the new detail links (AR_DETAIL_LINK.LINK_TYPE)
    • If this is not set, no detail link will be created even if the DetailLinkCreation property was set to true.


Contact your System Administrator or Business Analyst for more information on this feature implementation in OpenForms.


Related Topics


101-ar-fea-024


0 votes, average: 0.00 out of 50 votes, average: 0.00 out of 50 votes, average: 0.00 out of 50 votes, average: 0.00 out of 50 votes, average: 0.00 out of 5 (0 votes, average: 0.00 out of 5)
You need to be a registered member to rate this.
Loading...