SSRS – Changes to Handling of SSRS Reports (301-ssrs-util)

Changes to Behavior of SQL Server Reporting Services (SSRS)

Version 6.1.2206.0142 / 6.1.1811.2019

Overview

The following contains a description of the changes to the behavior of the SSRS feature in Govern

New Features and Changes in Behavior

Parameter Setup Changes

Users should note that parameters are no longer setup in the Reports Parameters screen. This screen will display only the run options that have been configured in GNA.

Possible “Run on” options that can be displayed are as follows:

On Database – Is configured to do not pass any record that is listed in the Govern Dataset Treeview.

On Recordset – Select this option when the SSRS report is to process a set of records. *

On Current Record – Select this option when the SSRS report is to process the current record.*

Changes related to Recordsets

The Recordsets created by the On RecordSet and On Current Record options come from the DataSet Treeview and are saved into the database (Table: USR_SAVED_DATASETS).
These records are grouped by the field SAVED_SET_NAME with a name like: SSRS_REPORT_GUID, where the GUID is a random GUI text generated at runtime.

Since these new recordsets are temporary, they are automatically removed each time a new SSRS report is executed. The criteria for removal is determined by confirming that SAVED_SET_NAME is like SSRS_REPORT_GUID and the field LAST_MODIF_DATE is older than the day before the current execution. For example, if a report execution is done on 08/10/2022, then all reports created before 08/09/2022 will be removed.

Note the following:

  • The Output tab with the report result is no longer displayed for SSRS reports.
  • The report result will be displayed directly on the default browser pointing to the SSRS server that has been configured for Govern.

New Online SSRS Viewer

In the new online SSRS viewer, the end user must perform the following actions to get the Report.

  1. Select/full fill the Report Parameter fields with the desired values for the report.
  2. Click the View Report button.
  3. A preview for the report will be displayed in the bottom.

To download the report, the user must select any of the output formats for the report with a click on the Save button.

To print the report

  1. Click the Print icon.
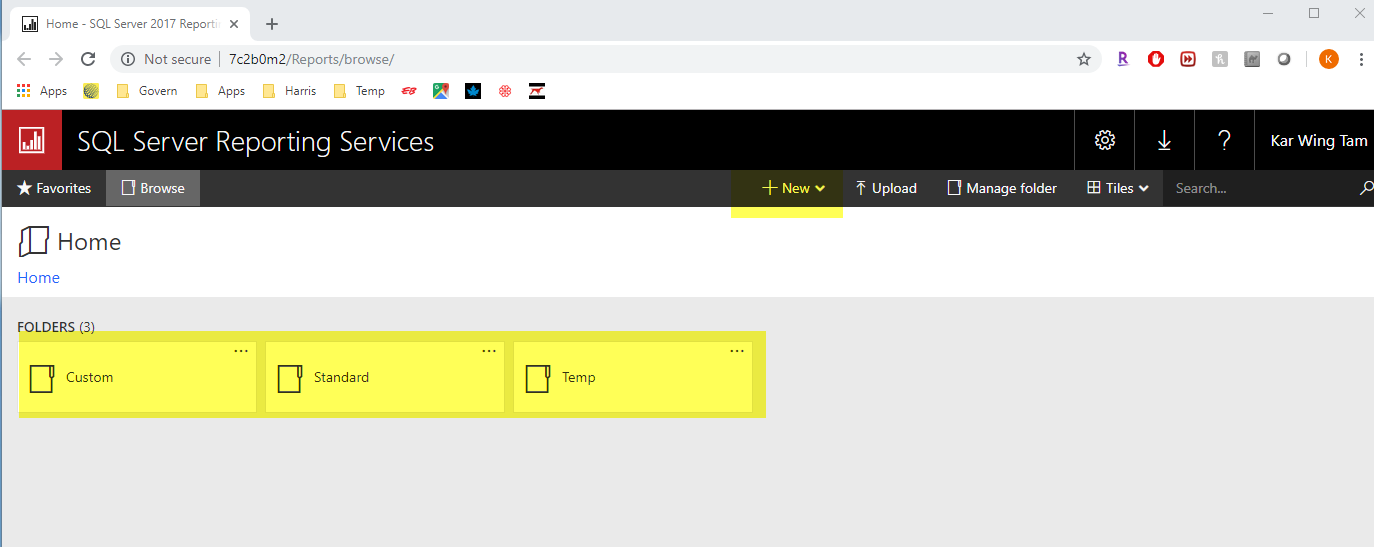
  2. The report will not be modified and will be copied into the TEMP folder, but in order to execute the report, it will keep looking in the Custom and Standard folders configured in the GNA settings.


NOTE: The appearance of the online SSRS screen can vary depending on the SSRS report version installed on the end users server.

This screen will display only the parameters configured as Visible on the report. Hidden parameters are not displayed here and must be configured in GNA under the parameters section in order to map a Govern Id value to them.

Considerations when running an SSRS report

  • At least one Run on option must be selected to run the report.
  • Reports created or edited in Report Builder 3.0 (2014), and the New SSRS Report Builder (2016), are supported and will be executed in Govern.
  • The report must have the SERVER and DATABASE parameters, where the parameters must be configured as:
    • The very first parameters in the report parameters; this because they will be used to configure the datasource.
    • The parameter visibility can be configured as Visible, or Hidden (this is the preferred value).
    • These parameters will be mapped by Govern with the name and database that are to be used to process the report.
    • The DataType must be ‘Text‘.
  • For the options On Recordset and On Current Record,  the report must have a parameter like RECORDSET_{GOVERN_ID} where:
    • {GOVERN_ID} is the Govern ID that will be used to filter the records.
      For example: if the Govern profile that will use the report is configured to use Parcel Ids, then the name for the parameter will be RECORDSET_P_ID.
    • The DataType must be ‘Text‘.
    • The parameter visibility could be configured as Visible, or Hidden (this is the preferred value).
    • A new recordset entry will be created with a dataset name like SSRS_REPORT_{GUID} to store the GovernId, or set of GovernIds that will be used for the operation.
    • These datasets will not be visible to the user in Govern in the Saved Dataset(s) screen.
    • These datasets will be automatically removed from the database after 2 days, upon the next SSRS report execution.
  • The new SSRS report functionality is no longer creating copies in the TEMP folder that is configured in GNA. As a result of this change, it means that the new version is no longer supporting:
    • Add filters on execution time.
    • Display the report output or parameters at govern.

In order to create/add these parameters the SSRS Converter Tool can be used to convert the rdl reports.

See Also

301-ssrs

301-ssrs-util


301-ssrs-util


0 votes, average: 0.00 out of 50 votes, average: 0.00 out of 50 votes, average: 0.00 out of 50 votes, average: 0.00 out of 50 votes, average: 0.00 out of 5 (0 votes, average: 0.00 out of 5)
You need to be a registered member to rate this.
Loading...

SSRS – SQL Server Reporting Services Report Conversion Tool

SQL Server Reporting Services Report Conversion Tool

Version 6.1

Overview

The SSRS Report Conversion tool is a Windows application developed to assist, with some minor manipulations, the conversion of a .rdl report for use in the latest versions of Govern and GNA.

User Interface

When initialized, the SSRS Report Conversion Tool displays as a utility window with input and output parameters.


SSRS Report Conversion Tool Parameters

Input Folder – Click to manually type in the path to the Input folder. This is the path to a physical folder that must contain at least one .rpt file that is to be converted.

[…] Select Folder – Click the ellipsis button […] to navigate to the required folder.

Output Folder – This non-editable parameter contains the path to the folder that the converted reports will be placed. This is always a folder named Converted that will be located under the Input Folder path.

Recordset – This combo-box is a GovernId that will be used to group records in Govern. This should be the same GovernId that is configured for the Profile that will be using the SSRS report.

Convert – Click Convert to run the conversion process.

Files to process: – The Files to process area will display all reports within the Input Folder. After a click on Convert, the report names with their status will be listed along with an indication as whether files were converted successfully, or if any issues were encountered during the process.

About the Conversion Process

Users should note the following about the conversion process:

  • The original .rdl file will not be modified.
  • The output file will always add the Parameters SERVER, DATABASE.
  • The parameters RECORDSET_{GOVERNID} will be added if the value for RecordSet is not empty.
    • For example, if the selected value is p_id, the parameter to add will be RECORDSET_P_ID.
  • The datasource connection string will be overridden with the following:
    =”Server=”+ Parameters!SERVER.Value +“;Database=” + Parameters!DATABASE.Value
  • The reports generated in the Output folder are the ones that should be submitted/replaced in the SSRS Server Folders.


See Also

301-ssrs

301-ssrs-changes


301-ssrs-util


0 votes, average: 0.00 out of 50 votes, average: 0.00 out of 50 votes, average: 0.00 out of 50 votes, average: 0.00 out of 50 votes, average: 0.00 out of 5 (0 votes, average: 0.00 out of 5)
You need to be a registered member to rate this.
Loading...

PDF Reporting (101-std-fea-050)

PDFTM Reporting

Overview

NEW! PDF reporting is a new type of reporting. Using PDF Forms, any user will be able to create a document and create bookmarks with form fields that they want the application to overwrite during the execution of a process.

Process

This process will allow users to create a report definition that uses a PDF Form document as a template and replaces defined bookmarks with values from a query that has been set up by the user. This process will allow…:

  • Allow user to select PDF Form template
  • Allow user to select query that will be used to get values
  • Allow user to specify which column will be used to replace which bookmark
  • Allow user to select the column that will be used in the query to filter the values and which Govern Id to use

Documentation

When available, click here to view or download the documentation containing the steps to create the document.


Related Topics


101-std-fea-050


0 votes, average: 0.00 out of 50 votes, average: 0.00 out of 50 votes, average: 0.00 out of 50 votes, average: 0.00 out of 50 votes, average: 0.00 out of 5 (0 votes, average: 0.00 out of 5)
You need to be a registered member to rate this.
Loading...

MB – Standard Report Recurring Entry Listing

Miscellaneous Billing (MB) – Standard Report Recurring Entry Listing

Specification Overview

Purpose

Identification

  • Process Name:
  • Requirement Number: 16146

Records to be processed:

  • See Selection Criteria


Report User Interface

The following parameters and options are available:

Selection Criteria

Batch Variables


Report Format

The report ….

Standard Report Recurring Entry Listing


101-mb-rpt-001


0 votes, average: 0.00 out of 50 votes, average: 0.00 out of 50 votes, average: 0.00 out of 50 votes, average: 0.00 out of 50 votes, average: 0.00 out of 5 (0 votes, average: 0.00 out of 5)
You need to be a registered member to rate this.
Loading...


MB – Invoice Report

Miscellaneous Billing (MB) – Invoice Report

Overview

Follow the procedures in this section in order to add the ability to print the Miscellaneous Billing Invoice report directly from the Miscellaneous Billing Invoice entity in Govern. Any network printer can be used.

Documentation

to view the information in this page in a comprehensive document, open the following:

101-mb-rpt-003-MBInvoiceReport.pdf

Prerequisites

SAP Crystal Reports 1.3.0.12 or higher is required.


Read More...


General Settings Parameters for Reports

The Miscellaneous Billing Invoice report is available in Crystal Reports. For information on customizing this report, see Customizing a Report on page 4. Otherwise, the following setup is required.
To define the General Settings:

  1. Launch GNA.
  2. Select Parameters > General Settings Editor.
  3. Select Report from the Registry Filter.
  4. Select the Use Crystal Report option.
  5. Enter the path to the Reports folder for your deployment in the Standard Reports Path parameter.
  6. Enter the path to the Custom Reports folder if you have created one. For details, see Customizing a Report on this page.
  7. Enter the path to the log file in the Standard Log Path folder.
  8. Click Save.

For further details, refer to the GNA documentation.

Configuring the Report

The following report must be available in your deployment, before you can print invoices from the Miscellaneous Billing form:
101-rpt-003.rpt Miscellaneous Billing Invoice
This report is included with the FormReference.xml file and imported by the GNA > Import/Export Tool. The changes that you apply to the report in GNA, such as adding an alternative connection key and adding prompts, are not overwritten during the import process. If you want to create a new custom report in Crystal Report or SSRS, follow the procedure under Customizing a Report on page 4.
You can perform the following configuration to add a second datasoure connection key, prompts and criteria to the report. However, this is not a required step.
To configure the report:

  1. Launch GNA.
  2. Select Parameters > Report Parameters Editor.
  3. Select 101_rpt_003.rpt – Miscellaneous Billing Invoice in the tree view.
    This Report Editor reads the report and lists all the datasources referenced.
  4. Click Report Criteria to add a prompt or other criteria to the report. This is an optional step.
  5. Click Save.

Refer to the documentation on the Report Parameters Editor for further details.

Customizing a Report

You can create a custom report to use in place of the standard Miscellaneous Billing Invoice report. The custom report can be created in either Crystal Reports or SSRS. You can save this report to any network directory. You need to enter the path on the OpenForms General Settings > Report form Whenever you launch the report, it is executed from the Custom folder.
Use the following procedure:

  1. Create a new network directory for all your custom reports.
  2. Create the custom report in Crystal Reports or SSRS.
  3. Save your custom cash collection receipt report to this folder.
  4. Ensure that the custom report has the same name as the standard report:101-rpt-003.rpt Miscellaneous Billing Invoice.
  5. Launch GNA.
  6. Select Parameters > General Settings Editor.
  7. Select Report from the Registry Filter.
  8. Select one of the following:
  9. Use Crystal Report
  10. Use SSRS
  11. Enter the path to the custom reports folder that you created in the Custom Report Path parameter.
  12. Enter the path to the Reports folder for the standard reports.
  13. Enter the path to the log file in the Standard Log Path folder.
  14. Click Save.

Refer to the documentation on the Report Parameters Editor for further details.

Printing the Receipt

The receipt can be printed on any printer, either automatically or manually.
The information added to the receipt includes the following:

Account Details

  • Invoice Date
  • Due Date
  • Invoice No.
  • Account No.
  • Reference

Invoice Details

  • Description
  • Quantity
  • Amount / Qty
  • Sales Tax
  • Total per itm
  • Invoice Total


Configuring the Miscellaneous Billing Action Button

The following procedure describes how to add the Report Printing action button to the Miscellaneous Billing form. However, by default, this button is included on the form.
To add this action button:

  1. Launch the Govern OpenForms Designer (OFD).
  2. Open the Miscellaneous Billing (MB001) form.
  3. Select the Invoice Posted entity.
  4. Select the Action Button in the Controls explorer.
  5. Drag it to the top of the form.
  6. Click the ellipsis button beside Action text box.
    This opens the Extension Selector.
  7. Select Only show classes that implement the custom control interface.
    MsGovernOpenForms.CustomControls.dll is displayed under Assembly.
  8. Select ExportCrystalReports_Action on the right.
  9. Click OK.
    This information MSGovernOpenForms.CustomControl.dllExportCrystalReports_Action is displayed in the Properties tab for the Action button on the Miscellaneous Billing form.
  10. Expand the Misc. property and configure the following:
  11. Enter the printer name in the PrinterName property.
  12. Select 101-rpt-003.rpt – Miscellaneous Billing Invoice from the ReportCode property.
  13. Select the export type that you want to generate, such as PDF or Crystal Reports from the ReportExportFormat property.
  14. Expand the Tooltip property.
  15. Enter a tooltip to appear when the user hovers the mouse over the Miscellaneous Billing Invoice Print action button on the Cash Collection form.
  16. Click Save.
  17. Launch Govern and open the Miscellaneous Billing > Invoice Posted form to view the button.

The Miscellaneous Billing Invoice Print button is located on the tab at the top of the form.

Launching the Report from Govern

You can print the report directly from the Miscellaneous Billing form in Govern.
To print the report:

  1. Launch Govern.
  2. Open a Profile that includes the Miscellaneous Billing form.
  3. Open the Miscellaneous Billing form.
  4. Perform a search and load the required Miscellaneous Billing record.
  5. Open the Invoice Posted entity.
  6. Click the Miscellaneous Billing Invoice Print action button.

The report is printed on the printer configured in the Cash Collection Parameters form.


101-mb-rpt-003-invoice


0 votes, average: 0.00 out of 50 votes, average: 0.00 out of 50 votes, average: 0.00 out of 50 votes, average: 0.00 out of 50 votes, average: 0.00 out of 5 (0 votes, average: 0.00 out of 5)
You need to be a registered member to rate this.
Loading...

SSRS – How to Install

How to Install SSRS

The following are the steps required to install Microsoft SQL Server Reporting Services. After successful installation you will be able to use SSRS reports in Govern.

Installation Steps

To proceed you will first need to obtain SQL Server Reporting Services from the Microsoft website.

NOTE: Before any installation, ensure that you have Administrator access to the target computer.
  1. Download Microsoft SQL Server Reporting Services from the following URL: https://www.microsoft.com/en-us/download/details.aspx?id=55252
  2. To install SSRS, click on SQLServerReportingServices.exe.
    • At the first screen click Install Reporting Services.
    • Click to select an edition – select Free: Developer or Free: Express).

      OR

    • Accept the License Terms and click Next.
    • At the Install Database Engine option select Install Reporting Services only. Click Next.
    • At the Specify an install location screen, use the default, or select a path. Click Install.
    • SSRS will be installed.

    • When the installation has completed, restart your computer and prepare to install the Report Server Configuration Manager.
  3. After the system restart, open the Report Server Configuration Manager from the Windows menu.

    1. In the Report Server Configuration Manager screen, at the Report Server Connection prompt, select a server name. This should be the server that contains the SSRS installation.
    2. After the server name has been specified, start the server. Click to select the server on the left hand pane of the Report Server Configuration Manager, and on the right-hand side (RHS), click Start.
    3. At the Report Server Database screen, specify the Report Server Database server.
    4. Next select the option to Create a new report server database.

      At the Change Database prompt, click Database Server on the left hand side. Enter the Server Name, Authentication Type, Username, and Password to test your connection.

      In the Change Database screen, click Database then either use the default or select a name.

      Click Credentials to get the prompt, select an Authentication Type, enter a Username, and a Password.

      Summary of the database, click on next if everything is correct

      On Progress and Finish, click Finish to finish the process.

    5. Select Web Service URL and click on the button Apply

    6. Click on the URL link

    7. Select Database and click on the button Apply
    8. Select Web Portal URL and click on the button Apply
    9. Click on the URL link
    10. Create 3 folders (Standard, Custom and Temp)
    11. Manage folder by adding security to everyone
    12. Refresh the Report Server site, you will see 3 folders
    13. Open the port
    14. Setup SSRS in GNA, go to Parameter\General Settings Editor, choose Report as Registry Filter.
  • Authentication Type – Use the windows integrated security
  • Custom Report Path – Set with the folder named “Custom” created in SSRS previously
  • Standard Report Path – Set with the folder named “Standard ” created in SSRS previously
  • Temporary Report Path – Set with the folder named “Temp” created in SSRS previously
  • URL – The Report Server Web service URL from SSRS
  • Use SSRS – Must be checked to be able to see the menu SSRS in GNA
  • User Domain / User ID / User Password – Will be empty (no need to be set)
You will need to install the Report Builder to be able to change/edit SSRS reports. At the moment you will need to install the version 2014 otherwise you may not be able to edit a Report: https://www.microsoft.com/en-us/download/details.aspx?id=42301


301-ssrs_how-to-install


1 vote, average: 5.00 out of 51 vote, average: 5.00 out of 51 vote, average: 5.00 out of 51 vote, average: 5.00 out of 51 vote, average: 5.00 out of 5 (1 votes, average: 5.00 out of 5)
You need to be a registered member to rate this.
Loading...

MS Word Report Templates

Govern MS WordTM Integration

Overview

When there is a business requirement to create and send simple letters to citizens. These letters when generated will be sent in PDF format. Previously, a Crystal Report or SQL Server Reporting Services (SSRS) report was required with all configuration performed in Govern. For some users this process may not be practical or prove to be overly lengthy, and may require a level of expertise that they do not possess. In some instances clients can have more than 200 letters that are required to be maintained. Govern Word Integration simplifies these types of processes both in configuration, and ease of use.

Process

Using MS WordTM, users are able to create a document, and create Govern specific bookmarks with text markers that the application will overwrite with query results during the generation of the report.

The steps are as follows:

  1. Create the report template document
  2. Create Govern bookmarks and save the document
  3. Place the file in a Custom Reports Folder
  4. Create or identify a query for the Report
  5. Setup a DOCX Report for Govern
  6. Test the Report Output
  7. Make the Report Available to a Govern Profile
NOTE: Steps required to create the required bookmarks in MS Word are explained in the documentation section of this page.

Documentation

Click to view or download the documentation containing the steps to create an MS Word Report Template.


Related Topics


101-std-fea-048


0 votes, average: 0.00 out of 50 votes, average: 0.00 out of 50 votes, average: 0.00 out of 50 votes, average: 0.00 out of 50 votes, average: 0.00 out of 5 (0 votes, average: 0.00 out of 5)
You need to be a registered member to rate this.
Loading...