Standard AR Controller – Create AR Payment Action Button (101-ar-fea-024)

Standard AR Controller – Create A/R Payment Action Button

Overview

NOTE: The following specifications will change due to enhancements, and as such may change.

This standard controller can be setup on different Account Forms (Real Property, Misc. Billing, Self-Reported Tax…) in order to provide the user with an Action Button to create an A/R payment for the users to enter payments, deposits or voluntary payments against this Account.

  • The Create A/R Payment button can be used for all Sub-Systems (Real Property, Self-Reported Tax, Personal Property, Miscellaneous Billing, etc.)
  • The AR Record to pay is determined by the action button controller setup….
  • This action button can be secured by profile user and role.

Functionality

This controller is used in different standard Forms distributed with the system. It can also be added and configured on a customized form.

NEW! The action button will open a Cash Collection Form in a modal window. When the form is opened, the focus will be on the Cash Collection tab. Next, a new Data Payment Entry record is created. The Subsystem and Transaction Type will be set to the ones specified in the action button properties. Note that these fields will be disabled in the Cash Collection form. If there are any ID’s, or a payer name is specified, they will be auto-loaded and set. When the payment is saved, the AR Detail links will be added if needed. At the end of the process, if required, the Cash Collection is closed.

Configuration

To add or configure this controller on a a form see below:


Read More...


Govern New Administration (GNA)

To configure in GNA…

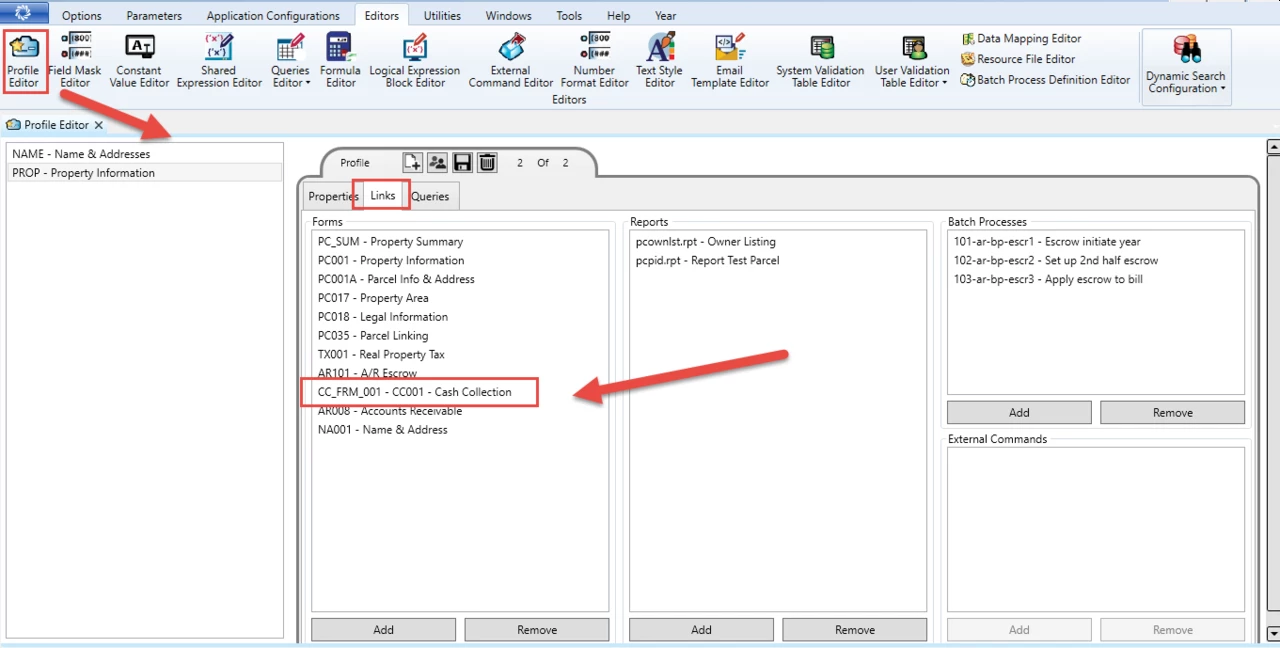
  1. On the GNA ribbon select Editors (tab) > Editors (group) > Profile Editor.
  2. In the Profile Editor, ensure that you have linked the cash collection form that will be opened by the AR Create Payment action button.

OpenForms Designer (OFD)

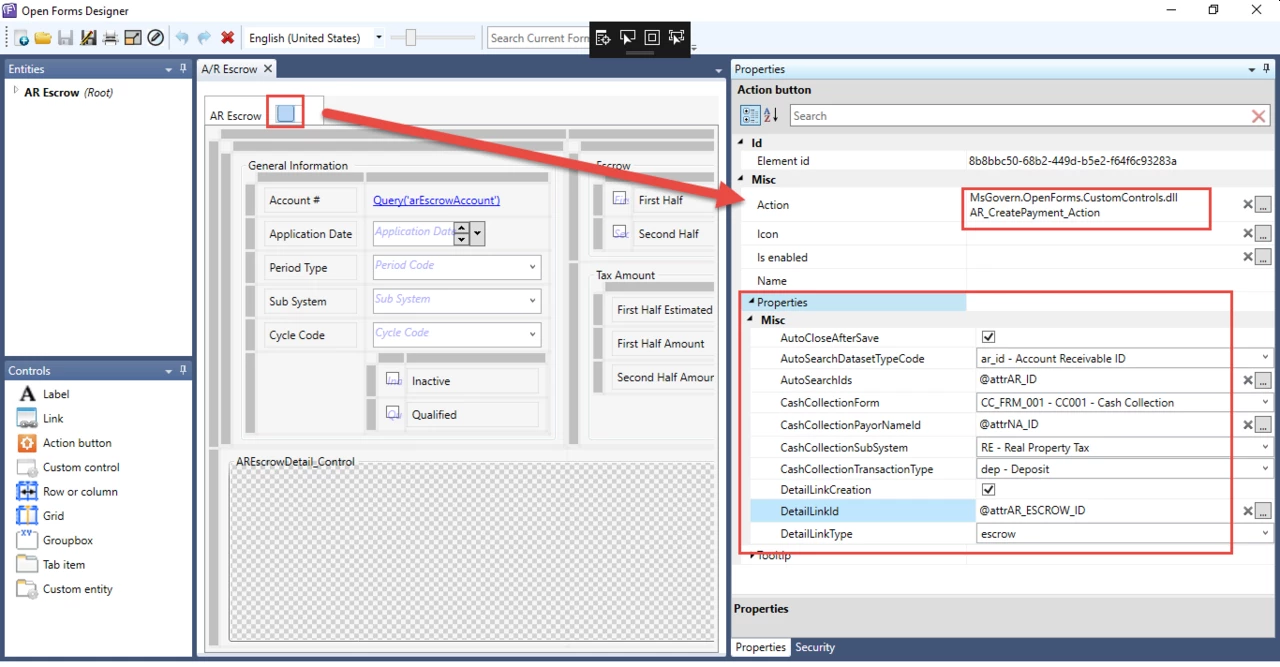
In the OFD, follow these steps…

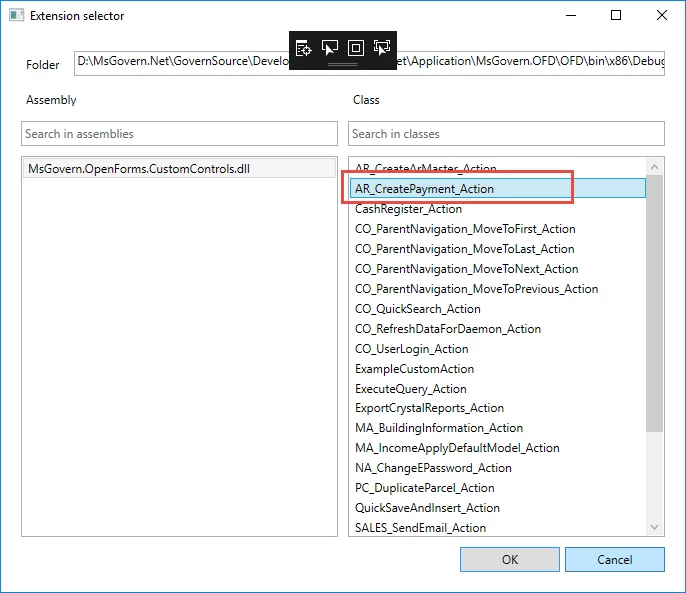
  1. Select the action for action button, i.e., the Ar_CreatePayment_Action.

The following are the available properties with their associated descriptions.

  1. AutoCloseAfterSave : When checked, the modal window in which the cash collection form was opened will be closed after the completion of the payment.
  2. AutoSearchDatasetTypeCode : Chose the Dataset Type code that defines the ids that you want to auto load (e.g ar_id, p_id)
    • If this is not set the Auto load will not function properly
  3. AutoSearchIds : An expression that returns a list of ids seperated by “;” that you want to load in the cash collection form automatically
    • E.g of a the output of a the expression = “10;30;100” or “20”
    • If this is not set the Auto load will not function properly
  4. CashCollectionForm : The form that you want to open for the payment.
    • This must be a form that is linked to the current profile
  5. CashCollectionPayorNameId : An expression that returns a na_id that you want to set as the default payor for the payment
  6. CashCollectionSubSystem : The subsystem for the payment transaction.
  7. CashCollectionTransactionType : The transaction type for the payment transaction (Note: The transaction field on the cash collection form will be disabled so you should use this property to set the correct transactiontype)
  8. DetailLinkCreation : If checked, a detail link will be created for all the Ar Details that are created for the payment transaction.
  9. DetailLinkId : An expression that returns the link id that will be inserted for the new ar details links (AR_DETAIL_LINK.LINK_ID)
    • If this is not set, no detail link will be created even if the DetailLinkCreation property was set to true.
  10. DetailLInkType : The type for the new detail links (AR_DETAIL_LINK.LINK_TYPE)
    • If this is not set, no detail link will be created even if the DetailLinkCreation property was set to true.


Contact your System Administrator or Business Analyst for more information on this feature implementation in OpenForms.


Related Topics


101-ar-fea-024


0 votes, average: 0.00 out of 50 votes, average: 0.00 out of 50 votes, average: 0.00 out of 50 votes, average: 0.00 out of 50 votes, average: 0.00 out of 5 (0 votes, average: 0.00 out of 5)
You need to be a registered member to rate this.
Loading...

BT – Period Validation for AR Deposit in CC Payment Data Entry

Business Tax (BT) Period Validation for AR Deposit in Cash Collection (CC) Payment Data Entry

Overview

This is a new validation in the A/R Payment Data Entry. When a Deposit (DEP) transaction type is attempted in the A/R Self-Reported Tax subsystem without a period, i.e. an ST_ID, one of two things will occur preventing the deposit:

  • The deposit transaction type will NOT BE AVAILABLE FOR SELECTION
  • A validation will be applied (depending on the form)
NOTE: Records from other subsystems, e.g. Land Management (LM), will not create an error state in the form.

Functionality

Depending on the form that the user is making the payment, they will be prevented from making a payment transaction type.

Accounts Receivable

In the Accounts Receivable form, ST records that users try to apply a payment to will be blocked from selecting the Payment option. In the upper Payment grid, the usual right mouse button click on a record displays the floating menu. Selecting the Payment Data Entry menu option will display the Accounts Receivable – Payment Data Entry form. In this form the Payment transaction type will not be available for selection.

Cash Collection

In the Cash Collection Payment Data Entry form, as with the Accounts Receivable form, all record entries from the Self-Reported Tax subsystem, that do not have an ST_ID will be identified. The Accounts grid will be put in an error state, i.e. red border displayed around the grid. When the entry in question is removed, the error state is also removed.

NOTE: Validations will occur when the Transaction Type is changed, or when a record is removed from the grid.

See Also


101-ar-fea-025


0 votes, average: 0.00 out of 50 votes, average: 0.00 out of 50 votes, average: 0.00 out of 50 votes, average: 0.00 out of 50 votes, average: 0.00 out of 5 (0 votes, average: 0.00 out of 5)
You need to be a registered member to rate this.
Loading...

AR – CC – Allow Payment less than Payment Plan Amount

Accounts Receivable (AR) & Cash Collection (CC) – Allow Payment less than Payment Plan Amount

Overview

This feature allows the collection of a payment that is less than the predefined Payment Plan Amount.

User Interaction

In Cash Collection, when a user tries to make a payment that is less than the set minimum to collect, a pop-up message is displayed. This message will block the transaction and prevent the saving of the payment. If the permission is checked, the message will no longer be displayed to the user. The payment can then be saved even if the amount is less than the set minimum that is to be collected.

Setup

To configure this option, you must set the new security parameter in the OpenForms Designer (OFD). This option can be set by Profile or by user for the Cash Collection Form.

NOTE: The default setting for all users for this permission is, False (F) .

In the OFD select… Cash Collection > Payment Data Entry > CCPaymentDataEntry_Control (while in security mode), set the following parameter:

  • Allow to pay less than minimum to collect


101-ar-fea-038


0 votes, average: 0.00 out of 50 votes, average: 0.00 out of 50 votes, average: 0.00 out of 50 votes, average: 0.00 out of 50 votes, average: 0.00 out of 5 (0 votes, average: 0.00 out of 5)
You need to be a registered member to rate this.
Loading...


AR – Inquiry Detail

Accounts Receivable (A/R) Inquiry Detail

Overview

NOTE: The A/R Inquiry Detail form has been merged with the AR Inquiry form.


101-ar-frm-002


0 votes, average: 0.00 out of 50 votes, average: 0.00 out of 50 votes, average: 0.00 out of 50 votes, average: 0.00 out of 50 votes, average: 0.00 out of 5 (0 votes, average: 0.00 out of 5)
You need to be a registered member to rate this.
Loading...

AR – Inquiry Notes

Accounts Receivable (A/R) Inquiry Notes

Overview

Use the Notes tab of the A/R Inquiry form for adding comments and warning codes, additional information about delinquent charges, history, arrears, and ACH payment information to the selected record.

Documentation

For the complete reference guide, see 101-all-001-GovernAccountsReceivable-(man)-(6.0)
For the A/R Transaction Rules, see 101-ar-001-AR-TransRulesGL.

Prerequisites

The following Regular User Validation Tables are required for the A/R Alerts, Warnings, and Protest Codes.

  • ARALERT: for the A/R Alert Codes
  • ARWARNC: for the A/R Warning Codes
  • ARPROT: for the A/R Protext Codes
  • COLLAGCY: for the Collection Agencies used for A/R

To access these tables:

  1. Launch GNA.
  2. Select Editors > User Validation Table Editor.
  3. Select Regular from the Table Type drop-down list.
  4. Select the table.
  5. Click Codes to add, modify, or delete codes.
  6. Click Save.

Completing the Notes Form for Alerts and Warnings

The form contains the following sections:

  1. General Information
  2. ACH Information
  3. Notes and Comments

General Information

Alert Code: Select an Alert Code from the drop-down list (Table: VT_USR_ ARALERT). An Alert is more severe than a Warning. If an alert code is associated with the account, no payment entry can be made.
Warning Code: Select a Warning Code from the drop-down list (Table: VT_USR_ARWARNC). A Warning is less severe than an Alert, in that a notification is sent, but the user can make a payment entry.
Collection Agency: Select a Collection Agency for the account from the drop-down list (Table: VT_USR_COLLAGCY).
Notes and Comments: Enter any notes or comments for the account.

Additional Information

Not Subject to Delinquent Charges
Select this option if you don’t want any interest calculated on the current account. Otherwise, these charges are calculated automatically.
History / Inactive Account
Select this option to indicate the account is historical or inactive. No further Accounts Receivable transactions can be performed on the account.
Arrears
Select the calendar beside the Arrears date field to select the date that the account went into arrears. Depending on your organization, the date could be populated by a batch process.

ACH Information

Amount: This field displays the amount for the selected record. This can be the amount of the displayed installment or a fixed amount. To override this value, for example, for partial payments, modify the field directly and click Save.
Installment: If the displayed amount is an installment, this field displays first, second, third, fourth or total (Table: VT_SY_INSTALL).
Active Flag: The Prepare Data for ACH File process sets the Active Flag to Pending. In the Pending state, you can:

  • Modify the displayed amount.
  • Change the Active Flag to Manually Deactivated.

Records set to Manually Deactivated are not included in the ACH File. Use this state for accounts that cannot be prenoted; for example, invalid accounts.
ACH Date: This field displays the date the Prepare Data for ACH File process was run.
Fixed Amount: Select this option if the selected amount is a fixed amount.


101-ar-frm-003


0 votes, average: 0.00 out of 50 votes, average: 0.00 out of 50 votes, average: 0.00 out of 50 votes, average: 0.00 out of 50 votes, average: 0.00 out of 5 (0 votes, average: 0.00 out of 5)
You need to be a registered member to rate this.
Loading...


AR – Automated Clearing House (ACH) Information

Accounts Receivable (A/R) Automated Clearing House (ACH) Information

Overview

Automated Clearing House (ACH) is a secure payment transfer system that provides a centralized clearing facility for Electronic Fund Transfer (EFT) payments occurring within the U.S. and Canada. It is used widely for payroll and a variety of recurring payments.
The ACH account is defined on the Name and Address form in Govern. It is linked to the following through the Mailing Index:

  • Real Property Tax
  • Personal Property Tax
  • Self Reported Tax
  • Miscellaneous Billing

The configuration and administrative setup are performed in the following applications:

  • Govern New Administration (GNA)
  • Business Entity Designer (BED)
  • OpenForms Designer (OFD)

There are three batch processes:

  • ACH Pre-notification
  • ACH Data preparation
  • ACH File Generation

Configuration

In order to configure ACH Information in your organization, follow the instructions in the document that you can download in the Documentation section..

Documentation

For complete information on the configuration, administrative setup, ACH user forms, and ACH Batch Processing, open the following guide:
ACH ConfigurationImplementation

Govern OpenForms ACH Information

To use ACH for bill payments in Govern OpenForms, you need to complete the ACH Information in the Name and Address form.
Then, complete the ACH Information for each applicable subsystem, as described in this section.

Name and Address ACH Information

ACH Information is added to a separate entity in the Name and Address form. You can set up multiple ACH accounts for any name and address account.

To access the ACH Information by Name entity:

  1. Launch Govern.
  2. Open the Name and Address from.
  3. Perform a search and load the results to the tree view.
  4. Select the required Name and Address record in the tree view.
  5. Select the ACH Info by Name entity.
    The selected Name and Address record is displayed at the top of the form.
    The required fields are outlined in red.
  6. Select an option from the Account Type drop-down list.
  7. Enter a description for the account.
    For example, both a personal and commercial Checking Account may be associated with the name record.
  8. Enter the bank transit and routing number in the Bank Transit No. field.
  9. This is a unique nine digit number used to identify the financial institution.
    The first two digits identify the district in which the bank is located. The remaining numbers are unique.
  10. Enter the bank account number in the Bank Account No. field.
    The bank transit and account numbers are cloaked when you enter them on the user form.
    You can click the icon on right of the text to view these numbers in plain text, provided you have the access permissions.
  11. Click Save.
  12. Repeat the procedure to create multiple name and address accounts.

ACH Information in Tax Forms

  • ACH Information is added to the following Govern user forms:
  • Real Property Tax
  • Personal Property Tax
  • ACH Information in Self-Reported Tax

Real Property Tax

The ACH Information is added to the Mailing Index entity in the Real Property Tax form.
The following rules apply to the Making Index:

  • The ACH Information is only available for the Primary Index.
  • The Primary Index receives all original bills and other mailings. All other recipients receive duplicates of the originals. Also, the Primary Index is listed on all reports. Select this option for the property owner or the person to whom you are sending original bills.

The following conditions apply:

  • There can be only one primary index per property.
  • The property owner must be defined as the primary index, even when the Mortgage Company is paying the bills.
  • If a primary index is not manually selected, the first name and address you enter automatically becomes the primary index.
  • All original bills and other mailings are sent to the primary index.
  • If the Status Information of the primary index is set to inactive, a duplicate bill is sent to the Primary Index and the original bill is sent to the Temporary Owner.
  • All other recipients receive duplicates of the originals, unless the Do Not Send Bill option is selected.
  • If Do Not Send Bill is selected for the Mortgage Company, an electronic bill is sent.

To access the Mailing Index entity in the Real Property Tax form:

  1. Launch Govern.
  2. Open a Profile that contains Real Property Tax.
  3. Open the Real Property Tax from.
  4. Perform a search and load the results to the tree view.
  5. Select the required record in the tree view.
  6. Select the Mailing Index entity.
  7. Select the Primary Index option.
  8. Click Save.

Personal Property Tax

Follow the instructions for adding information to the Real Property Tax Mailing Index.

Self-Reported Tax

Follow the instructions for adding information to the Real Property Tax Mailing Index.

Miscellaneous Billing

ACH Information is added to the Miscellaneous Billing Account entity. This information populates the Mailing Index table.
To access the Miscellaneous Billing Account:

  1. Launch Govern.
  2. Open a Profile that contains Miscellaneous Billing.
  3. Open the Miscellaneous Billing form.
  4. Select the Miscellaneous Billing Account entity.
  5. Select the description for the ACH Account that you want to associate with the selected Miscellaneous Billing Account from the ACH Account drop-down list.
  6. Double-click in the date fields and select a range of dates from the pop-up calendar if the ACH is to be used during a specific time only. You can enter a date in the From field or the Until field only.
  7. Click Save.

For further details, refer to the Miscellaneous Billing documentation.



101-ar-fea-006


0 votes, average: 0.00 out of 50 votes, average: 0.00 out of 50 votes, average: 0.00 out of 50 votes, average: 0.00 out of 50 votes, average: 0.00 out of 5 (0 votes, average: 0.00 out of 5)
You need to be a registered member to rate this.
Loading...

AR – CC – Allow Interest and Fees As of Date Feature

Accounts Receivable (AR) & Cash Collection (CC)
Allow Interest and Fees As of Date Feature

Version 6.0 | Version 6.1 (In Development)

Overview

This information will be updated when it becomes available.


101-ar-fea-007


0 votes, average: 0.00 out of 50 votes, average: 0.00 out of 50 votes, average: 0.00 out of 50 votes, average: 0.00 out of 50 votes, average: 0.00 out of 5 (0 votes, average: 0.00 out of 5)
You need to be a registered member to rate this.
Loading...