MA – Generate Pending Audit Batch Process

Mass Appraisal Generate Pending Audit Batch Process

Overview

The Mass Appraisal Audit Pending batch process automatically generates new MA Audit Information records in Govern OpenForms. While these records can be created manually, running the batch process can save time and increase the accuracy of the records

Records can be created for a:

  • Saved dataset
  • Jurisdiction and neighborhood
  • Range of tax map numbers

The MA Audit Pending batch process updates the following fields on the MA Audit Information form. Once the batch process is complete:

  • The Status field is set to Pending.
  • The Frozen ID is set to 0.

The following fields are updated as selected on the batch process form.

  • Audit Reason Code: This is a required field.
  • Appraiser
  • Entry Date: This is a required field.
  • Entry Code
  • Activity Code: This is a required field.
  • Source Code

You can select parcels from the batch process by jurisdiction or neighborhood within a range of tax map numbers, or in a saved dataset. Alternatively, you can crate audit records for all parcels. The fiscal year is required.

The Mass Appraisal Audit Pending batch process generates Audit Information user records in Govern OpenForms. The Status field is set to Pending once the process is run. These records can be modified or deleted, as any other record.

Documentation

To read this information in pdf format, click on the following link:

BatchAuditPending.pdf

Prerequisites

The following tables are required for the Mass Appraisal Audit Pending batch process:

  • MA_APPRAISERS: This table lists the appraisers that can be selected for the audit.
  • NA_NAMES: This table lists all the name and address accounts in the deployment.
  • VT_USER.MAENTRY: This table lists the entry code that can be associated with an audit.
  • VT_USER.MAINFSRC: This table lists the source codes associated with the Mass Appraisal audit.
  • VT_USER.MAACTV: This table lists the activity codes associated with the audit.
  • VT_USER.MA_AUDIT_REASON: This table lists the reasons for conducting the audit.

If you are running the process on a saved dataset, one must be created.

Related Forms

The Mass Appraisal Audit Information form is updated by the Mass Appraisal Audit Pending batch process. The Mass Appraisal Audit Finalized batch process can be run to create finalized MA Audit Information records from pending ones.

MA Audit Information User Form

The following new fields are now included in the MA Audit Information form. These are required for the MA Audit Pending and MA Audit Finalized batch processes.

  • Status: The Status field is automatically set to Pending when you run the MA Audit Pending batch process. In this state the form can be modified or even deleted. An appraiser can update the status field to Finalized. The MA Audit Finalized batch process selects the Finalized flag. At this point, the record can no longer be modified.
  • Audit Reason Code: The Audit Reason Code contains user defined values from the VT_USER.MA_AUDIT_REASON table. When you run the MA Audit Pending batch process, you must select a reason code. This can be modified after the process is complete.

For details, see Mass Appraisal Audit Information.

Related Batch Processes

The MA Audit Finalized Batch Process is similar to the MA Audit Pending batch process. It generates finalized Mass Appraisal Audit Information records for existing MA Audit Information records with the Status set to Finalized. The MA Audit Finalized batch process selects the Finalized option and updates the Entry Code as set on the batch process. The finalized Audit Information records cannot be deleted, except by a user with authorized permissions.
For details, see Mass Appraisal Audit Finalized.

Business Rules for the MA Audit Pending Batch Process

The MA Audit Pending batch process creates new MA Audit Information records for all Mass Appraisal records that:

  • Match the Selection Criteria
  • Do not have a current MA Audit Information recording with Frozen ID 0
  • Are in the Fiscal Year selected

Creating Mass Appraisal Audits

You can use the Mass Appraisal Pending and Mass Appraisal Finalized batch processes, as follows, in order to facilitate the Mass Appraisal audit procedure. None of these steps are required.

Step 1
Receive the requirement to create a number of Mass Appraisal Audit Information records on parcels within any of the following:
  • A Saved Dataset
  • A Jurisdiction and Neighborhood
  • A Range of Tax Map Numbers
Step 2
Run the Mass Appraisal Audit Pending batch process in order to create Mass Appraisal Audit Information records.:
Result
The MA Audit Pending batch process updates the following fields on the MA Audit Information form:
Status: Sets the Status field to Pending.
Frozen ID: Sets the Frozen ID to 0. This indicates that the record is current and modifications can be made.
It updates the following fields on the user form as selected on the batch process form.
  • Entry Date
  • Appraiser
  • Entry Code
  • Source Code
  • Activity Code
  • Audit Reason Code
The record can be modified or deleted at this point.
Step 3
Perform audits on the parcels, update the Audit Information records, and set the Status field to Finalized.
Step 4
Run the MA Audit Finalized batch process in order to create a number of Mass Appraisal Audit Information records for parcels within any of the following:
Result
The MA Audit Finalized batch process updates the following fields on the MA Audit Information form:
  • Status: Sets the Status field to Finalized.
  • Value Finalized: Selects the Value Finalized check box.
  • Frozen ID: The Frozen ID is set to a value starting with -2. This is updated for each audit performed/
Updates the following field as selected on the batch process form.
Entry Code
The record is frozen and cannot be modified, unless the user is granted the required access permissions. Typically, only supervisors have access to modify frozen records.

Defining the MA Audit Pending Batch Process

There are no special requirements for the MA Audit Pending batch process. It is set up as any other batch process in Govern OpenForms. You can create as many MA Audit Pending batch processes as required.

To configure the batch process:

  1. Launch GNA.
  2. Select Editors > Batch Process Definition Editor.
  3. Select 101-ma-bp-007 – MA – Audit Pending.
  4. Enter a Code, Short, and Long Description in order to uniquely identify the batch process.
  5. Select the Transaction tab.
    The Transaction Type and Transaction Mode can be set to any value, depending on how you want to run the batch process. Refer to the Govern Batch Scheduler guide for details.
  6. Complete the other parameters as required by your organization.
  7. Click Save.

Adding the MA Audit Pending Batch Process to a Profile

In order to use the batch process in Govern OpenForms, you must add it to at least one Profile. You can add it to multiple Profiles.

To add the batch process to a Profile:

  1. Launch GNA.
  2. Select Editors > Profile Editor.
  3. Select the Profile that you want to use.
  4. Select the Links tab.
  5. Click Add in the Batch Process section to add open a secondary window.
  6. Select the batch process.
  7. Click Save.

Running the MA Audit Pending Batch Process

To run the batch process:
Open the Batch Program:

  1. Launch Govern.
  2. Open a Profile that contains the MA Audit Pending batch process.
  3. Open the Batch Processing Explorer.
  4. Select the Mass Appraisal Audit Pending batch process.

Complete the Parameters:

  1. Complete the Selection Criteria as follows.In the Parcels to Compute, do one of the following:
    Select All to create Pending Audit records for all parcels with Aduit records that do not have a do not have a status..
    Select Saved Dataset and select a saved dataset from the drop-down list.
  2. Select Jurisdiction and select a jurisdiction and neighborhood from the drop-down list.
  3. Select Tax Map Number and enter a range of tax map numbers.
  4. Enter the year you are associating with the Audit records in the Year parameter.
  5. Click on the calendar icon and select the date of the audit.
  6. Select the Appraiser who is responsible for the audit from the Appraiser drop-down list.
  7. Select the entry code from the drop-down list (Table: VT_USR. MAENTRY).
  8. Select the source code from the drop-down list (Table: VT_USR. MAINFSRC).
  9. Select the activity code from the drop-down list (Table: VT_USER. MAACTV).
  10. Select the reason for the audit from the Audit Reason drop-down list (Table: VT_USR.MA_AUDIT_REASON).

Run the Program

  1. Do one of the following:
    Click Run to run the batch process immediately.
    Click Schedule to run the batch process at a later time.

Viewing the MA Audit Log Files

The following information is logged and appears on the Processing tab of the MA Audit Information batch process in Govern. If you are scheduling the process to run at a later time, the information can be viewed on the Log Files in the Govern Schedule

Parameter: ReasonCode = The Reason Code selected for the batch Process.
Parameter: BatchProcessType = The name of the batch process.
Parameter: Appraiser = The name of the appraiser who is responsible for the audit.
Parameter: EntryDate = The date of the audit.
Parameter: EntryCode = The entry code selected for the Audit.
Parameter: Activity = The activity code selected for the audit.
Parameter: SourceCode = The source code selected for the audit.
Parameter: ValueFinalized = Displays True or False according to whether the Value Finalized option is selected or deslected.
Parameter: YearId = The year the audit occurred.
Parameter: IsAllParcels = Displays True or False according to whether All is selected.
Parameter: CanChooseJurisdictionNeighborhood = Displays True or False according to whether the Jurisdiction option is selected.
Parameter: Jurisdiction = Displays the code for the jurisdiction.
Parameter: Neighborhood = Displays the code for the jurisdiction and neighborhood.
Parameter: CanChooseTaxMapRange = Displays True or False according to whether the Tax Map Number options is selected.
Parameter: TaxMapStart Displays the starting tax map number in the range.
Parameter: TaxMapEnd: Displays the ending tax map number in the range.
Parameter: CanChooseSavedDatasets = Displays True or False according to whether the saved dataset option is selected.
Parameter: SavedDataset Displays the name of the Saved Dataset.
Parameter: AuditBatchID = Displays the Batch ID associated with the audit.
Parameter: MaxNumberProcess = Displays the maximum number of records processed.
Parameter: RunBatchAsync = Displays True or False according to whether the transaction type of the batch process is Synchronous or Asynchronous
Information: Parameter: TransactionMode = Displays the transaction type, such as ContinueIfOneTransactionFail
Parameter: BatchId = Displays the batch ID.

Viewing the Updated Record in Govern

Once the batch process is run, a new audit record is created with the status set to Pending for all parcel records that meet with the criteria.
To view the updated records.

  1. Launch Govern.
  2. Open a Profile that contains the MA Audit Information form.
  3. Perform a search to retrieve the required records.
  4. Select a record.
  5. Open the MA Audit Information form.
  6. Scroll to the required record.


101-ma-bp-007


0 votes, average: 0.00 out of 50 votes, average: 0.00 out of 50 votes, average: 0.00 out of 50 votes, average: 0.00 out of 50 votes, average: 0.00 out of 5 (0 votes, average: 0.00 out of 5)
You need to be a registered member to rate this.
Loading...


Standard Feature – Sequential Batch Process

Standard Feature – Sequential Batch Process

Version 6.0 and Version 6.1

Overview

Available in Release 6.0 and 6.1

A standard feature that is available in version 6.0 and 6.1 of the Scheduler Console is sequential batch process scheduling. This feature may be configured to allow users to execute multiple batch processes without human interaction. This feature is convenient for launching batch processes during periods where there is less impact on users accessing the network. As an example, these sequenced batch processes could be initiated and set to run overnight, over a weekend, or through the extended periods of a holiday.

The Sequential Batch Process feature allows users to configure a list of Schedules in order to create a linked sequence of Batch Processes in the Govern New Administration (GNA). As each batch process is successfully completed, i.e. no errors generated, it will automatically initiate the next pre-configured batch process in the user defined sequence.

NOTE: Sequential Batch Processes are initiated, and monitored in the Govern Scheduler (SC). The status of the execution of each batch process is displayed through the console of the Govern Batch Scheduler application.

Example of a Sequential Batch Process

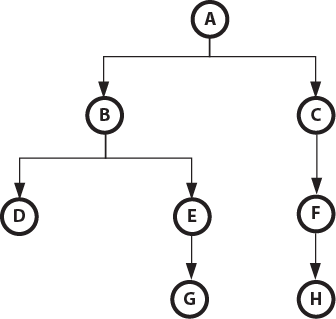
The following is an example of a possible Sequential Batch Process. The example will demonstrate a basic batch process that, upon successful completion, will initiate two (2) child batch processes. Each of the two child processes will in turn trigger other processes, and so on. Refer to the example below.

Example

  1. Batch process A is configured to run daily.
  2. When Batch process A ends it will initiate batch processes B and C
  3. Batch process B initiates batch processes D and E
  4. Batch process E initiates batch process G
  5. Batch process C initiates batch process F
  6. Batch process F initiates batch process H

All batch processes B, C, D, E, and F are configured to be triggered upon successful completion.

https://kb.harrisgovern.com/wp-content/uploads/2019/01/Sequential_Flowchart00.png

Configuration

Read More...

Sequential batch processes are configured in the Govern New Administration (GNA). Preview and execution of the batch processes are presented in the Govern Scheduler.

For further detail Govern batch process scheduling, refer to the Govern Schedule user guide for details (106-gs-all-GovernScheduler.60.pdf).


https://kb.harrisgovern.com/wp-content/uploads/2019/01/Sequential_Flowchart01.png

Govern New Administration (GNA)

To configure Sequential Batch processes it will be necessary to first create a new batch process or use an existing one. You would next need to create a schedule for that Batch Process. This batch process will then be configured to, upon completion, trigger the next batch process in the sequence.

TIP: When planning sequential batch processes, it is recommended that a flowchart of sorts is sketched out to use as a guide to visualize your setup. In addition, as each schedule is associated with a batch process, the batch process used should also be noted.


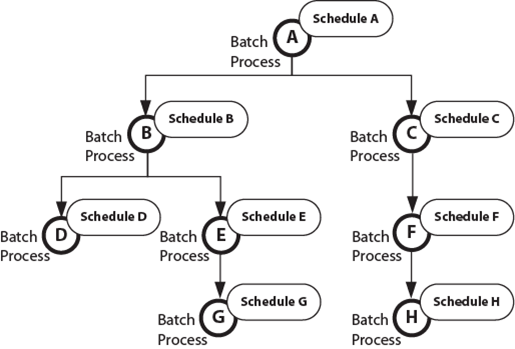
Using the example flowchart of schedules, i.e. A, B, C, D, E, and F, we will say that Batch Process A is associated with Schedule A.  Batch Process B will be associated with Schedule B, and so on.

Parent Schedule

With our flowchart drawn out for our example, we will say that the Batch Process A schedule will be called Schedule_A. Schedule A is also the parent batch process that will trigger all subsequent processes. As the parent process its configuration is different from all subsequent processes.

Creating the Parent Schedule

To create the first schedule called Schedule A in the GNA…

  1. On the GNA ribbon, click Editors (tab) > Batch Process Definition Editor.
  2. In the Batch Process Definition Editor select the batch process that will be the parent.
  3. On the Batch Process Definition tab, either select an existing batch process, or click Create a new item to create a batch process.
  4. Click to select the Scheduling sub tab.
  5. Click Add.
  6. The form to configure the schedule is displayed.
NOTE: If the batch process requires parameters to be configured, this must be completed first. The save action is required before you can schedule the batch process.
  1. Click to select the Schedule
  2. Enter a Name, and a Description.
NOTE: Name and Description are required parameters; you will not be able to save without completing them.
  1. In the Settings group below, set a frequency for the schedule; select One time, Day, Week, or Month. Additional settings allow you to specify a Start Date, and expiration date, i.e. Expires on:. For our example, this will be a one time schedule so select One time.
NOTE: As this is the first batch process, the option for Triggered should not be selected.
  1. Click Save Changes on the Schedule.
  2. Click the Close button [X] in the upper right hand corner to close the form.

Creating the Child Schedule

Configuring B and C

Referring back to our flowchart, we see that the Children batch processes, B, and C, are at the same level and are triggered by batch process A. We will need to configure Schedule B to trigger batch process D, and E. Batch process C will trigger batch process F. As batch processes B and C are both at the same level, they will be run simultaneously.

To create any Children schedules, e.g. Schedule B, C, and all other subsequent processes…

  1. On the GNA Batch Process Definition Editor, click to select the batch process that will be designated as Schedule B.
  2. On the Batch Process Definition tab, click to select the Scheduling sub tab.
  3. Click Add to display the Schedule
  4. If the batch process requires parameters to be configured, this must be completed first. The save action is required before you can schedule the batch process.
  5. Select the Schedule
  6. Enter a Name and a Description for the schedule; for our example we will use Schedule B, and “Schedule B triggered by Schedule A” for the Name and Description:

We now need to specify that Schedule B is to be triggered by the successful completion of the batch process that is attached to Schedule A.

  1. In the Settings group, click the Triggered radio button.
  2. In the Parent group, select the batch process for Schedule A from the combo box, i.e. Batch Process A.
  3. Select the Schedule; the combo box will display Schedule A.
NOTE: If the batch process is also associated with other schedules, they will also be listed. It is important that you select the correct schedule.
  1. On the Schedule tab, click Save Changes, to save the setup.
  2. Click the [X] in the upper left hand of the form to close the form.

Configuring Sequential Schedules D and E

Referring back to the workflow sketch, we see that Schedule C / Batch Process C is at the same level as Schedule B, it will be necessary to select the batch process that will be associated with Schedule C. For the Parent you will specify Schedule A. For the configuration, it will be necessary to repeat all steps for configuring a Child Schedule; see above steps. Schedule D / Batch Process D and Schedule E / Batch Process E are triggered by Batch Process B, and should be configured accordingly.

Govern Scheduler Console Preview and Execution

Viewing the setup in Govern Scheduler

When complete the final sequential batch processes can be seen in the Govern Scheduler group of the Govern Scheduler console. Looking at the interface, we can see that Schedule A is at the top of the list as the parent process. Schedule B and Schedule C are at the same level, both have their sub processes which they will trigger. Schedule D and Schedule E will be triggered by Schedule B, and Schedule F is triggered by Schedule C. Finally Schedule G is triggered by Schedule E, and Schedule F triggers Schedule H.

If a Batch Process fails…

During execution of the batch processes, if a batch process in the sequence fails, all subsequent children processes in that chain will not be executed. For example, if Batch Process B for Schedule B fails to execute, it will need to be corrected. After rectifying the error with the process, it will be necessary to execute Batch Process B again. After which all subsequent processes will then be triggered. It is not necessary to execute the entire process flow again, i.e. Schedule A.

Executing the Batch Process

To execute the Batch Processes in the Scheduler Console

  1. Click to select the process in the console.
  2. Click Execute.
NOTE: Refer to the Govern Scheduler user guide for additional configuration details, and running Batch Processes.

Business Rules

Deletions of Processes in Batch Scheduler and GNA

In the Batch Scheduler or in GNA, trying to delete a schedule with Child schedules will generate an error message. This message will indicate that in order to proceed, you must first delete the child schedules before you can delete the parent.

Deleting Parent Schedules in the Batch Scheduler

An error will be generated when attempting to delete parent schedules that are linked to sub schedules, i.e. schedules that they trigger.

Documentation

Click to view the .PDF document detailing this feature. (101-std-fea-046_SequentialBatchProcesses.pdf)


101-std-fea-046


0 votes, average: 0.00 out of 50 votes, average: 0.00 out of 50 votes, average: 0.00 out of 50 votes, average: 0.00 out of 50 votes, average: 0.00 out of 5 (0 votes, average: 0.00 out of 5)
You need to be a registered member to rate this.
Loading...

MB – Initialize Year Data Batch Process

Miscellaneous Billing (MB) – Initialize Year Data Batch Process

Overview

Govern OpenForms Miscellaneous Billing module is year based and the purpose of this functionality is to create the recurring invoices in choosen year for the invoices that have not expired.
The system will check the END date with the Current Menu date to make this determination.

The Initialize Year functionality is a Batch Process and like any other batch process, it can be setup by profile with role and user security, scheduled, monitored, etc.

  • The batch process name is [mb_init_year] and it will be created when the Verify Database is run for the first time after having deployed a 6.1.1609 deployment.
  • The batch process definition [103-mb-bp-006] is available using the import/export. (to be verified)
  • The same batch process can be setup in multiple batch process definitions (with different schedules, notifications, etc.)
  • The batch process definition can be setup as an Action Button or a Link item that can be placed on a standard Form or on the user Cool Bar.
  • See Standard Batch Process details Batch Program Setup or Govern Scheduler for more details

This batch process can be accessed from:

  • Govern Administrator (GNA), select Application Configurations, Miscellaneous Billing,
  • Govern, open Profile Batch Process tool box window


Read More...


Batch User Interface

The following user criteria will impact what invoices will be processed.
Selection Criteria
You can select criteria to refine the process or leave these fields blank to process all transactions.Year

  • Select the year for to copy

Recurring Code (Batch Name)

  • Enter the batch name or number for the records you are processing, or
  • Leave this field blank to process all transactions.
  • Mandatory

Category Code

  • Enter a category code to limit the process to invoices setup with this category code.

Issuing Department

  • Enter a department to limit the process to invoices setup/issued for this department.

Override Invoice Date

  • Used to override the invoice date that will be created.
  • If left blank will use the current date

The selection criteria for the From year is user persistent and will appear the next time the batch process is executed.
However, the destination year is not persistent, so this field will be reinitialized each time the batch process is executed

Batch Processing

General Batch Processing

  • The process definition can be executed in SYNC mode only and this mode will be forced or overridden upon execution.
  • The batch transaction Mode = “Roll Back If One Transaction Failed” is not supported. It will be “Continue If One Transaction Failed” by default


Records to be Processed

Only the recurring invoices meeting these rules will be processed:

  • Recurring Invoices for the specified year
  • User Profile Current Date is superior to the Recurring Invoices Effective FROM Date and inferior to the Effective TO Date or end date.
    • If Effective TO Date is blank, it will be set internally to 12/31 of the recurring invoice year.
  • User Profile Current Date must be in the 1/1 and 12/31 range of the selected year.

On Warning and Error Reporting
During the execution, standard warning and error messages will be presented in the batch result grid.

  • On error, the MB ID will be displayed in the message text. Note: Double-click on the message to access and copy the full text


On completion

The following standard information will be displayed:

  • Parameters and Options used
  • Total number of records read
  • Total number of records processed

Log File

At the end of the batch process, a log will be created:

  • Log file called mbInitializeYear.log


Troubleshooting

The following is to help troubleshoot the batch process.

  • After changes, it is always best to compute for a single year and small dataset
  • The parcel id is listed in the error message
  • Turning on the Govern Diagnostic Tool
  • Turning on the SQL Profiler Tool (system administrator)


Related Topics


103-mb-bp-006


0 votes, average: 0.00 out of 50 votes, average: 0.00 out of 50 votes, average: 0.00 out of 50 votes, average: 0.00 out of 50 votes, average: 0.00 out of 5 (0 votes, average: 0.00 out of 5)
You need to be a registered member to rate this.
Loading...


UB Reading Batch Entry

Utility Billing Reading Batch Entry

Version 6.0 and Version 6.1 – (In Development)

Overview

The Reading Batch Entry function is used to modify a reading entry when an error has been made while entering the Hand-Held Meter Reader information. This error can be due to a malfunction in the meter, or a loss of data. The Reading Batch Entry form is comprised of a configuration form, and a main form with a grid for reading entries.


101-ub-frm-005


0 votes, average: 0.00 out of 50 votes, average: 0.00 out of 50 votes, average: 0.00 out of 50 votes, average: 0.00 out of 50 votes, average: 0.00 out of 5 (0 votes, average: 0.00 out of 5)
You need to be a registered member to rate this.
Loading...

BP – Standard Attachments and File Transfer

Standard Batch Process – Attachments and File Transfer

Version 6.0

Overview

Batch programs can generate reports and files. It is possible to send these attachments by email and to specify the path where they will be copied.

Setting a Path

You can define a network or local path for saving the files and/or reports that are generated by the selected batch process. You can also enter an ftp address for these attachments.
This is useful for batch processes that generate an attachment, such as a csv or text file. For example, information about tax accounts with an overdue balance could be extracted from the database and copied to a csv file by a batch process.
You can specify the local or network path for this file and / or upload it directly to an ftp site where it can be made available to the bank.

106-install-security-UI-1.jpg

Copy Attachments to Path

Select Copy Attachments to Path if you want to copy the attachment to a specific folder on the network or server. Click the ellipsis button and enter the path to the server or network folder where you want to save the exported file.

  • For each batch definition, you can now specify the path and folder where the attachments (logs & output files) are to be copied.
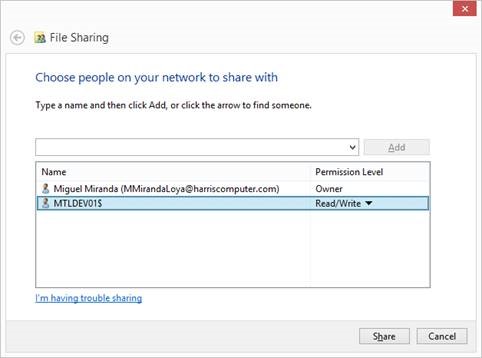
  • IMPORTANT FOLDER SHARING: These folders need to be shared with Read/Write access granted to the users that will run the batch process AND to the server that hosts the Batch Scheduler Service. (To grant access to a server, use the format SERVERNAME$).
  • Ensure that you enter the path in UNC format.

NEW! Archive Folder

You can now specify a folder (local or network path) that will be used as a central location to archive the files that served either as input or output in a batch program execution. Optional feature that must be implemented in the batch (standard or custom) program.

The Archive Folder is set in Govern OpenForms General Settings (SY REGISTRY):

  • [Filter] Batch Process – [Section Name] Batch Process – [Key Name ] Archive Folder

FTP Address for Attachments

FTP Specification

The following data needs to be entered:FTP Address

  • Enter the address of the ftp server.

FTP Folder

  • Select the folder and any subfolders for the files.

User Name

  • Enter the user name for the ftp account

Password

  • Enter the password for the ftp account

Port

  • Enter the Port Number for ftp communications. The default is 21.

Timestamp

Select Add Timestamp if you want to add a timestamp to the file This is appended to the file name, using the following format: Filename_YYYY_MM_DD_HH-MM-SS.File Extension, where

  • Filename is the name of the file.
  • YYYY are the four digits reserved for the year.
  • MM are the two digits reserved for the month.
  • DD are the two digits reserved for the day.
    • HH are the two digits reserved for the hour. This uses the 24-hour clock format.
    • MM are the two digits reserved for the minutes.
    • SS are the two digits reserved for the seconds.

File Extension

The file extension can be any format supported by OS and ftp site. Csv and txt are typical.
Following is an example of a file generated by a batch process.
InvoiceCloudInvoiceReport_UB_2013-05-22_12-07-42.csv


100-bp-Attachments


0 votes, average: 0.00 out of 50 votes, average: 0.00 out of 50 votes, average: 0.00 out of 50 votes, average: 0.00 out of 50 votes, average: 0.00 out of 5 (0 votes, average: 0.00 out of 5)
You need to be a registered member to rate this.
Loading...

BP – Import Name to Email

Batch Process – Import Name to Email

Overview

In Development


101-std-bp-005


0 votes, average: 0.00 out of 50 votes, average: 0.00 out of 50 votes, average: 0.00 out of 50 votes, average: 0.00 out of 50 votes, average: 0.00 out of 5 (0 votes, average: 0.00 out of 5)
You need to be a registered member to rate this.
Loading...


CC – Batch Deposit Selection & Creation Form

Cash Collection (CC) Form – Batch Deposit Selection & Creation

Version 6.0 | Version 6.1

Overview

The following is a feature of the Cash Collection Form. See also the standard A/R Deposit Form (stand-alone) that is used throughout the Accounts Receivable module.

Batch Deposit Management

The Cash Collection Form root entity AR_DEPOSIT is the entry point and it is used to create or select an existing batch deposit number.
This is a standard OpenForms (added fields, calculated amounts, etc. can be created and added to the form).

General Information

  • Deposit Number: This field displays the current cashier’s Deposit Number.
  • User ID: This field displays the current user id
  • Cashier ID. This field displays the Cashier’s identification code as previously defined on the Cash Collection Parameters in Govern Admin. – to be validated
  • Linked Deposit Number:
  • Transaction Type:
  • First Receipt: This field displays the first Receipt number used by the cashier for the deposit. – deprecated
  • Last Receipt: This field displays the last Receipt number used by the cashier for the deposit. – deprecated

Deposit Totals

This section displays the total deposit breakdown previously saved by the cashier, before they are posted. See 101-cc-OFR System Queries:

  • Total Collected: This field displays the total amount collected (system query)
  • Total A/R: This field displays the total amount of the collected Accounts Receivable (system query)
  • Total Pen / Int. This field displays the total collected penalties and interest. (system query)
  • Total Charges : This field displays the total charge amounts collected (system query)
  • Total Over/Dup: This field displays the total amount of Overpayment or Duplicate payment that are accrued and collected
  • Total Discount: This field displays the total discount amounts (system query CC)

Search by Receipt Number Feature

  • Under Review – See 101-cc-fea-005
  • Action Button to search by Receipting Group for a specific Receipt Number – replaced by the standard browse/Entity Search
  • Receipting Group drop down table (Tables: USR_KEY_RECEIPT and USR_USERFILE). deprecated

OpenForms Action Buttons

  • Browse: OF Standard Browse used to list all the NON POSTED Batch Deposits. Fields appearing in the list and position of the scrolling grid can be customized.
  • Delete: A deposit that contain payments or other transactions CANNOT be deleted – to validate
  • New: A deposit can be created by the user (all users can – validate security?).
    • Note: Depending on the Default Deposit Management options, the number is normally generated automatically.
    • The default deposit number is normally made up of a UserID and appended with an optional date.

Parameters

Deposit Management General Parameters

  • Configured in Govern Administrator, Application Settings, AR Deposit General Parameters
  • Prevent Override Option

    • If the Prevent Override of the Deposit Number option is selected in …. BEHAVIOR to be validated


Setting Up Security

The security setup is performed in the OpenForms Designer (OFD).
101-cc-frm-007-ui.png

Deposits

  • In OpenForms Designer (OFD), Select the CC001 Cash Collection Form, Click on the Deposit Management Entity (TAB), Click on the Security Mode
  • Select the Role or User, Profile and Security Mode (Regular)

On the Deposit Management Entity, the following standard security options are available:

  • View (eye): To view or not this entity or form TAB
  • Create (plus): To create new deposits
  • Modify (pen): To modify deposit information
  • Delete (garbage bin): Ability to delete deposits (if no payments are recirded)
  • Browse (list): Ability to show the browse screen

Special Security

  • Special (down arrow): Abiltity to see ALL deposits (default is deposits created by the user)


Cash Collection Form (Security Manager)

You can restrict the use of the Form

  • By profile (form is not linked to it)
  • By roles
  • By users


101-cc-frm-007


0 votes, average: 0.00 out of 50 votes, average: 0.00 out of 50 votes, average: 0.00 out of 50 votes, average: 0.00 out of 50 votes, average: 0.00 out of 5 (0 votes, average: 0.00 out of 5)
You need to be a registered member to rate this.
Loading...