GNA – Data Mapping Editor

Data Mapping Editor

Overview

When an external application, e.g. a GIS application, is required to communicate with the Govern system, it will need to understand how data is stored within the system. Govern’s Web service methods accept requests, to Retrieve, Update, or Delete data.
The Data Mapping Editor allows users to map specific tables and columns within the Govern database to unique Data Element Names. When the application makes a request from Govern, the data element names must be included in the methods that are sent to the Web services.
There are specific rules that are required when making a request to the Web Service, e.g. the Data Element Name of the data map must exist, or the parcel ID requested must exist in the database, etc. Refer to the MS Govern Property Control System Service API guide for the list of methods and file structure details.
There are three (3) tables in the Property Control section that can currently be updated, (Table: PC_AREA, PC_PARCEL, and PC_LEGAL_INFO).

To access the Data Mapping Editor…

  1. In GNA select Setups/Editors > Editors > Data Mapping Editor…

Read More...

Data Mapping Editor buttons

New – To create a new data mapping record click New.
Cancel – Use Cancel to cancel the creation of an new entry. The Cancel button replaces the New button a save of the entry is made.
Save – Click Save to save a new record or any changes to an existing record. New records will appear under the List of Data Mappings column on the left hand side of the editor.
Delete – After selecting an existing mapping record from the List of Data Mappings list on the left hand column, click Delete to delete the record.

Data Mapping Editor parameters

Choosing Data Element Names – The names that are used for Data Elements must ensure that no Special Characters or Reserved Keywords are used. Refer to Govern Keywords for a list of keywords that should not be used.

Oracle Users and Data Element Names

Due to the case sensitivity of table names, a convention of all Uppercase or all Lowercase names should be decided upon. Do not use any Oracle Keywords for Data Element Names.

Data Element Name

Specify a Data Element Name for the mapping record. This is a unique name that must be included in the request from the external application to the Web service.

NOTE: This field has a maximum of 15 characters; no special characters or spaces are allowed.

Enter a descriptive name for the mapping record that will be used in the following parameters:

English Short Description – Enter a short description for the mapping record. This is useful for fast data entry and look-ups if space is limited on the forms.
English Long Description – Enter a long description for the mapping record. This will be displayed for look-ups on forms and is normally used for reporting.

Second Language Fields

When there is a 2nd language, or multiple languages, ensure that these description fields are also completed; i.e. French Short Description, and French Long Description.
Table Name – From the drop down menu, select the name of the Govern table that the data will be mapped to. Available tables are:

  • PC_LEGAL_INFO
  • PC_AREA
  • PC_PARCEL

Column Name – The table columns that are listed are filtered according to the table that is selected in the Table Name parameter.

Creating a Data Map record

To create a data map record, use a Data Element Name that will be acceptable to the requesting external application. This name will be used in the method that will be sent to the Web service.

  1. On the GNA ribbon, select Editors (tab) > Data Mapping Editor…
  2. Click New in the Data Mapping Editor.
  3. Locate the parameter called Data Element Name; enter the Data Element Name.
  4. If not expanded click the expansion arrow (A) to display the additional parameters in the form; complete the parameters.
  5. Select a table from the Table Name drop down menu.
  6. Choose a column name within the table that was selected.
  7. Click Save to save the mapping record to database.

When the external application makes a request to the web service, if the Data Element Name is in the method, the data will be retrieved, updated or deleted from the Govern database.
Testing a Web Service Request

As an example, we want to make a request that will obtain the tax map and the zoning information of the following Parcel ID’s, 16800, 16804, and 16807. This can be done in three (3) steps.

STEP 1 – Create the data mapping records

It is necessary to create the data mapping records for the elements that will be called in the method structure. For our example we will be using the pcTaxMap and areaZoning elements.

  1. On the GNA ribbon, select Editors (tab) > Data Mapping Editor…
  2. Click New, to create a new Data Mapping Record.
  3. Enter a Data Element Name of pcTaxMap.
  4. Click to expand the fields and enter an English Short and Long Description; enter PC Tax Map as a description.
  5. The tax map information will be coming from is the PC_AREA table in the ZONING column; select PC_PARCEL for the Table Name, and TAX_MAP for the Column Name.
  6. Click Save to save your mapping record.

Repeat the above steps to create the areaZoning data element. Use PC Area Zone as the description. The Table Name and Column Name are PC_AREA and ZONING

STEP 2 – Create the XML request structure

Refer to the Service Contract section of the MS Govern Property Control System Service API guide; this will provide you with the expected structure of the MSGovern_GetElementValue function. From the guide we obtain the following information:

Function MSGovern_GetElementValue (
ByVal strXmlElement As String ) As String
The retrieve elements must in structure of xml:
<?xml version=”1.0″ encoding=”utf-8″?>
<getElementValue>
<ParcelIds>
<ParcelId value=”16800″/>
<ParcelId value=”16807″/>
<ParcelId value=”23452″/>
</ParcelIds>
<ElementItems>
<ElementItem name=”areaZoning”/>
<ElementItem name=” areaSchDist “/>
</ElementItems>
</getElementValue>

For our example we will use the following…

<?xml version=”1.0″ encoding=”utf-8″?>
<getElementValue>
<ParcelIds>
<ParcelId value=”16800″/>
<ParcelId value=”16804″/>
<ParcelId value=”16807″/>
</ParcelIds>
<ElementItems>
<ElementItem name=”pcTaxMap”/>
<ElementItem name=”areaZoning”/>
</ElementItems>
</getElementValue>

The Parcel ID’s that we are requesting are specified within the <ParcelIds> tags. our Element Items are specified within the <ElementItems> tags. Note that the names are identical to what was specified in GNA in STEP 1 above.

NOTE: Verify that the XML structure is identical to specifications in the MS Govern Property Control System Service API document.

Always ensure that the Element Item name is identical to the one created in GNA.

STEP 3 – Validate the XML request with the Test Client

Locate the WcfTestClient.exe application that is included with the WCF PC Web Services package. This program is usually located in a folder called Test Application. Refer to the MS Govern Property Control Service Setup and Configuration guide for details about using the test application.

  1. Start the test application; add the WCF Service.
  2. On the left hand side, under the list of available methods in the service, locate the MSGovern_GetElementValue() method.
  3. Double click on the method to load it in the Test Client.
NOTE: A limitation of the supplied test client is that Return characters and Line feeds are not recognized. These characters must be manually removed in the editor.

As an example, the following formatting will become a single line when the returns and line feeds are removed.

<?xml version=”1.0″ encoding=”utf-8″?>
<getElementValue>
<ParcelIds>
<ParcelId value=”16800″/>
<ParcelId value=”16804″/>
<ParcelId value=”16807″/>
</ParcelIds>
<ElementItems>
<ElementItem name=”pcTaxMap”/>
<ElementItem name=”areaZoning”/>
</ElementItems>
</getElementValue>

becomes…

<?xml version=”1.0″ encoding=”utf-8″?><getElementValue><ParcelIds><ParcelId value=”16800″/><ParcelId value=”16804″/><ParcelId value=”16807″/></ParcelIds><ElementItems><ElementItem name=”pcTaxMap”/><ElementItem name=”areaZoning”/></ElementItems></getElementValue>

The above is only a charateristic of this test client; other clients may differ in behavior.

4. Copy the single line version of your XML code and paste it into the Value field in the Test Client.
5. Click Invoke; any errors will be displayed in a dialog box.
6. When the action is successful, a response is displayed in the Response pane of the Test Client.

Viewing the Results

In the Test Client, the request and response parameters can be displayed in two (2) modes, Formatted, and XML. You can switch between the two views with a click on the corresponding tabs along the bottom of the Request pane. When you are in XML mode results from the successful requests to the Service can be observed.


103-ED-011


0 votes, average: 0.00 out of 50 votes, average: 0.00 out of 50 votes, average: 0.00 out of 50 votes, average: 0.00 out of 50 votes, average: 0.00 out of 5 (0 votes, average: 0.00 out of 5)
You need to be a registered member to rate this.
Loading...

GNA – Resource File Editor

Resource File Editor

Overview

Resource files typically contain data that is intended to be deployed with applications. This data can be in the form of text strings, and occasionally images. The Resource File also allows the storage of different language versions used for localization of the user interface.
The Govern Resource File contain text, headings, labels, exceptions and error messages that appear in the applications within the suite. Other areas and applications that access resource files are the, Mobile Inspector, the eComponents Web pages and their respective Help files.
To access the Resource File Editor, in the Govern New Administration (GNA):

  1. Select Editors (tab) > Resource File Editor…

Resource File Structure

The resource file hierarchy is as follows:

(ROOT) Resource File Name (1) > Module (2) > Function (3) > Key (4)

Read More...

Resource File Module

The Resource File Editor allows you to access and make modifications to the contents of the Govern Resource File. In the file each item or Module is saved containing one or more Functions.
The modules are organized as follows:

NEW: New modules are indicated with a NEW!.


Module Type of information
AR Electronic payment transactions
BE Text and messages for the Business Entity Designer (BED)
BP Batch Process text and messages.
BR Bankruptcy messaags
BW Web audit and Web translation error messages
CC Credit Card Processor error messages
CI Text for the DeployEZ™ Installer
CO eComponent error messages
CR Cadastral Renewal text
CX Text and messages for the Govern Security Manager (GSM)
DE Property Control messages and text
ES Text and messages for the Dynamic Search pane in Govern.NET
GI Text and messages for the embedded Search pane in Govern.NET
GL Text and messages for Govern FMS module
IN Inspection business rules
MA Text and messages for the Govern.NET Mass Appraisal module.
MB Text and messages for the Govern.NET Miscellaneous Billing module.
MD Text and error messages for the Govern Model Designer (MoD).
ME MelissaData business rules
MO Inspection Scheduling messages
NA Business rules for Name and Address records
OD OpenForms Designer
OF Text and messages for OpenForms.
PC: Business rules for Property Control records
PM ePermit business rules
QT Text and messages for Govern QueryTool
RB Text and messages for the Govern.NET ribbon menu interface.
SB Subscription Plan business rules and renewal notices
SC Data Synchronization process text and error messages.
SF Authentication messages
SL GIS Application text and messages
SM Text and messages for the Govern Security Manager . module.
ST Messages and labels for the Govern.NET Self-Reported Tax module.
SY System wide messages and error messages
TE Test translation text
TX Tax business rules
UB Business Rules for the Utility Billing searches
UL UEL Table related text (Quebec)
US Entries for the Govern User Registry
WB Text and error messages for the Web pages
WD Text and error messages for the Govern New Administration (GNA) and DeployEZ™ Publisher
WF Business rules for the Permit Activities
WM Workflow Management
WP Web Profile business rules
WZ Text and messages for the Data Access Block and Web Configuration

Resource File Function

Records are resource files that are organized by module. For example, text that might be related to payments might appear under AR (Accounts Receivable) and permit text under PM (Property Management). The modules are further subdivided according to the type of information they may contain.

Resource File Keys

Each separate Record, may contain multiple Key’s. Each key will contain three (3) columns titled, Key (this is the key name), English (or your first language), and French (a second language). Each of these fields is a text field. Typically, keys are grouped by Function and Module.
The Key is a unique identifier for the text within the function, and should not be modified. You can, however, modify any of the French or English text, in order to create customized Web pages. For example, you can change labels, headings and error messages to match your organization’s Web site.

WARNING: It is critical that the name of a Key should never be modified. Modifying the name of a key can potentially disable the correct functioning of a module.
Modifying Text in the Resource File Editor

Use the following procedure to modify any of the text that is saved to the Resource File Editor. This includes all the labels, headings, exceptions and error messages that appear on a Mobile Inspector, eProfile and eComponent Web pages.

An ampersand (&) before a word or letter displays an underline; for example, &File, E&xit, &Help appears as File, Exit and Help. The F, x and H in this example are hotkeys; i.e., Alt + F displays the File menu, Alt + H displays the Help menu and Alt + F, X closes the application.
To display an ampersand on the Web, you need to enter two ampersands (&&) in the Resource files; for example to display Cat & Dog Licenses, enter Cat && Dog Licenses.
To modify the text:

  1. In the Govern New Administration (GNA), select Editor (tab) > Resource File Editor…
  2. Select File > Open (Ctrl + O)
  3. Navigate to the directory where GovernNet.en.resources and GovernNet.fr.resources are located. By default, these files are located in a folder called ResourceFiles. This folder is created in the root of the MS Govern installation; the folder is called ResourceFiles.
  4. Select and open one of these files. Both files will open in the Editor.
  5. Click File > Find on the .NET Resource Editor main menu bar or click Ctrl + F on your keyboard, to locate the text you want to modify.
  6. Enter the text string that you want to locate in the Find textbox.
  7. Check Exact Match if you want to locate the whole word or phrase exactly as entered.
  8. Click Find to locate the text or click Cancel to close the Find form without any further actions.
  9. If the text was found, right-click on the text string to display a floating menu; select Edit… (1) to open the Resource Files Text Editor.
  10. Make your modifications directly in the English String (2) and French String (3) text boxes, as required.
NOTE: You should not modify the Label or Key, Function, or the Module.

11. Click OK.

NOTE: When you click OK, this closes the text box. You need to save the file in order to save your changes.
Click File > Find Next, on the .NET Resource Editor, or F3 on your keyboard, to locate the same text in another file, if required.

12. Click File > Save, or Ctrl + S, when you have completed your modifications. Both the French and the English files are saved.
13. Click File > Close the file. A confirmation message appears if there are any unsaved modifications. You need to save the file in order to save your modifications.

Similarly, when you click Exit, a confirmation message appears if there are any unsaved modifications.

Upgrading Resource Files

NOTE: The Resource File Merge feature is required for upgrades only.

Merging Resource Files

Performing an upgrade to the next version of one of MS Govern’s eGovern – Public Self Service Portal can lead to loss of modifications made to the resource file. In order to avoid losing these modifications, you will need to run the Resource Files Merge process.
In running the resource file merge process, new Keys, containing the new text and features, are added to your existing file while existing keys are left untouched.
To merge two resource files together:

  1. Click File > Merge on the .NET Resource Editor main menu bar, or click Alt + F, M, to open the Merging Resource Files process.
  2. Click Browse beside the Base File parameter and navigate to the new file that you want to merge with your existing file.
  3. Click Browse beside the File to include text box and navigate to your existing file.
  4. Click OK. All the new keys will be added to your existing file. All existing text is left as is. If the merge was successful a confirmation window will appear; click OK.

Click Cancel to close the form without merging the files.

Resource File Locking and IIS

Users of Govern’s eGov should note that when the Internet Information Services (IIS) is running, resource files cannot be maintained by the Resource File Editor. IIS locks the files making it inaccessible. In order to access the resource file, you must stop the IIS service. This can be performed through the Control Panel; Control Panel > Administrative Tools > Services > Internet Information Services (IIS) Manager

Managing User Changes to Resource Files

Internally the Govern system uses the following methodology to maintain resource files and manage any user modifications.

The Methodology

The methodology for updating the resource files located in the ResourceFile folder of the deployment directory is as follows:
When changes are made to the Resource file by the user, the modifications are not saved directly into the GovernNet.xx.resources files (xx = 2 letter culture language, e.g. en = English, fr = French, etc.). A new file called GovernNetClient.xx.resources is created that holds all user modifications.
When a new deployment is prepared and is ready for installation a three (3) step process occurs:

  1. The old GovernNet.xx.resources files on the client are deleted.
  2. A new empty file called GovernNet.xx.resources is created on the client, and the user changes within the GovernNetClient.xx.resources files are appended to these newly created files.
  3. Now a second append is performed by combining the new GovernNet.xx.resources file located on the server to the one on the client (this is the one with the appended user changes). The resulting resource file is then updated on the server.

This process will ensures that all client changes are kept when the resource file is updated, in addition the server will always maintain a version of the resource file with all user changes.

But what happened to my resource changes?

Modifications that are made to a resource node will be updated the next time a deployment is regenerated in the DeployEZ application.

NOTE: User modifications to resource files should be made to the GovernNet.xx.resources file. The system will internally manage the changes. Users should NOT modify the GovernNetClient.xx.resources file.


NOTE: Users of the eGovern – Public Self Service Portal should note that the resource files containing the content of the eGovern menu Help text, i.e. GovernNetHelp.en.resources and GovernNetHelp.fr.resources are separate from the main system resource files. These files are also maintained with the GNA Resource File Editor, but should be backed up in a separate location.


103-ED-012


0 votes, average: 0.00 out of 50 votes, average: 0.00 out of 50 votes, average: 0.00 out of 50 votes, average: 0.00 out of 50 votes, average: 0.00 out of 5 (0 votes, average: 0.00 out of 5)
You need to be a registered member to rate this.
Loading...


GNA – Shared Expression Editor

GNA – Shared Expression Editor

Version 6.1

Overview

The Shared Expression Editor is new in Govern OpenForms 6.1. It is used to facilitate the management of the expressions that are used in multiple forms. Shared Expressions can be created by year and / or jurisdiction.

To view a pdf version of this page with images, see:
Shared Expressions.pdf

Accessing the Shared Expression Editor

To access the Shared Expression Editor:

  1. Launch GNA.
  2. Select Editors > Shared Expression Editor.

Read More...

The Shared Expression Editor contains the following sections:

  • Treeview: The existing expressions are listed in the treeview on the left of the form.
  • General Information: The Code and descriptions of the Shared Expression are listed at the top of the form.
  • Shared Expression text box. The expression is created and displayed in the text box in the center of the form.
    There is an Evaluate section for testing the expression.
    The Context is used for adding the entity in which the expression
  • Used In: When you select an expression, it is displayed in the Expression Editor. The attributes and entities where the expression is used are listed in the Used In section at the bottom of the form.

Shared Expressions can be defined by year. However, the Shared Expression Editor form is not year-based.


Creating a New Shared Expression

To create a new Shared Expression:

  1. Launch GNA.
  2. Select Editors > Shared Expression Editor.
  3. Click New.
  4. Enter a code in the Code parameter to identify the Shared Expression.
    This can be any combination of alphanumeric characters and the underscore. It must start with a letter.
    This is a required field.
  5. Enter descriptions in the Short and Long English and French Description parameters.
  6. Enter the expression in the Shared Expression text box.
    This is a required field.
  7. Select an entity for the expression from the Context drop-down list.
    This is an optional field.
  8. Select By Year if the expression is specific to one or more years.
  9. Select By Jurisdiction if the expression is specific to one or more jurisdictions.
  10. Click Save.

Setting Up Expressions By Year / Jurisdiction

To set up expressions by year and / or jurisdiction:

  1. Select the By Year and / or By Jurisdiction option on the Shared Expression Editor.
  2. The Values by Year/Jurisdiction text box opens.
  3. Click the Add icon to add the years and jurisdictions.
  4. Additional Jurisdiction and Year text boxes are enabled.
  5. Select a jurisdiction from the Jurisdiction drop-down list.
  6. Enter a year in Year text box.
  7. Click Save.

Using Attributes in an Expression

If you want to add an attribute to an expression,
You can specify an entity for the expression. If you do this, the entity must be included in the form where the expression is used.
To specify an entity:

  1. Open the required expression in the Shared Expression Editor.
  2. Select the entity from the Context drop-down box.
  3. Click Save.

Expressions are listed by Code and Short Description in the Context text box.

Evaluating the Expression

Like the Expression Selector, the Shared Expression Editor has Evaluation functionality.
To verify your expression:

  1. Enter your expression in the Shared Expression text box.
  2. If any parameters appear on the Editor, enter values in the Parameters text boxes.
  3. Click the Execute button.
  4. One of the following occurs:
  5. If the expression is valid, the results are displayed in the Result text box.
  6. If the expression is not valid, an error message is displayed in the Result text box.
  7. Click Save to save the expression.

Convert Null Parameters to Default Values

Select this option to convert the Null parameters in the database to default values. This option is selected by default. It is used to facilitate the computation. However, for some expressions, it is better to disable this option. You can test the expression using the Evaluate feature and view the difference between enabling and disabling this option.

Adding the Expression to a GNA Form

Prerequisites

  • The expression must be created in the Shared Expression Editor.
    After creating the expression, you need to close GNA.


Adding the Shared Expression to an Administration FormYou can add the same shared expression to multiple forms in GNA, as well as user forms.For example, you may want to make multiple Mass Appraisal codes required when the Total Value of the property exceeds $1,000,000.00.
To add a shared expression to an administrative form in GNA.

  1. Launch GNA.
  2. Open the first form to which you want to add the expression.
    For example, open the Mass Appraisal Income Overall Adjustments table.
    Mass Appraisal > Table Maintenance > Single Entry Tables > inc – Income Adjustment
  3. Click the ellipsis button beside the Is Required field.
  4. This opens the Expression Selector.
  5. Select the Shared Expression from the Expression drop-down list.
  6. The expression is not displayed in the Expression Editor and it cannot be evaluated.
  7. Click OK.

Adding a Shared Expression to a Govern Form

You can add a Shared Expression to a Govern user form in the OpenForms Designer. For example, you may want to use the expression that you added to several MA Income tables to enable the Rent Summary group box on the CAMA Income form for buildings with a total value exceeding $1,000,000.00.
To add a Shared Expression to a Govern form:

  1. Launch the Govern OFD.
  2. Open the required form.
    For example, open the CAMA Income Information form.
  3. Select a groupbox or add a label to create an expression.
    For example, select the Rent Summary groupbox.
  4. Click the ellipsis button beside a parameter.
    For example, click the ellipsis button beside the Is Enabled parameter.
    This opens the Expression Selector.
  5. Select the shared expression from the Expression drop-down list.
  6. The expression does not appear in the Expression Editor.
  7. Click OK. on the Expression Selector.
  8. Click Save on the OpenForms Designer.

See Also

Related Information


103-ED-018


0 votes, average: 0.00 out of 50 votes, average: 0.00 out of 50 votes, average: 0.00 out of 50 votes, average: 0.00 out of 50 votes, average: 0.00 out of 5 (0 votes, average: 0.00 out of 5)
You need to be a registered member to rate this.
Loading...


GNA – Field Mask Editor

Field Mask Editor

Overview

With the Field Mask Editor, you can define a set of Field Masks that can then be applied to fields in the Business Entity Designer (BED). Applying a field mask automatically formats the data entered in the field according to a defined pattern. For example, you can define a pattern for telephone numbers and apply it to a Telephone field in the BED. When the user enters 18005551212 in an OpenForm, this is automatically formatted as 1-800-555-1212.

Use this editor for phone numbers, postal or ZIP codes, Tax Map Numbers, Social Security Numbers, etc.

NOTE: By default the fields on a form are “collapsed”, i.e. they are not fully visible. This is to give the form a cleaner appearance. Additional fields can be displayed with a click on the Collapse/Expand button.

Multi Box Field Masks

NEW! Along with the single box field masks, it is possible to specify Multi Box field masks. Field masks can be displayed in a single long field, or displayed over multiple fields. The Multi Box Field Mask Control takes a custom Govern mask and transforms each part into separate Text Box Masks that are parsed individually. This display option is available during the mask set up in the Field Mask Editor in the Govern New Administration (GNA). Govern’s set of mask rules and characters that apply to the control are below. See the  Validation Rules for Multi Box Masks on the 103-ed-002 page.

Govern Mask Preview

103-SY-003-GNA60-(FieldMskEdtr_PrevwBx00).png
Click image to display full size.

NEW! In the GNA Field Mask Editor there is a preview option that can aid the design and prototyping process. After designing your mask, you are able to get a preview of how it will appear. Entries can be made in the preview fields for further confirmation. This preview feature is valid for single box or the multi box field masks section of 103-ed-002.

NOTEUsing MaskedTextBox (developers can either bind the mask to the preview textbox or call the Initialize directly). This feature is available as of GNA Release 6.0.1502.0083,

Field Mask Editor Command Buttons

New
Click New to clear the screen so you can create a new Field Validation Mask.

When you click on New, the button changes to Cancel ; this will allow you to cancel the creation of the current record. The Cancel button is present until the new record is saved.

Save
Click Save to save a new record or modifications to an existing one.

Delete
Click Delete to remove the current record.

Closing the Editor
To close the editor, click the Close Window button in the upper right hand corner of the form.

Field Mask Editor – Format Tab Parameters

Name
Enter a name for the field mask. This appears in the drop-down list that is displayed when you apply the mask.
NOTE: Only alphanumeric entries are permitted incode parameters. This means that names for codes can only be made up of letters and or numbers. Special characters such as the underscore “_”, the dash “-”, the ampersand “&” , etc. are not recognized.
English Short Description
Enter a short description to identify the department. This is useful for fast data entry and look-ups if space is limited on the forms.
English Long Description
Enter a long description to identify the department. This will be displayed for look-ups on forms and will be normally used for reporting.

Second Language Fields

When there is a 2nd language, or multiple languages, ensure that these description fields are also completed.
Is System
This flag / option is reserved for constants that are designated as Govern system constants.
Display as multiple text boxes
Select this option to display your Field Masks as a multiple box; the default is single box.

GNA60_FieldMskEdtr_00.png
Click image to display full size.

System Reserved Values

Only users with Super-User access will be able to select and deselect the Is System option. In addition Super Users can also create new values and flag them for Govern system use.

NOTESystem constants are reserved for use by the Govern.NET system and as such should not be modified or deleted without a full understanding of the implications. Deletions of system values can damage the Govern.NET system, rendering it inoperable. Modifications that are made to System values should always be noted. When a system wide update is performed, these modifications may be overwritten.

Field Mask
In this parameter, enter the text string that will be used for your field mask.

The following tables list the symbols that can be used in field masks. The second table lists symbols that can be used for Tax Map Numbers only:

Valid Field Masks

Symbol Description
#

Numeric value. Exact number of digits must be entered as defined in the “New Database Field Creation”.

You can use the “-” (Dash) to separate the values.

9 Numeric value left justified compressed with trailing zeroes.
d Numeric value left justified compressed with trailing zeroes.
Z Numeric value right justified compressed with leading zeroes.
0 Numeric value right justified compressed with leading zeroes.
>

Alpha & Numeric values. Alphabetic characters must be in uppercase. If only ONE “>” is entered, then the number of digits entered can be LESS than defined in the “New Database Field Creation” Size.

Otherwise, the exact number of characters must be entered as defined. You can use the “-” (Dash) to separate the values.

< Alpha & Numeric values. Alpha in lowercase. If only ONE “<” is entered, then the number of digits entered can be LESS than defined in the “New Database Field Creation” Size. Otherwise, the exact number of characters must be entered as defined. You can use the “-” (Dash) to separate the values.
A

Alpha character in Uppercase. Number of characters entered must be as defined in “New Database Field Creation” Size.

The Dash “-” or Hyphen can be used to separate values.

^ When present in mask will present each option as a Combo box for selection.
NEW! – This symbol is no longer recognized as an “OR” clause.
! Alpha and numeric values as entered, both uppercase and lowercase. You can use the dash, — to separate values.
“ “ Leaves a blank space before the next series of characters, in the same text box.

EXAMPLE: A zip code should have 5 digits but may have a dash and 4 other digits.
The pattern could be: #####^#####-####

NOTE: NEW! – The “^” symbol is no longer recognized as an “OR” clause; when used in this context, the masks will be displayed in a combo box, (drop down menu), for selection.

Valid Masks for Tax Map Number Fields Only

(To use with the “0”, “9”, “d” and “Z” masks only):

Symbol Definition
. Displays the next series of characters in another text box with the period in between.
: Displays a single “.” Inside the series of characters, in the same text box.
“” Displays the next series of characters in another text box.
Displays a “-” (Dash) inside the series of characters, in the same text box.

=

=

NEW! Validation Rules for Multi Box Masks

Symbol Definition
^ When present in mask will present each option as a Combo box for selection. This symbol is no longer recognized as an “OR” clause.
# Numeric value. Exact number of digits must be entered as defined in the “New Database Field Creation”.
9 Numeric value left justified compressed with trailing zeroes
d Numeric value left justified compressed with trailing zeroes
Z Numeric value right justified compressed with leading zeroes.
0 Numeric value right justified compressed with leading zeroes.
A Upper case Alpha (transform lower case to upper case on key up)
a Case insensitive Alpha
? Any
! Case Insensitive Alphanumeric
> Upper case any
< Lower case any
. Separator
Separator
space Separator
: This character in the multi box field mask will function the same as a “ . ” separator in the single box field mask.

Other standard characters remain as is.

NOTE: The following rules apply for a Multibox

Parsing rules for areas with Read Only and Edit permissions

When parsing Read Only areas where masks are applied to, e.g. in the Treeview, and areas where the Edit permission is permitted, e.g. forms, the following rules will apply:

  1. The user will be prevented from entering invalid characters.
  2. If the mask contains a single “/”, it is validated as if the mask was the same length as the text
Symbol Definition
# Numeric
d Numeric, remove / add trailing 0
9 Numeric, add / add trailing 0
0 Numeric, add / add leading 0
Z Number, remove / add leading 0
> Upper case any => Transform lower case
< Lower case any => Transform Upper case
A Upper case Alpha => Transform Lower case
a Case insensitive Alpha
! Case Insensitive Alphanumeric
? Any

Other standard characters remain as is.

A Note to Users accessing Govern Remotely

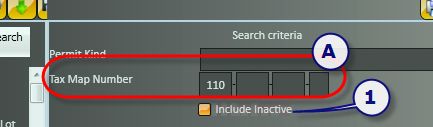
NOTE: Users should note that parameters with field masks that are designed to accept hyphen separated entries entries, e.g. Telephone Numbers, Tax Maps, will display in OpenForms as a parameter with individual fields. These individual fields can be accessed with the tab key (A).
GNA60_GloblValMaskEdtrGovRemote.jpg
The Field Mask for the above would look like the like the following “XXX-”XXX-XXX-X”, each of the grouped X’s are separated. Users that are accessing Govern over a Remote Link, e.g. VPN should pay attention to the tab sequence when pressing the Tab key to jump to the next parameter. Over a remote connection, in the Tax Map parameter, the tab key will not move the cursor to the next field of the Tax Map number, rather it will jump to the Include Inactive parameter (1). This behavior only applies to remote connections to Govern.


TUTORIAL

Create a Zip Code Field Mask

In the following example we will create a custom Zip Code Number. This field mask will accommodate the United States zip code format, and the Canadian postal code format. The background information required is that US zip codes can be 5 numeric digits, or in a format called ZIP+4. ZIP+4 includes the standard five digits plus a hyphen and four more digits. The Canadian postal code uses six alpha-numeric (6) characters; the Alpha and Numerical characters alternate starting with and alpha character. For example H8T 2M3. The first character is always an alpha, and there is a space between the first three characters and the last three.

To create our custom mask…

  1. In Govern New Administration (GNA), select Setups/Editors > Editors > Field Mask Editor…
  2. In the Field Validation Mask Editor form, click New.
  3. In the name field, enter zippostalcode.
  4. Enter a Short Description of US Zip & Cdn Post in the field.
  5. Click into the Long Description field, the Short Description will be copied into the Long Description, add any additional information to the name.
  6. In the Field Mask field, enter the following mask pattern:
    #####^#####-####^A#A#A# NEW!Note:The “^” symbol is no longer recognized as an “OR” clause; when used in the context of Field Masks, the masks will be displayed in a combo box, (drop down menu), for selection
  7. Click Save to save the mask.

Based on the information that was provided, the mask will format the following:
Five (5) numerical characters OR 5 characters a dash and then four (4) more numerical characters, OR six (6) alternating alpha and numerical characters.
NEW! – The Caret symbol, “^“, is no longer recognized as an “OR” clause; when used, the masks will be displayed in a combo box, (drop down menu), for selection.


103-ed-002


0 votes, average: 0.00 out of 50 votes, average: 0.00 out of 50 votes, average: 0.00 out of 50 votes, average: 0.00 out of 50 votes, average: 0.00 out of 5 (0 votes, average: 0.00 out of 5)
You need to be a registered member to rate this.
Loading...

Web Config Editor

Web Config Editor

Overview

The Govern New Administration (GNA) Web Config File Editor is designed to manage Govern’s eComponents. With the Web Configuration File Editor, you are able to define configuration parameters, determine how errors and exceptions are managed by the system, and set auto login parameters.

For details about using the Web Configuration File Editor, refer to the eGovern Public Self Service Portal Release 5.1 user guide. See e-Government (Public Web Portal)


103-AP-006


0 votes, average: 0.00 out of 50 votes, average: 0.00 out of 50 votes, average: 0.00 out of 50 votes, average: 0.00 out of 50 votes, average: 0.00 out of 5 (0 votes, average: 0.00 out of 5)
You need to be a registered member to rate this.
Loading...

GNA Profile Editor

Profile Editor

Overview

In Govern, a Profile is the equivalent of a department in Govern for Windows. Inside a department there would be Functions and Reports. In Govern for OpenFormsTM, this same analogy can be applied in the sense that Functions are referred to as OpenForms. With this analogy, in a Profile, we would have OpenForms and Reports. In Govern for Windows, inside a department we can have Functions for tasks like Permitting, Complaints, Offences or obtaining Property Information. Within Profiles are OpenForm Zones; these are the tabs that appear under the profiles. These tabs can have additional command buttons.
The Profile Editor is the interface used to configure profiles and access to OpenForms. Administrators that are familiar with MS Govern’s user access interface will notice similar parameters

Profile Editor tab

The Profile Editor interface is divided into three (3) sections, Properties, Links, and Queries. Each section can be accessed by selecting either one of the tabs below the Profile tab.

Command Buttons

New – On the Profile tab, click New to remove all parameter entries in the currently selected profile. When saved, this will add your profile to the list of profiles. (Table: USR_PROFILE)
When you click on New, the button changes to Cancel ; this will allow you to cancel the creation of the current record. The Cancel button is present until the new record is saved.
Save – Click Save to save the current parameters to the List of Profiles or to update an existing profile.

Copying a Profile

When creating one or more profiles that are similar in forms, a good strategy is to create a “base” profile, then make copies of the profile. The minor modifications can then be made to each copy.
Copy – Click Copy to create a copy of the currently selected record. When the record is copied, it is given a random name that is based upon the original Profile Code.
Delete – Select a profile from the List of Profiles, click Delete to remove it from the list.

Closing the Editor

To close the editor, click the Close Window button in the upper right hand corner of the form.

Profile Editor – Properties tab parameters

The Properties tab is used to configure details of the tab that are displayed in Govern.NET. Parameters such as the label displayed on the tab, the department that it is linked to, warnings and the fiscal year that the user may be restricted to. The Links tab is used to link Models to OpenForms, and Reports that are linked to the Profile.

Code – Enter the code that will be used for this profile. This is a unique number that cannot be shared with another existing profile.
There is an Expand/Collapse button located below this field; when entering parameters, ensure that you click on this button to display the additional fields.
English Short Description – Enter the English description that will be used for fast data entry and look-ups where space is limited on forms.
English Long Description – Enter the English description that will be displayed for look-ups on forms, and normally used for reporting.

Dataset Type Code – Select the Dataset Type code from the drop down menu. This refers to the key that the profile will be using. This value will also serve to filter the options that will be displayed in the Default eGroup and Default eStyle parameters.

NOTE: For example if a Dataset Type Code of Name ID is selected, only the eGroups or eStyles that return a Name ID will be displayed in the Default eGroup and Default eStyle parameters.

View for Dataset TreeView
Specify the view that will be used for the Dataset TreeView; available options provide additional Treeview information.

eStyles and eGroups

Search Styles and Search Groups that are created in the Web Search Styles Management and the Web Search Group Management forms can be applied to the profiles through the Profile Editor. Either individual styles or groups can be configured.

Default eStyle – Select a default syle from the drop-down menu.

Default eGroup – Specify the default group that will be used for this profile. This group is a collection of styles

Department – Choose a department from the drop-down menu that this profile will work by, for example a permitting related profile might work with the Building Department. Click the ellipsis button to display the Department maintenance form.

Current Fiscal Year – This parameter allows you to specify the fiscal year that this profile will have access to.

Properties tab parameters – Options

Approved Subdivision – Choose this option to restrict access to only approved subdivisions.
Overwrite Calendar – When selected, the user will be able to overwrite a calendar.

Make Profile Available for Govern Mobile Option

During the Initialize Mobile Database process, a subset of a Source database is created to be used for a mobile deployment. The Available for Mobile Application option, when selected, will allow the the user to control whether the currently selected profile is added to the subset database. By default this flag is not selected, i.e. will not be added to the Mobile database that is generated.

Available for Mobile Application – When selected, this flag will indicate that the system should include the currently active profile in the subset, i.e. Mobile database that is generated from the Initialize Mobile Database process.

NOTE: First time users must run the GNA Verify Database process in order to make the Available for Mobile Application option visible for selection.


WARNING: When the Initialize Mobile Database process is initiated, if no profile is selected, the following error will be displayed:
Handled Error – There are no available profiles for Mobile. Please select at least one in the Profile Editor.
This due to the fact that during the Verify Database process, the flags for inclusion of all profiles were deselected. Always ensure that at least one profile has been selected.


Available for Desktop Application – Select this flag to indicate that the system should make the currently active profile available.

Profile Editor – Links Queries tab parameters

Click Add to display the list of available forms that are required to be added to the profile. Select one or more forms; click OK to accept the forms.
To remove one or more forms, click to select the form(s); click Remove to remove the form.

Forms (group)

Appearing in this list are the Business Models that users can be given access to.

Reports (group)

Click Add to display the list of available reports that are required to be added to the profile. Select one or more reports; click OK to accept the reports.
To remove one or more reports, click to select the report(s); click Remove to remove.

A/R Subsystems (group)

As with Reports and Forms above, click Add to display the list of available items. Select one or more from the list and click OK to accept their addition.
To remove one or more batch processes, click to select the batch process(es); click Remove to remove.

Batch Processes (group)

As with Reports and Forms above, click Add to display the list of available batch processes. Select one or more from the list and click OK to accept their addition.
To remove one or more batch processes, click to select the batch process(es); click Remove to remove.

External Commands (group)

As with Reports and Forms above, click Add to display the list of available items. Select one or more from the list and click OK to accept their addition.
To remove one or more batch processes, click to select the batch process(es); click Remove to remove.

Profile Editor – Queries tab parameters

On Click (group)

A click on the radio button to select the action that will be executed when the user clicks on the icon. Options are as follows:

  • None – The result of the query that has been configured in the Query parameter is displayed, using the configured Control Type, i.e. Pie Chart, Line Chart, and so on.
  • Execute Command – Click Execute Command to display the combo box. This parameter will list command that are available. Alternatively, click the ellipsis “” to display the External Command editor, and enter an expression.
  • Open Batch Process – A click will launch a configured batch process.
  • Open Form – Launch a specified OpenForm.
  • Open Modal Form – Launch a specified OpenForm, but display the form in a modal window. See When to use a Modal Window in Govern
    below.
  • Open Query Tool – When installed, this option will launch the Govern Query Tool.
  • Open Report – This option will launch a configured report.
  • Open View Query – Select this option to display a screen that will be populated by the results of a View Query.


When to use a Modal Window in Govern

A modal window is a graphical control element that disables the main window and keeps whatever window that is displayed visible. The users must complete the actions required by the modal window before they are allowed to return to main application. Use this option when you want the user to address the requirements of the window before moving on.

See Also

Govern New Administration (GNA)


103-ED-001


0 votes, average: 0.00 out of 50 votes, average: 0.00 out of 50 votes, average: 0.00 out of 50 votes, average: 0.00 out of 50 votes, average: 0.00 out of 5 (0 votes, average: 0.00 out of 5)
You need to be a registered member to rate this.
Loading...

GNA – Constant Value Editor

Constant Value Editor

Overview

The GNA Constant Value Editor is used to define and maintain values that are constant within the Govern system. Constants can be used in formulas, logical expressions and expressions for values that change on a yearly basis or varies baseare different based on the . Constants are saved by year, as a result you only need to edit the constant definition in order to update your formulas and logical expressions.

NOTE: By default the fields on a form are “collapsed”, i.e. they are not fully visible. This is to give the form a cleaner appearance. Additional fields can be displayed with a click on the Collapse/Expand button (A).

What’s New

[6.1] User Constants have undergone changes to implement new concepts introduced in Version 6.1.
see Version 6.1

Command Buttons

Copy to Next Year
Click Copy to Next Year when you need to copy the constant value, code and value, and initialize a new year.
New
Click New to clear the form so that you can enter new data.

NOTE: When you click on New the button changes to Cancel ; this will allow you to cancel the creation of the current record. The Cancel button is present until the new record is saved.

Save
To save a new record or any modifications to an existing one, click Save .
Delete
Click Delete to remove the current record from the database.

Parameters

Filter group

In the Filter group (A), select the fiscal year that you would like to use as a filter for displaying available constants.
Year
Constant tables are created by fiscal year; by default this parameter displays the current fiscal year.

Constant Value Editor – Constant tab

Name
Enter the name for this constant.

NOTE: Only alphanumeric entries are permitted in code parameters. This means that names for codes can only be made up of letters and or numbers. Special characters such as the underscore “_”, the dash “-”, the ampersand “&” , etc. are not recognized.

Short Description
Enter a short description. This is used for fast data entry and look-ups if space is limited on forms.
Long Description
Enter a long description. This is displayed during look-ups and on forms and reports.
When there is a 2nd language, or multiple languages, ensure that these description fields are also completed.

Is System
This flag / option is reserved for constants that are designated as Govern for .NET system constants. (SYSTEM_FLAG in USR_CONSTANT table)

NOTE: When the Verify Database Objects Existence utility is run on the database, a new column called SYSTEM_FLAG of type smallint is added to the USR_CONSTANT table. When selected SYSTEM_FLAG=True. This option can only be modified by users with Superuser administrative rights.

System Reserved Values

Only users with Super-User access will be able to select and deselect the Is System option. In addition Super Users can also create new values and flag them for Govern.NET system use.
System constants are reserved for use by the Govern.NET system and as such should not be modified or deleted without a full understanding of the implications. Deletions of system values can damage the Govern.NET system, rendering it inoperable. Modifications that are made to System values should always be noted. When a system wide update is performed, these modifications may be overwritten.

Value
Enter a value for the constant. for example a Sales tax of 15% would be entered as 0.15.

TUTORIAL

In the following we will create a constant value for a specific fiscal year…

When no Fiscal Year has been defined…

For this example we will create a Sales Tax for the fiscal year 2015.

  1. In the Constant Value Editor form, enter 2015 in the Year: parameter.
  2. Click the Expand button to display the hidden parameters that need to be completed.
  3. Enter a Name for the constant value; use saleTax2014.
    NOTE: When naming the constant in the name parameter, avoid the use of underscore characters “_” and spaces.
  4. Next enter a Long Name for the constant; Sales Tax 2014
  5. Click inside the English Short Description field; the Long Name will be automatically copied into both the English Short Description and English Long Description field. Select and change the text if modifications are required.
  6. Enter names into the Short Description and Long Description fields of the second language parameters.
  7. Any incomplete fields will result in the display of an error screen.
  8. Click OK and complete any required fields.
  9. Save the newly created constant with a click on Save.

When a Fiscal Year has been defined…

  1. When there is a fiscal year already defined, click New; all parameters will be voided.
    NOTE: If you are dealing with multiple years, ensure that the correct year has been selected in the filter group.
  2. Enter a name in the Name field; complete all Short and Long Description fields.
  3. Enter the value for the rate in the Value parameter; click Save.

Once created, the constant value will appear on the left hand side under the Constant List (B) When saved this constant will be accessible for use in formulas and logical expressions. See the following for details:

  • Formula Editor
  • Logical Expression

About System Reserved Values

Only users with Super-User access will be able to select and deselect the Is System option. In addition Super Users can also create new values and flag them for Govern.NET system use. System constants are reserved for use by the Govern.NET system and as such should not be modified or deleted without a full understanding of the implications. Deletions of system values can damage the Govern.NET system, rendering it inoperable. Modifications that are made to System values should always be noted. When a system wide update is performed, these modifications may be overwritten.
ValueEnter a value for the constant. for example a Sales tax of 15% would be entered as 0.15.To create a constant value for a specific fiscal year…When no Fiscal Year has been defined…For this example we will create a Sales Tax for the fiscal year 2014. Enter 2014 in the Year: parameter.Click the Expand button to display the hidden parameters that need to be completed.


103-ED-003


0 votes, average: 0.00 out of 50 votes, average: 0.00 out of 50 votes, average: 0.00 out of 50 votes, average: 0.00 out of 50 votes, average: 0.00 out of 5 (0 votes, average: 0.00 out of 5)
You need to be a registered member to rate this.
Loading...