AR Inquiry – Change Payer Name (101-ar-fea-027)

Accounts Receivable (AR) – Change Payer Name in AR Inquiry

Overview

The Accounts Receivable Inquiry form displays transaction details on the selected account, including historical data. This form is linked to the master file of each subsystem so that you can access all the A/R information available on a given property or taxpayer name and address record.

The Accounts Receivable Inquiry form includes a Summary and a Detail section. The Summary section lists the Accounts Receivable transactions for the selected record. The Detail section displays transaction details on each entry selected in the Summary section.

There are two (2) ways to change the payer name in AR Inquiry:

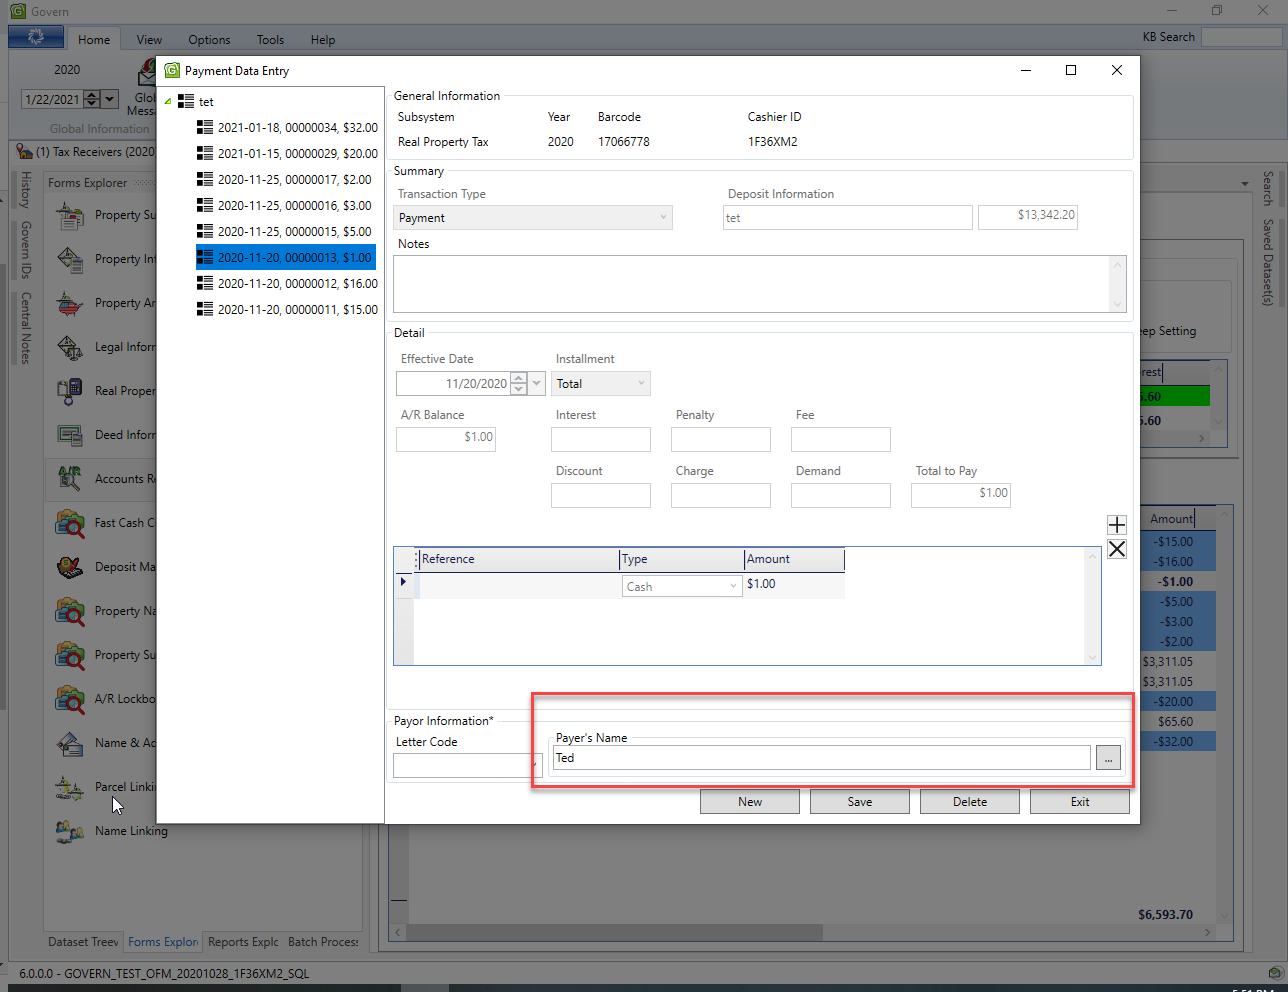
  • Payment Data Entry
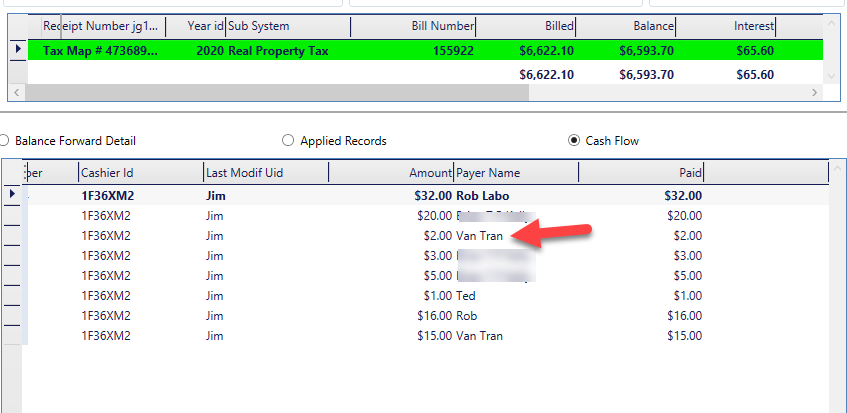
  • Double click on Payer Name row and column in Cash Flow

Functionalities

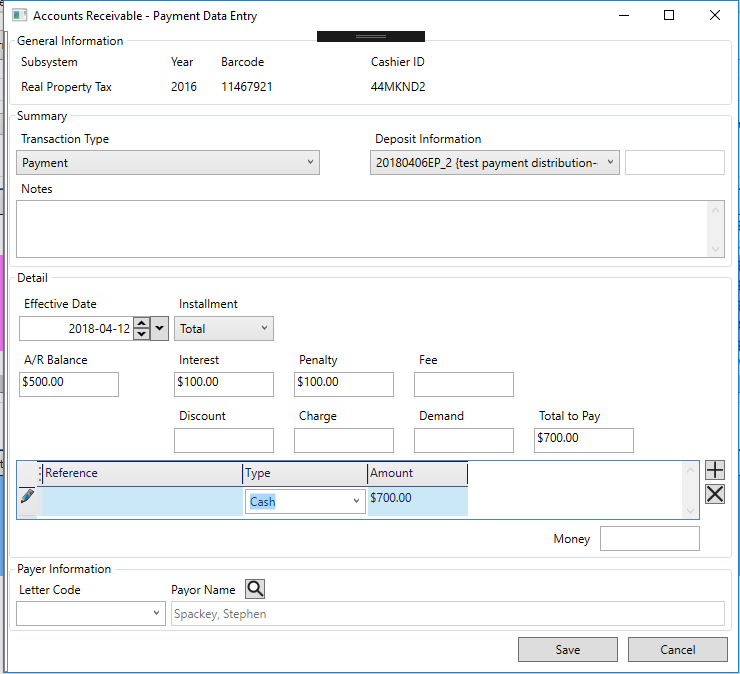
  • Payment Data Entry:

    The Payment Data Entry is using the CC Payor Name control
  • Double click on Payer Name row and column in Cash Flow

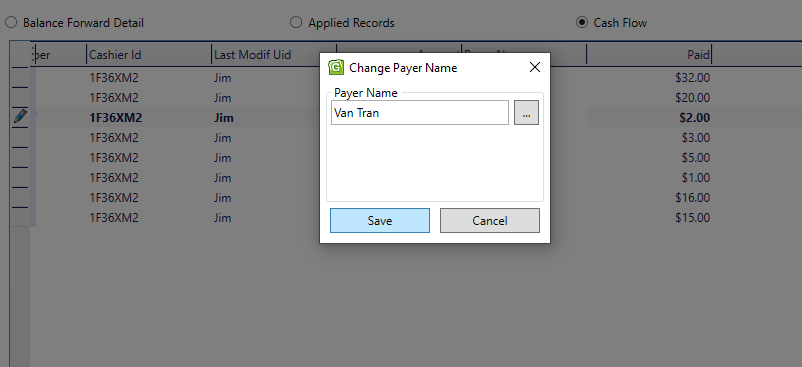
    Double clicking on row and column of Payer Name will open a window to change the payer name

Configuration

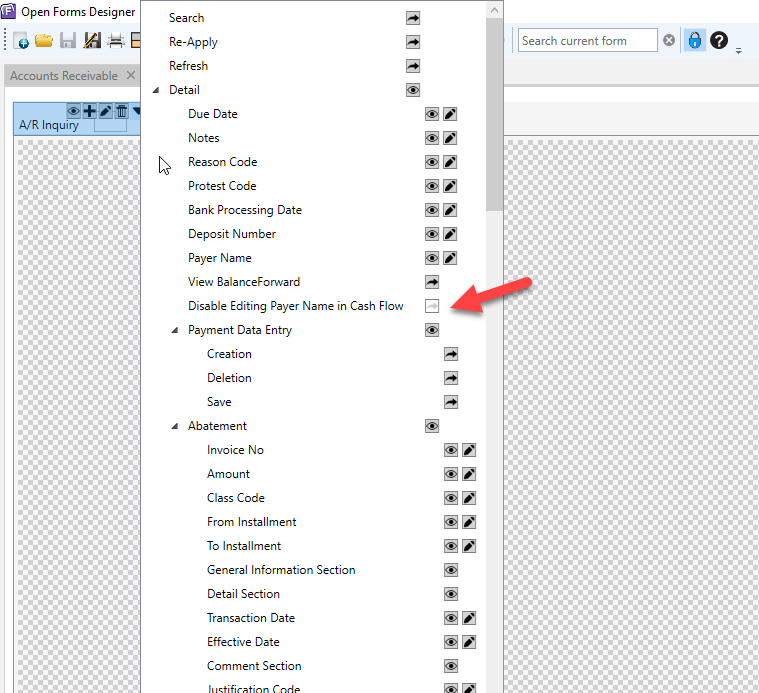
To be able to open the window to change the payer name in Cash Flow, the following setting must be set in the security of OFD in Accounts Receivable form:

The option “Disable Editing Payer Name in Cash Flow” must be disable to able to use the feature.

Related Topics

Accounts Receivable (A/R) – Payment Transfer Data Entry (101-ar-frm-027)

Accounts Receivable (A/R) – AR Inquiry form (101-ar-frm-001)

Accounts Receivable (AR) – What’s New


101-ar-fea-027


0 votes, average: 0.00 out of 50 votes, average: 0.00 out of 50 votes, average: 0.00 out of 50 votes, average: 0.00 out of 50 votes, average: 0.00 out of 5 (0 votes, average: 0.00 out of 5)
You need to be a registered member to rate this.
Loading...

AR – Justification Combo Box (101-ar-fea-029)

Accounts Receivable (A/R) Justification Combo box

Available in Release 6.0.1903

Overview

The Accounts Receivable Inquiry form displays transaction details on the selected account, including historical data. This form is linked to the master file of each subsystem so that you can access all the A/R information available on a given property or taxpayer name and address record.

This is a combo box for specifying a Justification code or Reason code on the AR Inquiry form. This combo-box can be configured to show a Code and/or Description. This is the same as an Entity or GfW. If no entry is selected, the default entry will be the Short Description.

Configuration

NOTE: Before proceeding, ensure that you have updated to Govern Rel. 6.0.1903 and above.

This option is configured in the Govern OpenForms Designer (OFD).

To configure this feature…

1. As an administrator, open the OFD.

2. On the OFD ribbon click Open Form.

3. From the list, select the Accounts Receivable form (default AR008 – Accounts Receivable).

4. Click to select the A/R Inquiry tab.

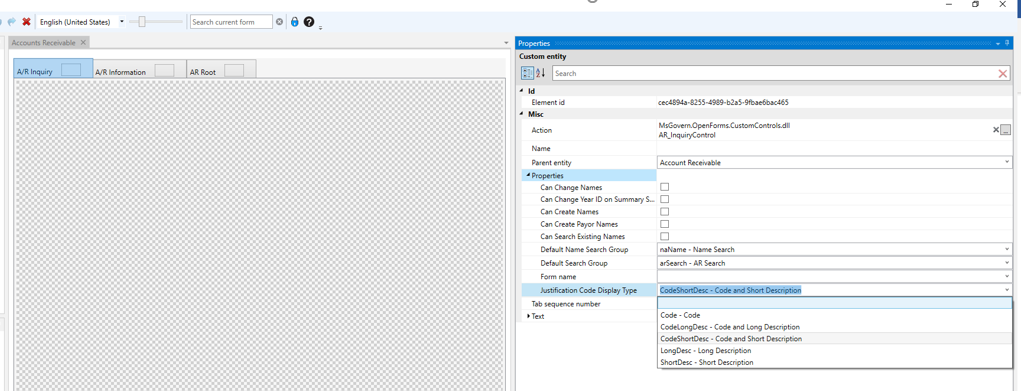
5. On the left-hand side Properties pane, click to expand Properties.

6. Under the list of properties, click to select Justification Code Display Type.

7. Select the default preference for the combo-box.

8. Click Save to save your configuration.


Related Topics

Accounts Receivable (A/R) Inquiry

Accounts Receivable (AR) – What’s New


101-ar-fea-029


0 votes, average: 0.00 out of 50 votes, average: 0.00 out of 50 votes, average: 0.00 out of 50 votes, average: 0.00 out of 50 votes, average: 0.00 out of 5 (0 votes, average: 0.00 out of 5)
You need to be a registered member to rate this.
Loading...

AR Payment Transfer (101-ar-fea-028)

Accounts Receivable (AR) Feature – Payment Transfer

Overview

The Accounts Receivable Inquiry form displays transaction details on the selected account, including historical data. This form is linked to the master file of each subsystem so that you can access all the A/R information available on a given property or taxpayer name and address record.

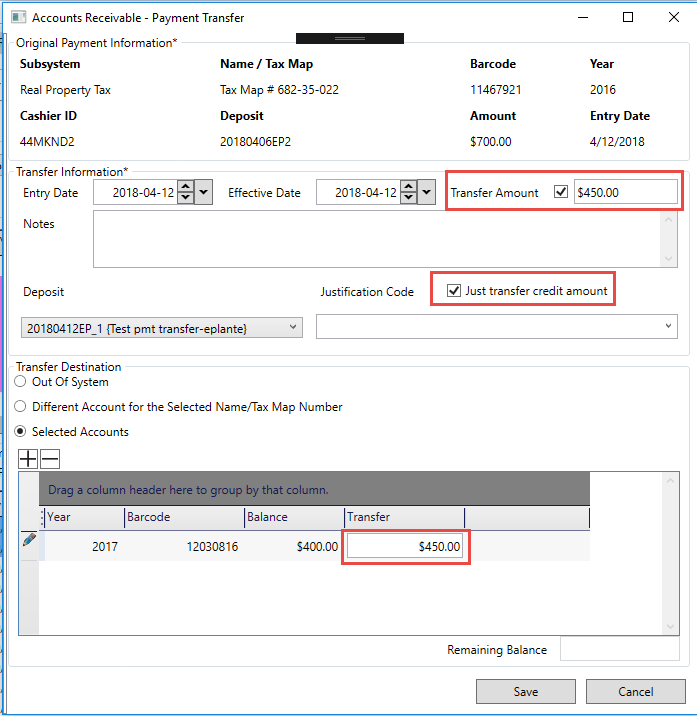
Payment transfers are used to transfer posted payments from one account to another. Typically, they are used to correct an error such as a payment made and posted to the wrong account. For example, a client could make a payment intended for a utility bill that is somehow processed on a tax bill. To correct this error, you can create a Payment Transfer.

Functionalities

Creating a Payment Transfer

To create a payment transfer:

  1. Open a record.
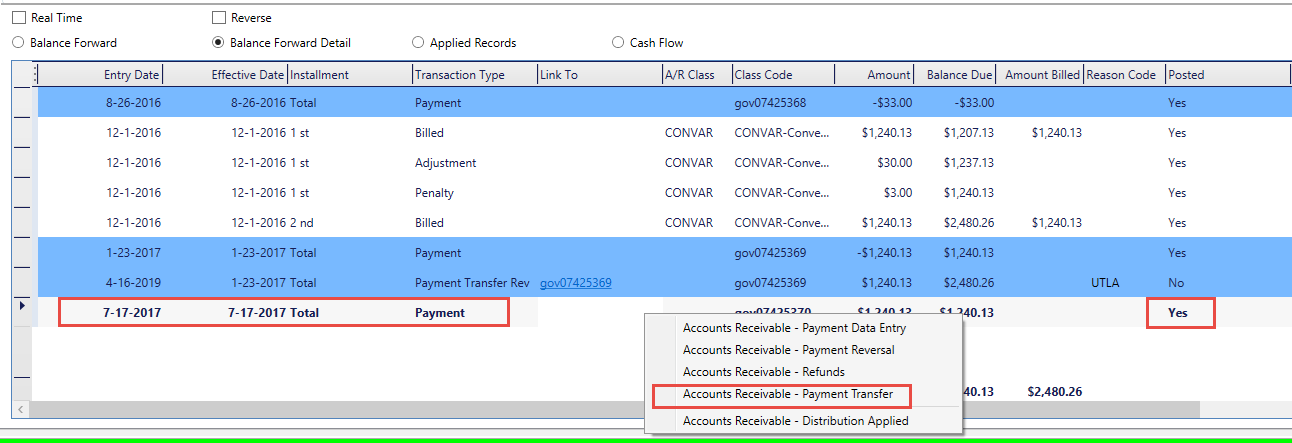
  2. In the A/R Inquiry screen right click on a Posted payment line item
  3. On the floating menu select Account Receivable – Payment Transfer

Read More...


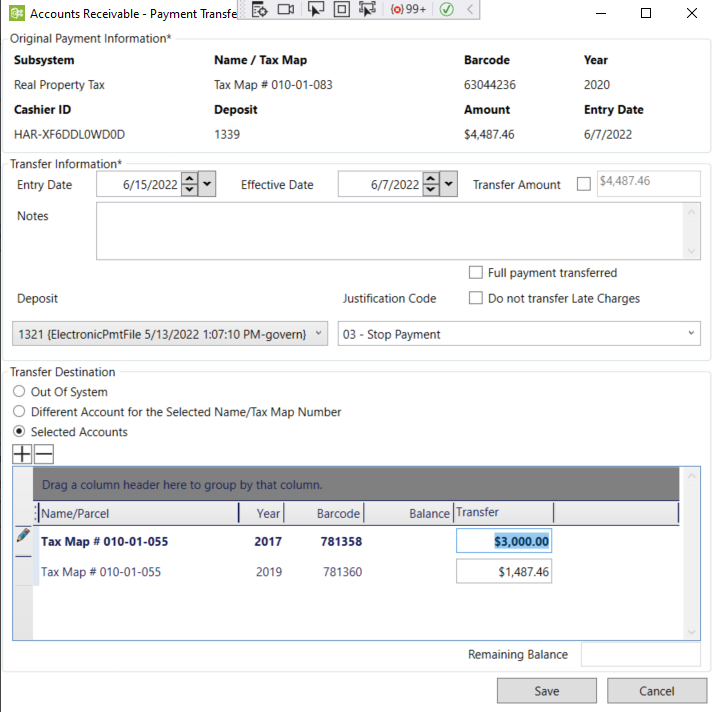
4. The Accounts Receivable – Payment Transfer form is displayed.

5. On the form click to select a transfer destination; Out Of System, Different Account for Selected Name/Tax Map Number, or Selected Accounts.

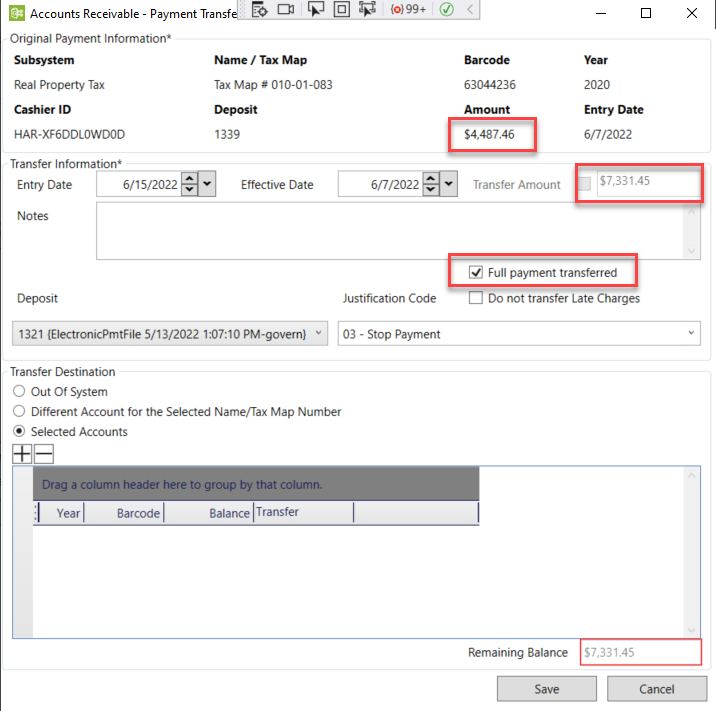
Full payment transferred

If the Full payment transferred option is checked…

In the Original Payment Information, the Amount listed is for the selected AR_ID, which is not necessarily the full payment. If Full payment transferred checkbox is checked, in the Transfer Information section, the Transfer Amount is updated to reflect the full payment amount, including all AR_ID’s attached to the payment. The same is done to the Remaining Balance in the Transfer Destination area.

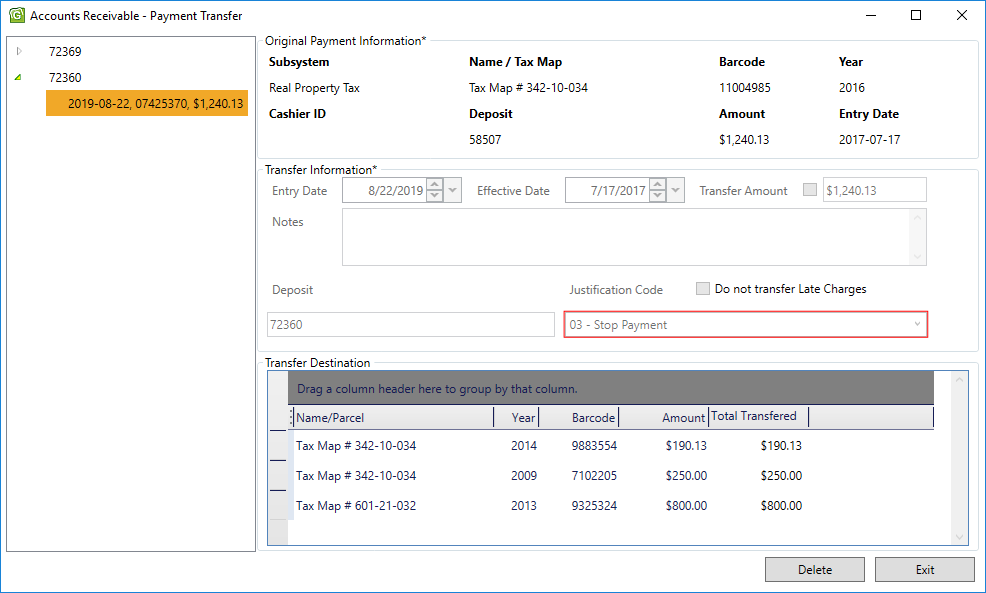
Changing a Payment transfer

Example: When a Payment only deletion is permitted.

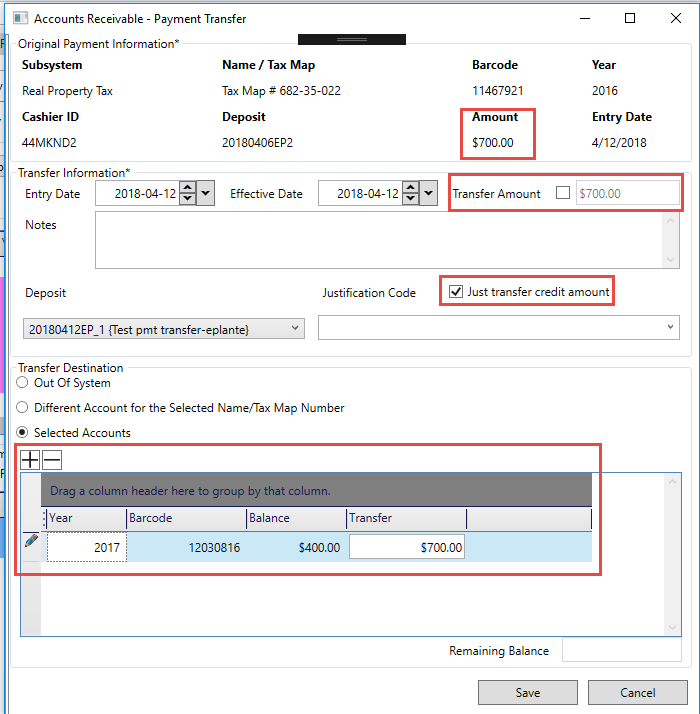
Do not transfer late charges (Just transfer credit amount)

When the Do not transfer late charges option is not selected, i.e. the default, both the principal and interest are transferred.

When the Do not transfer late charges option is selected, only the principal is transferred. This option is useful if the penalty and interest are calculated separately. There was a client that had that need.

NOTE: This applies to full payments, only. In instances of partial payments, the interest is not transferred, only the principal.


DEV NOTE: As stated above, a functionality of this feature when modified will only transfer the OCH part of the payment. Since partial payments do not transfer late charges by default a partial payment = OCH amount will do just that. If required by users, this change to functionality can be requested through Govern Customer Support.

Scenarios

Over-payment with Interests and penalties

Preparation

In this scenario, we have a balance of 400$. We add 100$ interests, 100$ penalties and add an extra 100$ to the now 600 balance which make the total amount 700$. Post the payment.

Test Do not Transfer late charges for a full Payment transfer

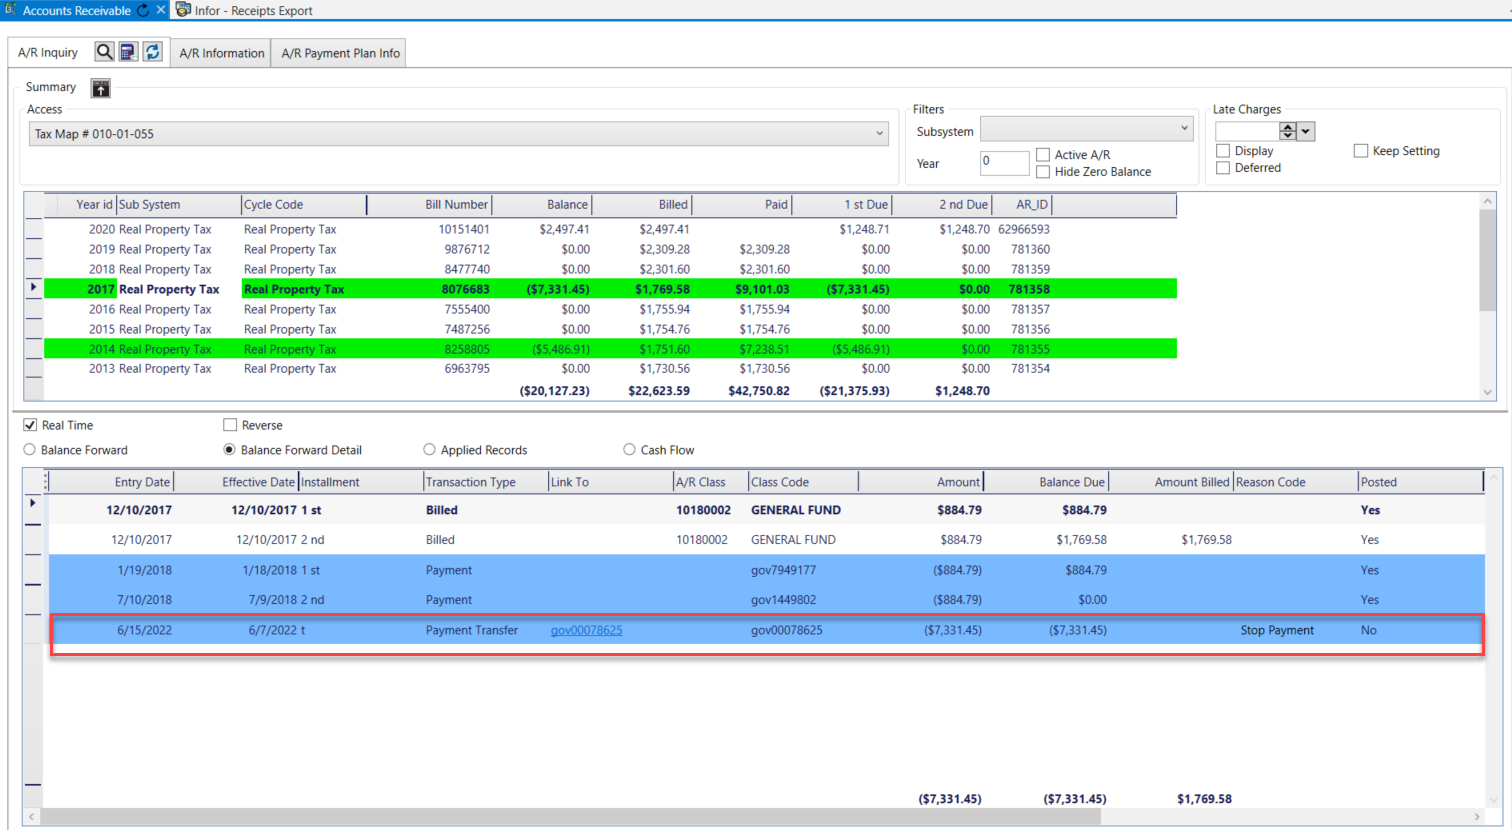
Result on Source Account. The result seems wrong since only 400$ should have been transferred.

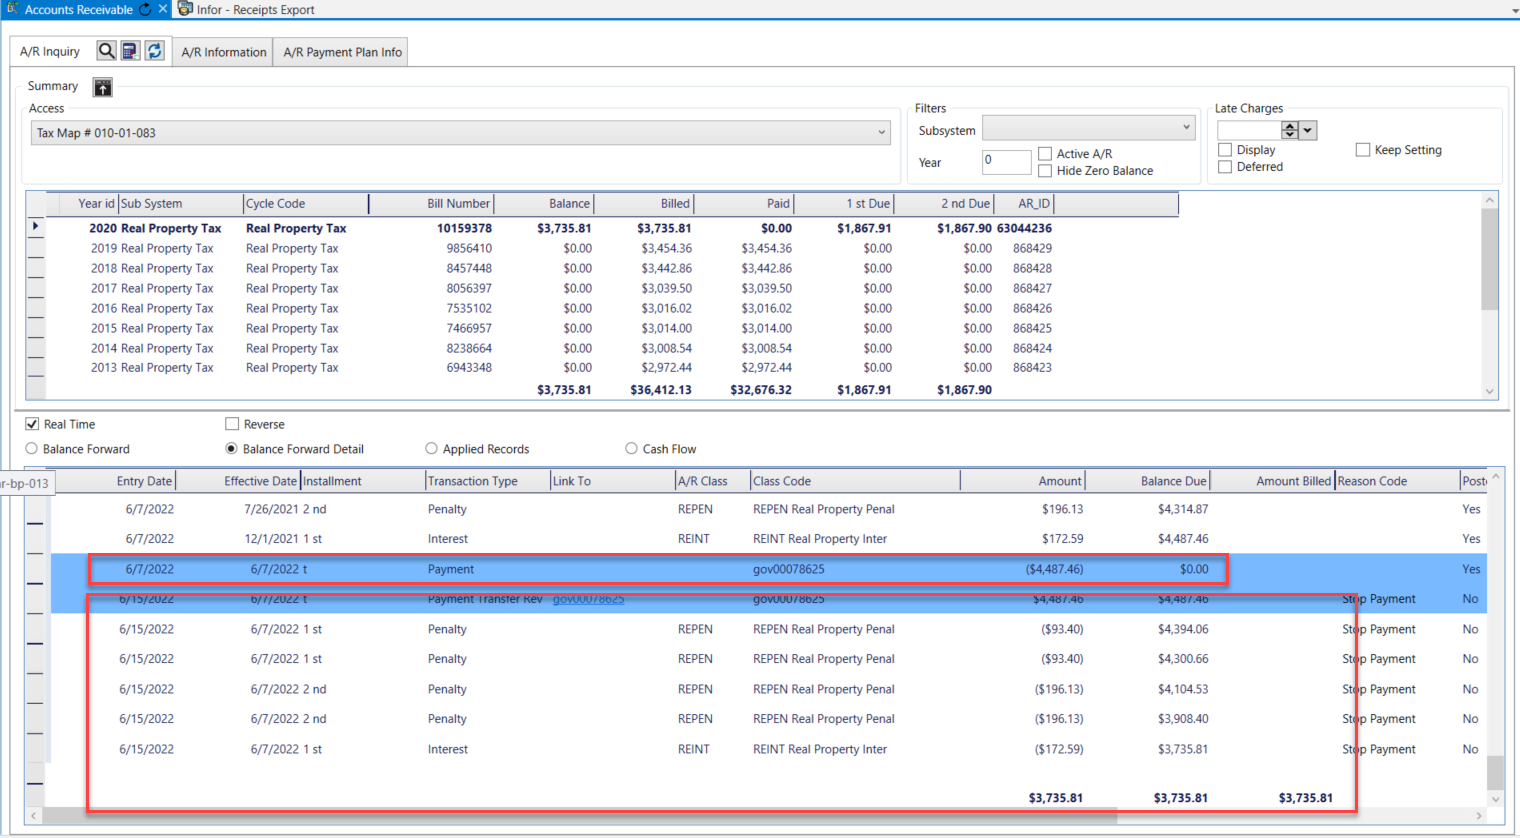
Result on Target Account.

Transfer Full Payment Option

Target Account Results

Source Accounts Result

Do not transfer late charges for a partial payment

Source Account Result

Target Account Result


Related Topics

Accounts Receivable (A/R) – Payment Transfer Data Entry

Accounts Receivable (AR) – What’s New


101-ar-fea-028


0 votes, average: 0.00 out of 50 votes, average: 0.00 out of 50 votes, average: 0.00 out of 50 votes, average: 0.00 out of 50 votes, average: 0.00 out of 5 (0 votes, average: 0.00 out of 5)
You need to be a registered member to rate this.
Loading...

AR – AR Inquiry Form (101-ar-frm-001)

Accounts Receivable (A/R) Inquiry

Overview

The Accounts Receivable Inquiry form displays transaction details on the selected account, including historical data. This form is linked to the master file of each subsystem so that you can access all the A/R information available on a given property or taxpayer name and address record.

The Accounts Receivable Inquiry form includes a Summary and a Detail section. The Summary section lists the Accounts Receivable transactions for the selected record. The Detail section displays transaction details on each entry selected in the Summary section.

The Detail section has three tabs:

  • A/R Detail providing details about the transaction selected in the Summary tab
  • Notes For entering notes or comments and additional information about the selected transaction
  • Payment Plan for entering payment plan information.

See Also Paid Under Protest in the Govern A/R User Guide.

Read More...

Documentation

For the complete reference guide, see Govern Accounts Receivable.
For the A/R Transaction Rules, see A/R Transaction Rules.

The following forms are opened in secondary windows from the A/R Inquiry form:

Payment Data Entry

The Payment Data Entry form is used for accepting and processing payments at the counter, by cash, check, credit card, debit card, or by any other user-defined method. The current owner of the account is automatically defined as the payer. A currently existing function, in the Payment Data Entry or in Cash Collection, is the ability for users to create a deposit on one or multiple A/R Accounts.
The feature also allows users to, Create a Deposit, Apply the Deposit, and Delete the Applied Deposit as needed. This feature is securable through the OpenForms Designer (OFD). See Securing Apply or Delete Applied Deposit in the Security section below.

A/R Transaction

The A/R Transaction form is used for a number of Accounts/Receivable transaction types, including abatements, charges, fees, and duplicate payments. It is used for viewing existing transactions, creating new ones, and for applying modifications to an account or bill. See A/R Transactions.

Abatements and Exemptions

Abatements are applied to reduce the amount owed on an account or to exempt an amount from payment. Typically, they are used to decrease property taxes and are applied after the real property tax assessment and levies are calculated.

Adjustments

The A/R Adjustment form is used to apply modifications to an account or bill and can be used to either increase or decrease the balance due on an account.

Charge, Demand, Fee, Interest, and Penalty Transactions

The transaction types in this section follow the same form as the A/R Adjustments. Select the applicable form for the transaction type. Then follow the procedures described under A/R Adjustments.

Refunds

The section describes the Refund transaction data entry form. Typically, refunds are used for over-payments and duplicate payments.

Payment Reversal

The section describes the Payment Reversal transaction data entry form. Typically, payment reversals are used for Non-Sufficient Funds (NSF) checks.

Payment Transfer

The section describes the Payment Transfer transaction data entry form. Payment transfers are used to transfer posted payments from one account to another. They can be used to correct payments that were posted to the wrong account. They can be made on posted payments only.

Deposit Management

Deposit Management is required in Govern OpenForms(TM). You can use either auto-assigned deposit numbers or create them manually on the Deposit Management form. Note that there are two Deposit Management forms, one for users with Full Access Rights who need to see the deposit number of all users. When creating the Profile, select the applicable form.

Functionality

Note that the function to apply a Deposit existed in Govern for Windows, but was not implemented in Govern for .NET. The Batch Process to apply a deposit was implemented in Govern for .NET, but the functionality was not added to the A/R Inquiry.

Creating a Deposit

  1. In the A/R Inquiry form, right click in the lower grid and select Accounts Receivable – Payment Data Entry.
  2. In the Accounts Receivable – Payment Data Entry form, select a Deposit Number and Transaction Type. (Set both to deposits)
  3. In the Detail group in the lower part of the form, set the type of deposit, e.g. Check.
  4. Click Save

When saving, both a Deposit, and a Payment will be saved in the account; this is to avoid changing the balance of the account because the deposit has not been applied yet; this is an old functionality.

  1. Apply the deposit on the account, this is done by posting the deposit. This is done through the Cash Collection Posting form. (Don’t forget to hit the refresh)
  2. Run the batch process to post the payment.
  3. Return to the A/R Inquiry form and Refresh.

The entry should be recorded as posted; look under the Posted column in the bottom grid.

  1. In the lower grid, right click on the entry and select the new Accounts Receivable – Apply Deposit function from the menu.

Selecting the Accounts Receivable – Apply Deposit will apply the deposit, if there are any interests or penalties, they will be also be applied, e.g. Late Charges.

NOTE: When selecting the Accounts Receivable – Apply Deposit function, posting does not occur immediately.

After applying the deposit, another deposit is created that pays the balance. Any Interests or Penalties are also applied.
At this point, an adjustment posting batch process can be run to post the entries, or a right click on the deposit displays the Accounts Receivable – Delete Deposit option. When selected, the deposit that was created will be deleted. The same behavior is observed in the Cash Collection form.

Self Reported Tax Subsystem Users
For the Self Reported Tax subsystem, the Govern system will only create a deposit on a Period, i.e. ST_ID, not on the account otherwise the system is not able to Apply it.

Security

Securing Apply or Delete an Applied Deposit

This feature in the Accounts Receivable form can be secured through the OpenForm Designer (OFD).
To secure the feature in the OFD…

  1. Open the Accounts Receivable form.
  2. Click to select the A/R Inquiry tab.
  3. Locate and click on the Padlock icon to to change to the Security Mode.
  4. Under the security pane, select the security By User radio button.

On the A/R Inquiry tab, click the black downwards pointing arrowhead to select the options for Apply Deposit and Delete Deposit.
For full details about using the Security Mode in the OFD, refer to the OFD user guide.

In the A/R Inquiry form, the system will display the Penalty and the Interest by installment for each A/R record. In (Table: AR_SUMMARY), 2 fields have been added.
· LATE_PENALTY
· LATE_INTEREST
These fields are updated based upon the Penalty or the Interest; note that this is the same process as the one that currently exists with a difference, the system now calculates late charges up to the installment, and then updates the LATE_CHARGE field. In addition, the system will also update the 2 new LATE_PENALTY and LATE_INTEREST fields.
What’s New!

Change Payer Name in AR Inquiry

NEW! There are two ways to change the payer name in AR Inquiry; Payment Data Entry, a double click on the Payer Name row and column in Cash Flow. See Change Payer Name in AR Inquiry for details.

A/R Class Codes Included in Balance Forward

After using the Govern Data Extraction Tool (DET),  a situation can result with the imports when there are multiple Class Codes. Imports into the same A/R Class can result in the same descriptions being used for different codes. As a result, the same A/R Class code would be added for different descriptions; currently there is no way to differentiate between records with the same description, but with multiple A/R Classes. See AR Class Code Included in Balance Forward for details.

For new features and functionalities in the Accounts Receivable module, see the A/R What’s New page.

Related Topics

Accounts Receivable (A/R) – Payment Transfer Data Entry

Accounts Receivable (AR) – What’s New


101-ar-frm-001


0 votes, average: 0.00 out of 50 votes, average: 0.00 out of 50 votes, average: 0.00 out of 50 votes, average: 0.00 out of 50 votes, average: 0.00 out of 5 (0 votes, average: 0.00 out of 5)
You need to be a registered member to rate this.
Loading...

MB – Recurring Invoices

Miscellaneous Billing (MB) – Recurring Invoices

Overview

Use the Miscellaneous Billing Recurring form in order to facilitate the data entry of miscellaneous billing records that are sent out on a regular basis.

The Recurring Code that you select for the miscellaneous billing recurring record is associated with a schedule, which can be set up on a monthly, weekly,or daily schedule. Invoices . The invoices are sent, according to this schedule, when the batch process is run.

The categories and items used for the standard one-time invoices are also used for the recurring invoices. The Category field is automatically populated with the default category for the account.

  • Recurring Invoice Entry (101-mb-frm-003-fea-001)


Read More...


Accessing the Miscellaneous Billing Recurring Form

To access the Miscellaneous Billing Recurring form:

  1. Launch Govern.
  2. Open a Profile that contains Miscellaneous Billing.
  3. Select the Miscellaneous Billing form.
  4. Select the Account tab.
  5. Perform a search and select the required account.
  6. Select the Recurring Invoice tab.
  7. Click Save.

There are two ways to create a recurring miscellaneous billing invoice:
Manually: Click New and complete the parameters on the form.
Automatically: Click Duplicate to create a recurring Invoice from an existing invoice. Complete and / or modify the data entry fields as required.

Miscellaneous Billing Recurring Invoice Fields

Recurring Code

Select a code from the Recurring Code drop-down list.
The recurring code is associated with a schedule on the Recurring Batch Code form in GNA. The invoice is sent out according to the schedule when the Miscellaneous Billing Recurring Posting batch process is run.
Issuing Department
Select the department that is responsible for the invoice from the drop-down list.
Reference
Enter a reference for the recurring batch invoice. This is used as a description for the invoice.
Effective Dates
Click the drop-down arrows in the From and To date fields to enter a range of dates.. The invoice remains effective during the selected dates. The recurring invoice will be effective starting at the FROM date and inactive on the TO Date (to validate)
Adding an Item
You add items to the recurring invoice in the same way that you add them to the one-time invoice. As with the latter, items can be predefined.
To add an item:

  1. Click the Add button.
  2. Complete the following fields.

Item
Select an item from the drop-down list under Item.
Only the items that are associated with the selected category are displayed in the list. If you want to add items from another category, you need to create another invoice. This is a required field.

Description
Add a description to make the invoice meaningful for the client.
Amount
Enter the cost of the item in the Amount field.
When you enter an amount:

  • The sales taxes are automatically calculated and displayed under Sales Tax 1 and Sales Tax 2, accordingly.
  • The total (Amount + Sales Tax) is automatically calculated and displayed under Subtotal.
  • All amounts in the Sales Tax 1 column are added together and total is displayed at the bottom of the form.
  • All amounts in the Sales Tax 2 column are added together and the total is displayed at the bottom of the form.
  • All amounts in the Subtotal column are added together and the total is displayed at the bottom of the form.

Unit
By default 1 is displayed in this column. Override this field to bill more than one of the selected item.
Sales Tax 1
This column displays the amount calculated for Sales Tax 1. This is based on the amount of the item and the sales tax method defined in GNA.
The total for Sales Tax 1 is displayed at the bottom of the form.
Sales Tax 2
This column displays the amount calculated for Sales Tax 2. This is based on the amount and the sales tax method defined in GNA.
The total for Sales Tax 2 is displayed at the bottom of the form.
Subtotal
This column displays the total for the first item or items. It is calculated as: (Amount * Unit) + Sales Tax 1 + Sales Tax 2 )
Total
The Total is displayed at the bottom of the column.

Adding Recurring Invoices from Existing Invoices

It is possible to copy a regular invoice to a recurring invoice.


101-mb-frm-003


0 votes, average: 0.00 out of 50 votes, average: 0.00 out of 50 votes, average: 0.00 out of 50 votes, average: 0.00 out of 50 votes, average: 0.00 out of 5 (0 votes, average: 0.00 out of 5)
You need to be a registered member to rate this.
Loading...

Custom Entity – Standard Module Form Control

Standard Module Form Control – Multimedia Custom Entity

Version 6.1

Overview

This page is intended for system administrators, business analysts, or technical support for information on how to install and configure the form Custom Entity control for multimedia.
The purpose of this control is to provide management functionalities (add,delete, view) to an entity (parcel, name, st…) Multimedia Documents.
It can be used:

  • With an existing form for it’s Root Entity id documents
  • As a stand alone form for the profile Govern id
  • As a stand alone form that can be linked to for view queries link option

Form Custom Entity Name: MultimediaDocuments_Control

Configuration (Root entity)

To configure the controller with an existing form:

  • In OpenForms(TM) Designer, on the form where you want to add the multimedia, drag the Custom Entity object to the form header at the position where you want to create the new entity.
  • Then click on the new entity for tab to set the following properties.

Controller Properties

Element Property Setup
Misc. Action MultimediaDocuments_Control
Name n/a – Maintain by System
Parent Entity The form Root Entity (must be name or property base)
Name Maintain by System
Properties
Misc. SelectedMultimediaType Multimedia can be setup for different type of forms and entities.
—-Options include:
  • None
Use to be verified
  • Building
For documents linked to a building
  • Inspection
to be reviewed
  • Parcel
  • ParcelOnly
  • PersonalProperty
  • Name
  • NameOnly
  • SpecialAssessment
  • SplitMerge
Special
  • Sales
Used to display comparable sales pictures – need to verify
  • Bankruptcy
  • DelinquencyCollection
  • SRT
  • Activity
  • Workflow
Tab Sequence Tab Stop Sequence Number Standard OpenForms
Text
Misc En Enter the name that will be displayed for the form entity
i.e Multimedia

Configuration (Stand Alone)

The following is the configuration of the controller or custom control object properties.


101-std-install-multimediadocuments_control


0 votes, average: 0.00 out of 50 votes, average: 0.00 out of 50 votes, average: 0.00 out of 50 votes, average: 0.00 out of 50 votes, average: 0.00 out of 5 (0 votes, average: 0.00 out of 5)
You need to be a registered member to rate this.
Loading...


MA – Audit Information

CAMA Audit Information

Overview

The CAMA Audit Information form is used for maintaining information about the mass appraisal audits associated with each property. This information includes the status of the audit, which can be either Pending or Finalized. A reason code can be associated with the audit. Details about the site visit, such as the appraiser’s name, dates, source codes and activity codes, as well as notes and comments can be tracked from this form. The Audit Information record can be transferred directly to the Govern Tax module.

When you save a CAMA Audit Record with the Value Finalized option selected, the historical data for the record are frozen.

Audit Information records can be created manually or generated automatically by the following batch processes:

  • MA Audit Pending: Run the MA Audit Pending batch process to generate a new Mass Appraisal Audit Information records with the Status set to Pending and the Frozen ID to 0. For details, see MA Audit Pending batch process.
  • MA Audit Finalized: Run the MA Audit Finalized batch process to generate Finalized Mass Appraisal Audit Information records from records with the Status set to Finalized. This batch process generates a Frozen ID for each audit, starting at -2 for the first. If a second audit is finalized, it is assigned Frozen ID -3, the third is assigned Frozen ID -4, and so on. Finalized records cannot be modified, except by authorized users. For details, see MA Audit Finalized batch process.

The Audit Information form contains new fields: Status and Reason Code.

Documentation

To view this information in pdf format, click on the following link

Accessing the Audit Information Form

To access the CAMA Audit Information form:

  1. Launch Govern.
  2. Open a Profile that contains the CAMA Audit Information form.
  3. Select Audit Information in the Forms Explorer.
  4. Perform a search to retrieve the required property record.
  5. Load the record to the form.

Audit Information Icons

New
Click the New icon to create a new Audit Information record for the property.
Save
Click the Save icon to save a new record or any modifications to an existing one. Data are saved to MA_AUDIT_INFO.
Delete
Click the Delete icon to remove the Property Information record from the database. A confirmation message appears. Click Yes to continue.
Browse
If multiple Frozen IDs exist for the record, click the Browse icon. You can then view and or select a copy of the record saved under a Frozen ID from the Browser Audit Information screen.
Transfer to Tax
Select the Transfer to Tax icon to transfer the active record directly to the TX_RE_ ASSESSMENT table in the Govern Real Property Tax module.
When you transfer the audit information to tax, the following fields are populated on the Tax Assessment Maintenance form and in the Govern database.

Govern OpenForms User Form and Fields Govern Database Table and Column
Form Real Estate Tax Assessment Maintenance form Table TX_RE_ ASSESSMENT table
Field Land Value Column VA_LAND_ VALUE
Field Improvement Value Column VA_IMPROVEMENT
Field Total Assessment Column VA_TOTAL_ASSMT

A confirmation message is displayed when you click the icon. Click OK to continue.

Audit Information Data Entry Fields

Value Finalized
Select the Value Finalized option and click Save when the audit is complete. Once a Value Finalized record is saved, all fields are read-only and cannot be modified, except by authorized users.A new Frozen ID is generated and applied to all the CAMA records for the property. These records can be viewed, at any time, by selecting the applicable Frozen ID in the History panel.
The MA Audit Finalized batch process automatically generates MA Audit Information records. On these records, the Value Finalized option is selected. Records are generated from MA Audit Information records with the Status set to Finalized.
Status
The Status combo box contains two items Pending and Finalized.
The MA Audit Pending batch process creates new MA Audit Information records with the Status set to Pending. An appraiser can set the Status to Finalized when the audit is complete. The MA Audit Finalized batch process generates finalized audit records and automatically selects the Value Finalized option.
Fiscal Year
By default, this field displays the fiscal year of the department. This year is also displayed on the Govern Toolbar.
Frozen ID
This field displays the frozen ID of the selected record. When the record is current, the Frozen ID is set to zero (0). When a finalized audit record is created for the property, the Frozen ID is set to -2 for the first, -3 for the second, -4 for the third, and so on.
Site Number
Select a Site Number from the drop-down list.
Audit Reason
Select a reason code to explain the reason for the audit (Table: VT_USER.MA_AUDIT_REASON).
Entry Date
Enter the date the information was recorded.
Appraiser
Select an appraiser’s name from the drop-down list.
Entry Code
Select the entry code from the drop-down list (Table: VT_USR_ MAENTRY).
Activity Code
Select the activity code from the drop-down list (Table: VT_ USR_MAACTV).
Source Code
Select the source code from the drop-down list (Table: VT_ USR_MAINFSRC).
Notes & Comments
This field provides space for notes and comments.


101-ma-frm-019


0 votes, average: 0.00 out of 50 votes, average: 0.00 out of 50 votes, average: 0.00 out of 50 votes, average: 0.00 out of 50 votes, average: 0.00 out of 5 (0 votes, average: 0.00 out of 5)
You need to be a registered member to rate this.
Loading...