Overview
The A/R Inquiry Payment Plan is used for defining a payment and calculating when payments are due. The form provides some flexibility. Payments can be received between dates and made for less than the amount specified in the Amount per Period field. The Next Payment Date field is updated when the full amount for the period has been paid.
Documentation
For the complete reference guide, see Govern Accounts Receivable.
For the A/R Transaction Rules, see 101-ar-001-AR-TransRulesGL.
Running Reversal and Refund Batch Processes
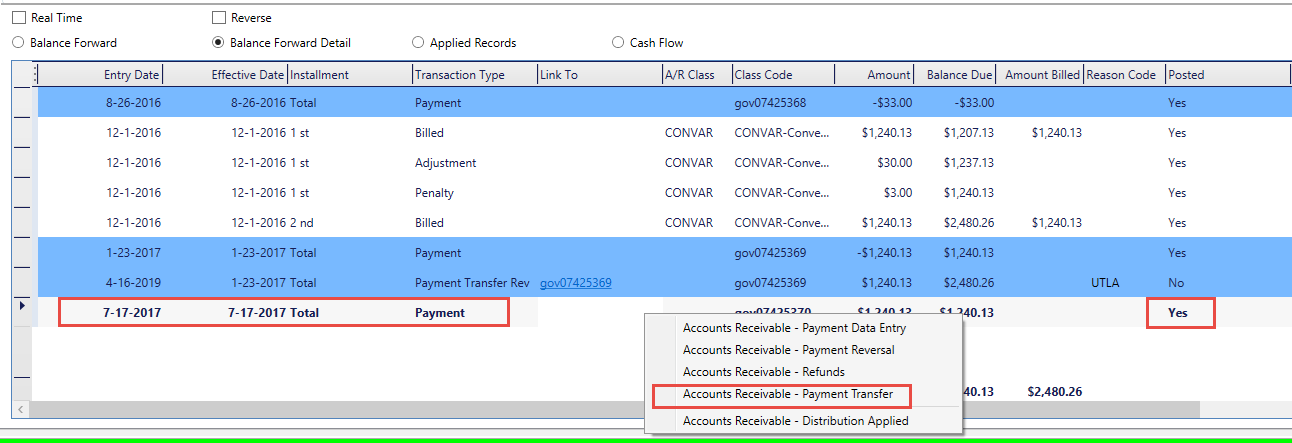
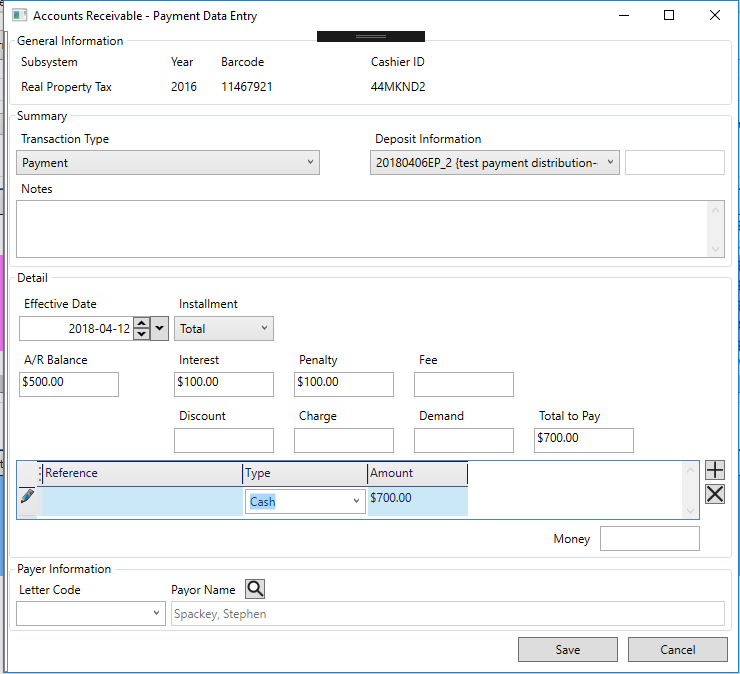
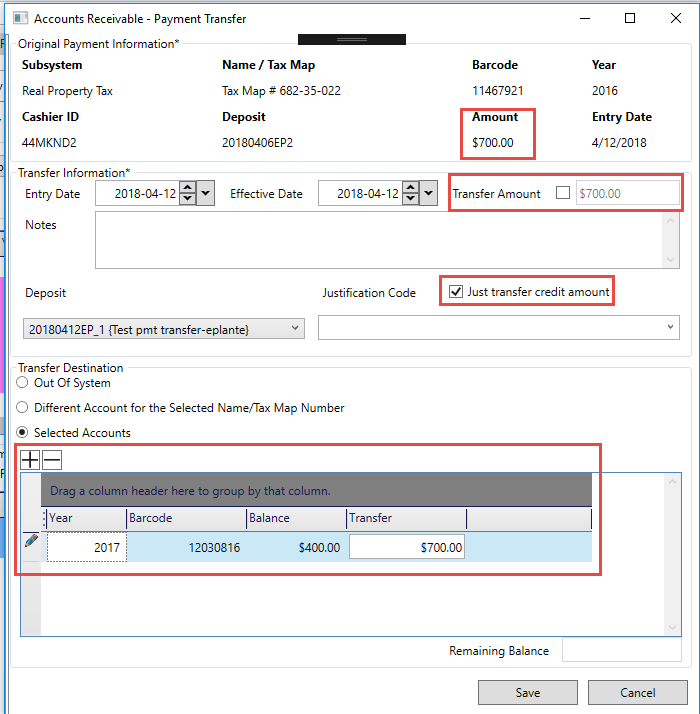
If you run the A/R Refund Posting or A/R Reversal Posting batch processes for a payment made through the Payment Plan, start with the last payment entered.
| NOTE: Running one of these batch processes on a payment prior to this may corrupt the Payment Plan data. |
Highlighting on Accounts with Payment Plans
To indicate that a payment plan is associated with an account, the text for the record is displayed in red in the Summary Detail.
Payment Plan Command Buttons
Save: Click Save to save the payment plan record.
Delete: If no payments have been made on the current payment plan, you can remove it by clicking Delete.
Show Detail:
Click Show Detail to display the payment plan details. This button is enabled after the record is saved at least once.
Payment Plan Fields
Plan Option (On/Off)
Select the On or Off option according to the status of the project. If required, you could set up all the payment plan parameters; then, turn on the plan when all conditions are agreed upon.
Payment Plan Information
Payment Option: The Payment option is displayed if the ACH (PAP) Supported via Payment Plan option is selected in GNA.
- Manual: Select this option if you are processing a payment on a Payment Plan made in person at the counter.
- Payment by ACH (PAP): Select this option for pre-authorized Automatic Clearing House (ACH) payments.
- Postdated Check: Select this option for postdated checks.
Payment Period: Select an option for the payment period from the drop-down list, according to how often payments are to be made:
- Semi-Annual
- Every two months
- Monthly
- Quarterly
- Weekly
- Other: When you select Other, you need to enter a date in the Starting Date and Final Payment Date fields. The Periodic Budget field is disabled. Payments are automatically generated.
Number of Payments: Enter the number of payments required for the plan.
Periodic Budget: Enter the amount of the budget that is agreed upon for the selected period. This field is disabled when the Other option is selected in Payment Period.
Payment Information
Starting Date : Enter the date the payment plan starts. By default, the current date is displayed.
First Payment Date : Enter the date the first payment is due.
Final Payment Date: Enter the date the final payment is due. This field is active when the Other option is selected in Payment Period.
Next Payment Date: The next payment date is automatically displayed when the first payment is made and after each subsequent payment.
Last Payment Date: The last payment date is automatically displayed when the first payment is made and after each subsequent payment.
Last Payment Amount: The last payment amount is displayed when the first payment is made and after each subsequent payment.
Period of Interest/Penalty Information
Not Subject to Delinquent Charges: Select this option to exclude the current record from interest, penalties, and other delinquent charges.
Effective Date: Enter the date that the interest comes into effect.
Ending Date: Enter the last date that interest can be charged.
Payment Additional Information
Resolution Number: Enter a resolution (reference) number for the record.
Reason: Select a reason from the drop-down list. Reasons are user defined. Examples include Credit Memo, Debit Memo, Duplicate Payment, and Overpayment (Table: VT_USR_AR_ REASON).
Authorized By: Enter the name of the person authorizing the payment plan.
Payment Plan Details
When you click the Show Detail icon the Payment Plan Detail window opens.
This window displays information about the total amount due and the details for each pay period within the plan. For example, if the total is $12,000 and the payment period is monthly, 12 payment periods of $1,000 each are listed.
Amount Due: This field displays the total amount owing on the account.
Amount Distributed: This field displays the amount that is spread across the payment periods.
Difference: This field displays the difference between the Amount Due and the Amount Distributed.
Payment Period Information
The information in the grid is automatically calculated based on the amount due and the number of payment periods. The first column displays the number of the payment period. If there are 12 periods, the numbers 1 to 12 are displayed.
Due Date: This field displays the due date for each period. The dates are automatically calculated based on the starting date and the number of periods. Select a date and click the Calendar icon to change a due date if required.
Period Amount: This field displays the amount calculated for each period. This is based on the amount due and the number of periods.
- You can change the amount due per period by overwriting the amount that is displayed. For example, if there is a small difference between the amount due and the amount distributed, you can add the difference to the first payment or spread it across all payments. If the total amount is uneven, you could add a small amount to the first payment in order to make the other amounts equal. When you change one amount, the others are automatically calculated.
Amount per Period: Enter the amount to be paid for each payment period.
| NOTE: If you run the A/R Refund Posting or A/R Reversal Posting batch processes for a payment made through the Payment Plan, start with the last payment entered. Running one of these batch processes on a payment prior to this may corrupt the Payment Plan data. |
Whats New!
Semi-Annual Payment Plan
The semi-annual payment plan will calculate the payment dates starting from the starting date, i.e. Begin Date, and then taking into account the user specified Number of Payments, calculate the dates of payment every six (6) months. For example, if we were to create a payment plan, specify the Payment Period to Semi-annual, with the number of payments entered as five (5). The plan will break down the amount owed into a Periodic Budget of five (5) payments that are to be made Semi-Annually, i.e. every six (6) months.
Entering a Semi-Annual Payment Plan
For example in the Govern A/R Module, we have an amount due of $1,585.14, the Begin Date is 08/15/2017, when we set the Payment Period to Semi-annual, and the Number of Payments to 5, Govern will determine the following first and final payment dates as:
- First Payment Date – 2/15/2018
- Final Payment Date – 2/15/2020
In Govern, locate an account via its AR_ID in the Govern search form. When the record has been located, click the A/R Payment Plan Info tab.
Applying a Semi-Annual Payment Plan
- Click New (Ctrl + N), to create a new payment plan.
- Select the Payment Period.
When the Number of Payments parameter is entered as 5, the First Payment Date and the Final Payment Date will be indicated. The details for our payment plan have been entered.
- Click on Save (Ctrl + S)
- Next click on the Show Periods Detail icon to display a modal screen with the scheduled payment dates (Payment Plan Detail).
The full details of the payment schedule are displayed as follows:
| Period |
Due Date |
Period Amount |
Amount Paid |
| 1 |
2/15/2018 |
$317.03 |
|
| 2 |
8/15/2018 |
$317.03 |
|
| 3 |
2/15/2019 |
$317.03 |
|
| 4 |
8/15/2019 |
$317.03 |
|
| 5 |
2/15/2020 |
$317.02 |
|
Paying Less than Periodic Budget Amount
The Periodic Budget amount is the system calculated payment amount. This amount is displayed in the Periodic Budget parameter. When a payment is made, after the click to save the payment, the Cash Collection dialog box will appear displaying a log of the transaction. This will include the Account No., the Account Name, and the Minimum to Collect. Situations may arise where the system generated Periodic Budget amount cannot be paid. In such instance a supervisor can give permission to allow a lower amount to be paid.
Configuration of this temporary transferring of permission is performed in the OFD. See the Enable Supervisor Permission Transfer for Minimum Payment in the Security section.
Change Payment with Supervisor Permission
NEW! When the option to “Allow to pay less than minimum to collect” is set in the OFD, an authorized user can enter their password and override the system requirement for a minimum payment. To use the supervisor override, after the prompt of the Cash Collection confirmation screen…
- Click OK to dismiss the screen.
- On the Payment Data Entry tab, click the padlock icon, i.e. Change the permissions for the form.
- At the Govern Login prompt, an authorized person can enter their Username and Password.
After the Supervisor enters the Username and Password, click the Save icon to confirm the permission transfer for the minimum payment.
NOTE: If a payment type is not selected, a Cash Collection dialog box will be displayed indicating that a “Payment Type is Required”; click OK. Choose a payment type, e.g. Cash.
Unless the user option to “Allow to pay less than minimum to collect” is set in the OFD, the minimum payment will be required to be entered. |
Security
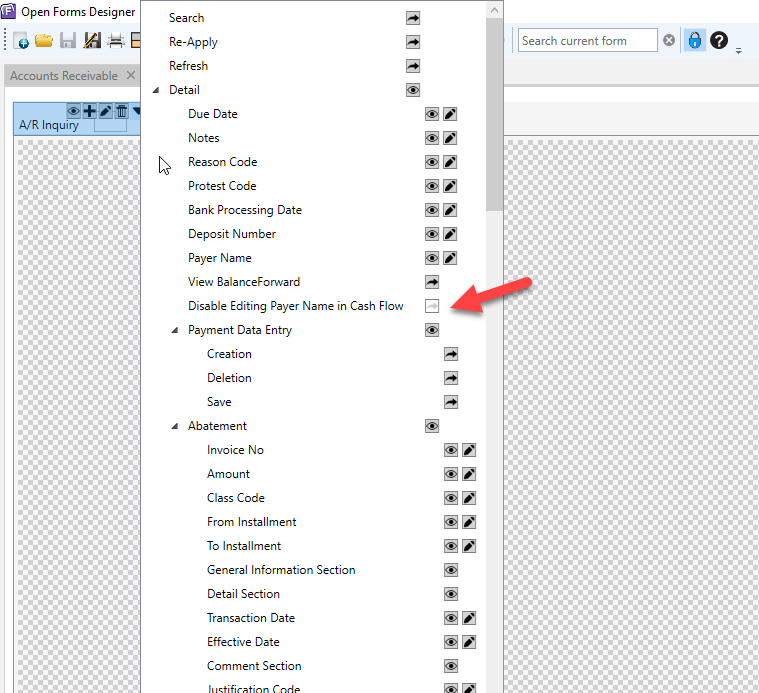
OpenForms Designer (OFD)
Enable Supervisor Permission Transfer for Minimum Payment
NEW! Security for this feature can be set by Role or by User. Enabling or disabling security options must be performed by a user with administrator level rights.
- In the OFD, open the Cash Collection form.
- Click the padlock icon to select Security Mode.
- Select the Payment Data Entry Tab
- Click to select the Custom Control (CCPaymentDataEntry_Control).
- On the Security pane on the Left Hand Side (LHS), select security type as Type: Normal (default selection).
- Click the required profile.
- Beside the Custom Control click the black arrow [V] to select the security option to enable “Allow to pay less than minimum to collect” for the Role or User.
Typically this option is enabled for a Supervisor or user that has administrator rights.
Related Topics