308-icloud

Integration – Invoice Cloud

Version 6.0

Overview

Governs’ Invoice Cloud integration provides an invoice presentation / payment solution using Invoice Cloud. With Invoice Cloud integration Govern users have 24/7 access to on-line bills and flexible payment options that include all major credit/debit cards and eChecks.
Invoice Cloud consists of 2 major areas. Batch Functions that can be scheduled to send Billing Information reports to Invoice Cloud and the AR & CC Cash Collection Service.

Requirement

Integration needed with invoice cloud. We need to make a new service that:
1. Allows Payments
2. Allows Payment Reversal
3. Update Paperless status for Mailing Index
4. GetArBalances
See AR/CC Web Service

The following actions are also needed:
1. Generate a Summary Account Balance and send it to an FTP
2. Generate a Detail Account Balance (bill) and send it to an FTP

Tax & UB Bill

Tax and Utility Billing PDF Bill

Account Balance Extract

Account Balance Extract is created and push to the FTP.
Work Order for Code: WALGOL1202
Crystal reports that show the balance for each NA_ID

Batch Processes

Consists of 2 batch process that generate reports in CSV format.

1) Batch process – Invoice Cloud Balance :
UI : ComboBox SubSystems (only RE, PP, UB)
Nb. Activity days Add to the report all entries in AR_Master having activities (all activities in AR_DETAIL except payment from InvoiceCloud) in the X last days of activity.

2) Batch Process – Invoice Cloud Invoice :
. UI : ComboBox SubSystems (only RE, PP, UB) ComboBox SubSystems (only RE, PP, UB)

a) subsystems : RE, PP :
UI : Year, Installment
File Name to generate : XXXXXX_RE_TimeStamp.csv or XXXXXX_PP_TimeStamp.csv

b) Subsystem : UB :
UI : ComboBox : Posting ID – Posting Date (From table UB_POST_MASTER)
File Name to generate : XXXXXX_UB_TimeStamp.csv

The Total Billed should be the Sum of Amounts from AR_DETAIL where type = ‘INV’ and having Creation_Date = Posting_Date

Supporting Documents

Click on the links below to view the .PDF document.

Right-click on the links below to down the view the .PDF document.

To download the Excel files below, either right click on the link and select “Save Link As…” from the menu, or click directly and select the option to open in Microsoft Excel.

To download the .CSV files below, right click on the link and select “Save Link As…” from the menu. The file may then be opened in an application like Microsoft Excel.

SQL for the INVOICE

SELECT "AR_MASTER"."SUB_SYSTEM", "AR_MASTER"."YEAR_ID", "AR_SUMMARY"."INSTALLMENT", "AR_SUMMARY"."AR_ID", "NA_MAILING_INDEX"."NA_ID", "NA_NAMES"."FREE_LINE_1", "NA_NAMES"."STREET", "NA_NAMES"."CIVIC", "NA_NAMES"."PRE_DIR", "NA_NAMES"."S_SUFFIX", "NA_NAMES"."POST_DIR", "NA_NAMES"."SEC_ADD_IND", "NA_NAMES"."UNIT", "NA_NAMES"."CITY", "NA_NAMES"."STATE", "NA_NAMES"."ADD_LINE_A", "NA_NAMES"."ZIP_POSTAL", "NA_NAMES"."EMAIL", "NA_NAMES"."NAME_2", "AR_MASTER"."SORT_KEY", "AR_SUMMARY"."PRINCIPAL", "NA_MAILING_INDEX"."SUB_SYSTEM", "NA_MAILING_INDEX"."PRIMARY_INDEX"
FROM (("Waltham"."dbo"."AR_MASTER" "AR_MASTER" INNER JOIN "Waltham"."dbo"."AR_SUMMARY" "AR_SUMMARY" ON "AR_MASTER"."AR_ID"="AR_SUMMARY"."AR_ID") LEFT OUTER JOIN "Waltham"."dbo"."NA_MAILING_INDEX" "NA_MAILING_INDEX" ON ("AR_MASTER"."P_ID"="NA_MAILING_INDEX"."REF_ID") AND ("AR_MASTER"."SUB_SYSTEM"="NA_MAILING_INDEX"."SUB_SYSTEM")) LEFT OUTER JOIN "Waltham"."dbo"."NA_NAMES" "NA_NAMES" ON "NA_MAILING_INDEX"."NA_ID"="NA_NAMES"."NA_ID"
WHERE "NA_MAILING_INDEX"."PRIMARY_INDEX"=-1 AND "NA_MAILING_INDEX"."SUB_SYSTEM"='UB'
ORDER BY "AR_SUMMARY"."AR_ID"

SQL for the BALANCE

SELECT "AR_MASTER"."SUB_SYSTEM", "AR_MASTER"."YEAR_ID", "AR_SUMMARY"."INSTALLMENT", "AR_MASTER"."AR_ID", "AR_SUMMARY"."AR_ID", "NA_MAILING_INDEX"."NA_ID", "NA_MAILING_INDEX_1"."NA_ID", "AR_SUMMARY"."BALANCE", "NA_MAILING_INDEX"."SUB_SYSTEM"
FROM (("Waltham"."dbo"."AR_MASTER" "AR_MASTER" INNER JOIN "Waltham"."dbo"."AR_SUMMARY" "AR_SUMMARY" ON "AR_MASTER"."AR_ID"="AR_SUMMARY"."AR_ID") LEFT OUTER JOIN "Waltham"."dbo"."NA_MAILING_INDEX" "NA_MAILING_INDEX" ON ("AR_MASTER"."P_ID"="NA_MAILING_INDEX"."REF_ID") AND ("AR_MASTER"."SUB_SYSTEM"="NA_MAILING_INDEX"."SUB_SYSTEM")) LEFT OUTER JOIN "Waltham"."dbo"."NA_MAILING_INDEX" "NA_MAILING_INDEX_1" ON ("AR_MASTER"."UB_ID"="NA_MAILING_INDEX_1"."REF_ID") AND ("AR_MASTER"."SUB_SYSTEM"="NA_MAILING_INDEX_1"."SUB_SYSTEM")
WHERE "NA_MAILING_INDEX"."SUB_SYSTEM"='RE' AND "AR_MASTER"."YEAR_ID"=2012 ORDER BY "AR_MASTER"."AR_ID", "AR_SUMMARY"."INSTALLMENT"

Installation of Web Services

Invoice Cloud Web Service (Release 5.1)

To install the following are the installation steps for the Invoice Cloud Web Service:

  1. Deploy the Release 5.0.9 of the Resources Files.
  2. Install and configure the WCF Accounts Receivable API [Filename: WCFAccountsReceivableAPI.zip].
  3. Modify the web.config file to use the GoverNetConfig.xml of the deployment [Location: In the root of the specific deployment folder]
  4. When installing Release 5.1 of the web service, administrators will need to manually create the following table in (Table: NA_NAMES: WEBPROFILEACCESSRT (Smallint, Allows Null). This field was added to provide support for the eGov and is used in the business rules of the Names.

Verification of the Service

The WcfTestClient.exe application is used to test the web service. This application can be obtained on the Govern FTP site or from Govern Technical Support: WCF Test Application.zip. For additional details regarding testing Govern Web Services

What’s New!

Release 6.0
The two (2) Govern batch processes that are associated with the Invoice Cloud process for Real Property and Personal Property modules have been modified to allow them to identify required InvoiceTypeID’s that match with AR Cycle codes for Real Property (RE) and Personal Property (PP). Release 1703.06

Prior to release 6.0 of the Govern Web service, manual changes were required to be made during the installation of the Invoice Cloud Web Service:

  • Modify the web.config to use the GovernNetConfig.xml file located in the deployment root directory.
  • Create (Table: NA_NAMES.WEBPROFILEACCESSRT), with properties set to (smallint, allow NULLS).

The above steps are no longer required, they are automatically created when the Database Verification process is run in the Govern New Administration (GNA).

Related Topic(s)

Govern API and Service


308-icloud
 

0 votes, average: 0.00 out of 50 votes, average: 0.00 out of 50 votes, average: 0.00 out of 50 votes, average: 0.00 out of 50 votes, average: 0.00 out of 5 (0 votes, average: 0.00 out of 5)
You need to be a registered member to rate this.
Loading...


SSRS – SQL Server Reporting Services

SQL Server Reporting Services (SSRS)

Version 6.0 & 6.1

Overview

SQL Server Reporting Services (SSRS), is a server-based report generation software system from Microsoft™. SSRS is administered via a web interface, and is used to prepare and deliver interactive and printed reports. SSRS is viewed as an alternative to Crystal Reports or any other tools that are used in gathering business intelligence.


NOTE: Govern supports SQL Server 2010 to 2014 for SSRS. SSRS 2016/2017 will not work. Database instances can exist in SQL Server 2016 or greater, but SSRS will need to be on a 2012 or 2014 instance. Users should NOT open SSRS 2014 reports with SSRS 2016 and save them. This will result in an error in GNA and Govern. Additional details can be found at the following link on the Microsoft Developers Network (MSDN)

What’s new

SSRS Report Conversion Tool (301-ssrs-util)

How to Install SSRS

Click here to follow the current instructions on how to install SSRS.

Documentation

Refer to the following user guide(s) for setup and configuration information.
301-(man)-SSRS-v5.1.pdf

Configuration

Refer to the “Configuration in the Govern New Administration (GNA)” section in the “Documentation & Standards SSRS” user guide.
This guide explains the configuration of SSRS in Govern.
Click here to see the General Settings Parameters (SY REGISTRY).

Report Parameters

dept Govern IDs: dept
dept_label Govern IDs: dept long description
language Current application culture
year Govern IDs: Year
rpt_county SY_Registry – SectionName: “General”; KeyName: “county”.
rpt_date String.Format(“{0} {1}”, Date.Now.ToShortDateString(), Date.Now.ToLongTimeString())
rpt_default_date Date.Now.ToShortDateString()
rpt_login Govern IDs: User
rpt_logo USR_Registry – SectionName: “govern”; KeyName: “bitmap”. OR SY_Registry – SectionName: “path”; KeyName: “bitmap”.
rpt_name Report Path
rpt_range Report Range Value (Filter on xyz)
rpt_state SY_Registry – SectionName: “General”; KeyName: “state”.
rpt_title Report Display Name
rpt_ub_max_variation SY_Registry – SectionName: “ub parameters”; KeyName: “Max Variation”.
rpt_uid Govern IDs: User
rpt_username GoverNetConfig.OrganizationName
uniform SY_Registry – SectionName: “work_text”; KeyName: “Assessment Equalisation Rate”.
all_int Call ‘ComputeLateChargesAmountsForArSummary(“na_id”)’ method


See Also

301-ssrs-util


301-ssrs


0 votes, average: 0.00 out of 50 votes, average: 0.00 out of 50 votes, average: 0.00 out of 50 votes, average: 0.00 out of 50 votes, average: 0.00 out of 5 (0 votes, average: 0.00 out of 5)
You need to be a registered member to rate this.
Loading...

SSRS – Changes to Handling of SSRS Reports (301-ssrs-util)

Changes to Behavior of SQL Server Reporting Services (SSRS)

Version 6.1.2206.0142 / 6.1.1811.2019

Overview

The following contains a description of the changes to the behavior of the SSRS feature in Govern

New Features and Changes in Behavior

Parameter Setup Changes

Users should note that parameters are no longer setup in the Reports Parameters screen. This screen will display only the run options that have been configured in GNA.

Possible “Run on” options that can be displayed are as follows:

On Database – Is configured to do not pass any record that is listed in the Govern Dataset Treeview.

On Recordset – Select this option when the SSRS report is to process a set of records. *

On Current Record – Select this option when the SSRS report is to process the current record.*

Changes related to Recordsets

The Recordsets created by the On RecordSet and On Current Record options come from the DataSet Treeview and are saved into the database (Table: USR_SAVED_DATASETS).
These records are grouped by the field SAVED_SET_NAME with a name like: SSRS_REPORT_GUID, where the GUID is a random GUI text generated at runtime.

Since these new recordsets are temporary, they are automatically removed each time a new SSRS report is executed. The criteria for removal is determined by confirming that SAVED_SET_NAME is like SSRS_REPORT_GUID and the field LAST_MODIF_DATE is older than the day before the current execution. For example, if a report execution is done on 08/10/2022, then all reports created before 08/09/2022 will be removed.

Note the following:

  • The Output tab with the report result is no longer displayed for SSRS reports.
  • The report result will be displayed directly on the default browser pointing to the SSRS server that has been configured for Govern.

New Online SSRS Viewer

In the new online SSRS viewer, the end user must perform the following actions to get the Report.

  1. Select/full fill the Report Parameter fields with the desired values for the report.
  2. Click the View Report button.
  3. A preview for the report will be displayed in the bottom.

To download the report, the user must select any of the output formats for the report with a click on the Save button.

To print the report

  1. Click the Print icon.
  2. The report will not be modified and will be copied into the TEMP folder, but in order to execute the report, it will keep looking in the Custom and Standard folders configured in the GNA settings.


NOTE: The appearance of the online SSRS screen can vary depending on the SSRS report version installed on the end users server.

This screen will display only the parameters configured as Visible on the report. Hidden parameters are not displayed here and must be configured in GNA under the parameters section in order to map a Govern Id value to them.

Considerations when running an SSRS report

  • At least one Run on option must be selected to run the report.
  • Reports created or edited in Report Builder 3.0 (2014), and the New SSRS Report Builder (2016), are supported and will be executed in Govern.
  • The report must have the SERVER and DATABASE parameters, where the parameters must be configured as:
    • The very first parameters in the report parameters; this because they will be used to configure the datasource.
    • The parameter visibility can be configured as Visible, or Hidden (this is the preferred value).
    • These parameters will be mapped by Govern with the name and database that are to be used to process the report.
    • The DataType must be ‘Text‘.
  • For the options On Recordset and On Current Record,  the report must have a parameter like RECORDSET_{GOVERN_ID} where:
    • {GOVERN_ID} is the Govern ID that will be used to filter the records.
      For example: if the Govern profile that will use the report is configured to use Parcel Ids, then the name for the parameter will be RECORDSET_P_ID.
    • The DataType must be ‘Text‘.
    • The parameter visibility could be configured as Visible, or Hidden (this is the preferred value).
    • A new recordset entry will be created with a dataset name like SSRS_REPORT_{GUID} to store the GovernId, or set of GovernIds that will be used for the operation.
    • These datasets will not be visible to the user in Govern in the Saved Dataset(s) screen.
    • These datasets will be automatically removed from the database after 2 days, upon the next SSRS report execution.
  • The new SSRS report functionality is no longer creating copies in the TEMP folder that is configured in GNA. As a result of this change, it means that the new version is no longer supporting:
    • Add filters on execution time.
    • Display the report output or parameters at govern.

In order to create/add these parameters the SSRS Converter Tool can be used to convert the rdl reports.

See Also

301-ssrs

301-ssrs-util


301-ssrs-util


0 votes, average: 0.00 out of 50 votes, average: 0.00 out of 50 votes, average: 0.00 out of 50 votes, average: 0.00 out of 50 votes, average: 0.00 out of 5 (0 votes, average: 0.00 out of 5)
You need to be a registered member to rate this.
Loading...

SSRS – SQL Server Reporting Services Report Conversion Tool

SQL Server Reporting Services Report Conversion Tool

Version 6.1

Overview

The SSRS Report Conversion tool is a Windows application developed to assist, with some minor manipulations, the conversion of a .rdl report for use in the latest versions of Govern and GNA.

User Interface

When initialized, the SSRS Report Conversion Tool displays as a utility window with input and output parameters.


SSRS Report Conversion Tool Parameters

Input Folder – Click to manually type in the path to the Input folder. This is the path to a physical folder that must contain at least one .rpt file that is to be converted.

[…] Select Folder – Click the ellipsis button […] to navigate to the required folder.

Output Folder – This non-editable parameter contains the path to the folder that the converted reports will be placed. This is always a folder named Converted that will be located under the Input Folder path.

Recordset – This combo-box is a GovernId that will be used to group records in Govern. This should be the same GovernId that is configured for the Profile that will be using the SSRS report.

Convert – Click Convert to run the conversion process.

Files to process: – The Files to process area will display all reports within the Input Folder. After a click on Convert, the report names with their status will be listed along with an indication as whether files were converted successfully, or if any issues were encountered during the process.

About the Conversion Process

Users should note the following about the conversion process:

  • The original .rdl file will not be modified.
  • The output file will always add the Parameters SERVER, DATABASE.
  • The parameters RECORDSET_{GOVERNID} will be added if the value for RecordSet is not empty.
    • For example, if the selected value is p_id, the parameter to add will be RECORDSET_P_ID.
  • The datasource connection string will be overridden with the following:
    =”Server=”+ Parameters!SERVER.Value +“;Database=” + Parameters!DATABASE.Value
  • The reports generated in the Output folder are the ones that should be submitted/replaced in the SSRS Server Folders.


See Also

301-ssrs

301-ssrs-changes


301-ssrs-util


0 votes, average: 0.00 out of 50 votes, average: 0.00 out of 50 votes, average: 0.00 out of 50 votes, average: 0.00 out of 50 votes, average: 0.00 out of 5 (0 votes, average: 0.00 out of 5)
You need to be a registered member to rate this.
Loading...

Govern – API and Services

Govern API & Services

Overview

Standard API Web Services

Govern’s standard API Web Services provide a communication and data exchange protocol to Govern Applications:

These services are distributed with a program called Mock-Up, to help the programmer test and make sure the correct information is received from the services.

Other Govern Web Services

Web services are used in OpenForms for:

Specification

In general:

  • Windows Communication Foundation (WCF) is an API in the .NET Framework.
  • Govern PC Web Services supports JavaScript Object Notation (JSON) serialization format to WCF.
  • Minimum System Requirements for IIS Servers and .NET Framework
  • IIS Server must be configured for each deployment (production, training, staging, tests…)
  • Govern Services are stand-alone programs that need to be installed separately.
  • API services downloads are zip files and a zip converter is required to install.
NOTE: Although the WCF PC Web Services supports (JSON), Harris Govern does not provide technical developer support for this type of implementation.

Configuration

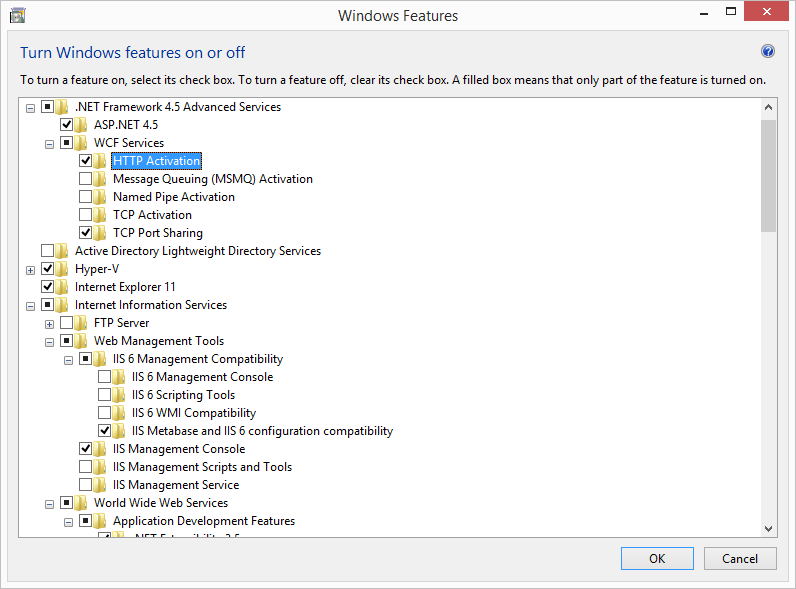
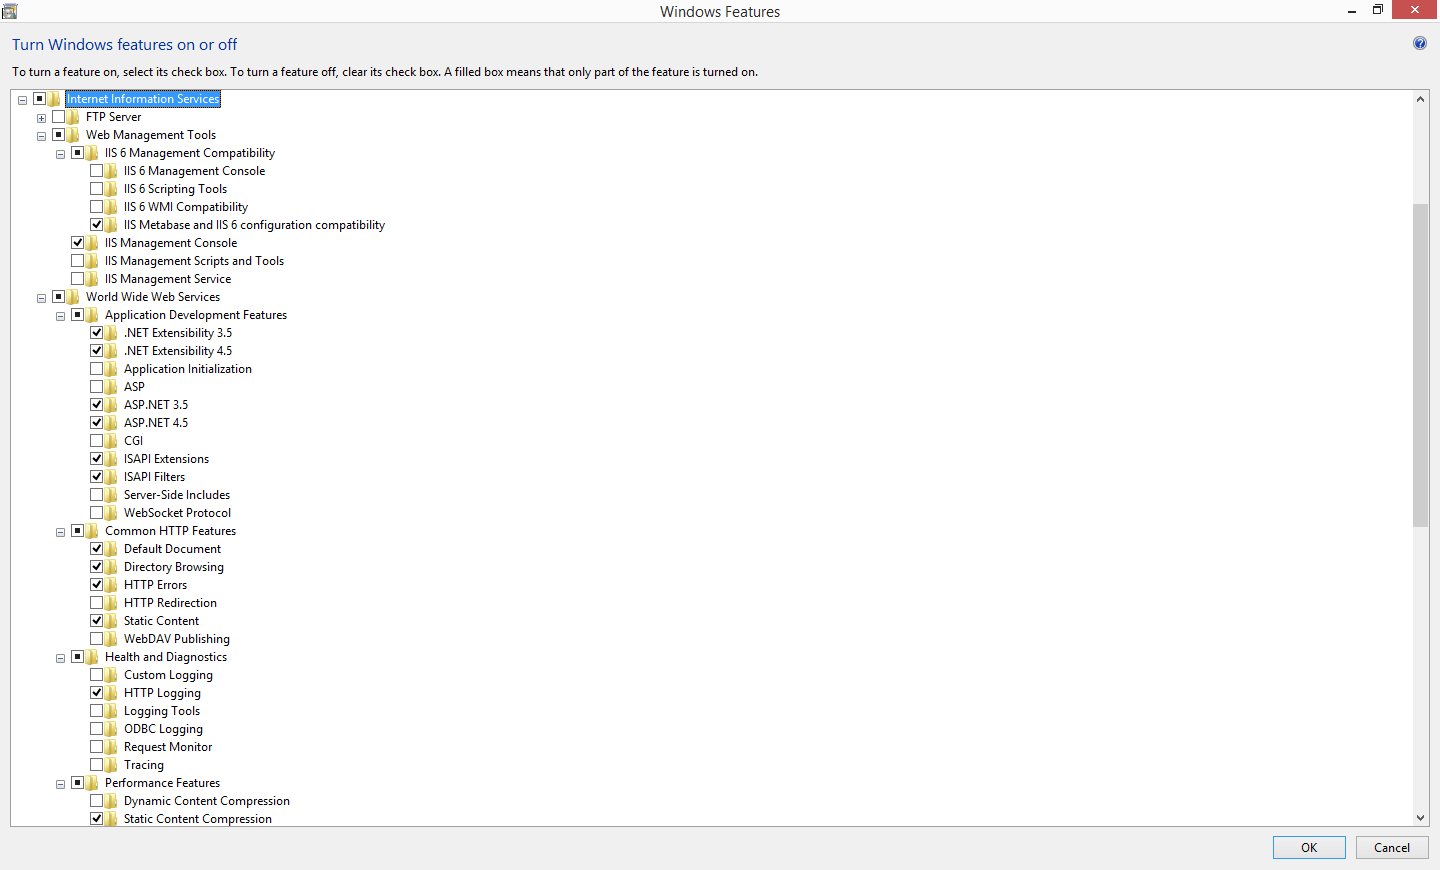
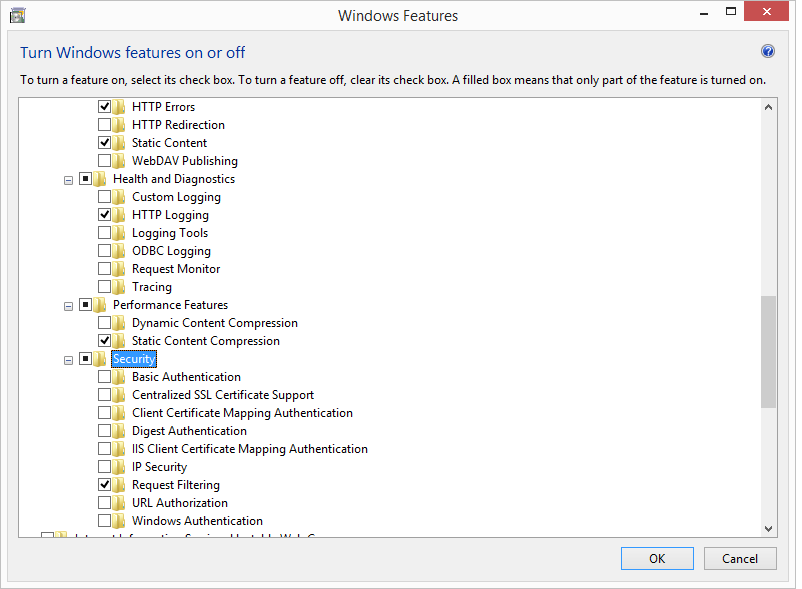
In the Windows setup screen “Turn Windows features on or off”, accessible from the Control Panel, there are some IIS options to activate:

1. NET Framework WCF Services HTTP Activation

IIS WCF Services HTTP Activation.png

2. Internet Information Services (IIS)

IIS Config 1.png

IIS Config 3.png

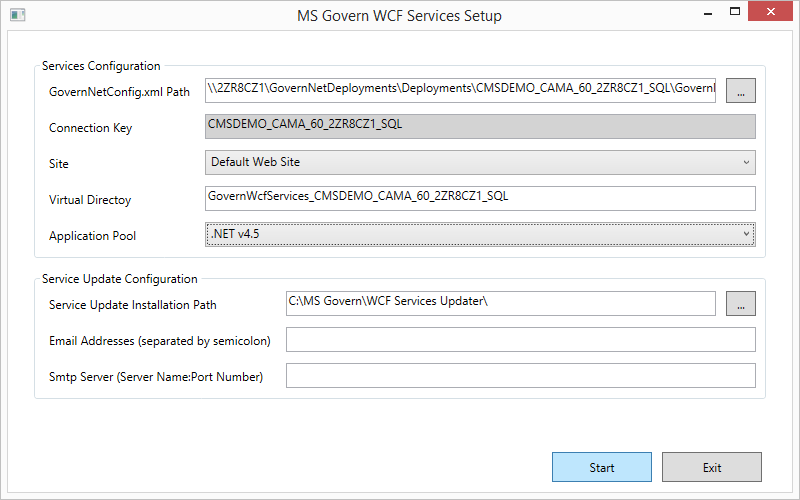
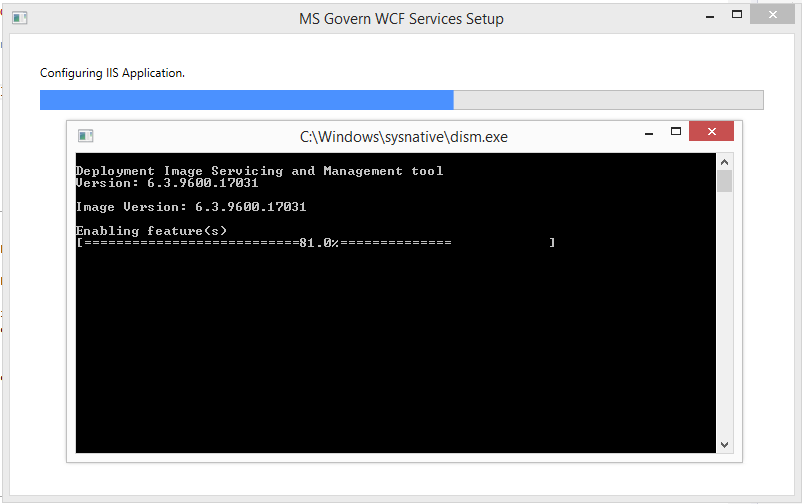
3. Next, run the Govern WcfServices exe:
X:Install Package6.1WCF Services Setup

MS Govern WCF Services Setup.png

MS Govern WCF Services Installation.png

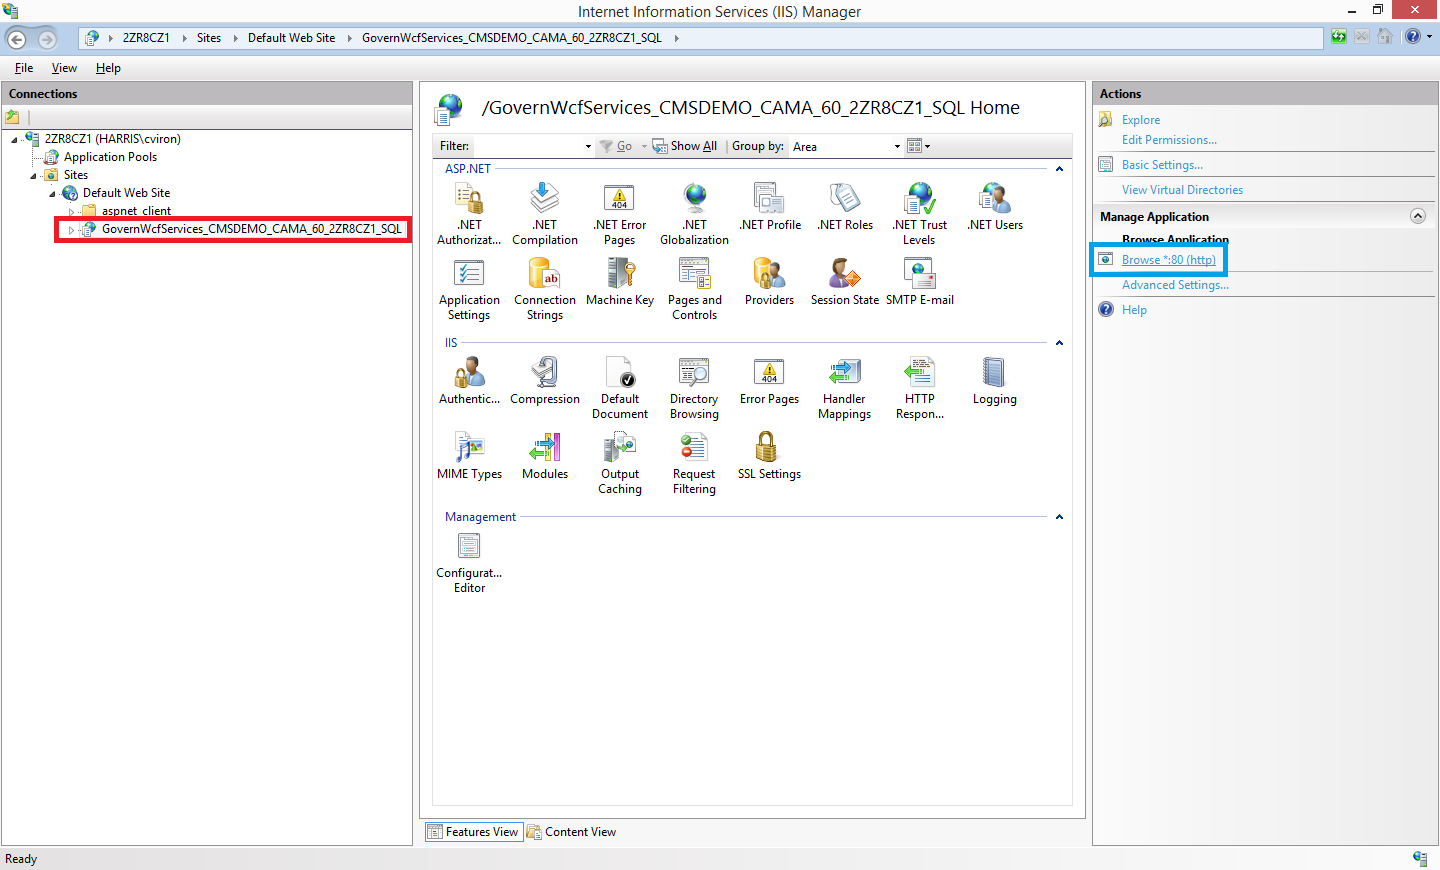
4. The IIS Application is installed and can be browsed:

IIS Browse.png

When clicking Browse, the service web page is open at the address:
https://localhost/GovernWcfServices_CMSDEMO_CAMA_60_2ZR8CZ1_SQL/

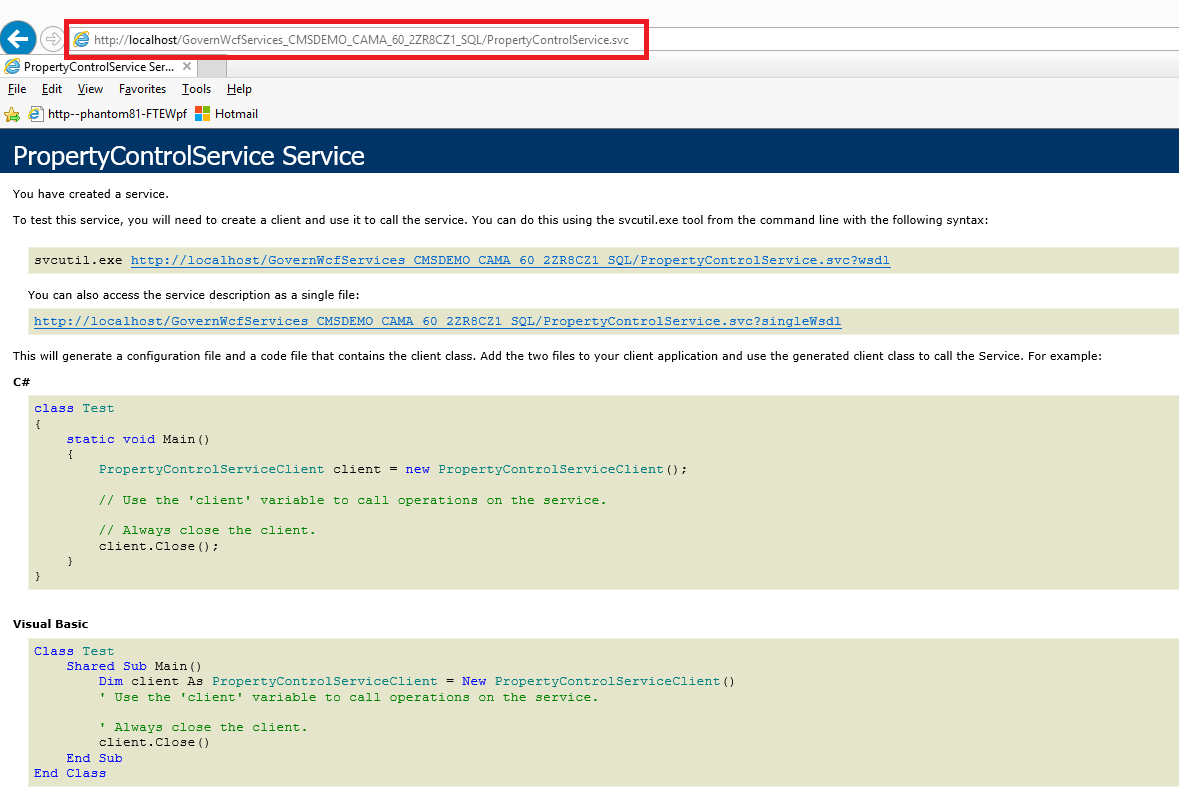
Click on the service name PropertyControlService.svc, you go to the service page. Copy-paste the link
https://localhost/GovernWcfServices_CMSDEMO_CAMA_60_2ZR8CZ1_SQL/PropertyControlService.svc

IIS Service Hyperlink.png

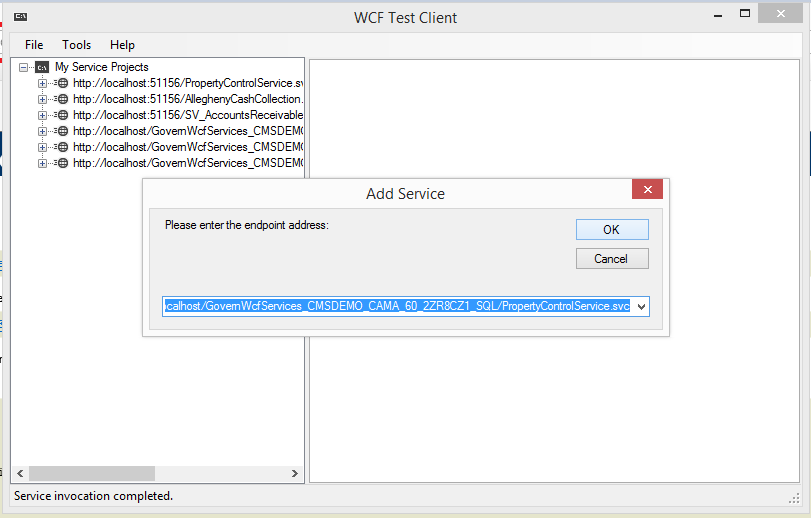
inside the WCF Test Client, located at: C:Program Files (x86) Microsoft Visual Studio 14.0/Common 7/IDE/WcfTestClient.exe:

WCF Test Client.png

You can then test any method from the service contract by clicking on it and set its parameters up.

Download and Install

As of 6.0, Deploy-EZ, can be used to download the standard Govern API WCF bundle (PC&GIS, AR&CC) and the Govern Scheduler Service.

  • Download Binaries for the required release (4.7, 5.1, 6.0., 6.1…)
  • Install for each Deployment (Production, Test, Train, Stage…)

For Govern e-Government or other Custom Services

  • Contact Harris Govern for FTP download information

For Harris Govern Employees, packages are located in GOVERN’s DEPLOYMENT SERVER, in the INSTALL folder by version.

What’s New

  • [6.0] New Govern Batch Scheduler Service (403) installation and automatic Service stop and restart for updates.
  • [6.0] The PC/GIS (401) and AR/CC (402) web services installation package have been bundled together.
  • [6.0] The installation pack can be downloaded via DeployEZ.

PC & GIS Web Service (401)

This service is used to load or create information in property control. It also establishes communication between Govern and a GIS system.
Click here for more information.

A/R & CC Web Service (402)

This service is used when cash is collected via a third party software.
Click here for more information.

Batch Scheduler Services (403)

Govern OpenForms Scheduler uses the following services:

  • Batch Scheduling
  • Batch Execution (Windows Services)

Click here for more information.


400-api


0 votes, average: 0.00 out of 50 votes, average: 0.00 out of 50 votes, average: 0.00 out of 50 votes, average: 0.00 out of 50 votes, average: 0.00 out of 5 (0 votes, average: 0.00 out of 5)
You need to be a registered member to rate this.
Loading...

SSRS – How to Install

How to Install SSRS

The following are the steps required to install Microsoft SQL Server Reporting Services. After successful installation you will be able to use SSRS reports in Govern.

Installation Steps

To proceed you will first need to obtain SQL Server Reporting Services from the Microsoft website.

NOTE: Before any installation, ensure that you have Administrator access to the target computer.
  1. Download Microsoft SQL Server Reporting Services from the following URL: https://www.microsoft.com/en-us/download/details.aspx?id=55252
  2. To install SSRS, click on SQLServerReportingServices.exe.
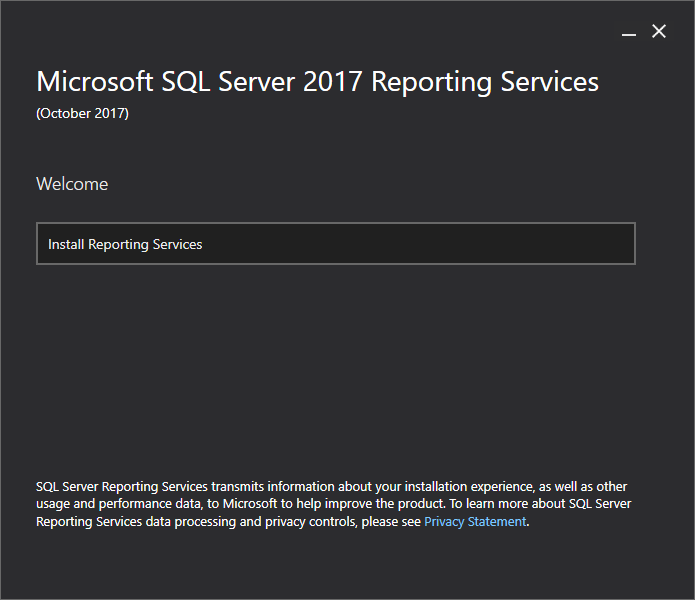
    • At the first screen click Install Reporting Services.
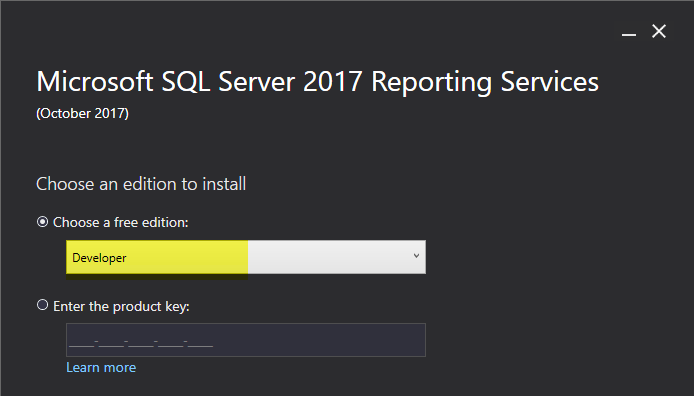
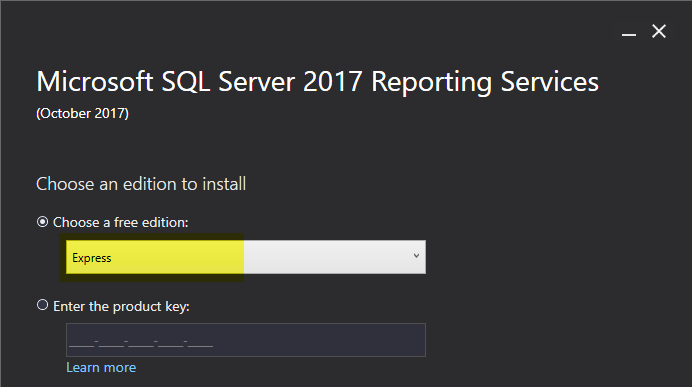
    • Click to select an edition – select Free: Developer or Free: Express).

      OR

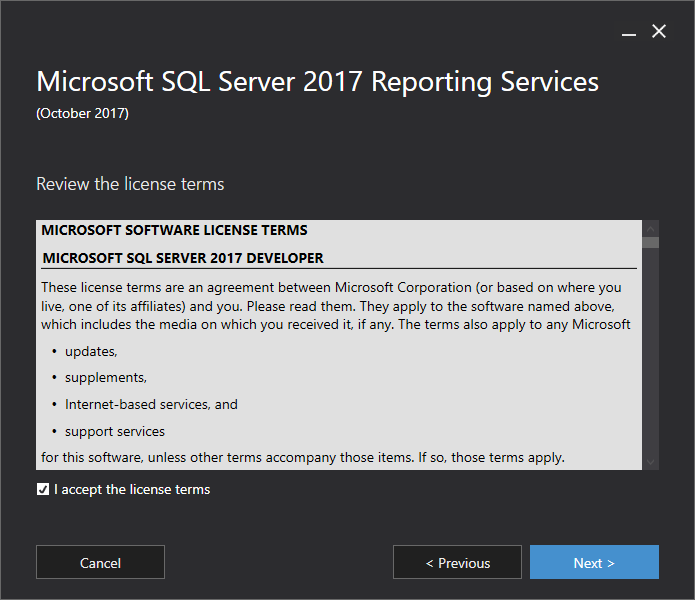
    • Accept the License Terms and click Next.
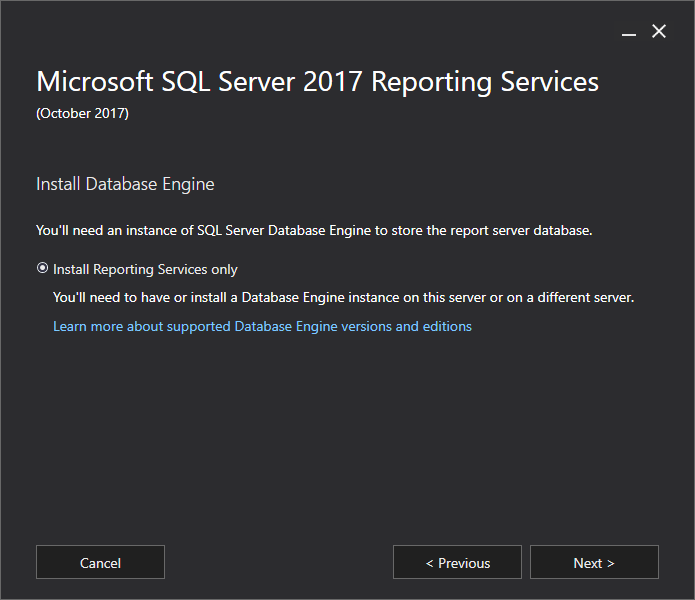
    • At the Install Database Engine option select Install Reporting Services only. Click Next.
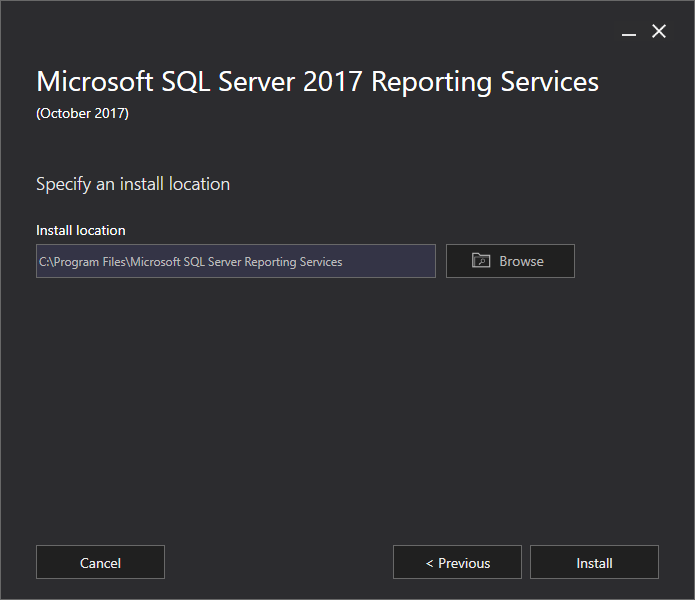
    • At the Specify an install location screen, use the default, or select a path. Click Install.
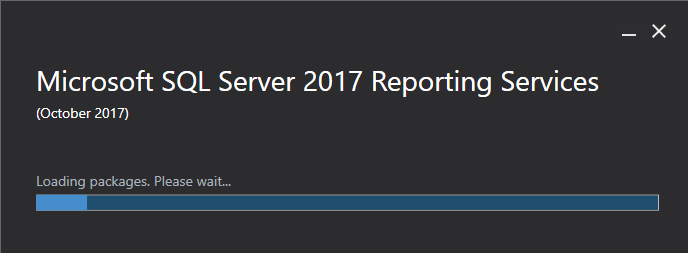
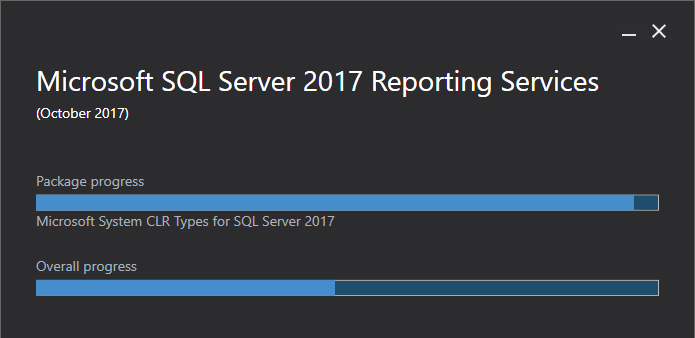
    • SSRS will be installed.

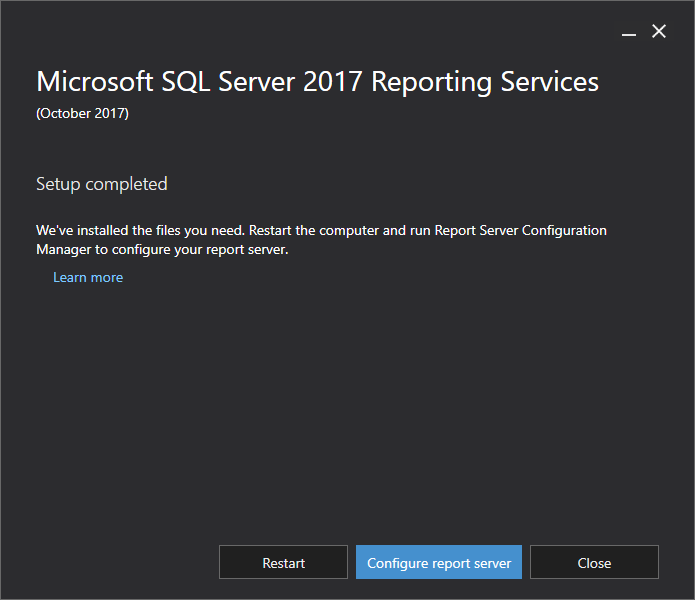
    • When the installation has completed, restart your computer and prepare to install the Report Server Configuration Manager.
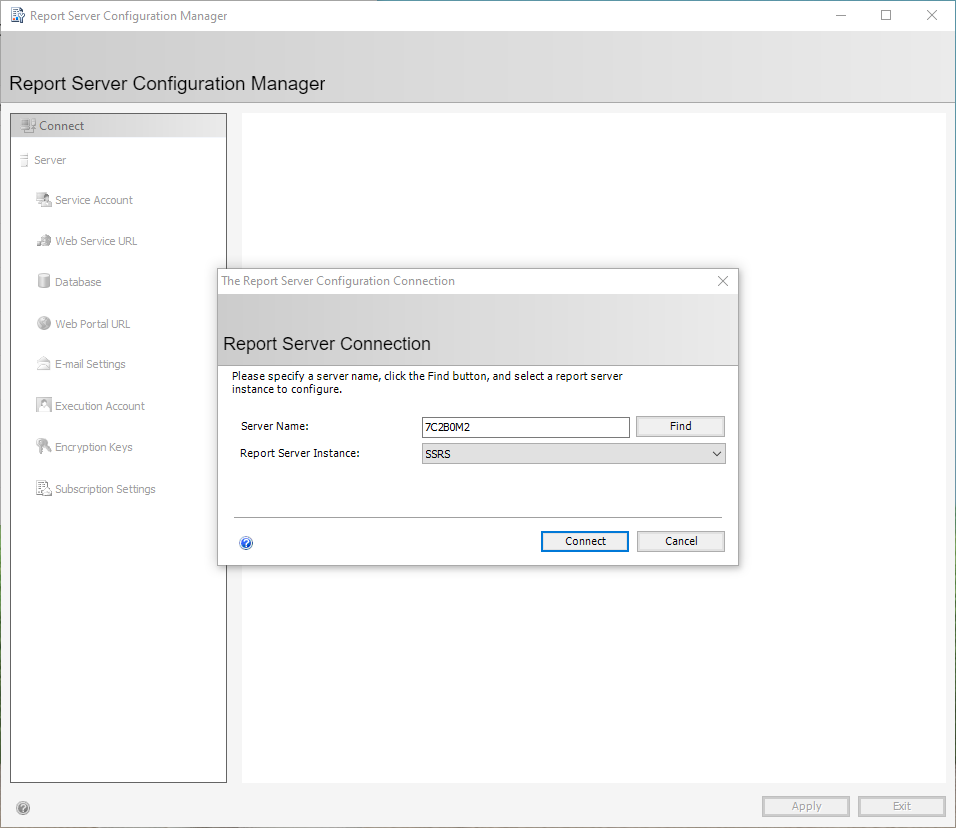
  3. After the system restart, open the Report Server Configuration Manager from the Windows menu.

    1. In the Report Server Configuration Manager screen, at the Report Server Connection prompt, select a server name. This should be the server that contains the SSRS installation.
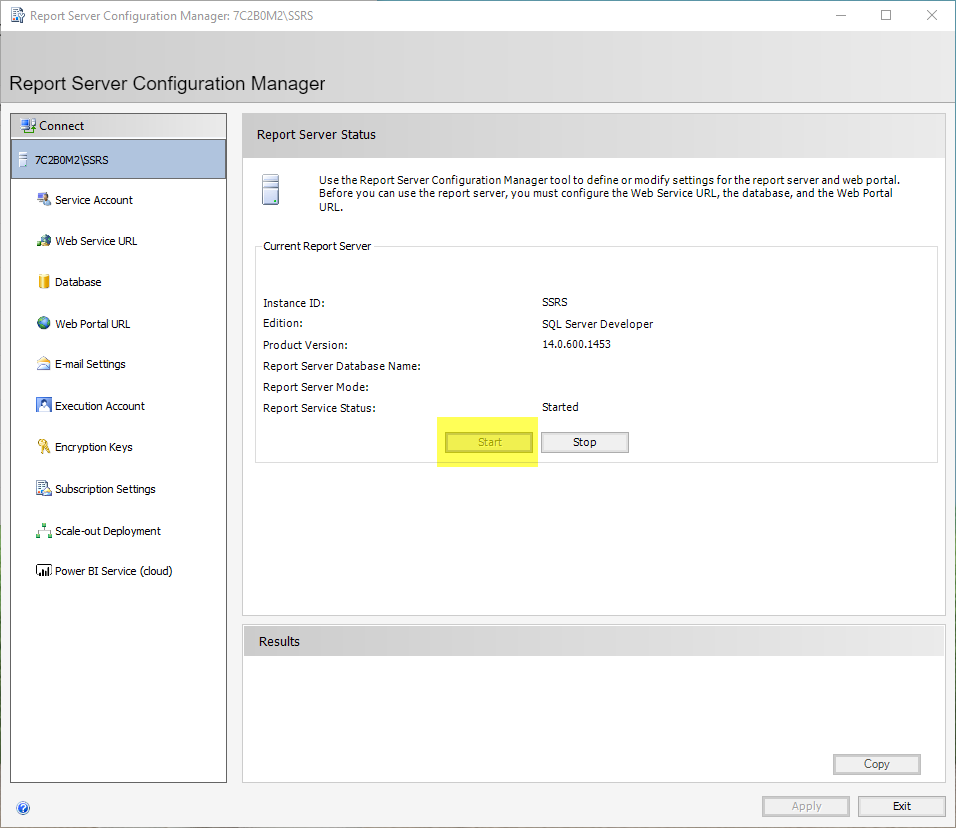
    2. After the server name has been specified, start the server. Click to select the server on the left hand pane of the Report Server Configuration Manager, and on the right-hand side (RHS), click Start.
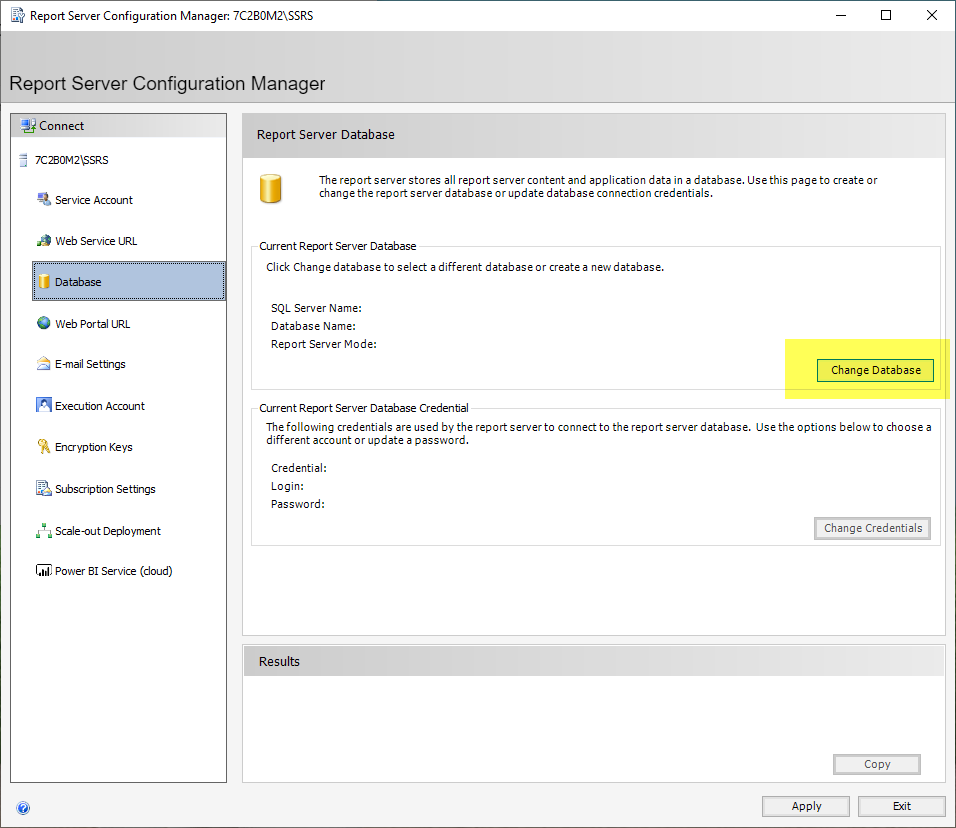
    3. At the Report Server Database screen, specify the Report Server Database server.
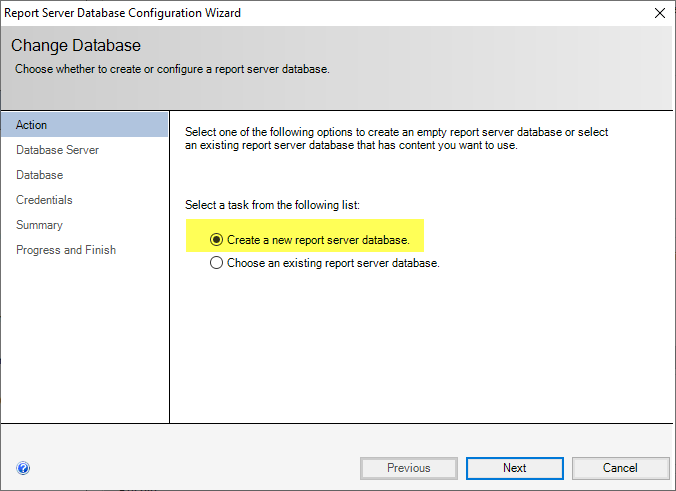
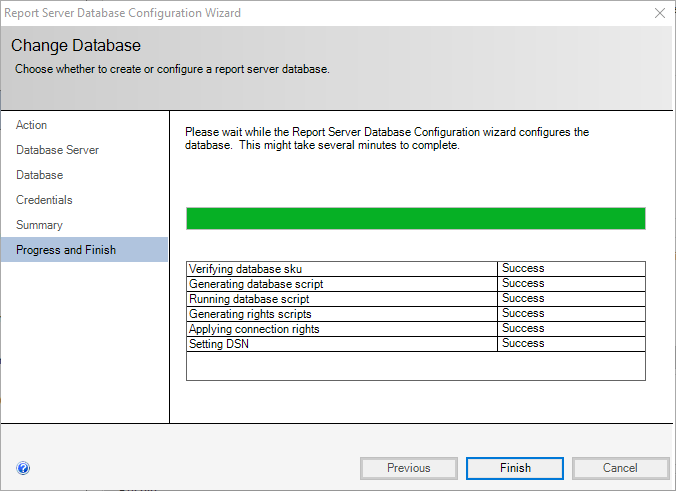
    4. Next select the option to Create a new report server database.

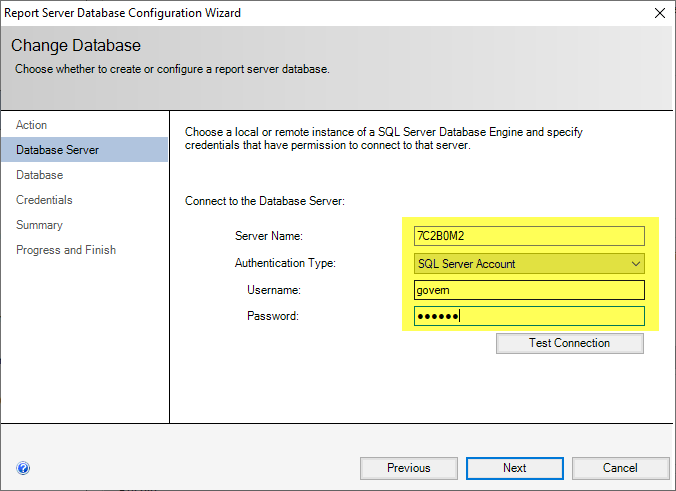
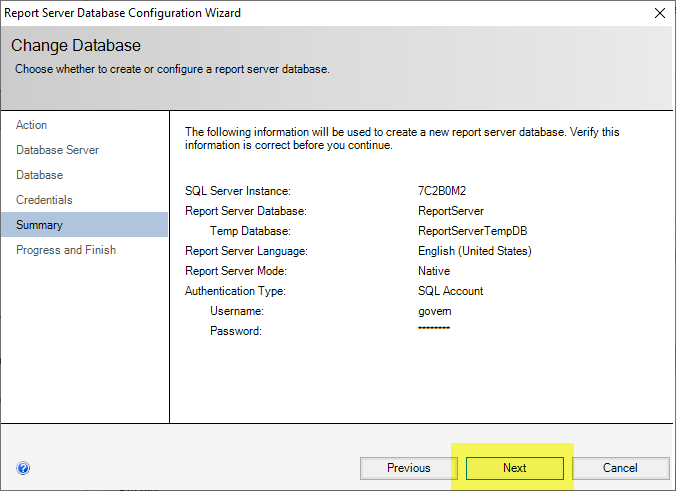
      At the Change Database prompt, click Database Server on the left hand side. Enter the Server Name, Authentication Type, Username, and Password to test your connection.

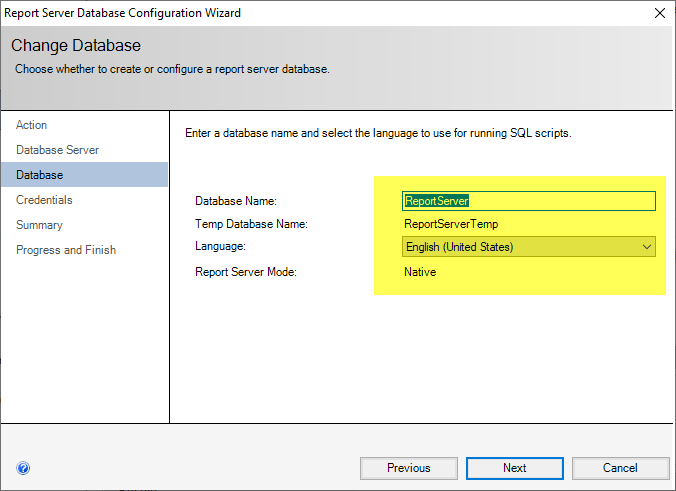
      In the Change Database screen, click Database then either use the default or select a name.

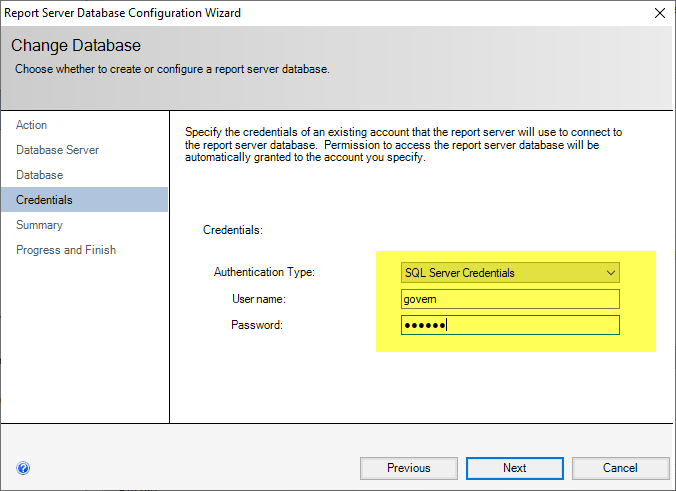
      Click Credentials to get the prompt, select an Authentication Type, enter a Username, and a Password.

      Summary of the database, click on next if everything is correct

      On Progress and Finish, click Finish to finish the process.

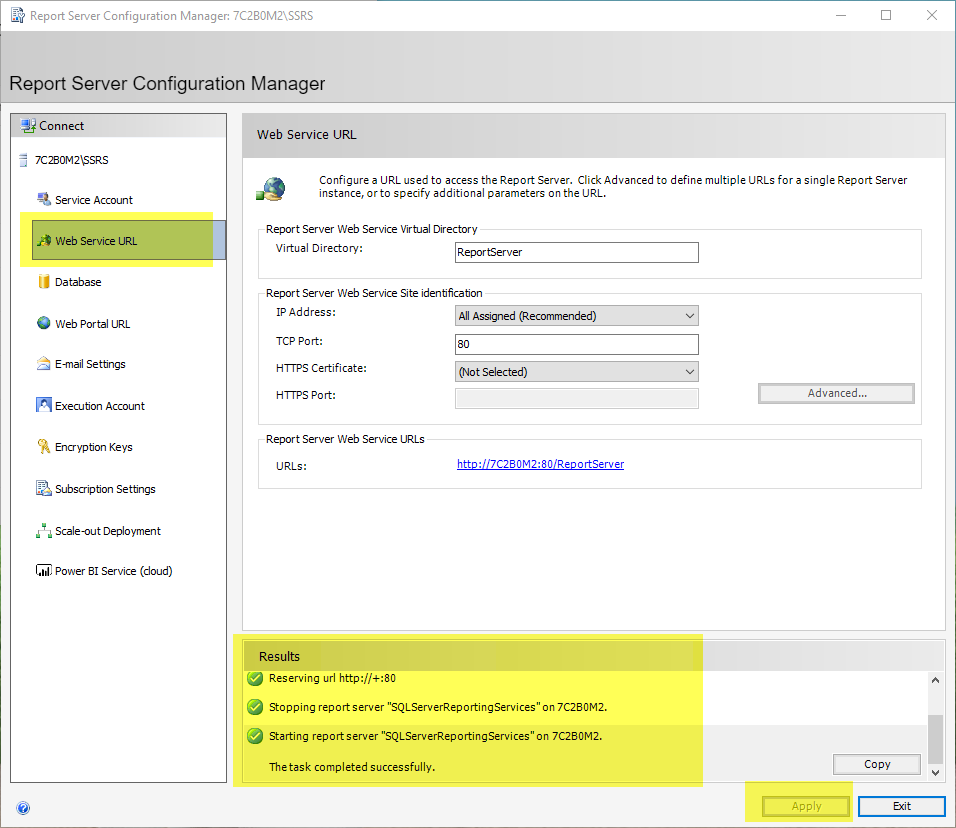
    5. Select Web Service URL and click on the button Apply

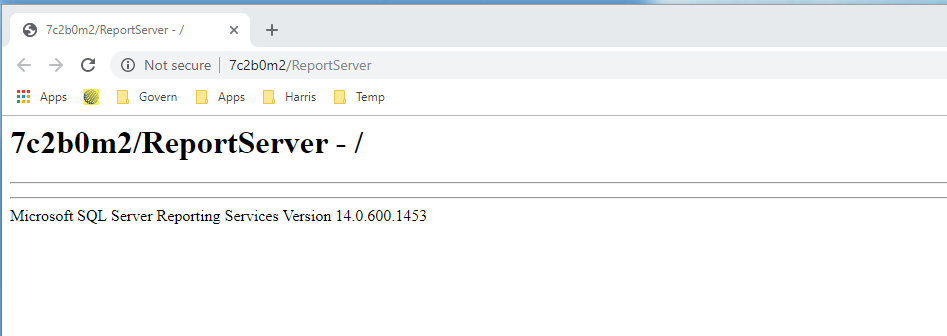
    6. Click on the URL link

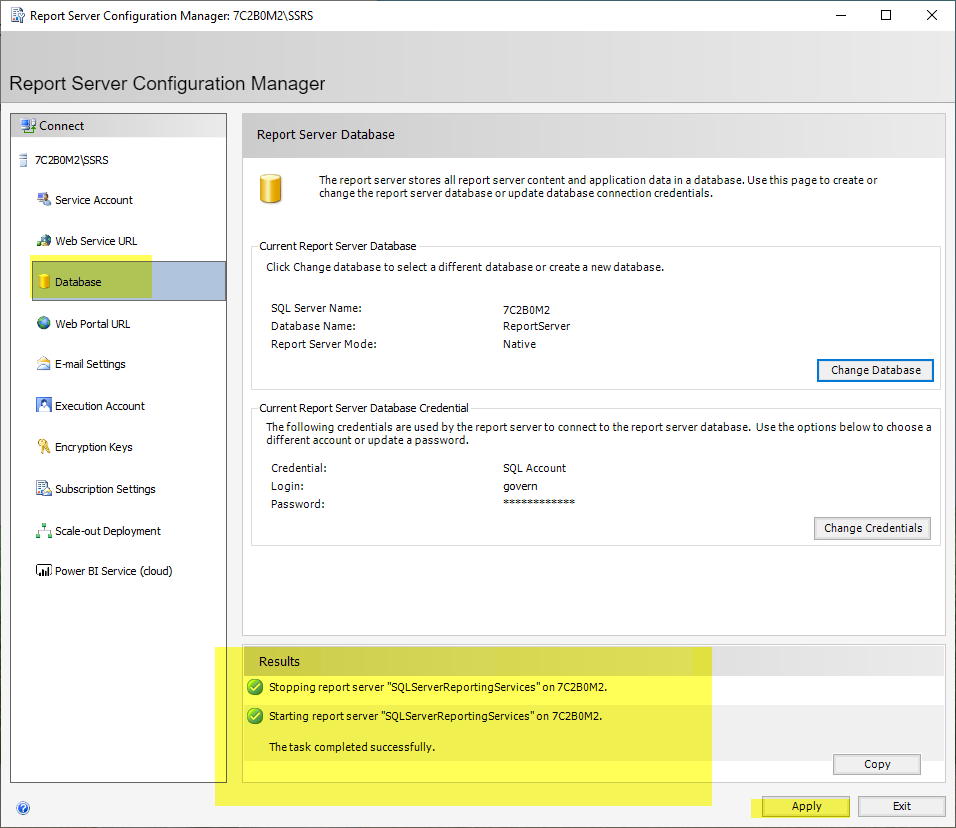
    7. Select Database and click on the button Apply
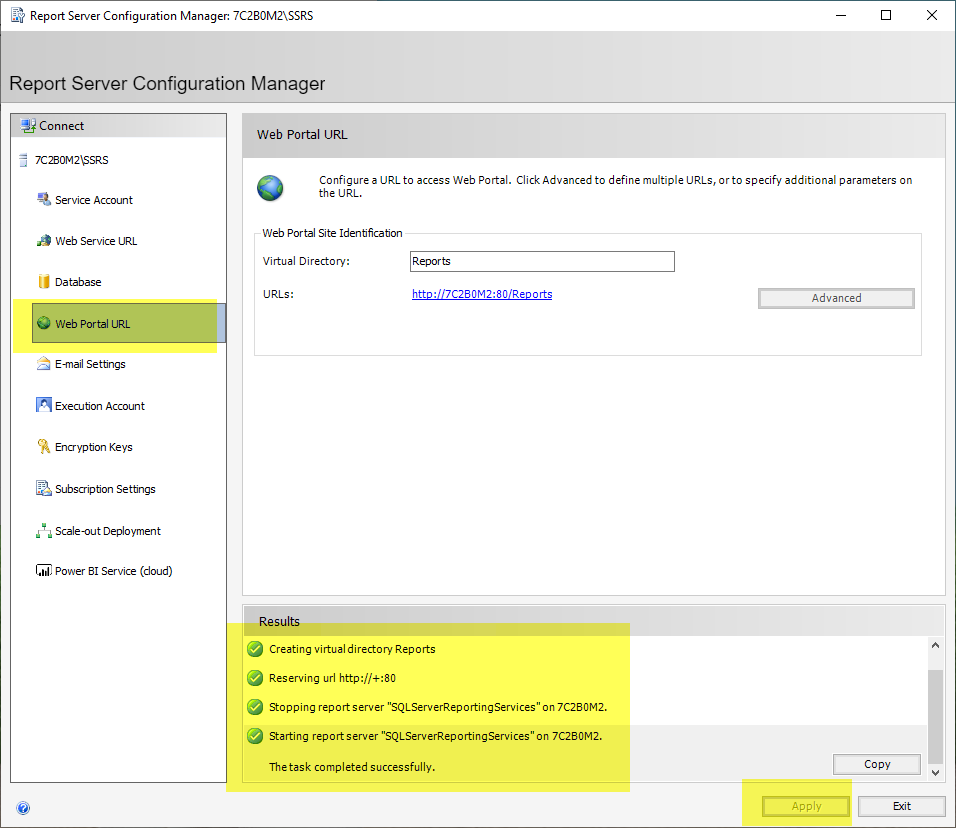
    8. Select Web Portal URL and click on the button Apply
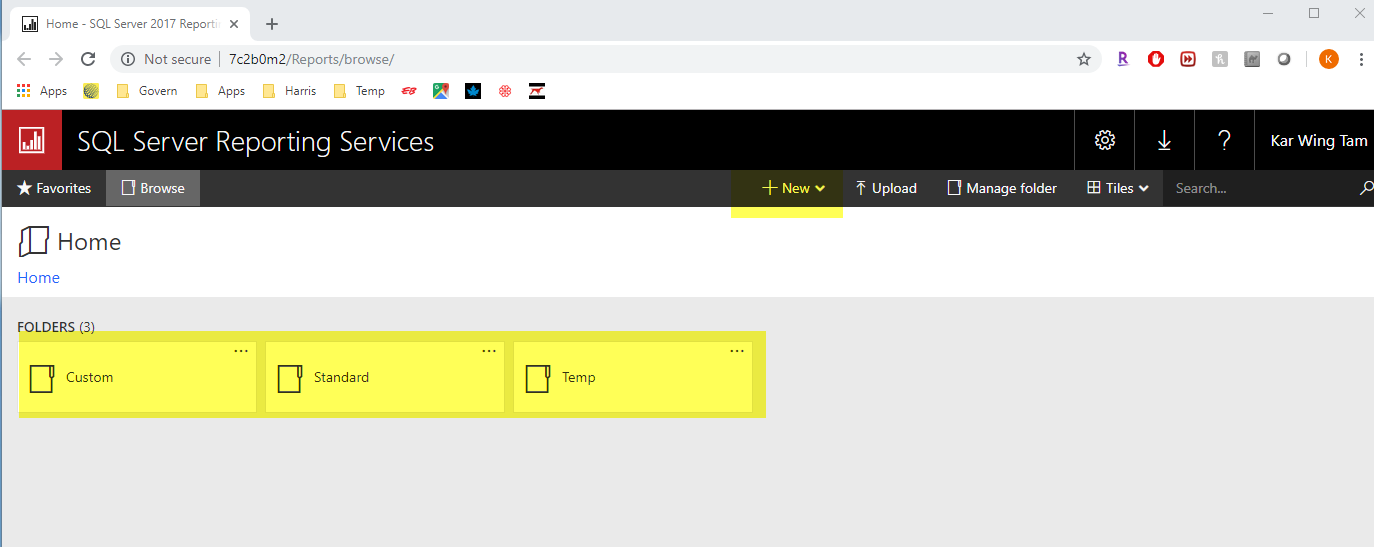
    9. Click on the URL link
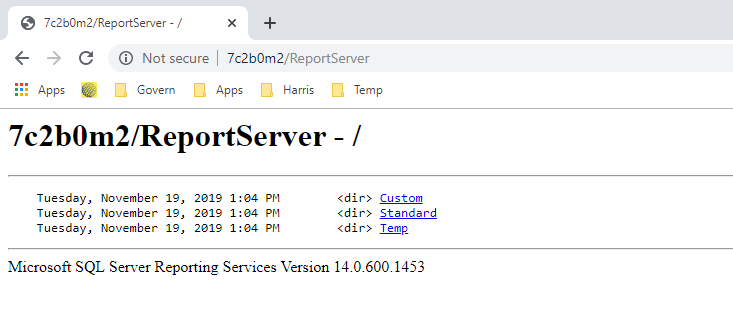
    10. Create 3 folders (Standard, Custom and Temp)
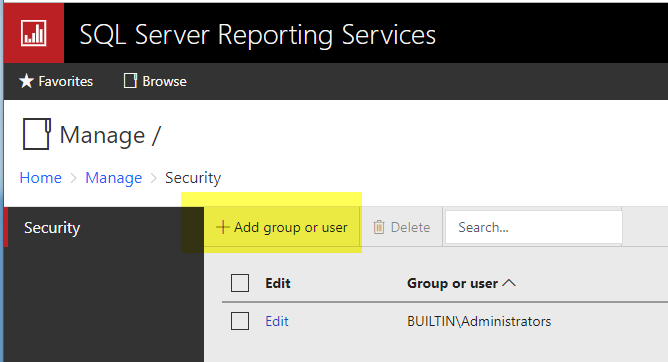
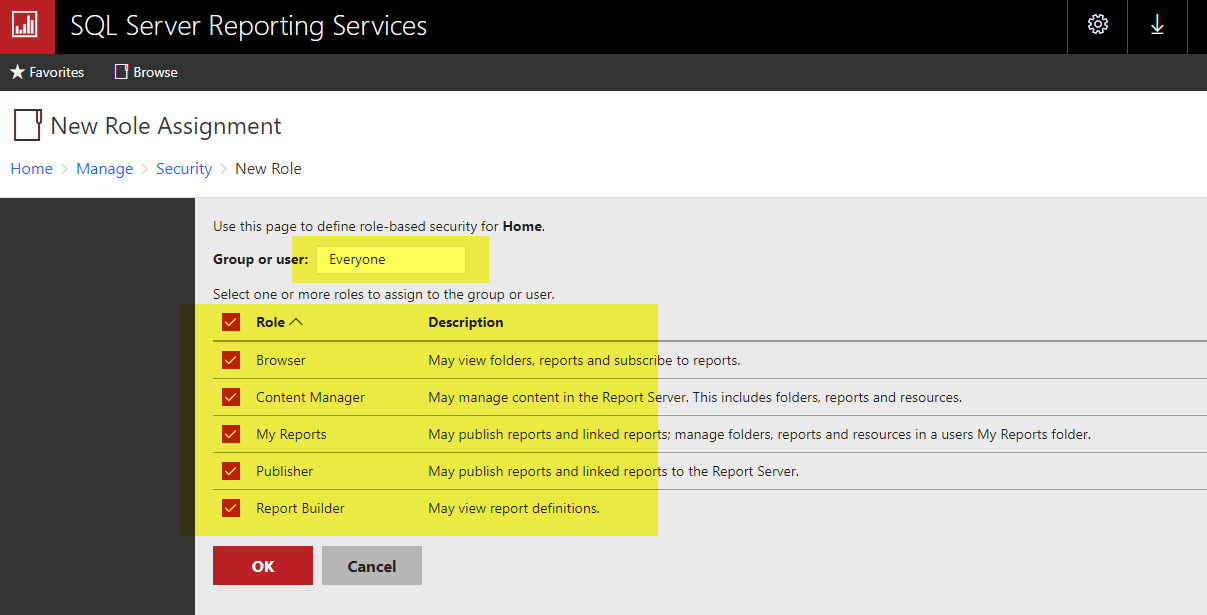
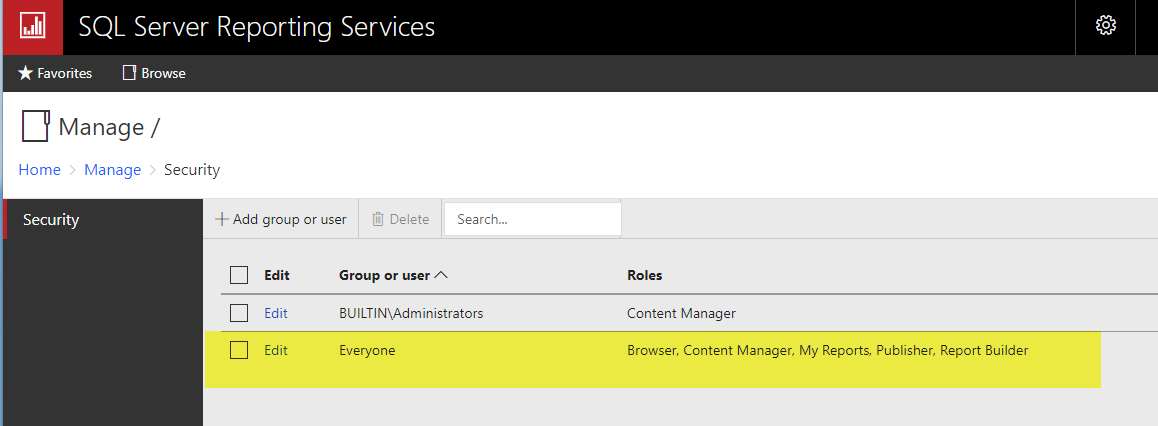
    11. Manage folder by adding security to everyone
    12. Refresh the Report Server site, you will see 3 folders
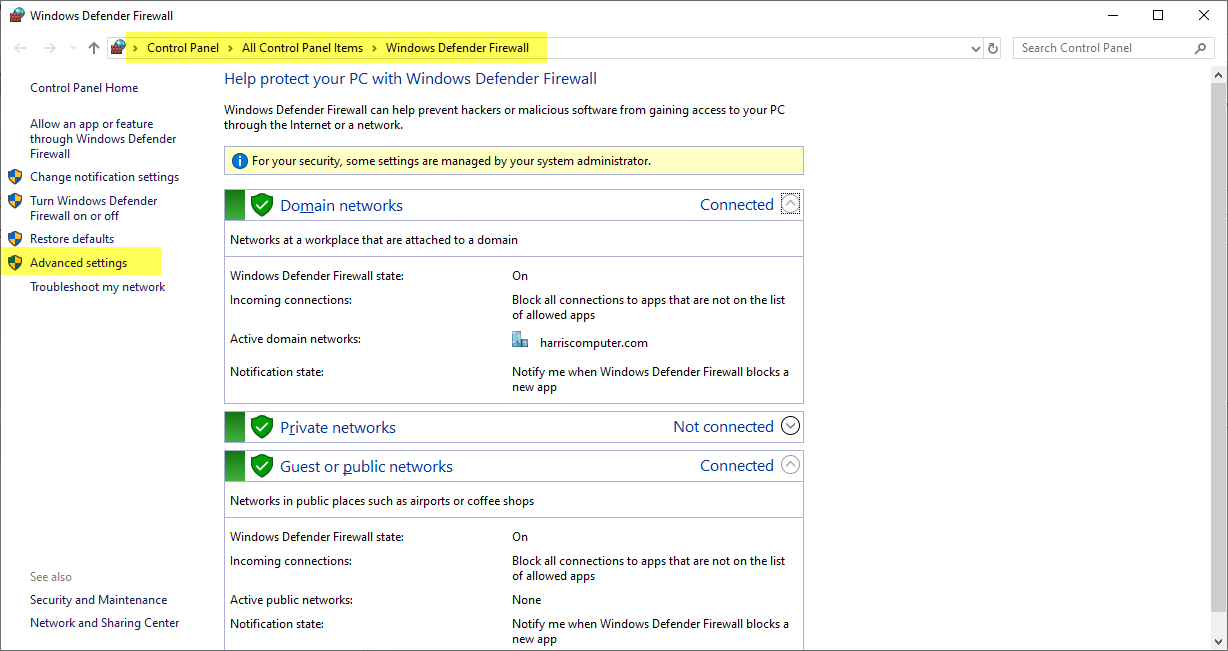
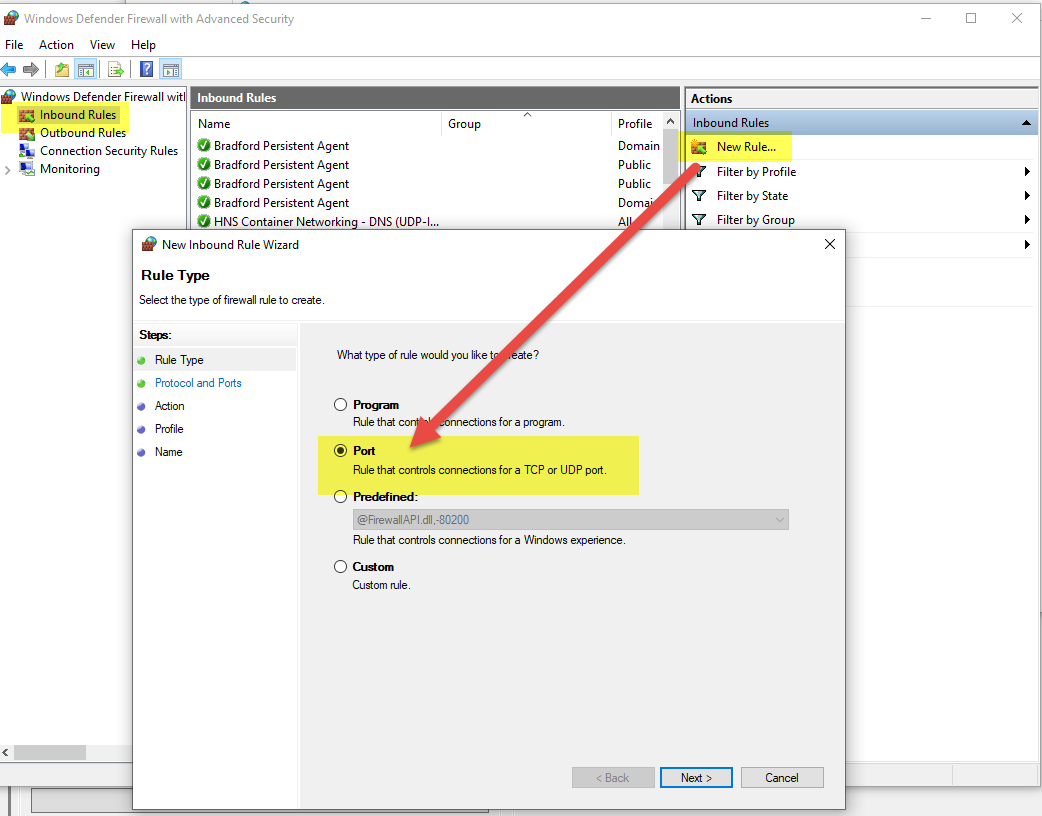
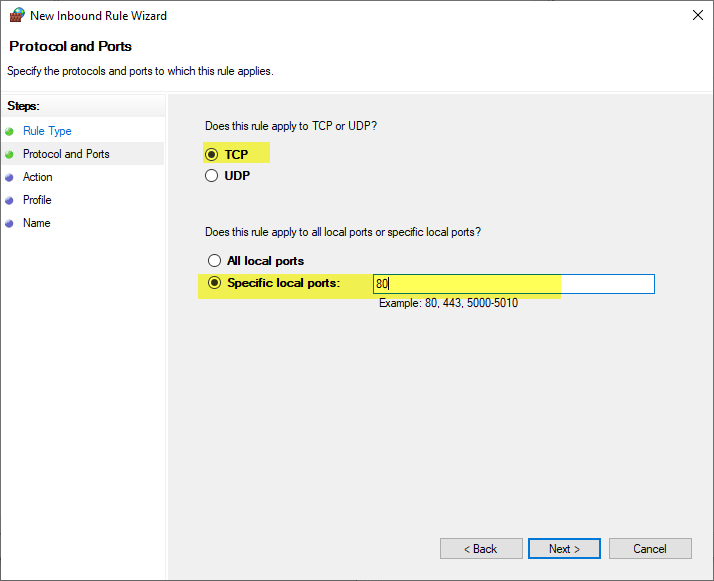
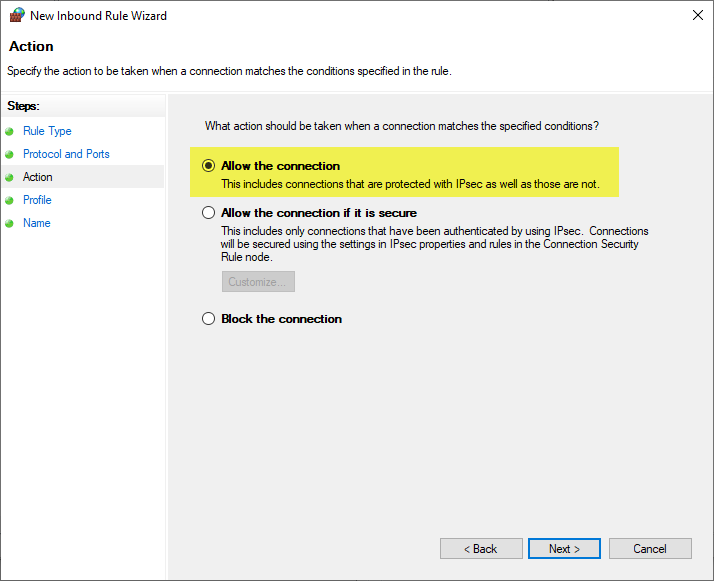
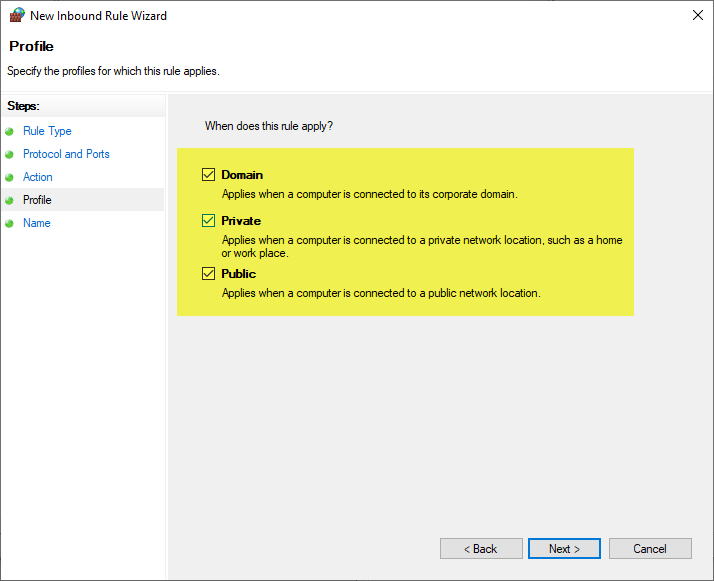
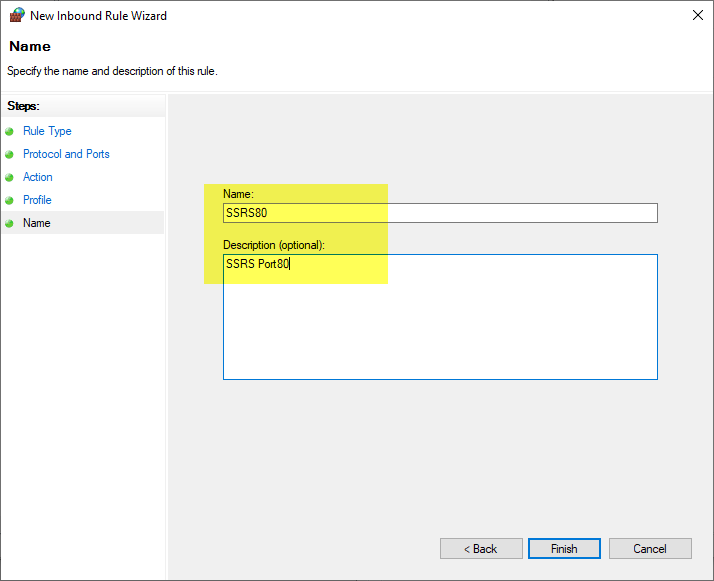
    13. Open the port
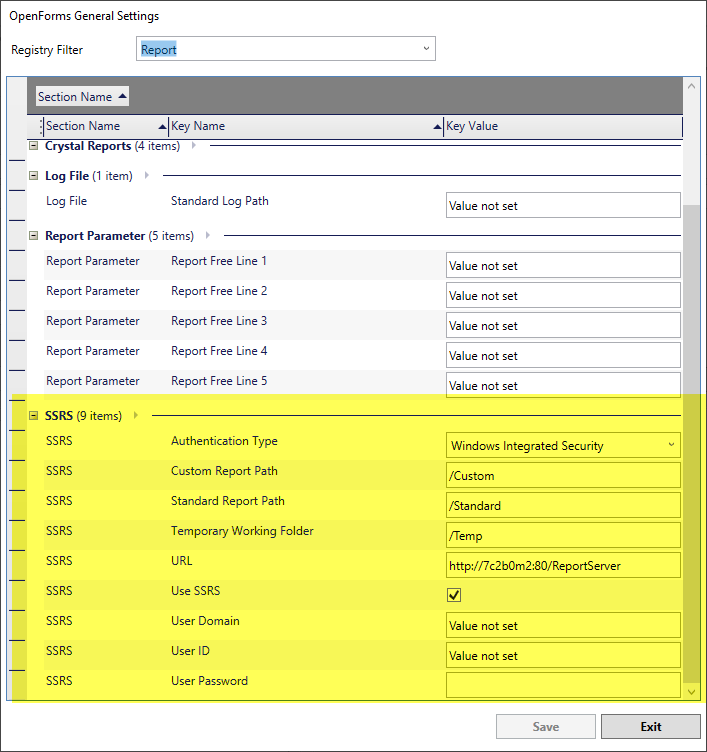
    14. Setup SSRS in GNA, go to Parameter\General Settings Editor, choose Report as Registry Filter.
  • Authentication Type – Use the windows integrated security
  • Custom Report Path – Set with the folder named “Custom” created in SSRS previously
  • Standard Report Path – Set with the folder named “Standard ” created in SSRS previously
  • Temporary Report Path – Set with the folder named “Temp” created in SSRS previously
  • URL – The Report Server Web service URL from SSRS
  • Use SSRS – Must be checked to be able to see the menu SSRS in GNA
  • User Domain / User ID / User Password – Will be empty (no need to be set)
You will need to install the Report Builder to be able to change/edit SSRS reports. At the moment you will need to install the version 2014 otherwise you may not be able to edit a Report: https://www.microsoft.com/en-us/download/details.aspx?id=42301


301-ssrs_how-to-install


1 vote, average: 5.00 out of 51 vote, average: 5.00 out of 51 vote, average: 5.00 out of 51 vote, average: 5.00 out of 51 vote, average: 5.00 out of 5 (1 votes, average: 5.00 out of 5)
You need to be a registered member to rate this.
Loading...