For the complete reference guide, see Govern Accounts Receivable.
For the A/R Transaction Rules, see A/R Transaction Rules.
To see the information on this page as a pdf, click on the following link:
PaymentTransfer.pdf
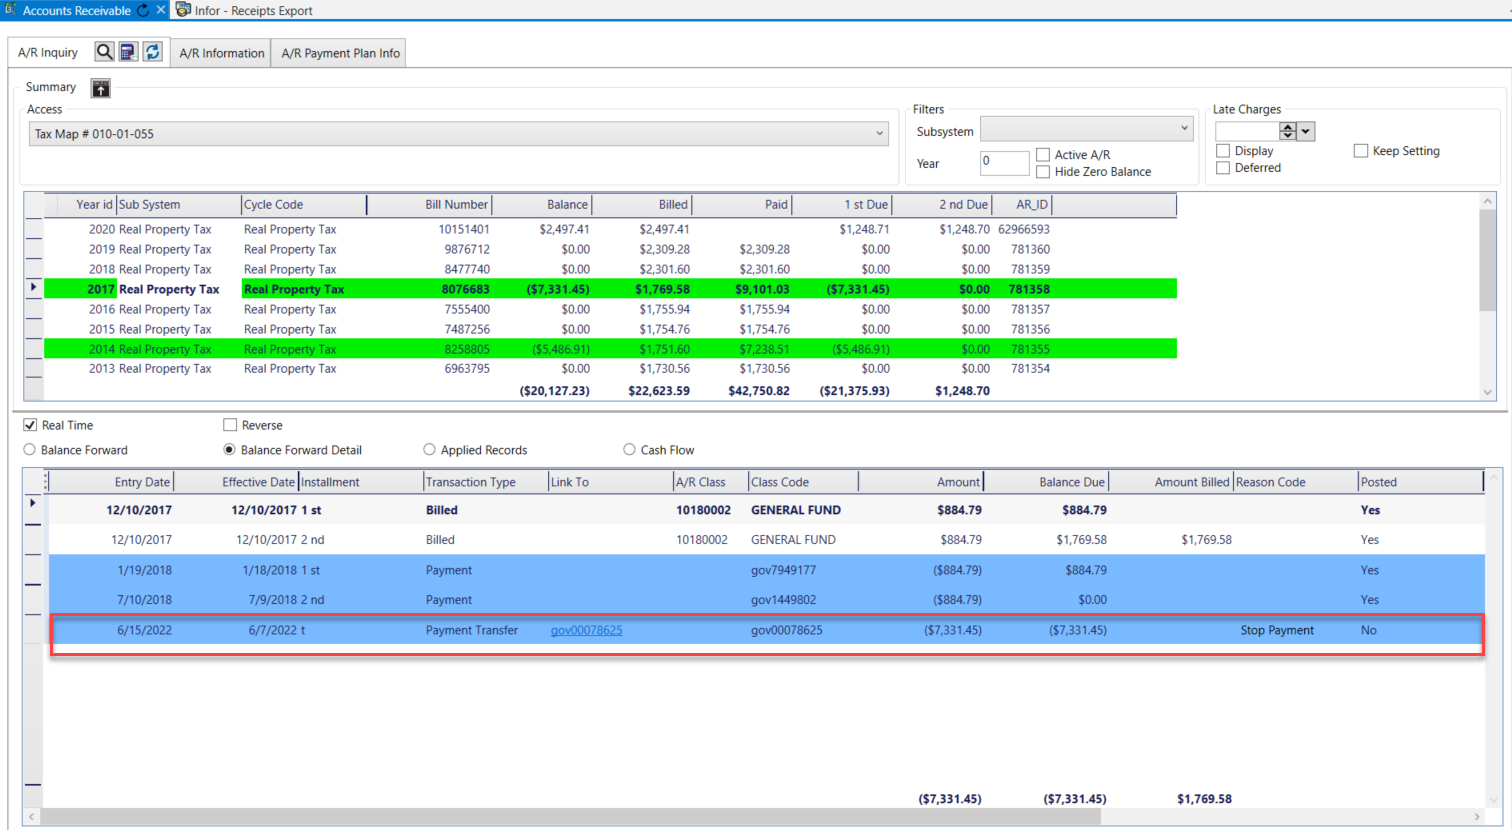
Payment Transfer (trp)
The Payment Transfer (trp) or Payment (pmt) can be viewed in the Detail section of the A/R Inquiry form when you select the account to which the payment is transferred. In the example, this is the utility account. In the Link To column, you can click on a direct link to the Payment Transfer Reversal (trr) or Reversal (rev) in account from which the original payment was transferred, the tax account in the example.
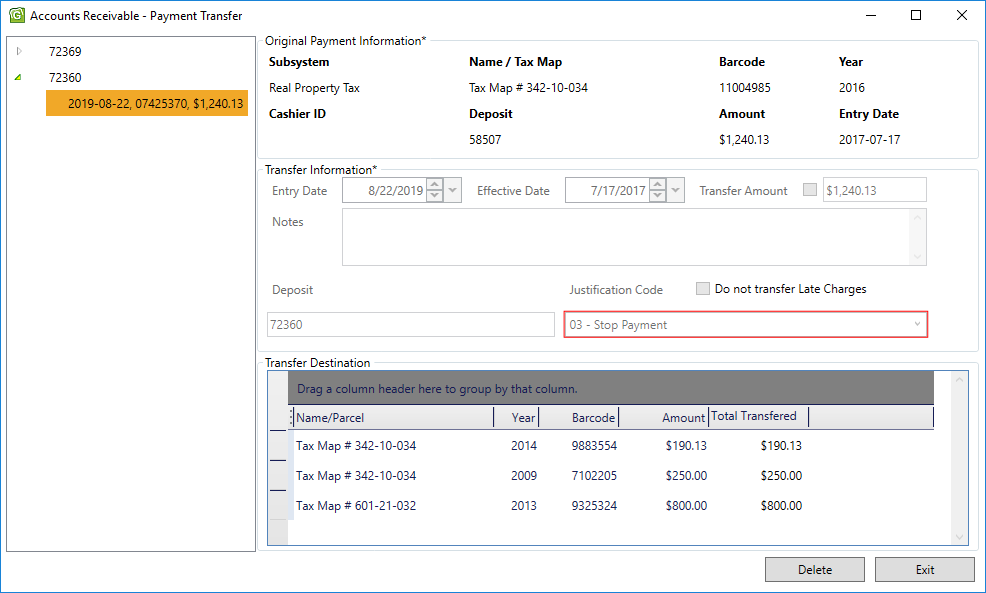
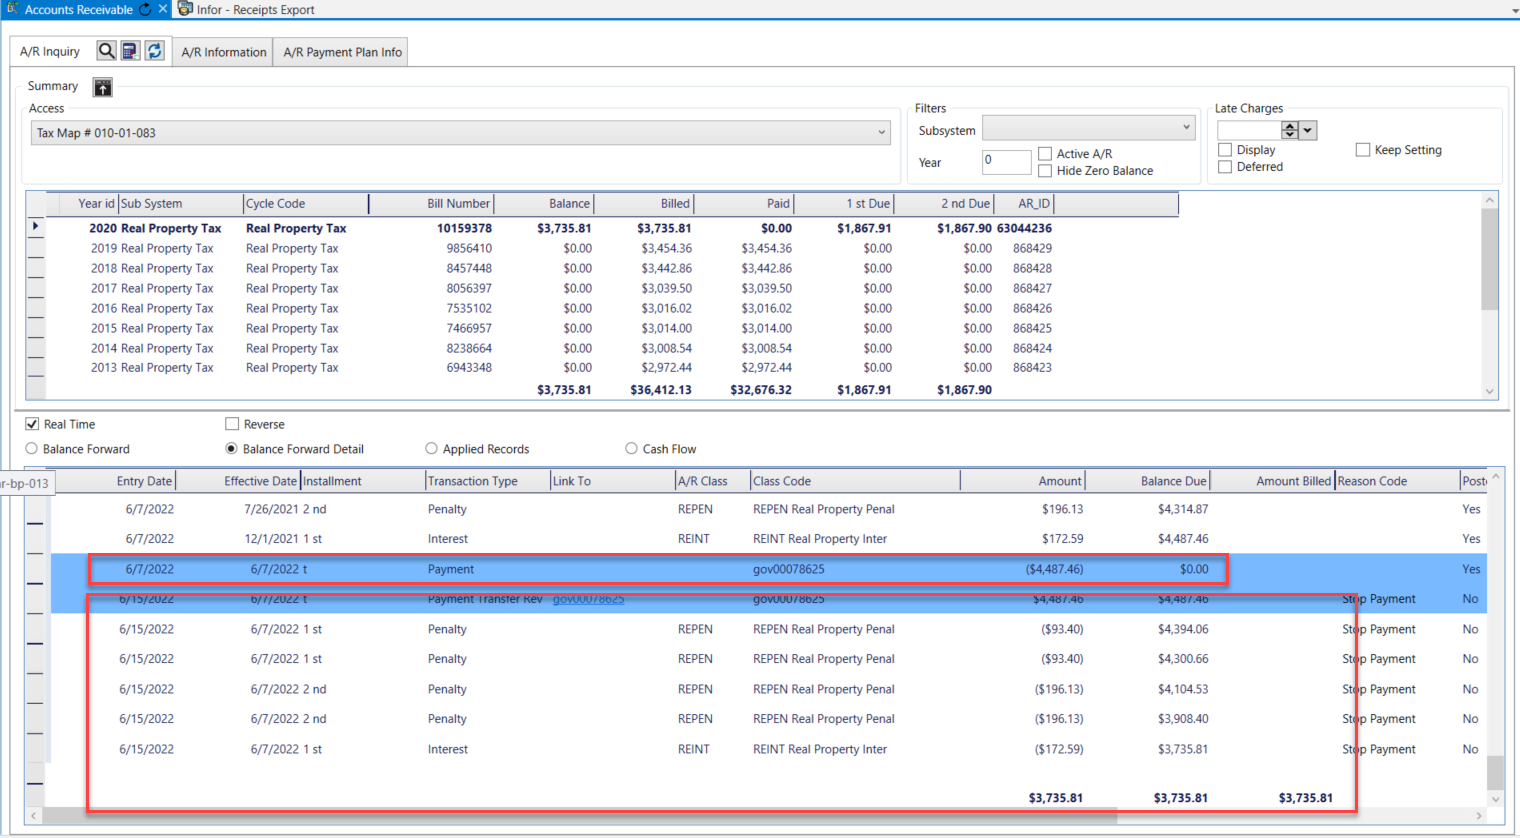
Payment Transfer Reversal (trr)
Similarly, the Payment Transfer Reversal (trr) or Reversal (rev) can be viewed in the A/R Inquiry Detail section when you select the tax account. In the Link To column, you can click on a direct link to the Payment Transfer (trp) or Payment (pmt) in the account to which it was transferred.
Accessing the Payment Transfer Form
To access the Payment Transfer form:
- Launch Govern.
- Open a Profile that has the Accounts Receivable module.
- Open the Accounts Receivable form.
- Perform a search and load the required record to the tree view and the form.
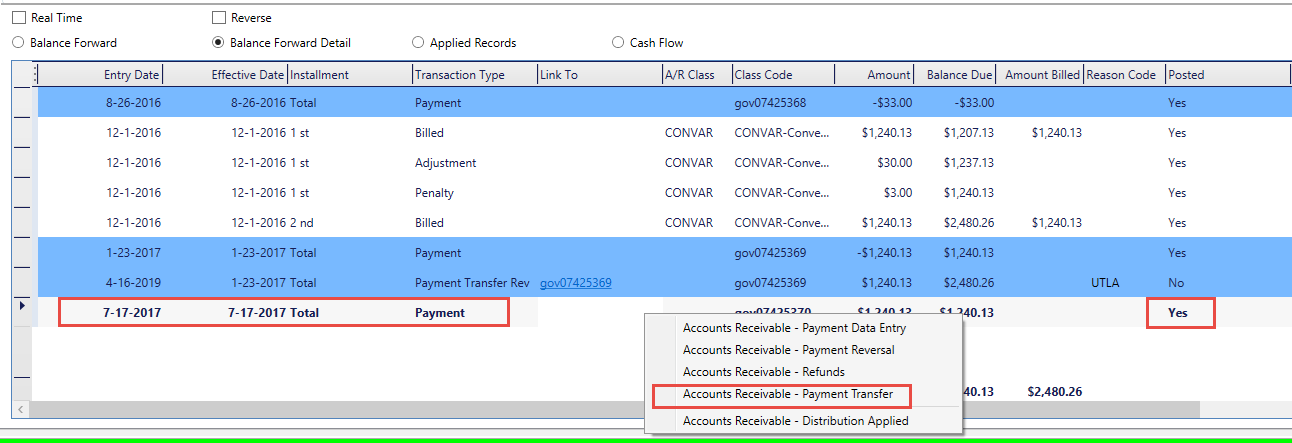
- Select the record in the Summary section of the A/R Inquiry in order to view the details.
- Right-click on the payment you want to transfer in the Detail section.
A context menu is displayed.
- Select Payment Transfer from the drop-down list This opens the Payment Transfer form.
The Payment Transfer form is described in the following sections:
- Original Payment Information
- Transfer Amount
- Transfer Destination
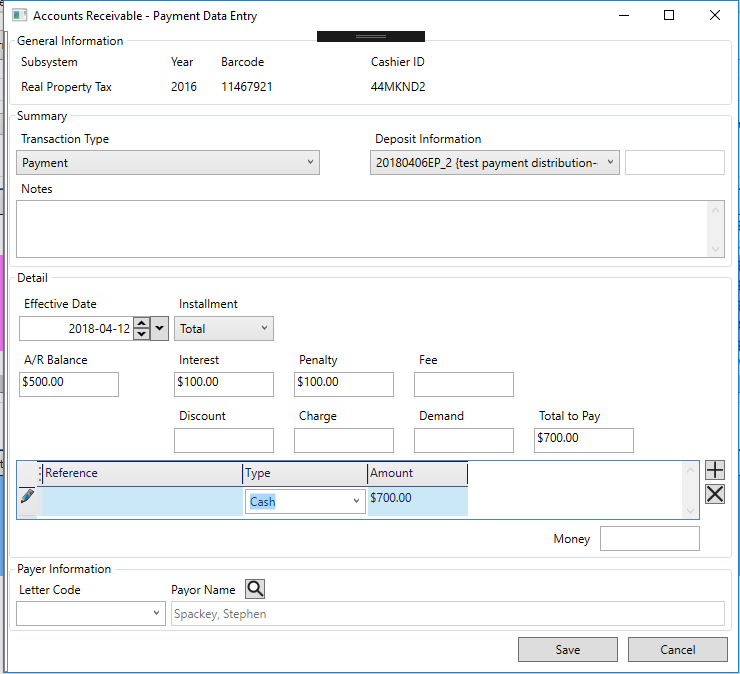
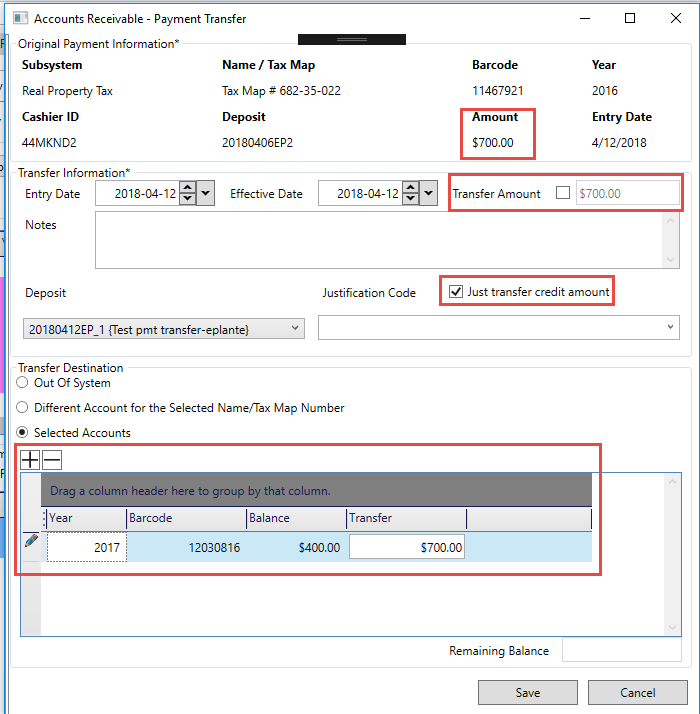
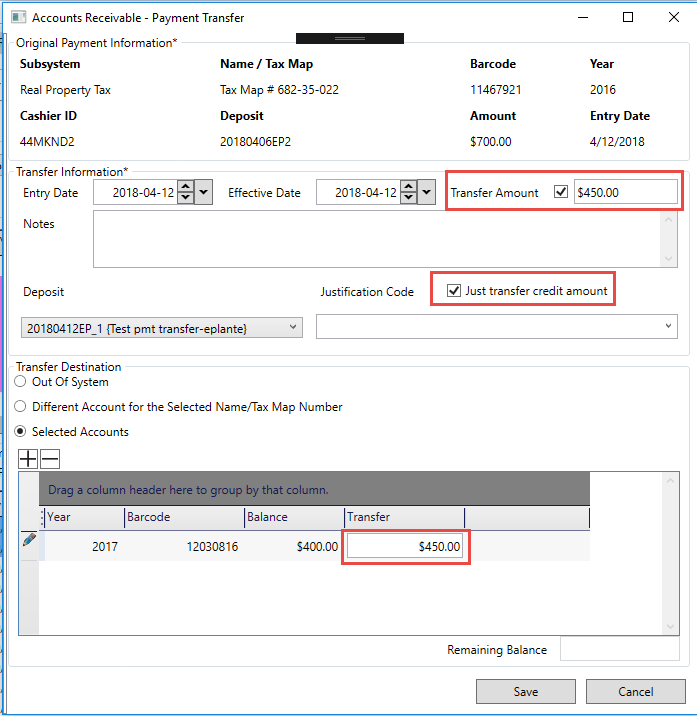
Original Payment Information
The Original Payment Information provides general information about the original payment and includes the following fields:
Subsystem: The subsystem for the record or entry selected on the A/R Inquiry form is displayed. This is the original payment record that will be transferred during this procedure.
Name / Tax Map: This field displays the name or tax map number associated with the account to which the original payment was posted.
Bar Code: This field displays the bar code or A/R ID associated with the original payment.
Year: This field displays the fiscal year of the original payment record.
Cashier ID: This field displays the ID of the cashier who processed the original payment.
Deposit Number: This field displays the deposit number of the original payment.
Amount: This field displays the amount of the original payment.
Entry Date: This field displays the date the original payment was entered.
Transfer Amount
The Transfer Amount section displays details about the transferred payment.
Entry Date: This field displays the entry date for the payment transfer, not the original payment. By default, this is the current date. To change the date, click the calendar beside this field and select a new date.
Effective On: This field displays the date that the payment transfer is effective. By default this is the effective date of the original payment. To change the default date, click the calendar beside the field and select a new date. For example, you may want to enter the posting date.
Amount: By default, this field displays the full amount of the payment that you are transferring, the original payment. You can modify the amount if you want to transfer only part of the original payment.
Note: If you transfer the full amount of the payment, all discounts and interest are transferred.
If you transfer only part of the original payment, no discounts or interest are transferred.
To modify the amount of the payment that you are transferring:
- Select the check box beside Transfer Amount.
- Overwrite the amount that is displayed.
The amount displayed beside Remaining Balance is automatically updated.
Transfer Destination
Select one of the following options for the destination account; i.e., the account to which you want to transfer the payment:
- Out of System: Select this option if you are transferring the amount to an external system.
- When you select this option, only the Payment Transfer Reversal (trr) or Reversal (rev) transaction is created. A Payment Transfer (trp) or Payment (pmt) transaction is not created.
- Different Account for Selected Name or Tax Map Number: Select this option if you are transferring a payment to another account associated with the same name or tax map number as the original payment.
- Selected Accounts: Select this option to transfer the payment to any account that can be selected through the A/R Inquiry Search.
Transfer Options
Deposit Number
Depending on the options selected in the GNA, deposit numbers can be automatically generated or user-defined.
Automatically generated deposit numbers are composed of one or two of the following fields: date, last deposit, and user ID. This number can be modified if you have the required security permissions.
If Deposit Management is activated, a drop-down list is added to the Deposit Information parameter. This is populated by the deposit numbers created in the Deposit Management form.
Do one of the following:
- Enter a new deposit number required.
- Select a deposit number from the drop-down list.
Justification Code
Select a Justification Code to explain the reason for the transfer (Table: VT_USR_ARREASON).
Just transfer credit amount
When this option is not selected, which is the default, both the principal and interest are transferred.
When this option is selected, only the principal is transferred. This option is useful if the penalty and interest are calculated separately. There was a client that had that need.
This applies to full payments, only. For partial payments, the interest is not transferred, only the principal.
Out of System
Select this option if you are transferring the payment to another system that is external to Govern.
To transfer the payment outside the Govern system:
- Open the Payment Transfer form to the applicable payment.
- Select Out of System under Transfer Destination on the Payment Transfer form.
- Modify the default Entry Date, Effective Date, and Transfer Amount, if required.
- Click Save.
- Perform the Payment Transfer batch process to post the payment transfer in Govern A/R.
With this option, only the Payment Transfer Reversal (trr) or Reversal (rev) transaction is created. The Payment Transfer (trp) or Payment (pmt) transaction is not created.
Different Account for Selected Name or Tax Map Number
Select this option to transfer the payment to a different account, or barcode, associated with the selected name or tax map number.
To transfer the payment to a different account associated with the same name or property:
- Open the Payment Transfer form to the applicable payment.
- Select Different Account for Selected Name/Tax Map Number.
- Select the Transfer Amount checkbox if you are overriding the default amount and enter a new amount. Otherwise, accept the default.
- Select Different Account per Name / Tax Map Number.
All the accounts for the selected name or property are loaded to the form.
Account details include the balance; interest; other amounts, such as discounts and penalties; and the amount to be transferred. These are displayed under the Balance, Interest, Other Charges, and Transfer columns.
By default, the amount displayed in the Transfer Amount text box is used to pay each account that is listed.
The amount that is transferred to a selected account is displayed in the Transfer column. This is subtracted from the total Transfer Amount and the result is displayed in the Remaining Balance text box.(Remaining Balance) = (Total Transfer Amount) – (Transfer per Account)
By default, all accounts, with a balance, that are listed for the selected name or tax map number are displayed.
If multiple accounts are listed, the Transfer Amount is used to pay the amount owing on each one. The final amount is displayed in the Remaining Balance text box.
- Modify the default Entry Date, Effective Date, and Transfer Amount, if required, as described under Transfer Amount on page 181.
- Click Save.
- Perform the Payment Transfer batch process to post the payment transfer in Govern A/R.
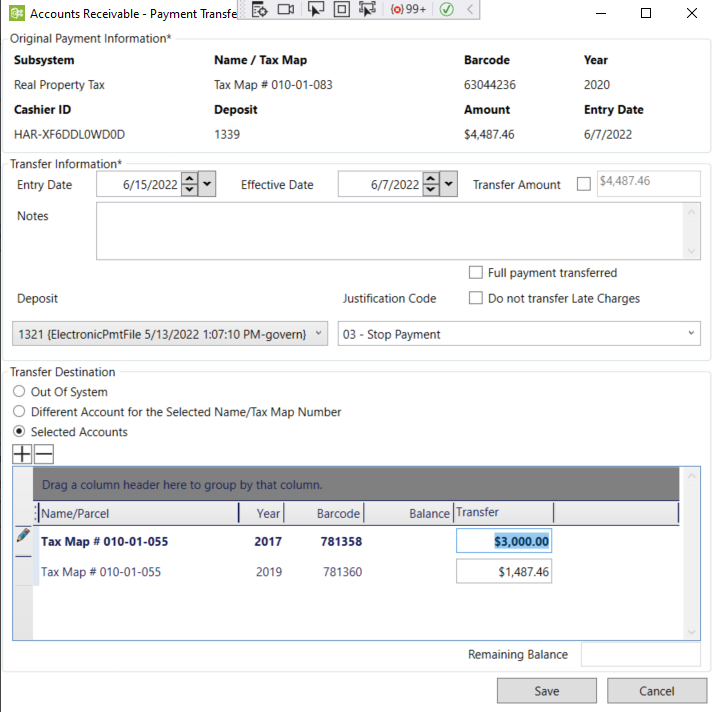
Selected Accounts
You can transfer a payment to any account in the Govern A/R system that has a balance.
To transfer the payment to another account:
- Open the Payment Transfer form to the applicable payment.
- Select the Selected Accounts option.
- Select the Add an Account icon.
The A/R Inquiry Search screen opens.
- Perform a search.
- Select and load the applicable account or accounts to the Payment Transfer form.
All selected accounts are displayed in the grid.
The account details include the balance; interest; other amounts, such as discounts and penalties; and the amount to be transferred. These are displayed under the columns: Balance, Interest, Other Charges, and Transfer.
By default, the amount displayed in the Transfer Amount text box is used to pay each account that is listed.
The amount that is transferred to a selected account is displayed in the Transfer column. This is subtracted from the total Transfer Amount and the result is displayed in the Remaining Balance text box.(Remaining Balance) = (Total Transfer Amount) – (Transfer per Account) If multiple accounts are listed, the Transfer Amount is used to pay the amount owing on each one.
The final amount is displayed in the Remaining Balance text box.
- Modify the default Entry Date, Effective Date, and Transfer Amount, if required.
- Click Save.
- Perform the Payment Transfer batch process to post the payment transfer in Govern A/R.
Removing a Displayed Account
If you are using either the Different Account for Same Name / Tax Map Number or the Selected Accounts option, you can remove any of the listed accounts that you are not using, from the Payment Transfer form.
To delete a selected account:
- Open the Payment Transfer form.
- Load the required record to the form.
- Select the account.
- Click the Remove Account icon
Modifying the Amount Transferred to a Selected Amount
If you are transferring the original payment to one or more selected accounts, you can modify the amount transferred to each account.
To modify the amount in the Transfer column for an account:
- Select the account that you want to modify.
- Overwrite the amount in the Transfer column.
Payment Transfer Troubleshooting
This section describes two scenarios where a payment transfer would not be completed.
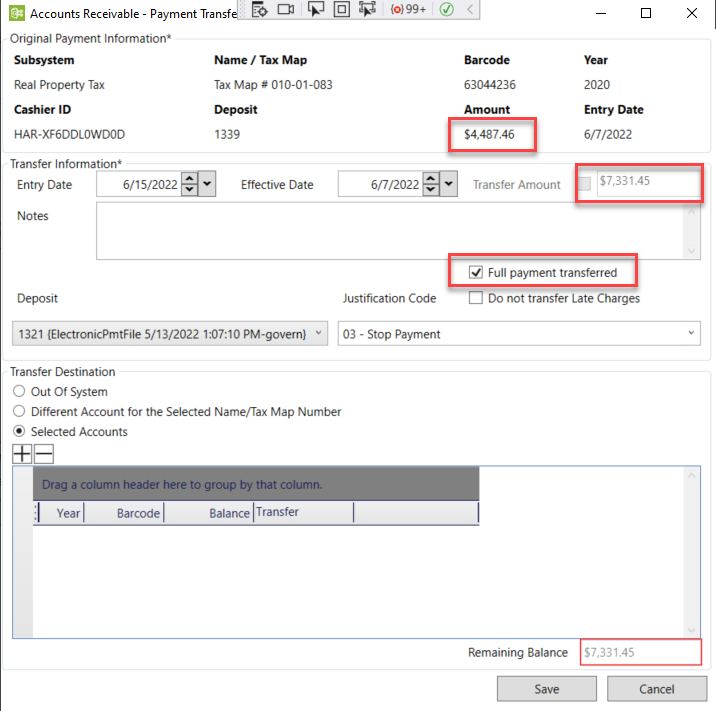
Remaining Balance is Less Than Zero
A Payment Transfer would not be completed if the remaining balance is less than or greater than the amount transferred. The transfer is completed only if the remaining balance is equal to zero, calculated as (Transfer Amount) – (Transfers for all accounts) = 0.
The transfer column displays the amount to be transferred to the selected account. This amount is subtracted from the Transfer Amount. The result is displayed in the Remaining Balance text box.
If the amount transferred to the selected accounts is greater than the original payment, the Remaining Balance is less than zero and a message is displayed.
Note: The Remaining Balance must be zero in order for the transaction to be completed.
Amount Transferred Is Less Than Amount Owed
Similarly, if the amount transferred to all the selected accounts is less than the amount of the original payment, an error message is displayed.
This could occur if you manually enter an amount in the Transfer text box that is less than the Transfer Amount.
| NOTE: The Remaining Balance, must be zero in order for the transaction to be completed. |