103-wm-parm-303

Workflow Management – Definition of Type and Steps

Version 6.1 (In Development)

Overview

Workflow Management – Department

The Workflow – Department form provides a flexible method for creating and maintaining the Kinds and Categories required in Govern, e.g. Licenses, Complaints, Offenses, Permits, Workflows, and so on, as well as any new ones that arise as a result of a business need. This is performed through the various interfaces in the Govern New Administration (GNA).
Parameters can be set at the department level, or for each permit or license type. If there is an overlap, a hierarchy is followed. Settings at the topmost specific level have the highest priority; i.e., those set for the permit or license type override those set for the department and those set for the department override those set for the organization.

User Interface

The Workflow Management form with Parameters and Definitions is accessed through the Govern New Administration (GNA) under the Application Configurations menu. The menu from the icon has options for the following:

    • Kinds and Categories
    • Departments
  • Link Types

As is standard for Govern interfaces, lists are displayed on the left hand pane. As items are selected on the list the parameters and details are displayed in the central pane. In this interface the list of departments is displayed on the left hand pane (Table: USR_DEPARTMENT). Departments cannot be added through this interface, only Department parameters related to the Workflow can be modified. Departments are created in the Department Maintenance form under the Parameters tab in the GNA ribbon. Refer to Govern Department Maintenance for details.

To open the Workflow – Department form in GNA…

  1. On the GNA ribbon, select Application Configurations (tab) > Workflow Management > Departments

The Workflow Department form is presented in the center pane.

What is a Type?

A Type is a classification for describing a Workflow item. For example a Permit can have multiple type, i.e. Building, Electrical, Plumbing, and so on.
The Types tab of the Workflow – Department form is used for creating the Types that can be selected by the department.

Accessing the Types List

When available, a list of existing types can be seen in the Workflow Department form. To access this form, in the GNA ribbon,

  1. Select Application Configuration (tab) > Workflow Management > Department.
  2. In the Workflow – Department form, if already existing, click to select a department from the list in left hand column.
  3. You will note on the right hand side of the Workflow – Department form, three (3) sub tabs labelled General, Activities, and Types. Click the tab marked Types.
  4. On the Types tab is a column that contains, when created, a list of types associated with this Department code.

The records listed under the Types tab are activity codes (TYPE_CODE) from (Table: WM_PARM_TYPE). These are the department codes that have been selected on the left hand pane.

Columns Displayed

The Types tab displays the following details regarding the Types:

NOTE: The grid content can be sorted by any of the headings, i.e. Kind, Category, or Description.

Kind – This is the classification of the type; for example in the instance of a Permit the Kind could be Building Permit, Electrical Permit, Plumbing Permit, and so on.

Generated Tables

When created, the Kind will generate a (Table: WM_KIND_<kind code>).
Category – The Category is a classification of the Kind. The Category will create a (Table: WM_CATEGORY_<category code>). If requested, each table will also generate respective required Added Fields.
Description – this information is taken from the Long Description field.
When an Activity is selected, the stored information associated with the activity is displayed. This information can be edited.

NOTE: When an Activity is created, a new record is created in (Table: WM_PARM_ACTIVITY). In addition, a record in (Table: VT_USER)
where TABLE_NAME = ‘WMACTIVITY’
is created for the descriptions.

The CODE in (Table: VT_USER) will be the Activity_ID of the record from (Table: WM_PARM_ACTIVITY).

RULE: Actions can only be added after an Activity has be created.

Types

Activities can perform different actions based upon the completion status of the activity. They are recorded by Department and Kind.

Types tab

The Types tab is linked to each type under the Types tab. When a base activity has been created, Actions can be added to it. To add an action to an activity…

Types tab – Action Buttons

Adding a Type

  1. Click Add [ + ] to add create a new code, and add a new Kind and Category to the list. When creating a Type, these parameters are mandatory.

Deleting a Type

  1. To delete a Type, click Delete [ – ], to delete a newly created Type.
  2. Click to select the activity under the Activities tab.
  3. On the right hand side is an Actions tab; click Add Action [ + ] to add a new action.

Creating an Type

Activities are created in the Govern New Administrator (GNA).

Type parameters

Type parameter – Code

Code – A new code may be created, or an existing one edited. This description is displayed for fast data entry and look-ups where space is limited on the forms. This parameter holds the English Short Description, the default name. There is an expand button on the left hand side of this parameter that will provide access to additional naming parameters. (Max. 15 alphanumeric code). The Code value is unique and entering a duplicate will display an error state.

NOTE: The following naming parameters are not required, but it is recommended as they can be useful in clarifying the meaning of the Code.

English Short Description – This field is automatically populated by the entry made in the Code field. This short description is displayed for fast data entry and look-ups where space is limited on forms.
English Long Description – Enter a long description. This is displayed on look-ups, forms and reports.
French Short Description – This is a second language short description that is displayed for fast data entry and look-ups where space is limited on forms.
French Long Description – Enter a second language long description. This is displayed on look-ups, forms and reports.
CONVERSION NOTE: Govern for Windows users that are performing conversions to Govern for OpenForms should note that Departments can have duplicates in Kinds and Categories but the same Department may not have a duplicate Code.

Kind – This is the classification of activity; for example in the instance of a Permit the Kind could be Building Permit, Electrical Permit, and so on. Note that when the Kind is changed, the Category list is updated and re-filtered. When the Kind is completely removed, any Category can be selected; when the category has been selected, the corresponding Kind is selected.
Category – This is a sub-classification of the Kind, e.g. for a Permit the category could be Building, Electrical, Plumbing, and so on. When no Kind has been selected, and only the category is selected, the corresponding Kind is selected.
AR Class default – Click to select the AR Class that will be associated with this record.
History – Select History to set the selected type to History mode.
Allow Quick Data Entry – Select this option to display the user-defined fields on a secondary screen when you select the type; only the field used in the fees calculation are displayed.
Allow reuse of this Workflow type (Allow Multiple Type) – this option will check to see if there are other workflows of the same type and allow their reuse.

NOTE: There are three options related to controlling the use of duplicate types; there are provisions to, allow/prevent, display a warning, and block additional types; their locations are listed as follows:
1. Workflow group > Departments > Workflow Department (tab) > Types (sub-tab) >Allow reuse of this Workflow Type – This option will allow/prevent thereuse of the current type as a duplicate type.
2. Workflow group > Departments > Workflow Department (tab) > General (sub-tab) >Display a Warning for a duplicate Type – Displays a Yes or No type warning to allow a duplicate type.
3. Workflow group > Kind and Categories > Workflow Kind (tab) > Categories tab > General (sub-tab) >Allow Additional Types – This option will, in general, allow additional types. This option will block the use of additional types.

Why Multiple Types?

There may be instances where there is a business requirement to either allow multiple types, or prevent the use of multiple types on a record. For example on a property, users may want to maintain a rule of a single family property on a parcel. Using a block will allow users to maintain this rule.
Refer to Workflow Management – Additional Types Wiki page for additional information.

UI NOTE: The following parameters are collapsed by default. When the check box is selected, additional parameters will be displayed.

Type parameters – Override Sequence

When defining permit numbers by department, when generating Applications, Permits, Certificates (CO & CC), Offenses, Workflows, Payment and Submission sequence number, a custom prefix sequence or length may be entered. The following fields are used to customize your numeration.
Prefix – Enter an alphanumeric string that will be appended at the beginning of a numerical sequence; e.g. entering ‘AMT’ will result in a numerical sequence that is always presented as follows AMT001, or AMT1234, and so on. Look under the Preview column to see a real-time example of your sequence.
Sequence (Start Number + 1) – The value that is entered in this field will be incremented by 1. The resulting value is your starting sequence number; e.g. if 100 is entered, the next starting number is 101. Look under the Preview column to see a real-time example of your sequence.
Length – Enter the number of digits to use for the length of the sequence. This field will accept a numerical value from 1 – 12. When a value is entered, the numerical portion of the sequence number will be “padded” with zero’s from the left hand side.
Example – When the number entered in this Length field is “8”, and no additional sequence numbers are entered, the starting number displayed under the preview will be 00000001.
Likewise, if “1000” is entered as a Start Number, and a Length of “8” is entered, the number that will be displayed will be 00001001
Preview – A preview of your sequence configuration is displayed under this column.
Application – This is the sequence format that will be applied to an Application number when it is generated.
Number – These parameters will modify the sequence format that will be applied to a generated Certificate number.
Certificate – Complete the parameters to modify the sequence format that will be applied to a Certificate number when it is generated.

Documentation

Click below to view or download the current documentation for this feature.
103-wm-parm-303 Workflow Dept – Types.pdf

Related Links

What’s New in Workflow Management
Main Workflow form
Workflow Management Overview
Workflow Management Installation
OpenForms Reference (Configuration) Setup Information
Workflow Management – Workflow Form Controller & Workflow Type Custom Control
Workflow Management – Additional Types
Workflow Management OpenForms Reference
Workflow Management Business Rules
Product Map


103-wm-parm-303


0 votes, average: 0.00 out of 50 votes, average: 0.00 out of 50 votes, average: 0.00 out of 50 votes, average: 0.00 out of 50 votes, average: 0.00 out of 5 (0 votes, average: 0.00 out of 5)
You need to be a registered member to rate this.
Loading...

103-wm-parm-304

Workflow Management – Defining Inspection Parameters

Version 6.1

Overview

Inspection parameters are maintained by department on the GNA > Workflow Management > Department > Inspection form: They include the:

  • Inspection Territory for the department
  • Fee setup for fees generated from an inspection
  • Inspection Types

Documentation

To read or download this information as a pdf, click on the following link:
103-wm-parm-304InspectionTypes.pdf

Related Forms and Tables

The following forms are used in the Inspection parameters:

  • Property Information: Property Area (PC_AREA). This form is used for Inspection Territories.
  • Inspection Fee Reason Code:
  • Workflow Inspector: The fields on this form are associated with the Workflow Inspector form.

Creating a New Inspection Type

The Inspection Type settings are located on the GNA > Workflow Management > Department form:

Notes

Inspection data are saved in WM_PARM_DEPARTMENT:
Inspection Types are saved to VT_USER where table = WMINSPECT
You cannot delete an inspection type if it is used in a workflow process

Accessing the Inspection Type Settings

To access the Inspection Type settings:

  1. Launch GNA.
  2. Select Application Configurations > Departments.
  3. Select the Inspection tab.
  4. Select a department from the list box on the left.
  5. Click New.
  6. Complete the parameters as described in the following section.
  7. Click Save.

Adding the Inspection Territory

You can select one Inspection Territory for a department. This is displayed in the Inspection Territory Field drop-down list on the Department > Inspection form.
The drop-down list contains all the fields in PC_AREA that are mapped to a Validation Table.

The Inspection Territory is the default field, but any attribute that is mapped to a validation table can be selected as the Inspection Territory field. This includes: Fire District, Special Districts, Park District, School District, Flood Zone, Income Neighborhood, Neighborhood, Polling, and Precinct. You could, for example, set up inspections for the department by territory or fire district.

The tables to which these attributes are mapped appear in the Inspection Territory Field drop-down list.

To change the codes used for inspections:

  1. Open the Workflow Management > Department > Inspection form in GNA.
  2. Select the required validation table from the for the Inspection Territory Field.
  3. Click Save.

Automatically Assign an Inspector

The Automatically Assign an Inspector option is used for inspections assigned through workflow activities.
An inspector can be assigned to a Scheduled inspection only.

The inspector is assigned according to inspection territory.
The option All Territories can be selected for an inspector,.
Inspections can be assigned by inspection type as well.
If the Automatically Assign Inspection option is selected, the By Inspection Type option is enabled.
The available inspection types are selected for each inspector on the Inspectors user form in Govern.
Note: The insp code must be present in the VT_USER_PMNAME table.
To setup automatic inspection assignments:

  1. Open the Workflow Management > Department > Inspection form in GNA.
  2. Select the Automatically Assign an Inspector option.
  3. Select By Inspection Type to assign inspections by inspection type as well as availability and territory.
  4. Click Save.

Showing / Hiding Inactive Inspectors

Select this option to show the inactive inspectors on the Inspection Selection forms.
You can select the Inactive option for an inspector on the Inspectors form in Govern. When the option is selected, you can maintain new records. However, you cannot schedule any new inspections for the inspector, until you deselect the option. Refer to the Inspectors form for details.

Using Light Inspection Scheduling

This parameter is reserved for future use.

Generating Fees From Inspections

You can set up fees to be automatically generated from an inspection. Typical reasons for this type of fee include incomplete and failed inspections.
You can select only reason and apply only one fee for the department. However, the fee is based on an expression to allow for flexibility.
Before setting up a fee, ensure that reason codes exist for these fees.
To defined the Inspection Type Reason Codes:

  1. Launch GNA.
  2. Select Editors > User Validation Table Editor > Regular.
  3. Select WMINTYRE – Inspection Type Reason Codes.
  4. Click Codes.
  5. Enter a unique code and a Short and Long Description.
  6. Click Save.

To set up a fee to be generated from an inspection:

  1. Open the Workflow Management > Department > Inspection form in GNA.
  2. Select the Generate Fee from Inspection option.
  3. This enables the Reason Code and Fee Amount fields.
  4. Click the ellipsis button in the Fee Amount parameter.
  5. This opens the Expression Selector.
  6. Enter an expression for the fee code.
  7. Click Save.

Displaying a Warning for Unlinked Inspections

This parameter is reserved for future use.

Creating Inspection Types

To create Inspection Types:

  1. Open the Workflow Management > Department > Inspection form in GNA.
  2. Click the Add button above the Inspection Types list box.
    This enables the Code and Short and Long Description fields.
  3. Click the Edit button to open the Inspection User Validation table codes directly.

The table is called INSPECT and is found under the User Validation Table Editor > Workflow Management.
This table is defined by department and maintained by system. The Department is displayed in read-only mode.
You cannot create or delete Inspection Codes in the User Validation Table Editor. You can modify the short, long, and full descriptions, You can select the Is History option for a code for which previous records exist, but which is no longer valid. Refer to the User Validation Table documentation for details.

Deleting an Inspection Type

To delete an inspection type:

  1. Open the Workflow Management > Department > Inspection form in GNA.
  2. Click the Delete button above the Inspection Types list box.
  3. You cannot delete inspection types that are used in a workflow. This is to be developed in a future release

See Also

Workflow Management
Click here to return to the main workflow form


103-wm-parm-304


0 votes, average: 0.00 out of 50 votes, average: 0.00 out of 50 votes, average: 0.00 out of 50 votes, average: 0.00 out of 50 votes, average: 0.00 out of 5 (0 votes, average: 0.00 out of 5)
You need to be a registered member to rate this.
Loading...

WM – GNA Conversion/Upgrade Utility

Workflow Management – GNA Conversion/Upgrade Utility

Version 6.1 (In Development)

Overview

A Workflow can be defined as any work process, from printing bills to completing end-of-year procedures. Workflows can incorporate batch processes designed to incorporate administrative procedures and reports. These individual processes are added to a queue in the order that they will need to be completed; any users that are to interact with the processes are given access permissions.
Govern for Windows (GovWin) users that have used Workflows can understand the level of complexity that can be involved with workflows. Workflows are now available in Govern for OpenForms (Govern). Within this document, GovWin users that are upgrading to Govern for OpenForms can review this document to obtain an understanding of what is involved in the conversion process in the context of Workflow Management (WM).

The Conversion Process

The conversion is a multiple step process that involves several areas of the Workflow. The steps involved include the following:

  1. Workflow Parameters Conversion
  2. Master Workflow Data Conversion
  3. Permits Data Conversion
  4. Activities and Steps Data Conversion
  5. Actions Conversion
  6. Inspections Data Conversion

This document will address each of the conversion steps in order to allow users to assess how the process relates to their existing workflows.

NOTE: The above numeration is not an indication of a set order of conversion, users may select specific

Run the Verify Database Process

In all instances, prior to starting a conversion, the Verify Database Process must be initiated first. This is to ensure that the most recent database structure and menus are available in the application.

NOTE: Once the Database Verification process has been executed users will note the following:

  • Internally, tables will be renamed
  • If not present beforehand, a new menu called “Workflow” will be displayed on the GNA ribbon; Utilities > Database Conversion > Workflow Management.


Initiating the Conversion Process

The process is initiated from the GNA menu. From the GNA ribbon, select Utilities (tab) > Database Utilities (group) > Database Conversion > Workflow Management.

Renaming of Legacy Workflow Tables

In GNA, when executing the Database Verification, all legacy workflow tables, i.e. tables from a prior version of Govern, will be renamed. These tables are named with “_BACKUP” being appended to the original name of the table, e.g. PM_DEPARTMENT will be renamed to PM_DEPARTMENT_BACKUP. This step in the process is carried out during the Database Verification process. See below for the List of Backed Tables.

List of Backed Up Tables

Original Table Name Renamed Table Name
PM_DEPARTMENT PM_DEPARTMENT_BACKUP
PM_TYPE PM_TYPE_BACKUP
PM_ACTIVITY PM_ACTIVITY_BACKUP
PM_ANIMAL_LICENSE PM_ANIMAL_LICENSE_BACKUP
PM_APPROVAL PM_APPROVAL_BACKUP
PM_BUSINESS_LIC PM_BUSINESS_LIC_BACKUP
PM_BONDS PM_BONDS_BACKUP
PM_ELECTRICAL PM_ELECTRICAL_BACKUP
PM_DECISION PM_DECISION_BACKUP
PM_GEN_PERMIT PM_GEN_PERMIT_BACKUP
PM_LICENSE PM_LICENSE_BACKUP
PM_PLUMBING PM_PLUMBING_BACKUP
PM_PROSECUTION PM_PROSECUTION_BACKUP
PM_LICENSE_PARCEL PM_LICENSE_PARCEL_BACKUP
PM_BLDG_PERMIT PM_BLDG_PERMIT_BACKUP
PM_COMPLAINT PM_COMPLAINT_BACKUP
PM_OFFENCE PM_OFFENCE_BACKUP
PM_INSPECTORS PM_INSPECTORS_BACKUP
PM_LK_PM_TYPE_A PM_LK_PM_TYPE_A_BACKUP
PM_LK_PM_TYPE_AL PM_LK_PM_TYPE_AL_BACKUP
PM_LK_PM_TYPE_BL PM_LK_PM_TYPE_BL_BACKUP
PM_LK_PM_TYPE_BN PM_LK_PM_TYPE_BN_BACKUP
PM_LK_PM_TYPE_E PM_LK_PM_TYPE_E_BACKUP
PM_LK_PM_TYPE_D PM_LK_PM_TYPE_D_BACKUP
PM_LK_PM_TYPE_G PM_LK_PM_TYPE_G_BACKUP
PM_LK_PM_TYPE_L PM_LK_PM_TYPE_L_BACKUP
PM_LK_PM_TYPE_P PM_LK_PM_TYPE_P_BACKUP
PM_LK_PM_TYPE_PN PM_LK_PM_TYPE_PN_BACKUP
PM_LK_PM_TYPE_PA PM_LK_PM_TYPE_PA_BACKUP
PM_LK_PM_TYPE_LP PM_LK_PM_TYPE_LP_BACKUP
PM_LK_PM_TYPE_B PM_LK_PM_TYPE_B_BACKUP
PM_LK_PM_TYPE_CO PM_LK_PM_TYPE_CO_BACKUP
PM_LK_PM_TYPE_OF PM_LK_PM_TYPE_OF_BACKUP
PM_LK_PERMIT_TYPE PM_LK_PERMIT_TYPE_BACKUP
PM_TYPE_FIELDS PM_TYPE_FIELDS_BACKUP


NOTE: The above renamed tables are used for conversion purposes only.


1. Workflow Parameters Conversion

The Workflow parameters conversion part of the Workflow Management module allows clients to convert previous Workflow parameter data into the new Govern Workflow Management structure.

Converting Parameters

The conversion of parameters is carried out with the conversion editor. To access this editor, from the GNA menu select Utilities (tab) > Database Conversion > Workflow Management.
This conversion process has multiple steps. Each step will convert the related tables. The listing is not representative of all steps involved. Each step can have one or more preceding steps that must be executed prior to proceeding to the next step. After execution, the screen will display the results of the conversion process. Click Return
A confirmation to save attachments is displayed. Click Yes to navigate to a location that the attachments will be saved to.

List of Conversion Steps for Workflow Parameters

In the Workflow Conversion form, in the left hand pane, the steps that are processed are listed under the Step column.

Steps to Process pane

The check boxes in the pane are used to indicate which steps are to be converted. Click the checkbox to select required steps, if all steps are required, select the checkbox at the top of the column.

NOTE: At least one selection must be made in order to proceed.


Convert Selected Steps (group)
After the steps are selected, the conversion process will be executed on the tables that are related to each of the selected steps. The steps for the process are as follows:
· Clear all data from the new Workflow table(s)
· Insert new data into the new Workflow table(s) using the data found in the backup table(s)

  • All backup tables that were named as XXXXX_BACKUP will be used for the Workflow parameters.
NOTE: The conversion process can be executed as many times as required. Once completed, users can elect to delete backup table(s).


Workflow Conversion form – Command buttons

Start Process – Click Start Process to start the conversion process for the selected steps. The conversion process will be executed on the tables that are related to the selected steps.
Delete Backup Tables – In order to delete the backup tables that were generated during the verify database process, click Delete Backup Tables.

The Process

When the process commences, a confirmation window is presented. Click Yes to proceed.
A secondary warning / confirmation window is displayed. This is a confirmation on the processing of historical data.

  • As the conversion process is executed, the tables related to the selected Step that are using the Workflow screen(s) in GNA will be deleted.
  • Delete Backup Tables

A secondary warning is displayed to confirm that you wish to proceed. The process will permanently delete all backup PM_XXXX_BACKUP tables from the database. Once deleted, these tables will no longer be available in the database. This means that the steps related to these tables will not be listed in the “Workflow Management Conversion” form.

Log Files

For each converted table, a log file will be generated. The file will contain information about Source and Destination table names, and the number of inserted records. CSV files will be generated for unconverted data.
At the end of the process, either close the window or click Return. You will be asked to save the attachments to a selected folder.

Conversion Step Details

The following parameters are converted.

  • Parameter – Departments
  • Parameter – Permit Types
NOTE: If there are duplicate type codes for different categories, they will be automatically overridden by adding the first letter of the category as a suffix in the type code. They are also displayed in a Duplicate Type Codes grid so that they can be overridden manually if required.
  • Parameter – Activities and Steps
NOTE:For an exhaustive breakdown of the details of the conversion for each of the parameter steps, refer to the Technical Documentation located in Confluence, https://harrisgovern.atlassian.net/wiki/spaces/govrd/pages/76185911/01+-+Workflow+Parameters+Conversion

Duplicate Type Codes

Duplicated types codes for different categories will be automatically overridden by adding the first letter of the category as a suffix in the Type Code. They will be displayed in the Duplicate Type Codes grid so that they can be manually overridden if required.

Parameter – Permit Types

The following processes are triggered when the Parameter – Permit Types is selected for conversion:

  • Delete all entries from the WM_PARM_TYPE table
  • Delete all entries from the VT_USER where TABLE_NAME = ‘WMTYPE’
  • Each entry in PM_TYPE_BACKUP will be inserted into WM_PARM_TYPE using a custom mapping. Refer to the Parameters – Permit Types section of the technical documentation for mapping
  • Each entry in PM_TYPE_BACKUP will be inserted into a new VT_USER in the table “WMTYPE” using a custom mapping. Refer to the Parameters – Permit Types section of the technical documentation for mapping.
  • Create log file for PM_TYPE
  • All entries are deleted from WM_PARM_KIND table
  • Delete all entries from VT_USER where TABLE_NAME = ‘wmkind’
  • All kind codes found in WM_PARM_TYPE

o Insert new kind record in WM_PARM_KIND
o Insert new vt user record in VT_USER

  • Create kind tables with all kind_code’s found in wm_parm_kind
  • All entries are deleted from WM_PARM_CATEGORY table
  • All entries are deleted from VT_USER where TABLE_NAME = ‘wmcategory’
  • For each category code found in WM_PARM_TYPE

o Insert new category record in WM_PARM_CATEGORY
o Insert new category link record in WM_PARM_CATEGORY_LK_LINK_TYPE
o Insert new vt user record in VT_USER

  • Create kind tables with all the categpry_code found in wm_parm_kind

o Create tables
o Create primary keys
o Create all existing fields from the OLD permit table in the new permit table
o Create all default added fields:
§ NB_OF_ITEMS, BASEMENT_SIZE, FIRST_FLOOR, SECOND_FLOOR,
o MEZZANINE_SIZE, TOTAL_DIMENSION, ESTIMATED_COST, USER_AMOUNT, TOTAL_FEE, LAST_FEE_DATE, LAST_FEE”
o Create all added fields from PM_TYPE_FIELDS

  • Create all entities and forms for all created categories
  • Create log files to identify all created kind parameters, category parameters, kind tables, category tables and category added fields.

Parameter – Activities and Steps

The following processes are triggered when the Parameter – Activities and Steps is selected for conversion:

  • Delete all entries from the WM_PARM_ACTIVITY table
  • Delete all entries from the VT_USER where TABLE_NAME = ‘WMACTIVITY’
  • Each entry in PM_ACTIVITY_BACKUP will be inserted into WM_PARM_ACTIVITY using a custom mapping. Refer to the Parameters – Activities and Steps section of the technical documentation for mapping
  • Each entry in PM_ACTIVITY_BACKUP will insert a new VT_USER in table ‘WMACTIVITY’ using a custom mapping. Refer to the Parameters – Activities and Steps section of the technical documentation for mapping
  • Delete all entries from WM_PARM_STEP table
  • Delete all entries from WM_PARM_STEP_LK_STATUS table
  • Delete all entries from WM_PARM_STEP_LK_ACTIVITY table
  • Create all Step parameters for the following…

o For each record found in SELECT * FROM pm_type_activity_backup WITH (NOLOCK)
§ Create Step Parameter in wm_parm_step
§ If the field value is NOT empty from pm_type_activity_backup, create Step Parameter Links in wm_parm_step_lk_status
§ Create Step Parameter Link to Activity in wm_parm_step_lk_activity; See Technical Documentation for details of SELECT query.

2. Master Workflow Data Conversion

The left side of the Workflow Management Conversion editor will list all Parameters and Data Steps involved in the conversion.

Entry point records

To fill the static workflow tables WM_MASTER and WM_LINKED_IDS, the PM_MASTER table is not sufficient, also needed are PM_COMPLAINT and PM_OFFENSE. This is because the KEY_ID which comes from PM_LK_PARCEL_PM for P_ID, and PM_LICENSE for NA_ID are required.

NOTE: VT_USER.STATCOMP codes must be added to VT_USER.WMSTATUS. See the Entry Point Records section of the technical documentation at https://harrisgovern.atlassian.net/wiki/spaces/govrd/pages/50495763/02+-+Master+Workflow+Data+Conversion

3. Permits Data Conversion

The following section will describe the process used to convert Permits tables, and their corresponding linked Permit Types table.
Refer to the section below for the List of Permits tables and Linked Permit Types table for the list tables

Permits Table
PM_APPROVAL
PM_ANIMAL_LICENSE
PM_BUSINESS_LIC
PM_BONDS
PM_ELECTRICAL
PM_DECISION
PM_GEN_PERMIT
PM_LICENSE
PM_PLUMBING
PM_PROSECUTION
PM_LICENSE_PARCEL
PM_BLDG_PERMIT
PM_COMPLAINT
PM_OFFENCE


Linked Permit Types Table
PM_LK_PM_TYPE_A
PM_LK_PM_TYPE_AL
PM_LK_PM_TYPE_BL
PM_LK_PM_TYPE_BN
PM_LK_PM_TYPE_E
PM_LK_PM_TYPE_D
PM_LK_PM_TYPE_G
PM_LK_PM_TYPE_L
PM_LK_PM_TYPE_P
PM_LK_PM_TYPE_PN
PM_LK_PM_TYPE_PA
PM_LK_PM_TYPE_LP
PM_LK_PM_TYPE_B
PM_LK_PM_TYPE_CO
PM_LK_PM_TYPE_OF
PM_LK_PERMIT_TYPE

…and Permit added fields definitions table: (Table: PM_TYPE_FIELDS)

Renaming old Workflow Tables

In GNA, when executing the Database Verification, all the previous Permits tables will be renamed. The tables will be used as backup tables for conversion purposes only.

Mapping Tables

Source Table Destination Table
PM_APPROVAL WM_CATEGORY_APPROVAL
PM_ANIMAL_LICENSE WM_CATEGORY_ANIMAL
PM_BUSINESS_LIC WM_CATEGORY_BUSLIC
PM_BONDS WM_CATEGORY_BOND
PM_ELECTRICAL WM_CATEGORY_ELECTRICAL
PM_DECISION WM_CATEGORY_DECISION
PM_GEN_PERMIT WM_CATEGORY_GENERAL
PM_LICENSE WM_CATEGORY_LICNAME
PM_PLUMBING WM_CATEGORY_PLUMBING
PM_PROSECUTION WM_CATEGORY_APPEAL
PM_LICENSE_PARCEL WM_CATEGORY_LICPARCEL
PM_BLDG_PERMIT WM_CATEGORY_BUILDING
PM_COMPLAINT WM_CATEGORY_COMPLAINT
WM_CATEGORY_WORKFLOW
WM_CATEGORY_GRIEVANCE
WM_CATEGORY_REQUEST
PM_OFFENCE WM_CATEGORY_OFFENCE

Scripts

Refer to the Scripts section of the technical documentation for a listing of required scripts.

Log Files

For each converted table, a log file will be generated for the inserted records with the following information, Source Table name, Destination Table name, and the number of inserted records. In addition a .CSV file will be generated for records that were not converted during the process.

4. Activities and Steps Data Conversion

The Activity Conversion for the Workflow Management module will insert data in the WM_ACTIVITY_STATUS table from the PM_ACTIVITY_STATUS_BACKUP table.

Prerequisite Steps

Prior to executing the Activity Data Conversion, the following will need to be executed:
· Run the Parameter – Departments, Permit Types and Activities and Steps conversion
· Run the conversion from Data – Permits

Activity Data Conversion Business Rules

The following business rules will be applied to the Activity Data conversion:
· Select all existing activities in the old workflow system.
· Obtain the associated Step ID and Activity ID for each record found.
· Use a custom mapping to create activity in WM_ACTIVITY_STATUS. See Step 3 under the Functionalities section of the technical documentation on Confluence.
https://harrisgovern.atlassian.net/wiki/spaces/govrd/pages/67403777/04+-+Activities+and+Steps+Data+Conversion
· Update the Workflow Master Source Status
· Update Workflow User Key Dynamic

5. Conversion of Actions

Actions conversion will generate a log file containing the list of actions in the Govern for Window VB6 Database that are to be converted manually to match their corresponding actions in Govern for .NET. Users will need to recreate these actions manually in GNA.
To convert Actions…
1. From the GNA ribbon, select Utilities (tab) > Database Utilities (group) > Database Conversion > Workflow Management.
2. In the Workflow Conversion form, select the Parameter – Actions checkbox.
3. Click Start Process.
After the conversion process, a Log file will be created for activity actions sand step actions to convert for each department:

6. Inspections Data Conversion – Prerequisite Steps

Prior to converting Inspection Data, ensure that the Inspector data conversion process has already be performed. With the use of mapping tables and conversion scripts the conversion is carried out. Below is a list of the mapping tables that are used in the conversion process.

Mapping Tables

Source Table Destination Table
PM_INSPECTIONS WM_INSPECTION
PM_LK_INSP_TYPE WM_INSPECTION_TYPE
PC_LK_PARCEL_INSP
PM_LK_INSP_PERMIT
WM_INSPECTION_LINKED_IDS
PM_LK_INSP_TYPE_IC WM_INSPECTION_TYPE_CODE

To convert Inspection data…

  1. From the GNA ribbon, select Utilities (tab) > Database Utilities (group) > Database Conversion > Workflow Management.
  2. In the Workflow Conversion form, select the Parameter – Actions checkbox.
  3. Click Start Process.

After the conversion process for each converted table, a Log file will be generated for inserted records. This file will indicate the Source Table name, Destination Table name, and the number of inserted records. In addition a .CSV log file will be generated for records that were not converted during the process.

7. Inspections Data Conversion

The following will describe the Data Conversion for Inspection Tables process. In addition the following list of linked tables will also be converted.
· PM_LK_INSP_TYPE
· PC_LK_PARCEL_INSP
· PM_LK_INSP_PERMIT
· PM_LK_INSP_TYPE_IC

Related Topics

Workflow Management

NOTE: Once the Database Verification process has been executed users will note the following:

  • Internally, tables will be renamed
  • If not present beforehand, a new menu called “Workflow” will be displayed on the GNA ribbon;

Utilities > Database Conversion > Workflow Management.


103-wm-cvt-001


0 votes, average: 0.00 out of 50 votes, average: 0.00 out of 50 votes, average: 0.00 out of 50 votes, average: 0.00 out of 50 votes, average: 0.00 out of 5 (0 votes, average: 0.00 out of 5)
You need to be a registered member to rate this.
Loading...

GNA – General Connection Parameters

GNA General Connection Parameters

Overview

In the General System Parameters form, you are presented with database details about the currently selected connection key, configuration parameters for controlling how users access the application, and synchronization and refresh parameters for mobile installations.

General Connection Parameters

Database Default Server Type group

In the Database Default Server Type group (A) you will see the database server type of the currently selected connection key.

NOTEThis area is informational and cannot be modified.

Specifying Connection Key Source Folder at Startup

As a time saver users starting up GNA can specify a connection key source folder; i.e. a location for the list of Connection Keys. This feature is useful in multiple database environments where users need to frequently switch between databases. By default GNA will maintain a lock on the location of the last selected Connection Key. The file that the GNA will obtain its list of connection keys from is (File: GovernDABConfig.xml)

Read More...

Database Connection Key parameters

The list of Connection Keys are obtained from the GovernDABConfig.xml file. If an administrator would like to provide an alternate GovernDABConfig.xml file containing Connection Keys, this information can be specified.

Definition File Folder: Type in a new path to the connection keys definition folder, i.e. location of the GovernDABConfig.xml file, or click “…” to browse for a folder.

Organization Parameters

In the Govern New Administration (GNA), it is possible to modify the parameters that were entered at installation. In the Organization Parameters group, you can modify the Organization name.

Organization Name: Enter your organization name. This is the name that appears in the GovernNetConfig.xml document.

User Name Prefix: The User Name Prefix field is used to enter a text string that is added to the beginning of the User ID. This feature allows for backwards compatibility with Govern for Windows. The specified prefix is concatenated with the user name, encrypted, and stored. Since it is appended to the password after a user enters their assigned password, they are not aware of it. The use of this method means that users will never see their real database UserID.

User Name Prefix: If required, enter a prefix into this optional field.

To specify an Organization Name and a User Name prefix…

  1. Select System Parameters > General Installation Parameters…
  2. In the Organization Parameters group, enter an Organization name, and a user name prefix.
  3. Click Save to confirm your changes.

The user must explicitly enable editing for each parcel: When selected the user must click on the Edit icon in the Govern.NET Dataset Treeview before editing a record. By default this option is disabled.

NOTE: This option is designed to minimize errors when selecting a record to edit in Govern. When a record is selected in the Dataset Treeview, a conscious effort must be made to click the Click to Edit icon a second time, and unlock the record for editing.

Mobile Device Parameters

Mobile Device Connection Check Trigger (in ms): After installing a mobile deployment, one of its functions is to continually check the connection to the master database, and compare and update changes to the data.

Connection Check Trigger (in ms): The Connection Check Trigger value determines the length of the interval, in milliseconds, between each check to verify the availability of the connection to the main database. The default value is 1000 milliseconds.

Synchronization Interval (in ms): The value in this field is the interval that will be used to force a synchronization of data between the mobile database and the main system database when Govern.NET’s automatic synchronization option is selected. This option is set on the mobile devices Govern.NET install.

NOTE: For details about Mobile Device configuration, refer to the Govern Mobile user guide.


103-sy-002


0 votes, average: 0.00 out of 50 votes, average: 0.00 out of 50 votes, average: 0.00 out of 50 votes, average: 0.00 out of 50 votes, average: 0.00 out of 5 (0 votes, average: 0.00 out of 5)
You need to be a registered member to rate this.
Loading...

GNA – Report Criteria Editor

Report Criteria Editor

Overview

User designed Crystal Reports™ are generated from data obtained from the data source. In some instances user input requested by a prompt is required to filter the data, e.g. entering a date range, specifying a fiscal year, etc. In other instances the data must first be extracted and “pre-processed”. For these types of reports it is necessary to configure the preprocessing. This configuration is in the form of prompts for the user to enter required criteria.

 NOTE: Attempting to run reports without configuring required prompts will result in an error.


NOTE: Users of Crystal Reports will need to install the Crystal Reports 2013 runtime on the server hosting the application, and on each client computer. Refer to the Crystal Report Runtime section of the Govern Deploy EZ guide.for details.

Display the Report Criteria Editor

To display the Report Criteria Editor…

  1. In the GNA ribbon, select the System Parameters tab.
  2. Click the Report Parameters Editor icon.
  3. Select a report from the List of Reports column on the left hand side.
  4. In the Report Editor, click Report Criteria.

In the Report Criteria Editor, you are able to configure any required user prompts. See Adding one or more Criteria to a Report for details about adding prompts.

Report Criteria Editor Parameters

Report Criteria: The Report Criteria column displays the list of criteria that are associated with the report. When a criteria is selected, its parameters are displayed in the Report Criteria Editor.

Report Criteria Properties group

  • Prompt: Enter a name that will appear in the title bar of the user prompt. Table Selection: Select the table that data is being selected from using the drop-down menu.
  • Field Selection: In the drop-down menu, select the field within the table that is being selected.
  • User Validation Table: If the criteria has to be validated with a user validation table, select the table from the drop-down menu.
  • System Validation Table: If the selected criteria is to be validated with a system validation table, select one from the drop-down menu.
  • Ask for Range: Select Ask for Range to display a range prompt; e.g. entering a date range.

Adding Criteria to a Report

When linking reports to a profile, it may be necessary to customize the report to make it more interactive. This can include requesting that the user enter a date range to define the scope of the report. For example, we can include a report for an Audit Trail Inquiry, but we will need to specify the criterion that we want to user to enter.

To specify the criteria for a report…

  1. In GNA, click the System Parameters tab. Click the icon for the Report Parameters Editor.
  2. In the Report Editor, click to select a report from the List of Reports:
  3. By default the report has a criteria called Tax Map Number. For our report we would like to be able to search for a Last Name as well as a First Name.
  4. Click Report Criteria to display the Report Criteria Editor.
  5. In the Report Criteria Editor, click New to begin adding your criteria. Under the Prompt parameter, enter First Name.
  6. For Table Selection, select na_names.
  7. Under Field Selection, we are looking for the FIRST_NAME; we will not be using any user or system validation tables.
  8. Do not select the Ask for Range option because it is required for these parameters.
  9. Click Add to add the criteria to the Report Criteria list.
  10. Repeat the above steps to add a criteria called Last Name.

Change criteria appearance order

Should you want to change the order that the criteria are presented to the user on the form in Govern…

  1. Select the criteria under the Report Criteria list.
  2. Click Up or Down to move them.
  3. When complete, click Save.
  4. Click the Close button to return to the Report Editor.
  5. In Report Editor, click Save and exit from the form.

In Govern, you can preview your updated profiles. Reports are viewed under the Reports Explorer. The two (2) added criteria appear on the form. Users can now perform a search for specific first names and/or last names in addition to the tax map number.

See Also

Report Parameters Editor


103-sy-007


0 votes, average: 0.00 out of 50 votes, average: 0.00 out of 50 votes, average: 0.00 out of 50 votes, average: 0.00 out of 50 votes, average: 0.00 out of 5 (0 votes, average: 0.00 out of 5)
You need to be a registered member to rate this.
Loading...

103-pp-parm-Category

Personal Property Categories and Items

Overview

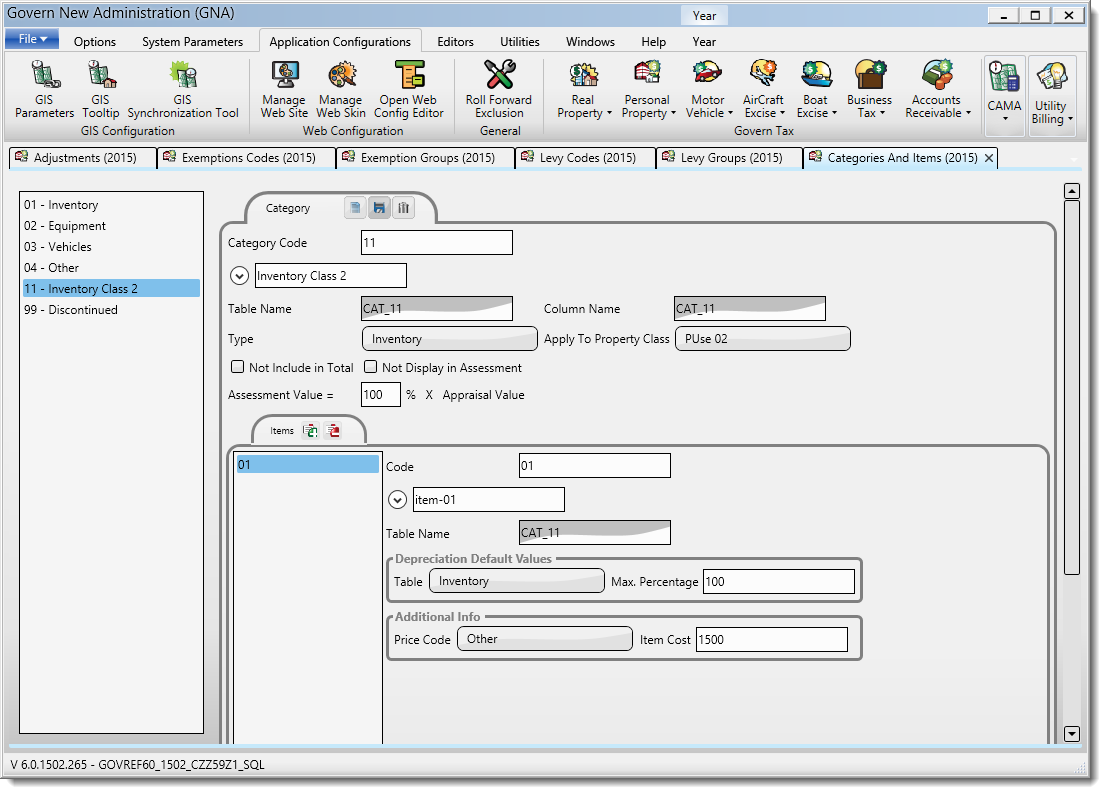
CATEGORY TYPE is a user table and needs to be setup beforehand. Table = PPGRCAT
Table [PP_TABLE]

103-pp-parm-Cat.png
Personal Property Category and Items Parameters


103-pp-parm-Category


0 votes, average: 0.00 out of 50 votes, average: 0.00 out of 50 votes, average: 0.00 out of 50 votes, average: 0.00 out of 50 votes, average: 0.00 out of 5 (0 votes, average: 0.00 out of 5)
You need to be a registered member to rate this.
Loading...

PP – Personal Property Exemptions

Personal Property Exemptions

Overview

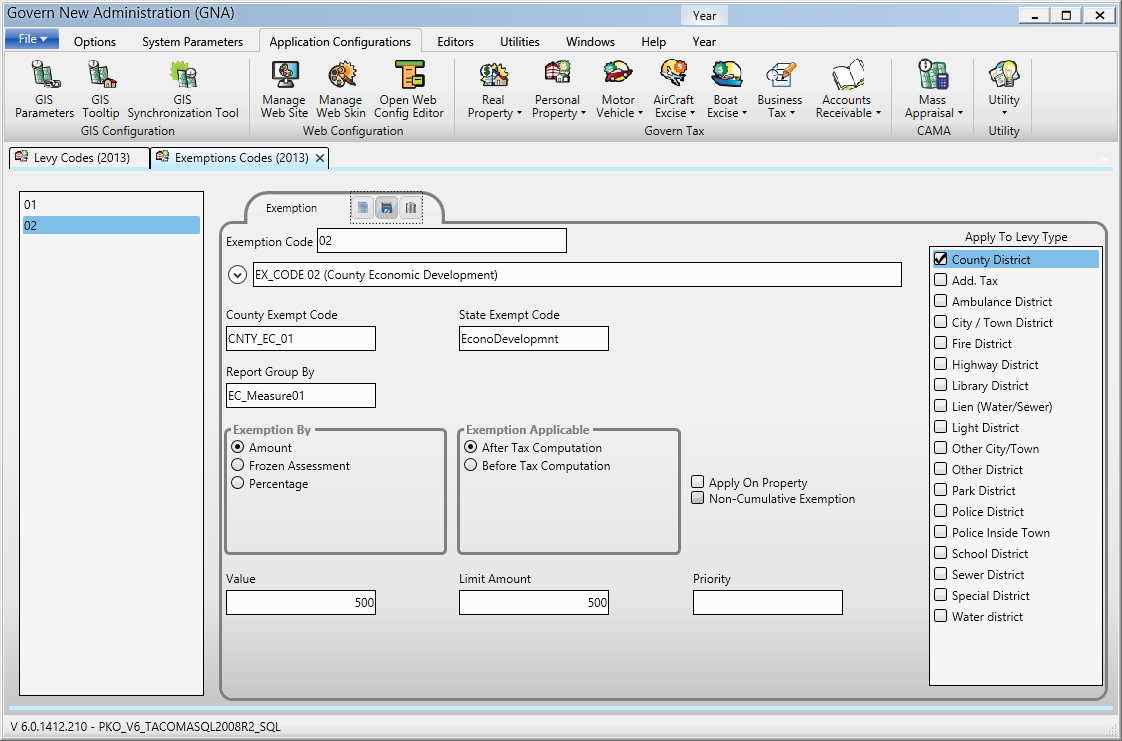
Exemptions can be created by Amount, Percentage and Frozen Assessment Difference (to be verified).
It is either applied BEFORE tax calculation (to reduce the assessment) or AFTER (to give a tax credit).
It can be applied on the Property (Economic Development Programs by zone or district) OR on the Owner (ex: Veteran or Senior Citizen exemption).

Exemption Codes

Exemptions are applicable by LEVY TYPE

101_pp_ui_ParmExemptionAFTER.png
Exemption After Tax Computation

Exemption Base Columns

When exemptions are applied Before Tax Computation (often on Property) we need to select on which taxation base column to apply it:
VA_AS_TOTAL
VA_AP_TOTAL
If we create a new Base Column, it is created as:
EX_(exemption code)

Click here for Exemption Before and other examples


103-pp-parm-exemption


0 votes, average: 0.00 out of 50 votes, average: 0.00 out of 50 votes, average: 0.00 out of 50 votes, average: 0.00 out of 50 votes, average: 0.00 out of 5 (0 votes, average: 0.00 out of 5)
You need to be a registered member to rate this.
Loading...