AR Payer Name Controller Setup

A/R Payer Name – Controller Setup

Overview

The Payer Name custom control is a standard feature that is used in the Payment forms.
Used in the standard Govern Cash Collection and Lockbox forms.

What’s New

[6.0.1611] Previously, when creating a new payer name, only the link was created and the user had to click on the link to update the payment information. The controller was changed in order to open the Name and Address form when creating a new payer.
The Name and Address form will be displayed. Fast Name Creation must be checked. If not checked, the name and address record will be created and only the name id will be displayed. Recommended for the Lock Box.

Configuration

Business Entity Designer (BED)

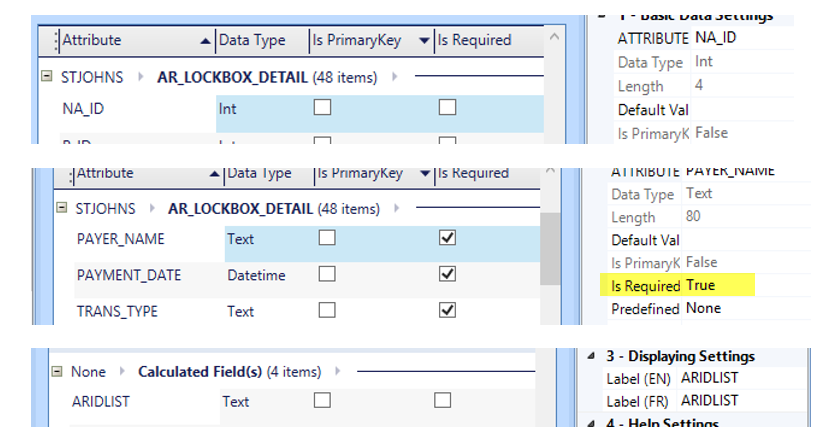
The following three (3) attributes are required on business entities used in the forms:

Required Fields

  • AR_ID
  • PAYER_NAME
  • ARIDLIST (a calculated field); this is the list of ArId’s used to find the last payer that the controller needs to manage; e.g. 12344;40004;34222.

101-ar-fea-021-ofr-ui-1.png
LockBox Forms


OpenForms Designer (OFD)

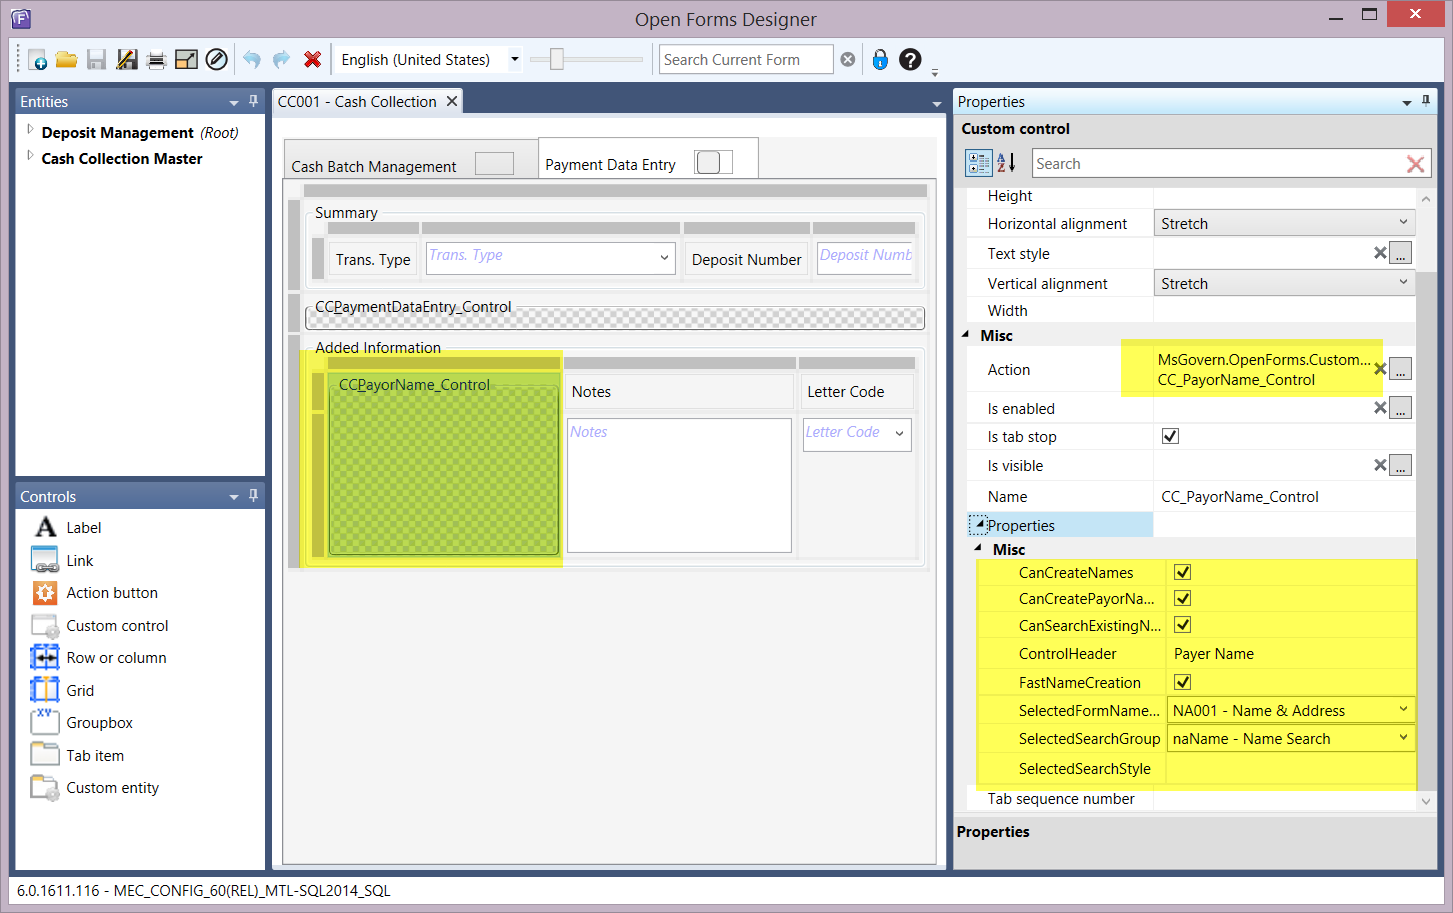
The following are configured in the OFD.

  • Select a Dynamic Search group
  • Select a form to open when the users clicks the button
  • Enter a description for the header
  • Selection any combination of the following options in the Misc Properties group to determine:
    • CanCreateNames – The users can create a new name if they have the proper security to the Name and Address form.
    • CanCreatePayorNames – Allows the creation of a new name without an NA NAME record. The name created will be recorded only in CC MASTER.
    • CanSearchExistingNames – The users will be able to search for an existing name.
    • Fast Name Creation – If not checked, when a new name is created, the form listed below (Name and Address) will be displayed so that the user can enter the name and address information. If not checked, a record will be created in Name and Address and the name id will be displayed.
    • Selected Form Name – Form that will be open when the user clicks on the name link or creates a new name with the option fast name create
    • Selected Search Group – Dynamic Search Group to use when searching for an existing name
    • Selected Search Style – Dynamic Search Style (if entered, only the search style will be listed on the search form)


cc-PayorName_Control

101-ar-fea-021-ofr-ux.png

Payer Name Control setup (cc_payer_name)


101-ar-fea-021-ofr


0 votes, average: 0.00 out of 50 votes, average: 0.00 out of 50 votes, average: 0.00 out of 50 votes, average: 0.00 out of 50 votes, average: 0.00 out of 5 (0 votes, average: 0.00 out of 5)
You need to be a registered member to rate this.
Loading...

Standard A/R Controller Configuration (101-ar-fea-022-ofr)

Standard Accounts Receivable (A/R) Controller – Create A/R (Configuration)

Overview

This standard OpenForms Controller can be added to a form to provide an Action Button to create Accounts Receivable for new accounts.
This controller is available in GA Release 1606

  • For more information on the functionality, see Product Information (101-ar-fea-022).

Configuration

Prerequisites

The following conditions are required in order to enable the Controller in OpenForms Designer Setup

Action Button Controller Properties

Read More...

Profile Security

  • The organization is licensed for the Accounts Receivable Sub-System to setup
  • The configuration for the Accounts Receivable has been completed
  • The Form’s ID Setters Properties must contain the …
  • The Govern ID must be …
  • The user must have security access (GSM) to the profile’s form.

Controller Setup

Adding a Custom Control to a Form

  • In OFD, drag the Action Button Control Icon to the Account Entity Tab on the form.

Custom Control Form Configuration

Once the Custom Control is displayed on the form, click on the object to configure the:

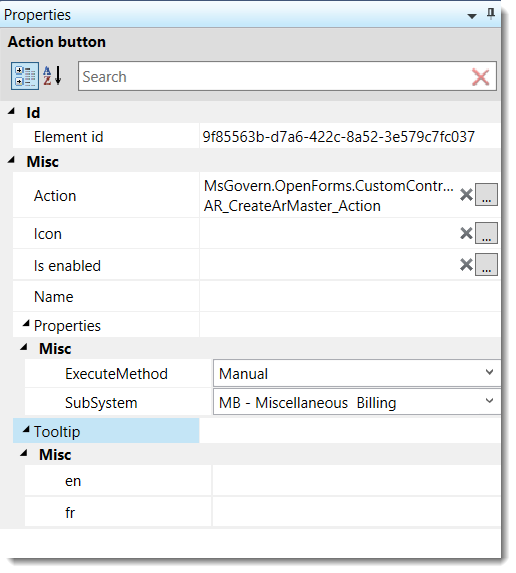
  • Assembly Name = Msgovern.OpenForms.CustomControls.dll (by default)
  • Class Name = AR_CreateARMaster_Action

User Interface (UI)

  • Icon
  • Is enable: An expression can be added to control the enabling (Can be executed) of the button.

Controller Properties

The following controller properties need to be set:

Execute Method

There is 2 options for the Action Button Controller

  • Manual: The user will need to click on the button
  • After Save: As soon as the record is saved, the A/R will be created automatically

Sub-System

  • Select the sub-system for which the A/R Summary Record needs to be created.

Related Topics

For more information, see:

Troubleshooting

  • The Organization must be a licensed user of the A/R Sub-System selected.


101-ar-fea-022-ofr


0 votes, average: 0.00 out of 50 votes, average: 0.00 out of 50 votes, average: 0.00 out of 50 votes, average: 0.00 out of 50 votes, average: 0.00 out of 5 (0 votes, average: 0.00 out of 5)
You need to be a registered member to rate this.
Loading...

Standard AR Controller – Create A/R (101-ar-fea-022)

Standard Accounts Receivable (A/R) Controller – Create A/R

Overview

This new standard controller can be setup on different Account Forms (Real Property, Misc. Billing, Self-Reported Tax…) in order to provide the user with an Action Button to create an A/R summary record on demand. With the A/R record, it will be possible for the users to enter deposits or voluntary payments against this Account.

  • The Create A/R button can be used for all Sub-Systems (Real Property, Self-Reported Tax, Personal Property, Miscellaneous Billing, etc.)
  • The Create A/R button is only available after an Account is created and saved where no A/R records associated to the account exists.
  • Once the Create A/R action has been executed, the button becomes disabled.
  • The A/R record created will match the System Registry A/R Sub-System rules (by name, by parcel, by year), etc. as configured in the A/R General Parameters Sub-System parameters.
  • This action button can be secured by profile user and role.

Configuration

This controller is used in different standard Forms distributed with the system. It can also be added and configured on a customized form.
To add or configure this controller on a form click below:


Related Topics

Standard A/R Controller Configuration (101-ar-fea-022-ofr)

Accounts Receivable Parameters (103-ar-parm-General)


101-ar-fea-022


0 votes, average: 0.00 out of 50 votes, average: 0.00 out of 50 votes, average: 0.00 out of 50 votes, average: 0.00 out of 50 votes, average: 0.00 out of 5 (0 votes, average: 0.00 out of 5)
You need to be a registered member to rate this.
Loading...

BT – Calculate Business Tax Late Filing & Late Payment Charges

Calculate Self Reported Business Tax (BT) Late Filing and Late Payment Charges

Overview

Penalty and Interest charges are defined on the General tab of the Self Report Tax Category form. Separate penalties can be defined for each category. Separate A/R Class Codes can be applied to each penalty type.
There are multiple parameters for calculating late filing and late payment charges. These can be employed to meet the needs of the organization for the following:

  • Computing Penalty and Interest on delinquent filings and balances
  • Automatically waiving penalty interest at a certain percentage based on the number of waivers granted
  • Adding a minimum and maximum late filing fee.

Documentation

For a pdf version of this information, click on the following link:
SRTPenaltyInterest.pdf

Configuring Late Filing and Late Penalty Charges

The configuration consists of the following steps:

  • Creating A/R Class Codes for Self Reported Tax
  • Defining Late Filing and Payment Charges
  • Defining Waivers

Changes to Late Filing and Late Payment PenaltyNEW! This is a change to the Late Payment Penalty in the Accounts Receivable (A/R) module. In prior releases, the late payment penalty in A/R used only A/R Classes that were set by Category. As a result, there was only one late payment penalty for each return. Now users can breakdown late payment penalties by levies.
Availability: 6.0.1706 and 6.1.1706, 6.1.1707 and greater releases.

Creating A/R Class Codes for Self Reported Tax (SRT)

The first step is to ensure that you have all the required A/R Class Codes for the Self Reported Tax category. These include the:

  • A/R Class Code for the Levy associated with the Category: This code is used for the original charge on the invoice.
  • A/R Class Codes for Late Filing and Late Payment Penalties: You can create multiple Class Codes for penalties or use a single code for both late filing and late payment.
NOTE: The A/R Self Reported Tax Penalty and Interest Method must be used for the A/R Class Code for the Levy.
No Penalty and Interest Method is required for the A/R Class Codes used for the Late Filing and Late Payment penalties. The parameters for these penalties are set on the General tab of the Self Reported Tax form. See Defining Late Filing and Payment Charges

Creating A/R Class Codes for SRT Levies

To create A/R Class Codes for the Levies:

  1. Launch GNA.
  2. Select Application Configurations > Accounts Receivable > A/R Class.
  3. Click New to create a new Self Reported Tax A/R Class.
  4. Select Self Reported Tax from the Interest and Penalty Method drop-down list.
  5. Select A/R Method to open the A/R Method Self Reported Tax form if you want to add additional parameters described in the following section Adding Additional Parameters for the Self Reported Tax Method.
  6. Complete the parameters for the A/R Class Code as described in the Accounts Receivable documentation.
  7. Click Save.

Defining Additional Parameters for the Self Reported Tax Method

Penalty and Interest charges for Self Reported Tax are defined on the General tab of the Self Reported Tax Category form for each category. In addition, you can use the Penalty / Interest Additional Parameters – Self Reported Tax method to define charges that apply to all categories using the same A/R Class, as described in this section.

These parameters can be applied to increase the interest charges after a set number of days.

To set additional parameters for the Self Reported Tax Method:

  1. Open the A/R Class form.
  2. Select the required A/R Class Code.
  3. Select Self Reported Tax from the Interest and Penalty Method drop-down list.
  4. Click A/R Method to open the A/R Method Self Reported Tax form.
  5. Enter the number of days following which interest charges increase in the After parameter.
  6. Enter the percentage in the Percentage % parameter.
  7. Enter the maximum percentage in the Maximum Interest and Penalty parameter.
  8. Click Save.

Creating A/R Class Codes for Late Filing and Late Payment Charges

No A/R Penalty and Interest Method is required for A/R Class Codes created for the Late Filing and Late Payment penalties. These penalties are configured on the General tab of the Self Reported Tax form.
You can create separate A/R Class Codes for each penalty or use a single code for all penalties. It depends on the requirements of your organization.
There are no special requirements for these class codes. Complete the parameters as described in the Accounts Receivable documentation.

Defining Late Filing and Payment Charges

Late Filing and Late Payment Charges are defined for each category on the General tab of the Self Reported Tax Category form. Other penalties are described in the main Self Reported tax documentation. This section describes only the following topics:

  • Defining the Late Filing Charges
  • Defining the Late Payment Charges

For related information, see the scenarios following this section for further details: Scenarios for Applying Late Filing and Late Payment Charges.

Prerequisites

Before creating the Late Filing and Late Payment Penalty charges, you need a completed Self Reported Tax Category form.
Refer to the Self Reported Tax documentation.

Defining the Late Filing Penalty Charges

To define late filing charges:

  1. Launch GNA.
  2. Select Application Configurations > Business Tax > Categories.
  3. Select the required Category in the tree view on the left.
  4. Open the General tab.
  5. Select Amount or Percentage beside Late Filing depending on how you are calculating the charge.
  6. Enter the amount or percentage in the parameter to the right of the radio buttons.
  7. Select the A/R Class from the A/R Class drop-down list.
    • Select None, if the penalty is applied once only, instead of by day or month.
      Enter the minimum amount of the penalty in the Minimum Amount field.
    • Select By Month to apply the penalty by month and enter the maximum number of months in the Maximum Months/Days field.
    • Select By Day to apply the penalty by day and enter the maximum number of days in the Maximum Months/Days field.
      Then, if there are additional charges after a set number of days, enter the number of days in the After filed.
      Enter the percentage in the % By Month field.
  8. Click Save.

Defining the Late Payment Penalty Charges

To define penalties and interest for late payment.

  1. Launch GNA.
  2. Select Application Configurations > Business Tax > Categories.
  3. Select the required Category in the tree view on the left.
  4. Open the General tab.
  5. Enter the percentage you are charging in the Late Payment parameter.
  6. Select the A/R Class from the A/R Class drop-down list.
    You can use the same A/R Class Code for all penalties or use different Class Codes according the requirements of your organization.
  7. Do one of the following:
    Select Once if the penalty is applied once.
    Enter the minimum amount of the penalty in the Minimum Total field.
    Select Monthly if the penalty is to be applied monthly.Enter the maximum number of months it is to be applied in the Maximum Months/Days field.
    Enter the minimum amount of the penalty in the Minimum Total field.
  8. Select Daily if the penalty is to be applied daily.
    Enter the maximum number of days it is to be applied in the Maximum Months/Days field.
    Enter the minimum amount of the penalty in the Minimum Total field.
  9. Click Save.


Scenarios for Applying Late Filing and Late Payment Charges

The scenarios in this section illustrate how to set up late filing and late payment charges for Self Reported Tax that address the following business needs.

Scenario 1

This scenario illustrates how to set up the penalty and interest charges for the following:
A return is filed after the due date. A ten dollar penalty is applied to each day up to a maximum of $2,000 dollars for each return.
If the return is more than thirty days late, an additional tax of five percent of the amount due is added each day.
The following table illustrates how charges are applied

File Pay Penalty and Interest Charge
File on May 20 Pay on May 20 No penalty or interest charges
File on May 20 Pay on May 21 No penalty or interest charges (Less than 30 days have passed)
File on May 20 Pay on June 21 No daily penalty, but 5% on the amount due for one day (5%)
File on May 22 Pay on May 22

Two day penalty for filing late ($20.00)

No 5% penalty for late payment

Less than 30 days have passed)

File on June 20 Still unpaid on June 20

30 days Penalty

5% additional on amount due

File on June 20 Pay on June 20

30 days Penalty

5% additional on amount due

File on June 20 Pay partial amount on June 20

30 days Penalty

5% additional on amount due

File on May 20 Still unpaid on July 21 5% penalty on the balance and 5% thereafter until fully paid

To set up this scenario:

  1. Launch GNA.
  2. Select Application Configurations > Business Tax > Categories.
  3. Select LDT – Lodging Tax from the tree view on the left.

To set up the Late Filing Penalty:

  1. Select Amount beside Late Filing.
  2. Enter 10.
  3. Select the Late Penalty A/R Class.
  4. Select By Day.
  5. Enter 200 in the Maximum Month/Days parameter.
  6. Enter 30 in the After days parameter.
  7. Enter 5 in the add an additional % by month parameter.

To set up the Late Payment Penalty:

  1. Enter 5 in the Late Payment % parameter.
  2. Select the Late Penalty A/R Class.
  3. Select Daily.
  4. Click Save.

Scenario 2

In this scenario a five percent penalty is added to a return that is filed after the due date. An additional five percent is added for each additional month to a maximum of 25%.
Interest accrues at the rate of 0.75% per month on the principal amount of the tax. This is illustrated in the following table

File Pay Penalty and Interest Charge
21-Mar 21-Mar 0.75% of amount due
2-Apr 2-Apr 0.75% of amount due
21-Apr 21-Apr 0.75 + 0.75 = 1.5%

To set up this scenario:

  1. Launch GNA.
  2. Select Application Configurations > Business Tax > Categories.
  3. Select LDT – Lodging Tax from the tree view on the left.

To set up the Late Filing Penalty:

  1. Select Percentage beside Late Filing.
  2. Enter 5.
  3. Select the Late Penalty from the A/R Class drop-down list.
  4. Select By Month.
  5. Enter 5.00 in the Minimum Amount parameter.
  6. Enter 5 in the Maximum Month/Days parameter.

To set up the Late Payment Penalty:

  1. Enter 10 in the Late Payment % parameter.
  2. Select the Late Penalty from the A/R Class. drop-down list.
  3. Select Monthly.
  4. Click Save.

Scenario 3

In this scenario a five percent penalty is added to a return that is filed after the due date. A minimum of payment of five dollars is required. The penalty cannot exceed 25%. To set up this scenario:

  1. Launch GNA.
  2. Select Application Configurations > Business Tax > Categories.
  3. Select LDT – Lodging Tax from the tree view on the left.
  4. Select Percentage beside Late Filing.
  5. Enter 5.
  6. Select the Late Penalty from the A/R Class drop-down list.
  7. Enter By Month.
  8. Enter 5.00 in the Minimum Amount field.
  9. Click Save.

Applying Waivers

A maximum of three waivers can be applied on each Self Reported Tax account. Although waivers are added on the category form, they are applied to the account. The number of waivers are tracked and updated in the table ST_EVENT_HIST for each Self Reported Tax account ST_ACCT_ID.

If three waivers are created, they are applied on the account as follows:

  • For the first penalty infraction, even if the business pays multiple late returns at once, they are granted a 100% waiver on all payments.
  • If the business pays late a second and third time, the second and third waivers are used. These can be applied to a single ST_ID only.
  • After the third late payment, there are no further waivers, penalties are applied in full.

Defining Waivers

Once they are configured, waivers are applied automatically.

You can set up different percentages for each waiver. For example, you could set the first to 100%, the second to 75%, and the third to 50%.

The first waiver can be applied to multiple Self Reported Tax IDs (ST_ID) if they are paid at the same time. The second and third waivers can be applied on single ST_IDs filed under the same ST_Account.

To set up the waiver.

  1. Launch GNA.
  2. Select Application Configurations > Business Tax > Categories.
  3. Select the required Category in the tree view on the left.
  4. Open the General tab.
  5. Select the Allow Waiver option.
  6. Enter a percentage beside Waiver 1.
  7. Enter a percentage beside Waiver 2 if applicable.
  8. Enter a percentage beside Waiver 3 if applicable.
  9. Click Save.

Business Rules for Applying Waivers

The following example illustrates the business rules:

  • Waiver 1 = 100%
  • Waiver 2 = 75%
  • Waiver 3 = 50%

On the first penalty infraction, the business can file multiple and pay multiple late returns at once. Each one is granted the 100% waiver.

The second time the business files and pays only one late return. They are granted the 75% waiver.

The third time the business files and pays only one late return. They are granted the 50% waiver.

Each waiver updates a column in ST_MASTER.WAIVER with 1, 2 or 3, indicating the number of waivers provided.

Each waiver granted updates ST_EVENT_HIST with a record of the waiver granted.

The following tables are evaluated for each Self Reported Tax account ST_ACCT_ID.

  • If Waiver 1, Waiver 2, Waiver 3 are not yet used, apply Waiver 1.
  • If Waiver 1 has been used, but Waiver 2, Waiver 3 are not yet used, apply Waiver 2.
  • If Waiver 2 has been used, but Waiver 3 is not yet used, apply Waiver3 and update table with WAIVE3

Self Reported Tax filings (ST_ID) are eligible for waivers as follows, when ST_MASTER.WAIVER = 0 or NULL

  • Several periods and several categories may be filed with the same effective date. All are eligible for the first 100% waiver.
  • Once ST_MASTER.WAIVER >=1, only one ST_ID is considered. The lowest ST_ID created for the same ST_ACCT_ID is used for the effective date ST_FILING_MASTER.EFFECTIVE_DATE.
  • To locate multiple ST_ID’s for the same ST_ACCT_ID with the same effective date that are eligible for 100% waiver (ST_MASTER.WAIVER = NULL or 0), the AR_BATCH_NO.BATCH_ID is used.

The table ST_EVENT_HIST is updated as follows:

ST_ACCT_ID ST_ID Event Type Event Date
85274 159263 WAIVE1 2/2/2015
85274 236580 WAIVE2 6/20/2015
951357 398745 WAIVE1 10/5/2015
951357 456987 WAIVE2 1/5/2016
123422 569874 WAIVE1 1/20/2016
96752 698740 WAIVE1 2/15/2016
123422 763258 WAIVE2 5/20/2016
951357 896526 WAIVE3 7/5/2016

Documentation

To view this information in a pdf, click on the following link.
SRTPenaltyInterest.pdf

Related Information

For details on how to set up Penalties and Interest in Self Reported Tax, click on the following link:
103-st-parm-Category_Detail

101-ar-fea-023


0 votes, average: 0.00 out of 50 votes, average: 0.00 out of 50 votes, average: 0.00 out of 50 votes, average: 0.00 out of 50 votes, average: 0.00 out of 5 (0 votes, average: 0.00 out of 5)
You need to be a registered member to rate this.
Loading...

AR – Controller Config – Create AR Payment

Standard Accounts Receivable (A/R) Controller – Create A/R Payment (Configuration)

Overview

This standard OpenForms Action Button controller can be added to a form to provide an Action Button to create the Accounts Receivable payment.

This controller is available in GA Release 1706

  • For more information on the functionality, see Product Information (101-ar-fea-024).

Prerequisites

The following conditions are required in order to enable the Controller in OpenForms Designer Setup

  • The organization is licensed for the Accounts Receivable Sub-System to setup
  • The configuration for the Accounts Receivable has been completed
  • The Form’s ID Setters Properties must contain the …
  • The Govern ID must be …

Profile Security

  • The user must have security access (GSM) to the profile’s form.


101-ar-fea-022-ofr-UI.png
Action Button Controller Properties


Controller Setup

Adding a Custom Control to a Form

  • In OFD, drag the Action Button Control Icon to the Account Entity Tab on the form.

Custom Control Form Configuration

Once the Custom Control is displayed on the form, click on the object to configure the:

  • Assembly Name = Msgovern.OpenForms.CustomControls.dll (by default)
  • Class Name = AR_CreateARMaster_Action

User Interface (UI)

  • Icon
  • Is enable: An expression can be added to control the enabling (Can be executed) of the button.

Controller Properties

The following controller properties need to be set:

Sub-System

  • Select the sub-system for which the A/R Summary Record needs to be created.

Related Topics

For more information, see:

Troubleshooting

  • The Organization must be a licensed user of the A/R Sub-System selected.


101-ar-fea-024-ofr


0 votes, average: 0.00 out of 50 votes, average: 0.00 out of 50 votes, average: 0.00 out of 50 votes, average: 0.00 out of 50 votes, average: 0.00 out of 5 (0 votes, average: 0.00 out of 5)
You need to be a registered member to rate this.
Loading...


AR – Interest, Penalty, Fee, Charge, Demand Transaction Data Entry

Interest, Penalty, Fee, Charge, and Demand Transaction Data Entry

The following transaction types use the same form and parameters as A/R Adjustments.

Documentation

For the complete reference guide, see Govern Accounts Receivable.
For the A/R Transaction Rules, see A/R Transaction Rules.

Transaction Types

Charges: A Charge (chg) is an amount applied to an account or bill. Typically, this transaction type is used with Miscellaneous Billing.
Demand: A Demand (dmd) is a special charge applied to delinquent bills. This is used in the Motor Vehicle Excise Tax subsystem.
Fee: A Fee (fee) is an amount charged for a service or product.
Interest: Interest (int) is a charge, usually a percentage, applied on delinquent bills or borrowed money.
Penalty: A Penalty (pen) is a charge applied on delinquent accounts.

Creating a Transaction

To create a charge, demand, fee, interest, or penalty transaction:

  1. Launch Govern.
  2. Open a Profile that contains A/R Inquiry.
  3. Open the A/R Inquiry form.
  4. Perform a search and load the applicable record to the form.
  5. Right click on the record in the A/R Inquiry form.
  6. Select the transaction type from the context-sensitive menu:
  7. Follow the procedure as described under Adjustments.


101-ar-frm-024


0 votes, average: 0.00 out of 50 votes, average: 0.00 out of 50 votes, average: 0.00 out of 50 votes, average: 0.00 out of 50 votes, average: 0.00 out of 5 (0 votes, average: 0.00 out of 5)
You need to be a registered member to rate this.
Loading...

AR – Configuration

Accounts Receivable (A/R) Configuration

Overview

This section provides an overview of the A/R administrative forms. For the complete reference guide, see 101-all-001-GovernAccountsReceivable-(man)-(6.0).
For the A/R Transaction Rules, see 101-ar-001-AR-TransRulesGL.

Parameters

General Parameters

  • The General Parameters are used for setting default A/R parameters for all subsystems.
  • See the A/R 101-ar-001-AR-AdmGnrlPrmtrs document.

A/R Class Parameters

  • A/R Class Codes are associated with transaction types and linked to G/ L account numbers. You can define penalty and interest computation methods.
  • See the A/R Class Codes wiki page and the 101-ar-001-AR-AdmClassCodes document.

A/R Method

  • A/R Methods are used for calculating penalty and interest charges. They are linked to A/R Class Codes.

G/L Distribution Parameters

G/L Transaction Setup

Cash Collection Parameters

A/R Subsystem Priorities

  • The A/R Subsystem Priorities form is used for setting the order in which centralized cash collection and lockbox payments are made.

Copy to Year

  • Use the A/R Copy to Year form in order to copy the following A/R data from one fiscal year to another: A/R Class Codes, A/R Methods, and G/L Distribution Parameters. All data are copied. See the 101-ar-001-AR-CopytoYear document.

Deposit Type

Security

Security for A/R Forms

  • In order to complete the security setup for Accounts Receivable in Govern OpenForms v6, access to GNA, the GSM, and the OFD is required.
  • Because the A/R Inquiry form is built on a custom control, the security is different from other user forms. See the 101-ar-001-AR-AdmOpenFormsSecurity document.


101-ar-config


0 votes, average: 0.00 out of 50 votes, average: 0.00 out of 50 votes, average: 0.00 out of 50 votes, average: 0.00 out of 50 votes, average: 0.00 out of 5 (0 votes, average: 0.00 out of 5)
You need to be a registered member to rate this.
Loading...