WM – Actions List

Workflow Management (WM) ACTIONS List

Version 6.1 Release 1706

Overview

Actions can be setup in a workflow process for Activities and Steps. When defining the workflow steps, you can specify actions to be automatically executed, i.e. triggered on At Initialize, on All Status (any status) of the step regardless of the status, for a specific status (answer), or On Request (Available Release 6.1.1706).

NOTE: Typically an action is called automatically on Initiation or on Completion, actions added to the On Request section are executed manually; i.e. users will have to click on a user defined link that will trigger the action.

Workflow Actions

The following actions are available for use in the context of a Workflow.

Global Actions

Global Actions are actions that may be used outside the context of the Workflow as opposed to Workflow specific actions, see above. The following actions are currently assigned only to the Workflow context but may also be used outside of the Workflow:

Workflow Action Undo

It is possible to undo a global action. Currently this feature is implemented in the context of workflows. To implement the undo, a de-serialization process is used on the stored serialized action arguments. The de-serialized information is then used to restore the action. Note that for all actions, the configuration information is saved in the following tables:

  • USR_TRIGGER
  • USR_TRIGGER_ACTION
  • WM_PARM_ACTIVITY_LK_ACTION (link between trigger and activity if the action is configured at the activity level)
  • WM_PARM_STEP_LK_ACTION (link between trigger and step if the action is configured at the step level).
  • WM_ACTION_LOG (Contains the serialized action arguments)

How to Create / Update / Remove Actions

Actions are added through the Govern New Administrator (GNA).
To add an action to a Type…

  1. On the GNA ribbon Application Configurations (tab) > Workflow (group) > Departments.
  2. Click to select the Types sub tab.
  3. On the Types tab, click Steps.

Actions can be added to the following sections:

  • At Initialization
  • All Status
  • On Request (Available GA 6.1.1706)

Creating an Action in Workflow Steps

In the Available Status group

  1. Click on [+] beside the Action and Count group box located within each Available Status.
  2. A modal window called Add a New Action will be displayed.
  3. Select the required action from the Action combo box and complete the action parameters.
  4. Click Save.
NOTE: The number of actions for a step is indicated by the number that appears in parenthesis immediately on the right hand side of Count (). To view the list of multiple actions when present, click the expansion arrow on the left of Action(s).

At Initialize and All Status actions

In the Initialization Settings group
Repeat the above steps at the At Initialize or All Status group.

On Request Actions

(Available in Rel. GA 6.1.1706)
When correctly configured, actions are executed automatically, based upon their configuration in the Govern New Administration (GNA). Typically an action is called automatically on Initiation or on Completion, as of release GA 6.1.1706, actions may also be added to the On Request section. The actions in this section are executed manually; i.e. users will have to click on links that will trigger the action.

Presentation of On Request triggers in Govern

The links will appear on the right hand side (RHS) in the Available Actions group under the Activity tab. These links will be presented in the order that the actions were entered. Available actions that correspond to each step can be viewed with a click on the step; they will be presented in the group. To change the order of presentation, they will need to be rearranged in the Options group, saved, and refreshed in the GNA.

Adding an Action

To add the Action in the Steps form…

  1. On the Steps form select a step on the LHS and select a step.
  2. On the Right Hand Side (RHS), add an action.
  3. On the Add a new action form, add an action through the Action combo box; select the Invoke an External Command option.
  4. In the Options group, select the saved external command.
  5. Click Save.

Add a new action Form parameters (On Request trigger)

Label – On the Add a new action form there is a mandatory 25 character alphanumeric label that is used for the action link. Completion of the Label parameter is mandatory; this will be the name of the link that will invoke the action.

Updating an Action

To update an existing action…

  1. Locate the action in the required group; you may need to click the expansion arrow on the left of Action(s).
  2. Click on the Action hyperlink to display the Edit Action modal window.
  3. Make any necessary modifications.
  4. Click Save.

Deleting an Action

To delete an action previously created, click on the “X” beside the action.

Multiple Actions

It is possible to have multiple actions on an Activity. For example you can set a Completion Status 2 – Set the Permit on hold, and Completion Status 1 – Generate the permit number.

Saving Actions

Saves are made with the Save icon at the top of the interface.
After configuring multiple actions, when a save is made, the results that are presented in the Actions grid will be sorted by the Trigger column.

Actions and Activities

The following actions can be setup and will be launch based on the trigger selected:

Action

Select the Class name of the action that is to be completed. Users should note that each time a selection is made from the combo-box, the User Interface (UI) will be modified to accommodate the selection.

NOTE: The options available under the Action combo-box are based upon the Classes that have been implemented.

UI changes in the Options group appear with the following combo-box selections:

Change the status of a Workflow

Select this option to change the status of a Workflow

  • ActionIssue Number or Issue Certificate; note that these are hard-coded in the system and require Govern to modify them, but descriptions can be modified through the Resource File.
  • Activity Date – This parameter is populated by an expression that returns the date that is used to update (Table: WM_MASTER.NUMBER_DATE) or (Table: WM_MASTER.CERTIFICATE_DATE).
NOTE: In Govern, this date is the Completion Date of the activity; in this case the expression would be: @parmActivityDate

Set Status

  • Options are, Closed, On Hold, Open, Received, or Void. These options are user configurable through (Table: VT_USR) and are used to update (Table: WM_MASTER.STATUS). They are taken from (Table: VT_USER) where…
    Table_name = ’WMSTATUS’.

By default the values are automatically created by the Database Verification: CLOSED, HOLD (i.e. On Hold), OPEN, RECEIVED, VOID

Execute Query

  • This query executes the following three (3) types of action queries, Update (U), Insert (I), and Delete (D).
    Select from a list of configured queries. All queries that are accessible through theGovern Action Queries editor are presented by their Long Descriptions.

BUSINESS RULES (For Action Queries)

The Execute a Query option adheres to the following Business Rules:

  • The selected query must exist in (Table: USR_QUERY) and (Table: USR_QUERY_VALUE).
  • Queries must be created prior creating any actions in Workflow Department Editor.
  • When a Query is added after the Workflow – Department editor has been opened, it will not be refreshed in the Workflow – Department editor dropdown.

Generate Report

  • Choose a Report from the list of reports that are accessible to the Department. This is a required field. There are available options to:
    • Bypass Report Prompts – Use Current ID(s) – To bypass the report with prompts.
      • When selected, the current Govern IDs will be used as parameters for the Report. This information will be previewed on the screen, and no input parameters box will be displayed.
        Unchecked, the default, the report will open on a Tab in the form and the user will have to click on Run Report, to display the report.
    • Send to Default Printer – This will send the report to a default printer that has been configured through Windows, or Terminal Server when users are configured with Terminal Server.

Validate an expression

  • Configure an Expression that is to be used for validation. Click the ellipsis [ … ] beside the parameter to display the Expression selector screen. Refer to the Govern documentation regarding Expressions

Set the date of a Workflow

  • Select this option to change specified dates. Select the field that is to be evaluated from the Field combo-box. Click the ellipsis button […] beside the Expression parameter to display the Expression selector screen. Refer to the Expressions page on the Wiki for details about Expressions http://product.govern.harrisgovern.com/100-Expressions
    • Field – This parameter will display all queries present in the Action Queries Editor. The Long Description field of the Code is displayed.
    • Expression – Enter an expression that will be used to change the specified date field

Message (Conditional Message)

  • Allows the entry of a message through a conditional expression. This can be used for displaying messages, or for testing purposes.

Workflow Action Log

NEW! All action steps are logged. The log information is maintained in (Table: WM_ACTION_LOG). This table in conjunction with (Table: WM_PARM_STEP), will provide a historical view of the activity steps as they were executed, the action, and the time and date of occurrence. The following is a sample query that illustrates how information such as the Step Number could be retrieved for reporting purposes.

EXAMPLE:
SELECT SELECT s.STEP_NO, a.*
FROM WM_ACTION_LOG a
INNER JOIN WM_PARM_STEP s on a.STEP_ID = s.STEP_ID
ORDER BY COMPLETION_DATE ASC;

Table structures are as follows:

Table Name Column Name Table Name Column Name
WM_ACTION_LOG ACTION_LOG_ID WM_PARM_STEP DEPT
WM_ACTION_LOG WM_ID WM_PARM_STEP TYPE_CODE
WM_ACTION_LOG STEP_ID WM_PARM_STEP STEP_NO
WM_ACTION_LOG ACTIVITY_ID WM_PARM_STEP DESCRIPTION
WM_ACTION_LOG IS_STEP_ACTION WM_PARM_STEP DEFAULT_STATUS
WM_ACTION_LOG STATUS_SEQ WM_PARM_STEP AUTO_INIT_NEXT
WM_ACTION_LOG ACTION_TYPE
WM_ACTION_LOG COMPLETION_DATE
WM_ACTION_LOG HAS_ERRORS
WM_ACTION_LOG UNDO_ARGS
WM_ACTION_LOG UNDO_DATE

Related Links

What’s New in Workflow Management
Main Workflow form
Workflow Management Overview
Workflow Management Installation
OpenForms Reference (Configuration) Setup Information
Workflow Management – Workflow Form Controller & Workflow Type Custom Control
Workflow Management – Additional Types
Workflow Management OpenForms Reference
Workflow Management Business Rules
Workflow Management Wiki Map


103-wm-parm-Actions


0 votes, average: 0.00 out of 50 votes, average: 0.00 out of 50 votes, average: 0.00 out of 50 votes, average: 0.00 out of 50 votes, average: 0.00 out of 5 (0 votes, average: 0.00 out of 5)
You need to be a registered member to rate this.
Loading...

101-wm-install-wm_controller

Workflow Management Form Controller – WM Controller

Version 6.1 (In Development)

Overview

This page is intended for System Administrators and Business Analysts to create a Workflow form and configure the form controllers.
The following is used in all Workflow Management Forms’ Root Entities. It manages the database model and controls dynamic user key creation, master record creation and deletion as well as read-only fields.

Configuration

The following is the configuration of the controller or custom control object properties.

Main Workflow Custom Entity (WM_CONTROLLER)

In OpenForms Designer, after having created the new form, click on the Entity header tab to configure.

Element Property Setup
Controller Name WM_CONTROLLER
Properties NONE
Browse Columns Select the columns for the browse when there are more than 1 workflow record
and the order of the fields to appear in the browse window
Hidden on Load If hidden on load, user will need to click on the browse button
Show on Left If not clicked will show on top
Size Space to use when the browse window is used.
TIP: Reduce size during the configuration in order to have more room
to see the form itself.
Miscellaneous
(optional)
Allow Delete Allow Delete of a workflow record (Standard OpenForms Option Available)
Allow Insert Allow Insert (creation) of a Workflow
Allow Save Allow Save
Configuration Filter by system id n/a
Filter by constants n/a
Order by n/a
Reposition n/a
ID Setters n/a (if i want to use a view query link to a record, do i need)
Record Description Expression For example
@attrWM_ID.Display
+ ‘ Application# ‘ + @attrAPPLICATION
+ ‘ Number# ‘ + @attrNUMBER
+ ‘ Cert.# ‘ + @attrCERTIFICATE
+ ‘ Status ‘ + @attrSTATUS
Expression Setup Convert Null parameters to default Value must be set to TRUE?
Tab Sequence Number n/a
Text/Misc. Text Used for the business entity name verify
Misc EN Will be used for the SY DICT description? verify
Misc FR French (n/a)
Internal Elements Controlled internally as READ ONLY
Read Only Fields LAST_MODIF_UID, LAST_MODIF_DATE
WM_ID, ID, STATUS, Linked ID, Linked ID type (list to be defined and changed in the controller)


101-wm-install-wm_controller


0 votes, average: 0.00 out of 50 votes, average: 0.00 out of 50 votes, average: 0.00 out of 50 votes, average: 0.00 out of 50 votes, average: 0.00 out of 5 (0 votes, average: 0.00 out of 5)
You need to be a registered member to rate this.
Loading...


WM – System Configuration

Workflow Management System Configuration

Version 6.1 (In Development)

System Configuration

101-wm-pres-Configuration-ux.png
Click for more information on Configuration

All Levels

The following configs can be set and overridden at the different levels:

Tax Rate (Time Cost)

Enter the rate to be applied to the Contribution amount, as entered on the Contributions function in Govern. This is saved to SY_ REGISTRY. Refer to the Time Cost and Contributions guide for more information.

Number of Digits in Sequence #

Enter the number of digits to be used for the Permit, License, Certificate, Workflow and Application sequence numbers. If you leave this field blank, the system uses a default of nine.

Same Sequence No. for All Functions

Select this option to use the standard method of generating application, permit and certificate numbers. Deselect this option if you want to define different sequence numbers for each function. For example, you could use B2001000 for Building Permits, G2001000 for General Permits, E2001000 for Electrical Permits and P2001000 for Plumbing Permits.

Default A/R Link Name group

It is possible to specify a default A/R link name for Permits, Complaints, Offense, Workflow, Request For Services (RFS), and Grievances. Previously the default names were used for both the applicant and the A/R recipient.
To specify a default A/R Link Name:

  1. Select the A/R Link Name from the drop-down menu; this name will be used as the default A/R billing recipient.

Default Applicant Type group

To specify a default Link Name Type:

  1. Select the Link Name Type from the drop-down for each type to be used as a default for the applicant.

Include Base Fee for All Steps

Select this option to use the sum of the values entered for the Base Amount, on the Fee Computation Setup form, from all linked fee codes. Deselect it, to use the Base Amount for the selected fee code.

Additional Columns by Function

Select this option to create additional columns by Permit Kind or function. This option gives you the flexibility to create many more additional columns or fields. Previously, a single linking table was used for the additional columns for all Permit Kinds with a limit 256 columns. Now, a new linking table has been created for each Permit Kind or function. 16 columns are included by default. This leaves space for 240 user-defined columns for each Permit Kind within the organization.

(Roadmap) Filter Violation Codes by Offense Type

When selected, the Offense Type Maintenance form will display a Violation Code Types group. The Violation Code Types group now displays violation codes by offense types. This display method offers improved presentation and added functionality. It is now a simple process to add new offense types to your list of violation code types. For users that prefer the display method of previous versions of govern, the option for this still remains.
To view violation code types in the unfiltered manner:
1. In Govern System Admin select Parameters > Land Management >Parameters…
2. In the Land Management Parameters form, select the General tab.
3. Deselect the Filter Violations by Offense Type option.
4. Click Save.

(Roadmap) Plumbing & Gas Matrix

When selected, this feature in the Plumbing Permits function allows the entry of itemized quantities of installed plumbing fixtures. In some municipalities, a breakdown of quantities of installed items may be required with the plumbing permit.

Allow Duplicate Issue Permits

Once a permit number has been issued, a permit cannot be duplicated; select this option to allow the duplication of issued permits in Govern for Windows.

Organization Level

The following configs can be set at this level:

Department Level

The following configs can be set at this level:

  • A/R and G/L
  • A/R Class Sub-system = LM and L1
  • Fee Description
  • G/L Revenue Account 1 %
  • G/L Revenue Account 2 %

Sequencing

  • Number of Digits in the Sequence#

Use activity date to compute the expiration date from the activities

Inspection (under review)

  • Inspection Territory Text box
  • Automatically Link Applicant Name
  • Automatically Link Owner Name
  • Automatically Link Cool Bar Components
  • No Automatic Linking of Hearings
  • No Automatic Linking of Offenses
  • Display all permits on the Selection Screen
  • Automatically Assign an Inspector
  • By Inspection Type
  • Display Warning for Unlinked Inspections
  • Generate Permit Fees from Inspection
  • Generate Workflow Fee from Inspection
  • Generate Offense Fee from Inspection
  • Hide Inactive Inspector
  • Use Light Inspection Scheduling

Workflow Type

NEW! Governs’ Automatic Linking options will allow users to set flags that will auto-link Govern ID’s to Workflows.
There are three (3) auto linking options available that can be used in the context of the Workflow. These options are located under the General tab of the Workflow Department form in the Govern New Administration (GNA). Select Application Configurations (tab) > Workflow (group) > Workflow Management > Department. Under the Workflow – Department form locate the General sub tab.
The options are as follows:

  • Automatically Link Applicant Name
  • Automatically Link Owner Name
  • Automatically Link System ID’s

The following configs can be set at this level:

Automatically Link Applicant Name

  • Selecting this option will result in the property’s principal owner being automatically listed as the Applicant. When there are multiple owners, the Primary Owner will be listed as the applicant. The primary owner is either the owner that is assigned with Priority Sequence 1 on the Owner Information form, or the name from the first record for this form.
    The Link Type will be the one selected under the Kinds and Categories tab (Application Configurations (tab) > Workflow (group) > Workflow Management > Kinds and Categories); Default Applicant Type parameter. Options can be an Applicant, Owner, Name, and so on.

Automatically Link Owner Name

  • When this option is selected, the property owner is automatically listed as the Owner. In the event that there are multiple owners, all owners are linked.
    The parameter Link Type setting is taken from the same form as the Automatically Link Applicant Name option. The option that was selected under the A/R Link Name Type parameter.

Automatically Link System ID’s
Select this option to link the active Govern ID’s to the Workflow. This is the default link type that is associated with the system ID.
From the Govern ribbon, select Application Configurations (tab) > Workflow (group) > Workflow Management > Link Types); Default Applicant Type parameter. The default ID’s are:

  • Building ID (BLDG_ID)
  • Misc. Billing ID (MB_ID)
  • Name ID (NA_ID)
  • Parcel ID (P_ID)
  • Personal Property (PP_ID)
NOTE: The link type must be supported by the Workflow.

Under the Workflow Kind tab, the list of types are configured manually. The type is selected, and the link type to support is selected from the list in the “Supported Link” group.
To locate the form from the GNA ribbon:

  1. Select Application Configurations (tab) > Workflow (group) > Workflow Management > Kinds and Categories.
  2. In the Workflow – Kind form, select a Type from the Categories sub tab.
  3. Under the General tab, locate the Supported Link group.


101-wm-config


0 votes, average: 0.00 out of 50 votes, average: 0.00 out of 50 votes, average: 0.00 out of 50 votes, average: 0.00 out of 50 votes, average: 0.00 out of 5 (0 votes, average: 0.00 out of 5)
You need to be a registered member to rate this.
Loading...

WM – Form Controller – WM Links Controller

Workflow Management (WM) Form Controller – WM Links Controller

Version 6.1 (In Development)

Overview

This page is intended for System Administrators and Business Analysts to create a Workflow form and configure the form controllers.

Configuration for Names

The following is the configuration of the controller or custom control object properties.
Main Workflow Custom Entity (WM_LINK_CONTROLLER)
In OpenForms Designer, after having dragged the LINKED NAMES entity to the form, click on the Entity header tab to configure.

Element Property Setup
Controller Name WM_LINK_CONTROLLER
Properties NONE
Browse Columns Select the columns for the browse when there are more than 1 workflow record
and the order of the fields to appear in the browse window
Hidden on Load If hidden on load, user will need to click on the browse button
Show on Left If not clicked will show on top
Size Space to use when the browse window is used.
TIP: Reduce size during the configuration in order to have more room
to see the form itself.
Miscellaneous
(optional)
Allow Delete Allow Delete of a workflow record (Standard OpenForms Option Available)
Allow Insert Allow Insert (creation) of a Workflow
Allow Save Allow Save
Configuration Filter by system id n/a
Filter by constants Attribute = ID type
Operator = Equals to
Constant = NA_ID
Order by n/a
Reposition n/a
ID Setters n/a (if i want to use a view query link to a record, do i need?)
Record Description Expression For example
Expression Setup If expression is used, click on Convert Null parameters to default Value must be set to TRUE?
Tab Sequence Number n/a
Text/Misc. Text Used for the business entity name verify
Misc EN Will be used for the SY DICT description? verify
Misc FR French (n/a)
Internal Elements Controlled internally as READ ONLY
Read Only Fields ???

Configuration for Other Links

The following is the configuration of the controller or custom control object properties.
Main Workflow Custom Entity (WM_LINK_CONTROLLER)
In OpenForms Designer, after having dragged the LINKED IDs entity to the form, click on the Entity header tab to configure.

Element Property Setup
Controller Name WM_LINK_CONTROLLER
Properties NONE
Browse Columns Select the columns for the browse when there are more than 1 workflow record
and the order of the fields to appear in the browse window
Hidden on Load If hidden on load, user will need to click on the browse button
Show on Left If not clicked will show on top
Size Space to use when the browse window is used.
TIP: Reduce size during the configuration in order to have more room
to see the form itself.
Miscellaneous
(optional)
Allow Delete Allow Delete of a workflow record (Standard OpenForms Option Available)
Allow Insert Allow Insert (creation) of a Workflow
Allow Save Allow Save
Configuration Filter by system id n/a
Filter by constants Attribute = ID type
Operator = NOT EQUAL TO
Constant = NA_ID
Order by n/a
Reposition n/a
ID Setters n/a (if i want to use a view query link to a record, do i need?)
Record Description Expression For example
Expression Setup If expression is used, click on Convert Null parameters to default Value must be set to TRUE?
Tab Sequence Number n/a
Text/Misc. Text Used for the business entity name verify
Misc EN Will be used for the SY DICT description? verify
Misc FR French (n/a)
Internal Elements Controlled internally as READ ONLY
Read Only Fields ???


101-wm-install-wm_link_controller


0 votes, average: 0.00 out of 50 votes, average: 0.00 out of 50 votes, average: 0.00 out of 50 votes, average: 0.00 out of 50 votes, average: 0.00 out of 5 (0 votes, average: 0.00 out of 5)
You need to be a registered member to rate this.
Loading...

WM – Design Guidelines and Tools

Workflow Management – Design Guidelines and Tools

Version 6.1 (In Development)

NOTICE: The following page is intended for BAs, System Administrators, Project Managers for guidelines, resources, templates and tool to help implement the module.

Design Guidelines and Tools

Organization Setup

  • Before Getting Started
  • Organization setup
  • Roles and Users
  • Profiles

Workflow Structure

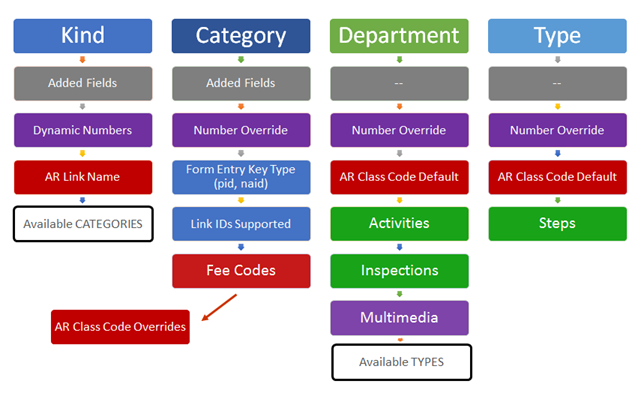
  • Kind, Category, Fees
  • Dept. Activities, Types

Business Entity Designer (BED)

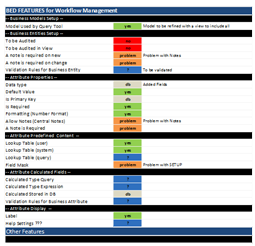
  • Setup Feature Available Checklist BED Setup Guidelines
  • 101-wm-setup-BED.png
    Click to enlarge the Available BED Features Setup Options


OpenForm Design

  • Design [pdf] [Balsamic templates]


101-wm-design


0 votes, average: 0.00 out of 50 votes, average: 0.00 out of 50 votes, average: 0.00 out of 50 votes, average: 0.00 out of 50 votes, average: 0.00 out of 5 (0 votes, average: 0.00 out of 5)
You need to be a registered member to rate this.
Loading...


WM – Form Controller – WM Type Control

Workflow Management Form Controller – WM Type Control

Version 6.1 (In Development)

Overview

This page is intended for System Administrators and Business Analysts to create a Workflow form and configure the form controllers.
This custom control is used to provide the workflow type drop down table for categories that ‘Allow additional types’.

Configuration

The following is the configuration of the controller or custom control object properties.

Workflow Type Custom Control (WM_TYPE_CONTROL)

First you need to add the custom control object by dragging the control to the form (root entity) then click on the custom control object on the form to set the properties.

Element Property Setup
Layout Height Standard OpenForms
Horizontal Alignment Standard OpenForms
Margin Standard OpenForms
Text Style Standard OpenForms
Vertical Alignment Standard OpenForms
Width Standard OpenForms
Misc. Action WM_TYPE_CONTROL
Is Enabled n/a
Is Tab Stop Standard OpenForms
Is Visible n/a
Name Maintain by System
Properties
Misc. IsAdditionalComboBoxEditable If you want to be able to type in the combo box, to start the drop down list based
on the data entered, click
Tab Sequence Tab Stop Sequence Number Standard OpenForms
Internal Element Instructions
Not applicable


101-wm-install-wm_type_control


0 votes, average: 0.00 out of 50 votes, average: 0.00 out of 50 votes, average: 0.00 out of 50 votes, average: 0.00 out of 50 votes, average: 0.00 out of 5 (0 votes, average: 0.00 out of 5)
You need to be a registered member to rate this.
Loading...

101-wm-f06-fees

Managing Workflow Fees

Version 6.1

Overview

Workflow Fee Editor is used to configure and maintain workflow fees. Fees can be applied through actions, which can be added to a workflow status of an activity step.
Fees can be set up as:

  • Expressions: Expressions can be created for flat fees or for any calculations. When a fee does not require a rate schedule, an expression can be written instead of using the Formatted Fee form.
  • Formatted: Create formatted fees if you need to add a rate schedule. A formatted fee type can be used instead of an expression. Fee types parameters are selected from combo-boxes.
  • Groups: Groups of fees are created when you want to execute multiple fees at the same time. All fees in the group are added together. The minimum, maximum, and rounding can be applied to the group if all fee methods in the group are defined with the same A/R Class Code.

Business Rule(s)

The system will NOT allow a fee to be deleted if it is being used anywhere in the system.

Prerequisites

Workflow Kind and Category

Fees are defined by category, therefore a Workflow Kind and Category must be created.

A/R Class Codes

A/R Class Codes are required for the workflow fees.

  • If Land Management is selected as the subsystem, all codes with the transaction type invoice (inv) or empty are listed.
  • For all other subsystems, all codes with the transaction types Fee (fee), Charge (chg), or Demand (dmd) are listed.
  • A/R Class Codes are created by year. Workflows are not created by year.

Creating Fees

The Workflow Fee Editor is used to create fees. This page contains the following topics:

  • Accessing the Workflow Fee Editor
  • Using an Expression in a Fee
  • How to create a Formatted Fee
  • How to create a Group Fee

Accessing the Workflow Fee Editor

To access the Workflow Fee Editor:

  1. Launch GNA.
  2. Select Application Configurations > Workflow Management > Kinds and Categories.
  3. Click to select the Categories tab. Categories are listed in the tree view on the left.
  4. Select a category.
  5. Click the Edit Fees action button at the top of the form; note that the Edit Fees button is disabled if the fee has not been saved.
  6. The Fee Method Editor opens.

Existing workflow fees are listed on the left by Type: Expression, Formatted, and Group.

Fee tab Icons

The Fee Method Editor contains the standard New, Save, Delete, and Cancel icons, as well as the following icons that can be used to facilitate the creation of new fee methods.

Copying and Importing Fee Methods

  • Copy: An existing Fee may be copied in order to create a new one. When you click Copy, all parameters are copied, with the exception of the Fee Code, which must be unique. Click the Copy icon at the top of the form to copy a fee method; modify any required parameters.
  • Import: You can import fee methods from one Kind and Category to another. You may also overwrite existing fees.

Importing a Fee Method

To import a fee method:

  1. Click the Import icon at the top of the Fee Method form.This opens the Select Fees to Import window.
  2. Select a workflow kind from the Kind drop-down list.
  3. Select a workflow category from the Category drop-down list
  4. Select the Overwrite Existing Fees checkbox to overwrite the fees in the current Kind and Category that have the same name as the fee methods that you are importing.
    This can be useful if you modify a fee in one Kind and Category and want the same change in all Kinds and Categories.
  5. Select the fees that you want to import from the Available Fees list.
    You can select multiple fees by holding down the [Shift] or [Ctrl] keys.
  6. Click Import.

There is no warning.
All parameters are imported including the Fee Code. You can modify all parameters with the exception of the Fee Code.

Fee Method Parameters

This section covers the common parameters for all Fee Method types in the following sections:

  • Defining the General Information for Fee Methods
  • Defining Minimum, Maximum, and Rounding
  • Defining the General Information for Fee Methods

Completing the Fee Method Setup

To set up a Fee Method:

  1. Enter a code to identify the fee in Fee Code parameter.
  2. The code can be a maximum of 15 characters and must be unique in the category.
  3. Click the drop-down arrow to expand the description fields.
  4. Enter descriptions in the English Short and Long Description fields.
  5. Select one of the following from the Type field and follow the corresponding instructions.
  • Expression: See Creating an Expression Type Fee
  • Formatted: See Creating a Formatted Type Fee
  • Group: Creating a Group Type Fee

Defining Minimum, Maximum, and Rounding

The following parameters can be added to any fee method type. If they are added to a group fee, they apply to the sum of all fees in the group.
Round Fee To: Define a value for rounding the fees generated for a permit or license, using standard rounding rules. For example, enter 1 to round the fee to the nearest dollar, 10 to the nearest multiple of ten dollars or 100 to the nearest multiple of one hundred dollars.
The rounding occurs after the Base Amount is added but before the Minimum and Maximum Fees are compared.
Minimum Fee: Enter the minimum amount for the fee. If you are setting up a Group Type fee, this value includes the sum of all the fee codes linked to the current code, unless the Use Min., Max for This Fee Code option is selected.
Otherwise, if a Minimum amount is entered, it applies to the current fee.
Maximum Fee: Enter the maximum amount for the fee. If you are setting up a Group type fee, the maximum applies to the sum of all the fee codes in the group. Otherwise, it applies to the current fee only.

Creating an Expression Type Fee

You can use an expression in order to create a fee. This is useful for flat fees and fee that use queries or constants.
This section covers the following topics:

  • Setting Up an Expression Type Fee
  • Using a Constant in a Fee
  • Setting Up an Expression Type Fee

To create an expression to define a fee:

  1. Follow steps 1 to 8 under Creating Fees.
  2. Select Expression from the Type drop-down list:
  3. Select the subsystem from the Subsystem parameter.
  4. All applicable A/R Class Codes are listed. This varies according to the subsystem selected as described under A/R Class Codes.
  5. Select an A/R Class Code from the A/R Class drop-down list.
  6. All A/R Class Codes for the selected subsystem are listed for all years
    However, if you select an A/R Class Code that does not exist in the current year, the A/R Class parameter is outlined in yellow.
  7. Click the ellipsis button to open the A/R Class Code editor and create a new A/R Class Code.
  8. Click the ellipsis button in the Expression parameter.
    This opens the Expression Selector.
  9. Create the expression.
    Only the attributes that are in the business model are available and can be used in the expression.For details on expressions, see the OpenForms Designer documentation :http://product.govern.harrisgovern.com/105-all-OFD
  10. Click Save.

Using a Constant in a Fee

Constants are useful for setting up fees that change from year to year or from one jurisdiction to another.

Prerequisites

For this type of fee, the first step is to create the constants.
To create a constant for a workflow fee:

  1. Launch GNA.
  2. Select Editors > Constant Editor.
  3. Click the New icon to create a new constant.
  4. Enter text to uniquely identify the constant in the Code parameter.
  5. Add descriptions in the Short and Long Description parameters.
  6. Do one the following:
    Select By Year if the value of the constant changes from year to year.
    Select By Jurisdiction if the value changes from one jurisdiction to another.
    Select both By Year and By Jurisdiction if the value changes by both.
  7. Click the Add icon (+) to add a new value.
  8. Select the jurisdiction in the Jurisdiction parameter if applicable.
  9. Enter the year in the Year parameter if applicable.
  10. Enter the value in the Value parameter.
  11. Repeat steps 7 to 10 as required.
  12. Click Save.

For further details, see Constant Value Editor (103-ed-003).

Adding a Constant to a Fee

To set up a fee code that uses a constant:

  1. Follow the procedure under Creating an Expression on page 5, with the following exception.
  2. When you create the expression for the fee, enter:@ct A drop-down list of all the constants in the system appears.
  3. Select the constant from the drop-down list.
  4. A parameter with the Year ID and/or Jurisdiction ID appears on the editor, depending on how you set up the constant.
    For example, if the constant is year-based, enter the year in the Year_ID parameter.
  5. Click Execute.The value associated with the year is displayed in the Result field.
  6. Click OK on the Expression Editor.
  7. Click Save on the Fee form.

Creating a Formatted Type Fee

You need to create a formatted type fee if the fee uses a rate schedule or if it accesses codes in a validation table. You can also the formatted type fee to create a fee using any parameter that the is in the workflow kind or category.
This section covers:

  • Defining a Formatted Fee
  • Creating a Formatted Fee with the Apply Rate Option
  • Creating a Formatted Fee with the Rate / Unit Option
  • Creating a Formatted Fee with a Lookup

Defining a Formatted Fee

To define a formatted fee:

  1. Follow steps 1 to 8 under Creating Fees.
  2. Select Formatted from the Type drop-down list:The Formatted Fee parameters appear.
  3. Select the subsystem from the Subsystem parameter.
    All applicable A/R Class Codes are listed.
  4. Select an A/R Class Code from the A/R Class drop-down list.
    All A/R Class Codes for the selected subsystem are listed for all years.
    However, if you select an A/R Class Code that does not exist in the current year, the A/R Class parameter is outlined in yellow.
  5. Click the ellipsis button to open the A/R Class Code editor and create a new A/R Class Code if required.
    A formatted fee can be based on a single attribute or on two attributes with an operator. All numeric and lookup attributes in the business model are listed in the drop-down lists for the fee.
    The attributes can be a numeric type of lookup.
    If you select an attribute that has a lookup, the validation table icon is enabled and a secondary window opens.Only numeric values can be entered.
  6. Select the first attribute for the calculation for from the first drop-down list beside the Fee parameter.
  7. Select an operator if you adding a second attribute, + – * ÷
    The second attribute is required if you enter an operator.
  8. Select the second attribute.
  9. Select one of the following and follow the corresponding procedure.
  • No Rate
  • Apply Rate
  • Apply Rate / Units
  • Click Save.

Creating a Formatted Fee with the Apply Rate Option

For this type of fee, you need to provide the Base Amount and the Rate.

To create a formatted fee with the Apply Rate option:

  1. Click the Apply Rate option on the Formatted Fee form.
  2. Enter amounts in the Base Amount and the Rate parameters.

Creating a Formatted Fee with the Rate / Unit Option

For this type of fee, you need to provide the Base Amount and the Rate. An Up to units rate can be used only once.

Click the plus (+) symbol beside Rate to add a new rate.
Enter the maximum number of units to which the rate applies in the Up to Units field.
Enter the rate for the number of units.
Enter the number of units to which the rate applies in the Per Units column.
Click Save.

Creating a Formatted Fee with a Lookup

The Formatted Fee type can be used to facilitate the setup of fees that access validation tables.
This is best illustrated with a scenario.
In the following scenario, a fee method is used to apply fees based on property use to a workflow. The fee varies according to whether the property is residential or commercial. The property use codes are defined in the user validation table QA_PERMIT_USE.
Prerequisite
The first step is to create the Validation Table. In this scenario, the QA_PERMIT_USE table is used.
To create this table or modify it:

  1. Launch GNA.
  2. Select Editors > User Validation Table Editor > Permits.
  3. Click New to create a new table.
  4. Enter QA_PERMIT_USE in the Table Name parameter.
  5. Enter QA-PERMIT Use in the English Description parameter.
  6. Select By Department.
  7. Click the Codes icon to create the validation codes for the table.
  8. Click the New icon to create new codes.
  9. Enter COM in the Code parameter to uniquely identify the validation code.
  10. Enter Commercial in the Short and Long Description fields.
  11. Select QA – QA Permit (Test Scenarios) from the Department drop-down list.
  12. Repeat steps 8 to 11 to create codes for Residential Building, Residential, and Utilities in the same department.
  13. Click Save.

Defining the Formatted Fee with Lookup

This scenario demonstrates how to use the Formatted Type Fee to generate fees according to values set up in a validation table.
To define the fee:
Follow the procedure under Defining a Formatted Fee on page 12 with the following exception.
Select the QA_PERMIT_USE validation table from the first Fee drop-down list.
Click the Codes and Values icon .
This opens the Codes and Values form.

Enter the following values beside the associated codes:
COM: 1000.0
NONRES: 150.0
RES: 475.0
UTIL: 600.0
Click Save.
Creating a Group Type Fee
The Group Type is used for fees that are generated together.
To create a group fee:
Follow steps 1 to 8 under Creating Fees on page 2.
Select Group in the Type parameter.

Click the plus (+) icon next to parameters to add a fee to the group.
A secondary window opens.
Repeat step 3 to add more fees to the group.
Enter values in the Min., Max., and Round To parameters if required.
These values apply to the sum of all the fees in the group.
Click Save.

Adding a Fee to a Workflow

Fees are added to workflows at the Activity Steps.
To add a fee to a workflow:

  1. Launch GNA.
  2. Select Application Configurations > Workflow Management > Departments.
  3. Select the step at which you want to add the fee.
  4. Select one of the following:
    At Initialization, At Status, or At Step
    This opens the Add a new action form.
    The Trigger parameter is automatically populated.
  5. Select Generate Workflow Fee from the Action drop-down list.
  6. Select a fee from the Fee Method drop-down list.
    The Subsystem parameter is automatically populated.
  7. Select a reason for charging the fee from the Reason Code drop-down list.
    This is an optional field.
  8. Select an A/R Class Code from the A/R override parameter if users can over the selected A/R Class.
  9. Select the following options:
    Allow User to Override A/R Class Code.
    Allow User to Override Fee.
  10. Click Save.


Documentation

To view this information in .pdf format, click on the following link:

ManagingFees.pdf

See Also

Managing Workflow Fees
Workflow Fee Editor

Workflow Kind and Category Editor
Workflow Kind
Workflow Category


101-wm-f06-fees


0 votes, average: 0.00 out of 50 votes, average: 0.00 out of 50 votes, average: 0.00 out of 50 votes, average: 0.00 out of 50 votes, average: 0.00 out of 5 (0 votes, average: 0.00 out of 5)
You need to be a registered member to rate this.
Loading...