CC – OpenForms Reference (OFR)

Cash Collection – OpenForms Reference (OFR)

Version 6.0 | Version 6.1

Overview

Cash collection standard OpenForms Reference distributed items include:

  • System Queries (Totals deposit queries … )
  • Dynamic Search Queries Forms (New search group and style)
  • Business Entity Model and Entities (Standards)
  • Cash Collection Form

The Database tables used in Cash Collection include:

  • CC_MASTER (key = BATCH_ID)
  • AR_BATCH_NO (key = BATCH_NO and BATCH_ID)
  • AR_DETAIL (key = BATCH_ID)

Govern IDs used for Cash Collection:

  • CC ID (1603)
  • Batch ID (roadmap)

Govern Access ID used for Cash Collection:

  • Any Govern ID
  • No Govern ID

System and Dynamic Queries

Deposit Form Total and Chart Queries
The following system queries are used to provide the totals on the deposit section of the cash collection.

  • CCIBldgCount Total Principal
  • CCcc003 Total Charges
  • CCcc004 Total Collected
  • CCcc002 Total Penalty
  • CCcc005 Total Discount

Dynamic Query Group

  • A/R Payment Data Entry (new) is the form default
  • New Search Queries linked to the A/R Payment Entry Group include:

Govern Views

  • View for A/R Description in CC and Receipt A/R Description to print (roadmap)

System Resources


Business Model and Entities (BED)

The Cash Collection Model (CC_CASH_COLLECTION) contains 2 business entities:

  • Deposit Management (AR_DEPOSIT)
    • Root entity of the form as the user must first select a deposit number before the data entry of payments
    • OpenForms entity (It is possible to setup new fields to be added to the deposit management divider of the form)
  • Cash Collection Master (CC_MASTER)
    • OpenForms entity with custom controls

Business Entities Setup (BED)

The following Standard OpenForms Features can be set-up in BED:
Model – Cash Collection (CC-001)

  • Used by Query Tool Property

Entity – Deposit Management (AR_DEPOSIT)

101-cc-frm-001-ofr(security).png
OFD Configuration – Click to Enlarge

Note is Required on Creation

  • Note is Allowed on Modification

Entity – Cash Collection Master (CC _Master)

  • Note is Required on Creation
  • Note is Allowed on Modification


Cash Collection Form (OFD)

Overview

The following controllers are used and system default options can be configured on the Cash Collection Form (cc001)

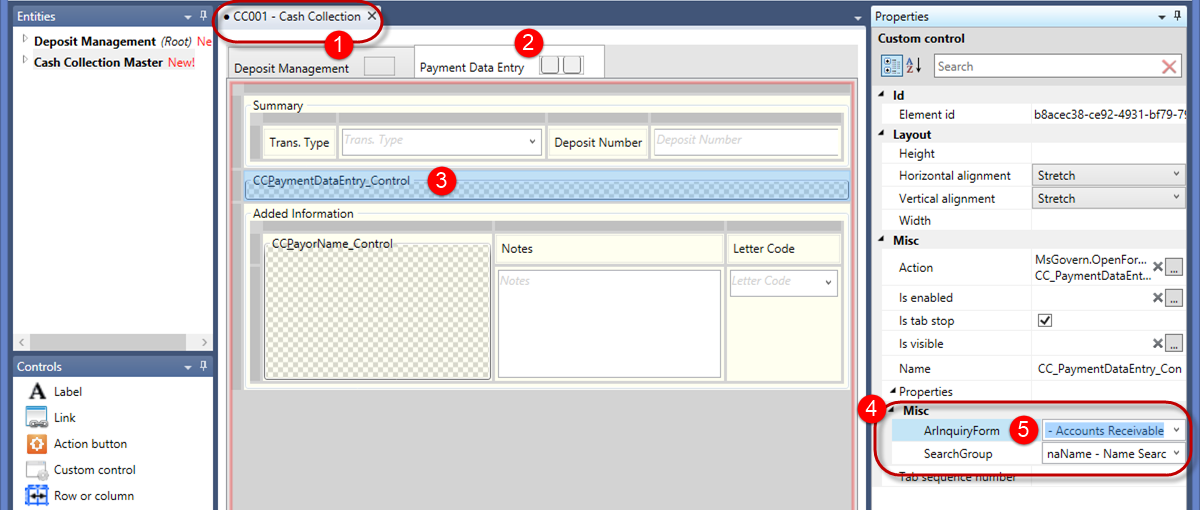
Payment Controller (CC_PaymentDataEntry_Control)
Click on the payment controller miscellaneous properties.

  • SEARCH GROUP
    • Styles from this group will be used in the search
  • AR INQUIRY FORM (Enable Auto-Launch)
    • Form to linked to when user double clicks on a A/R (Drill down)

Payer Name Controller

  • Payer Name (Used in Cash Collection to record the name)
    • Can Create Properties
    • Selected Search Group and Name and Address Form

Login as Administrator


Setup the Search Group

The following standard OpenForms features are setup:

Search Group

Payment Data Entry Controller CCPaymentDataEntry_Control

  • Click on the Payment Data Entry Tab
    • Click on the CC PaymentDataEntry_Control
    • In the Properties, expand Properties, expand Misc
    • Select the Dynamic Group to use in the Quick Search form


Enable Auto-Launch of A/R form (Drill Down to A/R Inquiry)


NEW! As of Release 6.0.1603.262 the Cash Collection Payment Data Entry grid can configured to exhibit a new behavior when the user double clicks on a line item.

OFD60_AR_CC_AutoLaunch_AR_cfg.png

To obtain this new behavior, configuration will need to occur in the Payment Data Entry tab of the Cash Collection OpenForm. This configuration is carried out using the OpenForms Designer (OFD). To make this change in the OFD…

  1. Open the CC001 – Cash Collection Form
  2. Click to select the Payment Data Entry tab
  3. Locate and click on the CCPaymentDataEntry_Control.
  4. On the right hand side, Properties pane, locate and expand the Misc section; set the ArInquiryForm parameter to AR008 – Accounts Receivable.
  5. Click Save.


Behavior in Govern

In Govern, when users are in the Cash Collection form, click on the Cash Collection Data Entry tab. A double click on a line item in the grid will load the Accounts Receivable (AR008) form.


101-cc-ofr


0 votes, average: 0.00 out of 50 votes, average: 0.00 out of 50 votes, average: 0.00 out of 50 votes, average: 0.00 out of 50 votes, average: 0.00 out of 5 (0 votes, average: 0.00 out of 5)
You need to be a registered member to rate this.
Loading...

CC – OFR Text Error Messages

Cash Collection – OpenForms Reference (OFR) Text Error Messages

Version 6.0 – Version 6.1 (under review)

Overview

Resources

Cash Collection Error Messages

Key Resources Message
CC CC_PaymentDataEntry,INVALIDCHANGETOTOTALTOPAY The amount to redistribute must be lower or equal to the actual total payable amount ($ {0}).
CC_PaymentDataEntry,ChangeLessCashValidation Change Must Be Less than Cash Amount
CC_PaymentDataEntry,MoneyMustBeZeroValidation Money Must Be Zero
CC_PaymentDataEntry,PayerNameRequired Payer Name Is Required
CC_PaymentDataEntry,PaymentTypeRequired Payment Type Is Required
CC_PaymentDataEntry,TotalToPayGreaterZero Total To Pay Must Be Positif
CC_PaymentDataEntry,MIX_AMOUNT_TYPES_ERR Credit Card payments must be kept separate from Cash and Check payments for Deposit Number {0}, due to the administrative setup
CC_PaymentDataEntry,MinimumPaymentIs The Minumum for the payment is {0}
CC_PaymentDataEntry,MinimumToCollectStringFormat Minimum To Collect = {1}
CC_PaymentDataEntry,MinimumToCollectHeaderError There are minimum to collect errors for:
CC_PaymentDataEntry,MinimumLateChargesStringFormat Late Charges = {1}
CC_PaymentDataEntry,MinimumLateChargesHeaderError Payment cannot be less than the late charges For:
CC_PaymentDataEntry,OnEffectiveDateChangedValidation Changing Effective Date will recalculate all amounts. Are you sure you want to continue ?


See Also

AR OBJECT Error Reporting


0 votes, average: 0.00 out of 50 votes, average: 0.00 out of 50 votes, average: 0.00 out of 50 votes, average: 0.00 out of 50 votes, average: 0.00 out of 5 (0 votes, average: 0.00 out of 5)
You need to be a registered member to rate this.
Loading...


101-cc-resources

CC – Cash Collection Receipt Log

Cash Collection Receipt Log

Version 6.0 | Version 6.1

Overview

To be developed. Refer to the Govern Roadmap.


101-cc-rpt-057-ReceiptLog-backlog


0 votes, average: 0.00 out of 50 votes, average: 0.00 out of 50 votes, average: 0.00 out of 50 votes, average: 0.00 out of 50 votes, average: 0.00 out of 5 (0 votes, average: 0.00 out of 5)
You need to be a registered member to rate this.
Loading...

Dataset Treeview

Dataset Treeview

Overview

Datasets that appear in the Dataset Treeview are populated with the results of searches made through the Search form. Records that are loaded into the Dataset Treeview may be appended to through the Saved Dataset pane, or deleted directly in the Treeview pane.

Populating the Dataset Treeview

To populate the Dataset Treeview with search results…

  1. When the Predefined Searches pane is in its default position, place your mouse pointer over the tab to display the search form (A).
  2. In the form perform a search type; for this example we will perform a property search by P_ID.
  3. Click Search for Result.
  4. Search results will be displayed in the lower portion of the search form.
  5. Click Load to the search result to transfer the search result records to the Dataset Treeview pane.
  6. If the Dataset Treeview pane is not displayed, click its tab at the bottom of the pane.


The Treeview Explorer

The Treeview Explorer displays record information in a hierarchical arrangement. In the Treeview panel, you are able to expand or contract a record by clicking on the arrowhead icons.
For example, on a search that retrieves tax map records, when you double-click on the tax map, it lists name information at the next level. Each item can be expanded to show specific data on the property, such as owner and occupant names, parcel information and location, permits, utility billing and accounts receivable records.
As you select each level of information, the data is displayed in the appropriate OpenForm when it is displayed on the right hand side.

Record Edit Confirmation

When a dataset has been loaded, it is easy to select and begin to edit a record. This ease of selection may at times be a detriment as at times the wrong record may be selected, and the user immediately begins to edit in error. It has been determined that if a secondary confirmation is introduced during the record selection process, there is less chance of erroneously editing the wrong record.

Through the Govern New Administration (GNA), the Record Edit Confirmation option can be enabled to add a secondary confirmation. When Record Edit Confirmation is enabled, after the user selects a record, they are obliged to click on a secondary icon (A), to fully unlock the record for editing.

To enable Record Edit Confirmation…

  1. In GNA, select System Parameters (tab) > General Connection Parameters.
  2. In the General Connection Parameters form, locate the Organization Parameters group and select The user must explicitly enable editing for each parcel option.
  3. Click Save to save the option.
  4. To close the form, click Exit.

When this option is enabled, after loading a dataset, users may still select a record for editing, but the selected record will have an icon beside it. The user must click the icon in order to fully unlock the record for editing.

System Architecture

For all details regarding the Govern Treeview Architecture, refer to 101-std-fea-005-Treeview_Architecture.

What’s New

Context Menu in Dataset Treeview

NEW! Users of the Dataset Treeview will note that when it is populated with one or more records, there is a description for each record. This description can be a Parcel ID, an Account Number, and so on. A quick method of deleting individual records is to hover the mouse pointer over a record. When the width of the Dataset Treeview pane is wide enough, placing the mouse cursor over the description will display an “x” that can be used to remove the record. Unfortunately when there is insufficient space, i.e. the space is not wide enough to display the full description, the “x” is not visible. To address this situation a context based menu has been added to the interface.
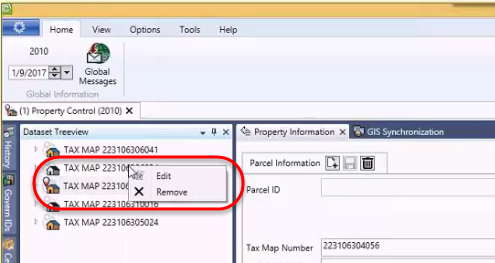
TreeviewContextMenu00.png
To display this menu…

  1. Right click on the record of interest in the Dataset Treeview.
  2. In the floating menu, you now have option for additional functions that appear beside the record when the entire line is visible.

By default, there will be an option to “[x] Remove”. When there are other options, e.g. Edit, they will also be presented in the menu.
This feature is available in the following releases: 6.0.1611.0067 / 6.0.1702.0080 / 6.1.1611.0060 / 6.1.1702.0121

Reposition

Previously, when performing a search of records with the same NA_ID but multiple ST Account numbers, when you copy the record to the Treeview, the system would only select the first account. Now the selected record will be sent to the Treeview. (Available in release 6.0.1503)

Hibernate Mode

This behavior of selecting only the first account also applies to the Hibernate process. As Govern is restored from a hibernation if a second or third account is selected before hibernation, when the application is restored, although the NA_ID is correct, only the first account will be displayed.

Load to Treeview and Add (Append)

As data is loaded or appended to the Treeview from the Search, or the Saved Datasets form, the following rules apply:

  • When a record is selected for append, only new files will be loaded. If previously loaded, the file will not be reloaded into the Treeview.
  • If no search result is selected, the Add to Search Results button will be disabled.

Hibernate

Previously the Hibernate would store the NA_ID of the records displayed in the various panes that are opened in the interface. Now to maintain the fidelity of the hibernated user environment, all Govern ID’s are used; i.e. NA_ID, P_ID, ST_ID, and so on.

NOTE: User Hibernate information is stored by user in (Table: USR_HIBERNATE). The following query will display the hibernation information for “userName”

SELECT *
FROM USR_HIBERNATE
WHERE USR_ID = ‘userName’;

Treeview Synch
In Govern for VB6, external tables (PC_EXTERNAL, NA_EXTERNAL, and PM_EXTERNAL), were used by external applications and reports to automatically know the current recordset and currently viewed parcel. In Govern release 6.0 and upwards, these external tables are being phased out and the functionality provided by them will need to be reproduced.

NEW! The Treeview sync. feature saves the contents of the current profile in (Table: USR_SAVED_DATASETS) with a “Saved Dataset” name of “AUTOSAVE” under (Column: USR_SAVED_DATASETS.SAVED_SET_NAME). Should a profile be changed, the dataset loaded in the Treeview will be automatically synchronized to (Table: USR_SAVED_DATASETS).
This feature recreates the functionality provided by the three (3) external tables that were used in Govern for Windows, (Tables: PC_EXTERNAL, NA_EXTERNAL, and PM_EXTERNAL). For example users could run a batch process on a saved external dataset as opposed to a set range.

NOTE: In release 6.0 a simultaneous save will be made to (Table: PC_EXTERNAL) and (Table: USR_SAVED_DATASETS), Tables NA_EXTERNAL and PM_EXTERNAL are no longer supported.
In release 6.1, all three (3) tables PC_EXTERNAL, NA_EXTERNAL, and PM_EXTERNAL will not be supported.

  • PC_EXTERNAL (Supported in release 6.0; not supported in release 6.1)
  • NA_EXTERNAL (Not not supported in release 6.0 and 6.1)
  • PM_EXTERNAL (Not not supported in release 6.0 and 6.1)

Enabling “Synchronize Dataset Treeview”

This feature is enabled in the User Registry through the User Registry Manager. The Options button is located below the Govern suite button in the Govern User Interface.

  1. Click the Options button; click Options.
  2. In the Registry Manager form, verify that the Registry Filter is set to User ID.
  3. Under the Section Name column, locate Synchronize Dataset Treeview; click to select the option under the Key Value column.
  4. Click Save to save your changes.

When you return to the Govern interface, the Treeview Sync. icon will be enabled. This is a toggle, i.e. ON/OFF button that will enable or disable the feature.

Location of Data

As indicated above, all data will saved in (Table: USR_SAVED_DATASET). Associated columns are as follows:

COLUMN DESCRIPTION
USR_ID User ID
SAVED_SET_NAME By default will be AUTOSAVE
REF_TYPE “P_ID”, “NA_ID”, etc. Based on the profile Key Type
SORT_SEQ Order in the Treeview
IS_CURRENT TRUE if the current item in the Treeview

NOTE: All data will be saved based on the Key Type of the profile. This is done so as to support multiple Key Types at the same time.

  • The data is not saved by profile, so the synchronization for a Key Type will be done on the last active profile using that key type.

The desired behavior when there is more than one Treeview dataset for the same ID Type is to perform a reload when the user switches from one instance to another.

Business Rules

Programmers should note the following Business Rules.

When Parameters Change:

  • From TRUE to FALSE – Delete all SAVED_SET_NAME that have a status of “AUTOSAVE” and replace the value with the current USR_ID
  • From FALSE to TRUE – Delete All SAVED_SET_NAME equal to “AUTOSAVE” and replace with the current USR_ID and current REF_TYPE
    – Insert Into USR_SAVED_DATASET based on the tree view data
    – Starts monitoring Dataset tree view changes

When Opening Govern (Before opening Profiles):

  • Starts monitoring Dataset tree view changes if Flag is on

When monitoring Dataset tree view changes:

  • If Active profile changes – Delete All SAVED_SET_NAME equal to “AUTOSAVE” and replace with current USR_ID and current REF_TYPE
    – Insert Into USR_SAVED_DATASET based on the tree view data
  • If Treeview is replaced (By eSearch / QueryTool / Matix/…); i.e. a Load
    – Delete All SAVED_SET_NAME equal to “AUTOSAVE” for current USR_ID and current REF_TYPE
    – Insert Into USR_SAVED_DATASET based on the Treeview datazzz
  • If an item is added into the Treeview (By eSearch / QueryTool / Matix /…); i.e. Add Or AddAndReposition
    – Insert the new item into USR_SAVED_DATASET
  • If an item is removed from the Treeview (using the X button); i.e. Remove
    – Delete the new item into USR_SAVED_DATASET
  • If the active item changes in the Treeview; i.e. Reposition()
    – Update IS_CURRENT in USR_SAVED_DATASET
NOTE: This is done by setting the current id to -1 and setting the prior id to 0


NOTE: Always hide AutoSave SAVED_SET_NAME from saved dataset functions

  • V6.0 (only) – PC_EXTERNAL will need to be maintained at the same time
  • V6.1 – All three (3) tables, PC_EXTERNAL, PM_EXTERNAL, and NA_EXTERNAL are to be removed.

Related Topics

Dataset Treeview Temporary Records

Forms Explorer
Reports Explorer
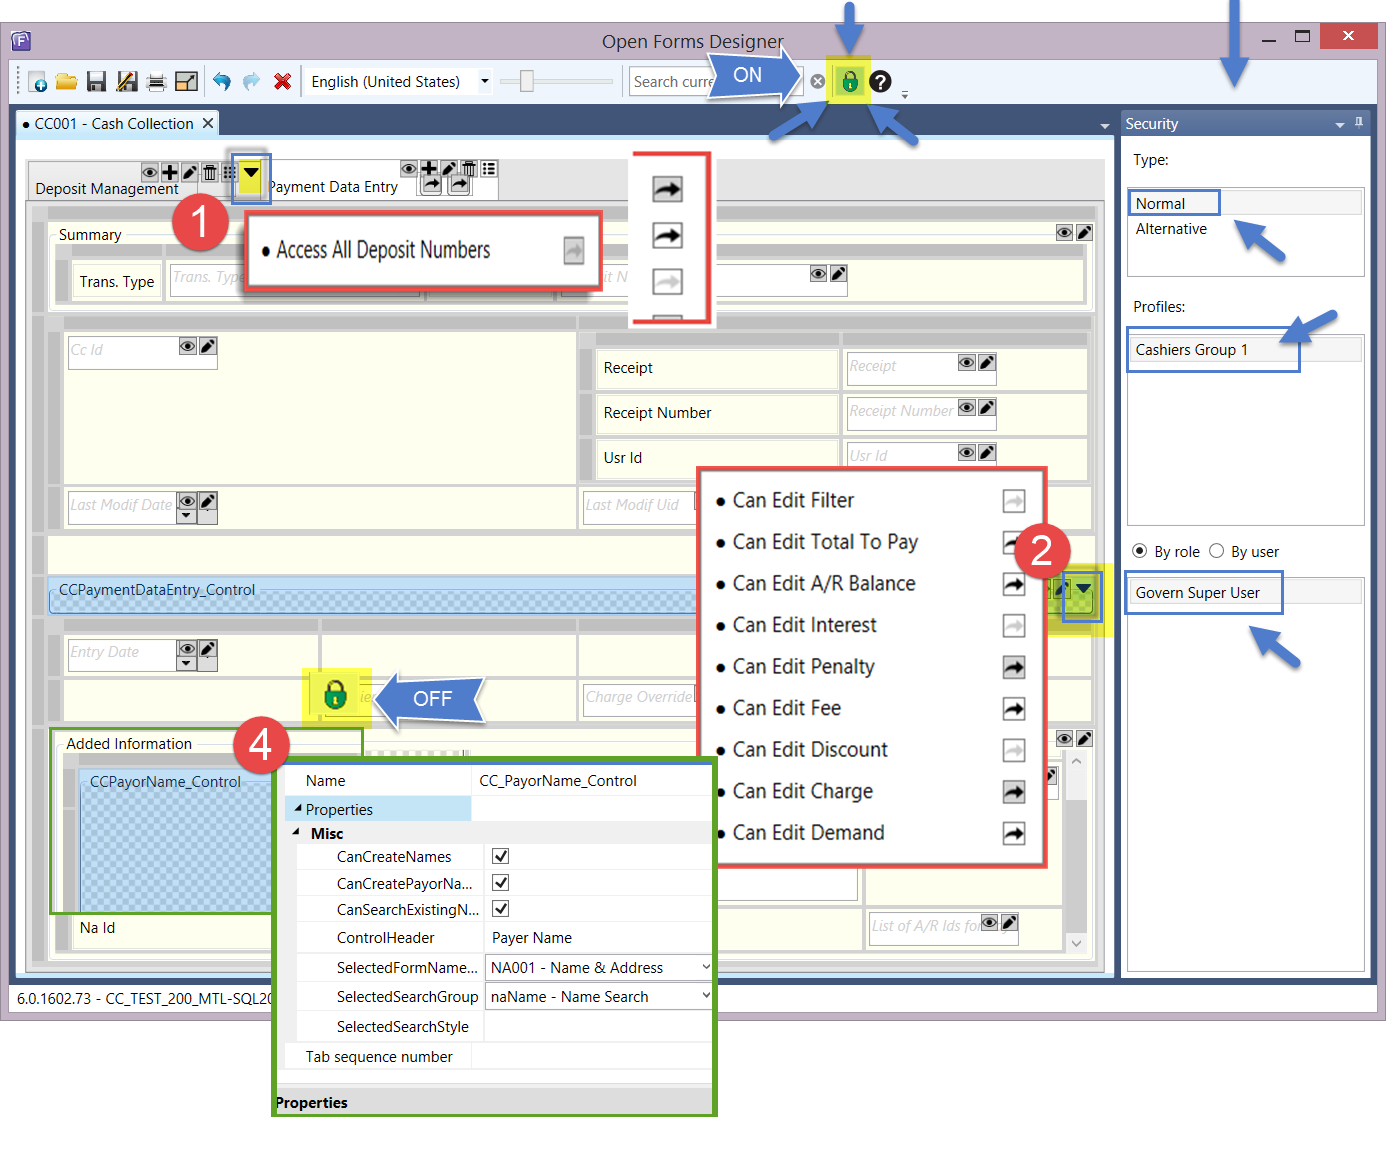


101-std-fea-005


0 votes, average: 0.00 out of 50 votes, average: 0.00 out of 50 votes, average: 0.00 out of 50 votes, average: 0.00 out of 50 votes, average: 0.00 out of 5 (0 votes, average: 0.00 out of 5)
You need to be a registered member to rate this.
Loading...


AR Payer Name Controller Setup

A/R Payer Name – Controller Setup

Overview

The Payer Name custom control is a standard feature that is used in the Payment forms.
Used in the standard Govern Cash Collection and Lockbox forms.

What’s New

[6.0.1611] Previously, when creating a new payer name, only the link was created and the user had to click on the link to update the payment information. The controller was changed in order to open the Name and Address form when creating a new payer.
The Name and Address form will be displayed. Fast Name Creation must be checked. If not checked, the name and address record will be created and only the name id will be displayed. Recommended for the Lock Box.

Configuration

Business Entity Designer (BED)

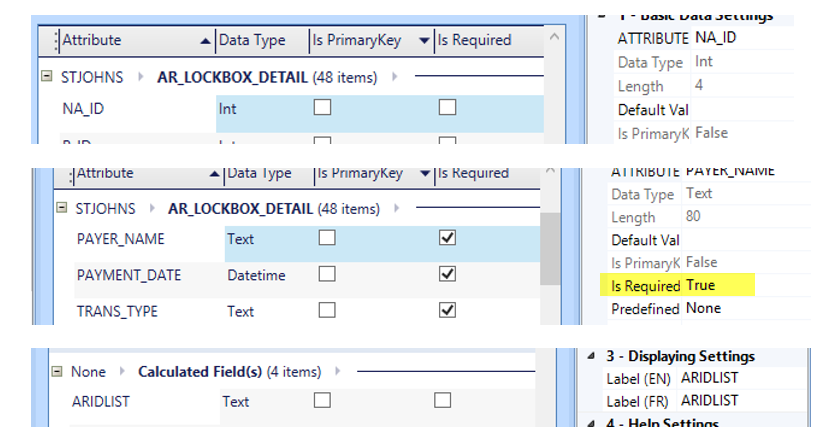
The following three (3) attributes are required on business entities used in the forms:

Required Fields

  • AR_ID
  • PAYER_NAME
  • ARIDLIST (a calculated field); this is the list of ArId’s used to find the last payer that the controller needs to manage; e.g. 12344;40004;34222.

101-ar-fea-021-ofr-ui-1.png
LockBox Forms


OpenForms Designer (OFD)

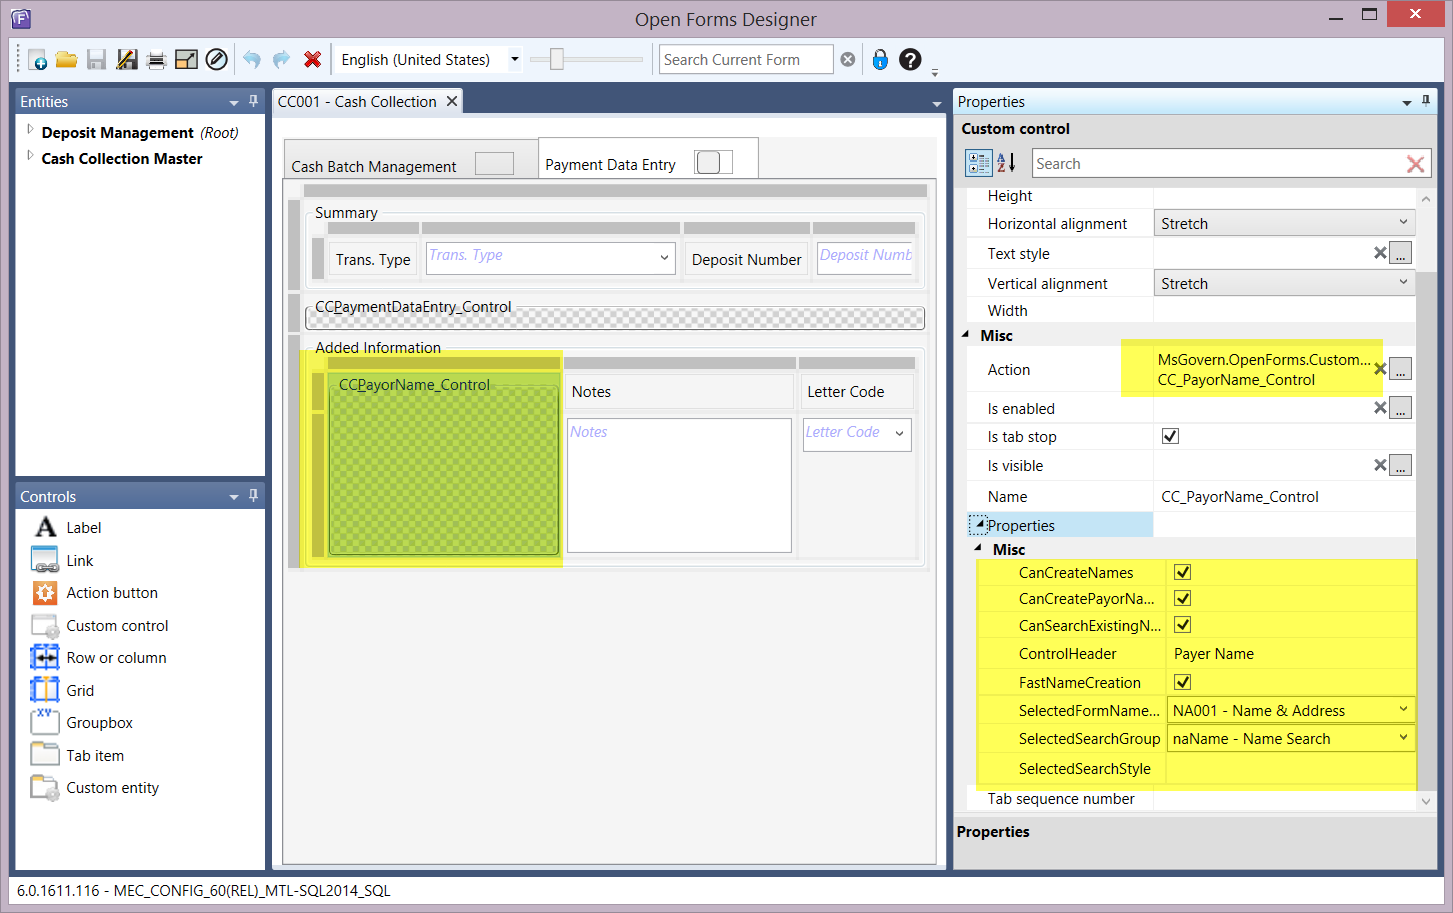
The following are configured in the OFD.

  • Select a Dynamic Search group
  • Select a form to open when the users clicks the button
  • Enter a description for the header
  • Selection any combination of the following options in the Misc Properties group to determine:
    • CanCreateNames – The users can create a new name if they have the proper security to the Name and Address form.
    • CanCreatePayorNames – Allows the creation of a new name without an NA NAME record. The name created will be recorded only in CC MASTER.
    • CanSearchExistingNames – The users will be able to search for an existing name.
    • Fast Name Creation – If not checked, when a new name is created, the form listed below (Name and Address) will be displayed so that the user can enter the name and address information. If not checked, a record will be created in Name and Address and the name id will be displayed.
    • Selected Form Name – Form that will be open when the user clicks on the name link or creates a new name with the option fast name create
    • Selected Search Group – Dynamic Search Group to use when searching for an existing name
    • Selected Search Style – Dynamic Search Style (if entered, only the search style will be listed on the search form)


cc-PayorName_Control

101-ar-fea-021-ofr-ux.png

Payer Name Control setup (cc_payer_name)


101-ar-fea-021-ofr


0 votes, average: 0.00 out of 50 votes, average: 0.00 out of 50 votes, average: 0.00 out of 50 votes, average: 0.00 out of 50 votes, average: 0.00 out of 5 (0 votes, average: 0.00 out of 5)
You need to be a registered member to rate this.
Loading...

Standard AR Controller – Create A/R (101-ar-fea-022)

Standard Accounts Receivable (A/R) Controller – Create A/R

Overview

This new standard controller can be setup on different Account Forms (Real Property, Misc. Billing, Self-Reported Tax…) in order to provide the user with an Action Button to create an A/R summary record on demand. With the A/R record, it will be possible for the users to enter deposits or voluntary payments against this Account.

  • The Create A/R button can be used for all Sub-Systems (Real Property, Self-Reported Tax, Personal Property, Miscellaneous Billing, etc.)
  • The Create A/R button is only available after an Account is created and saved where no A/R records associated to the account exists.
  • Once the Create A/R action has been executed, the button becomes disabled.
  • The A/R record created will match the System Registry A/R Sub-System rules (by name, by parcel, by year), etc. as configured in the A/R General Parameters Sub-System parameters.
  • This action button can be secured by profile user and role.

Configuration

This controller is used in different standard Forms distributed with the system. It can also be added and configured on a customized form.
To add or configure this controller on a form click below:


Related Topics

Standard A/R Controller Configuration (101-ar-fea-022-ofr)

Accounts Receivable Parameters (103-ar-parm-General)


101-ar-fea-022


0 votes, average: 0.00 out of 50 votes, average: 0.00 out of 50 votes, average: 0.00 out of 50 votes, average: 0.00 out of 50 votes, average: 0.00 out of 5 (0 votes, average: 0.00 out of 5)
You need to be a registered member to rate this.
Loading...

AR – Controller Config – Create AR Payment

Standard Accounts Receivable (A/R) Controller – Create A/R Payment (Configuration)

Overview

This standard OpenForms Action Button controller can be added to a form to provide an Action Button to create the Accounts Receivable payment.

This controller is available in GA Release 1706

  • For more information on the functionality, see Product Information (101-ar-fea-024).

Prerequisites

The following conditions are required in order to enable the Controller in OpenForms Designer Setup

  • The organization is licensed for the Accounts Receivable Sub-System to setup
  • The configuration for the Accounts Receivable has been completed
  • The Form’s ID Setters Properties must contain the …
  • The Govern ID must be …

Profile Security

  • The user must have security access (GSM) to the profile’s form.


101-ar-fea-022-ofr-UI.png
Action Button Controller Properties


Controller Setup

Adding a Custom Control to a Form

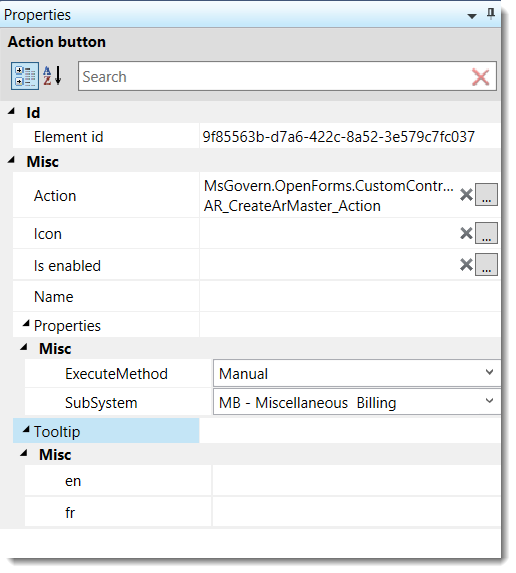
  • In OFD, drag the Action Button Control Icon to the Account Entity Tab on the form.

Custom Control Form Configuration

Once the Custom Control is displayed on the form, click on the object to configure the:

  • Assembly Name = Msgovern.OpenForms.CustomControls.dll (by default)
  • Class Name = AR_CreateARMaster_Action

User Interface (UI)

  • Icon
  • Is enable: An expression can be added to control the enabling (Can be executed) of the button.

Controller Properties

The following controller properties need to be set:

Sub-System

  • Select the sub-system for which the A/R Summary Record needs to be created.

Related Topics

For more information, see:

Troubleshooting

  • The Organization must be a licensed user of the A/R Sub-System selected.


101-ar-fea-024-ofr


0 votes, average: 0.00 out of 50 votes, average: 0.00 out of 50 votes, average: 0.00 out of 50 votes, average: 0.00 out of 50 votes, average: 0.00 out of 5 (0 votes, average: 0.00 out of 5)
You need to be a registered member to rate this.
Loading...