AR – Search to Load Data (101-ar-fea-026)

Accounts Receivable (A/R) Search to Load Feature

Available in Govern Rel. 6.0/6.1

Overview

Selecting a Record Key from the DataSet TreeView will load AR Data, the form also has a feature that allows you to search for keys to load the data. The key is then sent to the TreeView as a Temporary Key to allow the application to recalculate information based on that key.

Demonstration of the Temporary Key

To demonstrate the functioning of a Temporary key in Govern, follow these steps:
Preparatory steps:
  1. Search for a few records to add to the Treeview from the eSearch then open the AR Inquiry form.
  2. Search for a key that contains a field that is of the same type as the profile and is already in the Treeview. It gets selected.
  3. Perform Step 1) but for a key that isn’t in the Treeview already. It gets added, selected, 1st and orange background.
  4. Perform Step 2). the key added by 2) gets replaced by this new one.
  5. Repeat Step 1). notice that the same result and the one added in Step 3) remains.
  6. Perform a search for a key that doesn’t contain a field that matches the Treeview key. The description is based on the Main ID of the key.
  7. Manually remove the temporary key from the Treeview and search for it again. It gets added as Temporary again.

Related Topics


101-ar-fea-026


0 votes, average: 0.00 out of 50 votes, average: 0.00 out of 50 votes, average: 0.00 out of 50 votes, average: 0.00 out of 50 votes, average: 0.00 out of 5 (0 votes, average: 0.00 out of 5)
You need to be a registered member to rate this.
Loading...

MA – M&S Valuation Setting Editor (103-ed-025)

Valuation Setting Editor (Marshall & Swift MVP Interface)

Available in release 6.1.2211 – (In Development)

Overview

Marshall & Swift (M&S) is a cost-based appraisal methodology intended to value buildings and non-buildings improvements using the reconstruction cost method. It comes with two different valuation approaches, one for residential properties and one for commercial ones. This appraisal method is rarely used to produce final values but often used to provide a comparison point with other value types such as comparable sales or market values (MRA). The Marshall & Swift Valuation Platform Online (MSVPO) integrates with Computer Assisted Mass Appraisal (CAMA) systems via web services hosted by CoreLogic®.

Purpose

In Govern for Windows, M&S was offered as a special set of configurations within the Building Structural Element (BSE) function. An interface was developed to periodically load M&S valuation tables within the Govern BSE tables from the M&S database tables.

A different approach has been taken with OpenForms v6.1. In OpenForms, a new M&S API was developed to support the MSVPO interface for both residential and commercial valuations.

M&S In Govern

New admin parameters have been created as well as new database table structures that are specific to M&S. An internal API or data exchange tool will be needed for each Harris Govern product line to read/write the data from/to our product specific format (either in the legacy improvement tables or in new ones).

With the implementation of the new MSVPO API, a conversion tool has been created to convert the legacy M&S data into the new format.

The CoreLogic MSVPO API has been developed by CoreLogic as a public facing Web Service. This MSVPO service has been leveraged for Govern development.

The system defaults are by year and valuation types. As the M&S tables determine the type of computation, residential or commercial, the interface offers two entries, one for the Residential valuation method and one for the Commercial valuation method.

Valuation Settings Editor User Interface (UI)

The Valuation Setting Editor interface is located in the Govern New Administration (GNA)

To access the UI in GNA…

  1. On the GNA ribbon click Editors (tab) > Valuation Settings Editor
  2. The Valuation Settings editor will be displayed.

<–>

Valuation Settings Editor Setup Parameters

Valuation Settings Form – tab buttons

New – Click New to create a new Valuation Setting record.

Save – After completing the required parameters, click Save to save your Valuation Settings.

Delete – Click Delete to delete the currently selected valuation settings record

Refresh – To update the settings in the form with those of the M&S Valuation tables, click Refresh.

Valuation Settings Form – parameters

Description – Enter a descriptive name for the new valuation settings record.

Commercial / Residential – These options refer to the valuation method; select which type of table will be obtained from the M&S tables, e.g., Commercial or Residential.

Years – This column lists the valuation type and corresponding year that are available.

Year – This field that will indicate the year of the currently selected record.

Residence Type – This optional parameter is a drop-down menu that displays the residence types available in the Marshall & Swift (M&S) tables.

NOTE: This parameter is disabled when the valuation method selected is Commercial.

Default Style – When a Residence Type is selected, all possible styles will be displayed.

NOTE: This parameter is disabled when the valuation method selected is Commercial.

Valuation Date – All valid valuation dates will be displayed in this drop-down menu

Base Date – Select a Base Date from the date picker; this is a value that is less than or equal to the Valuation Date. The default is the Valuation Date.

Multipliers (group)

The local multiplier adjusts the calculated costs to the location of the building. Commercial Estimator automatically uses a local multiplier based on the ZIP or Postal Code entered on the General Information screen.

Local Multiplier – Enter a value to set the Local Multiplier; this parameter accepts values between 0.10 and 3.00.

Local Multiplier Adjustment Percentage – The Local Multiplier Adjustment is used to increase or decrease costs for unusual situations, such as remote locations, resort locations, shortages, surpluses, and so on. Enter a positive or negative percentage to increase or decrease the local multiplier. Accepted values are -50.00 to 200.00

Regional Multiplier – Accepted values for this parameter are 0.10 to 3.00.

NOTE: This parameter is disabled when the valuation method selected is Commercial or when the Regional Multiplier parameter is not set.

Manufactured Home Mult. Type (group)

Manufactured homes are residential structures built on steel undercarriages with necessary wheel assemblies to transport them to permanent or semi-permanent sites.

Use Regional Multiplier / Use Local Multiplier – Select either Use Regional Multiplier or Use Local Multiplier.

NOTE: This parameter is disabled when the valuation method selected is Commercial.

Effective Age Adjustment Value – When entering an Effective Age Adjustment Value, accepted values are 020.

Rounding Value – Accepted Rounding Values are 01000000.

Architect Fee Percent – Valid values for the Architect Fee Percentage is 0.00100.00.

Depreciation Percent Adjustment Value – Refer to MPV Commercial 2.1.3 & 8.6.3 and MPV Residential 2.1.4 & 7.8.3 for more information.

US Localization Type (group)

Select one of the available three (3) options, 3-digit only, 5-digit only, or 5-digit or 3-digit.

Depreciation Percent Apply Flag – Select True or False ; See MPV Commercial 8.6.2 and MPV Residential 7.8.2 for details

Depreciation Maximum Percent – Refer to MPV Commercial 2.1.3, 8.6.3 & 8.6.4 and MPV Residential 2.1.4 & 7.8.4 for details.

Section Depreciation Maximum PercentSee MPV Commercial 2.1.3, 8.6.3 & 8.6.4 and MPV Residential 2.1.4 & 7.8.4 for details.

Zone Information Adjustment Override (group)

NOTE: The Zone Information Adjustment Override frame is only available when the valuation method selected is Residential.

Target Zip Code – Enter the zip code of the required area on the M&S table.

Energy Zone – Select an Energy Zone, e.g., Moderate.

NOTE: This parameter is enabled only if a Target Zip or Postal Code has been entered.

Foundation Zone – Select a Foundation Zone.

NOTE: This parameter is enabled only if a Target Zip or Postal Code has been entered.

Hillside Construction – Choose a value from the drop-down menu; e.g., Flat.

NOTE: This parameter is enabled only if a Target Zip or Postal Code has been entered.

Seismic Zone – Choose a value from the drop-down menu.

NOTE: This parameter is enabled only if a Target Zip or Postal Code has been entered.

Wall/Energy Zone – Select a Wall Energy Zone code; e.g., 2×4 Base Cost.

NOTE: This parameter is enabled only if a Target Zip or Postal Code has been entered.

Wind Zone – Select a Wind Zone code.

NOTE: This parameter is enabled only if a Target Zip or Postal Code has been entered.

Documentation

When documentation is available click here to view it.

GNA Product Map


103-ED-025


0 votes, average: 0.00 out of 50 votes, average: 0.00 out of 50 votes, average: 0.00 out of 50 votes, average: 0.00 out of 50 votes, average: 0.00 out of 5 (0 votes, average: 0.00 out of 5)
You need to be a registered member to rate this.
Loading...

AR Payment Transfer (101-ar-fea-028)

Accounts Receivable (AR) Feature – Payment Transfer

Overview

The Accounts Receivable Inquiry form displays transaction details on the selected account, including historical data. This form is linked to the master file of each subsystem so that you can access all the A/R information available on a given property or taxpayer name and address record.

Payment transfers are used to transfer posted payments from one account to another. Typically, they are used to correct an error such as a payment made and posted to the wrong account. For example, a client could make a payment intended for a utility bill that is somehow processed on a tax bill. To correct this error, you can create a Payment Transfer.

Functionalities

Creating a Payment Transfer

To create a payment transfer:

  1. Open a record.
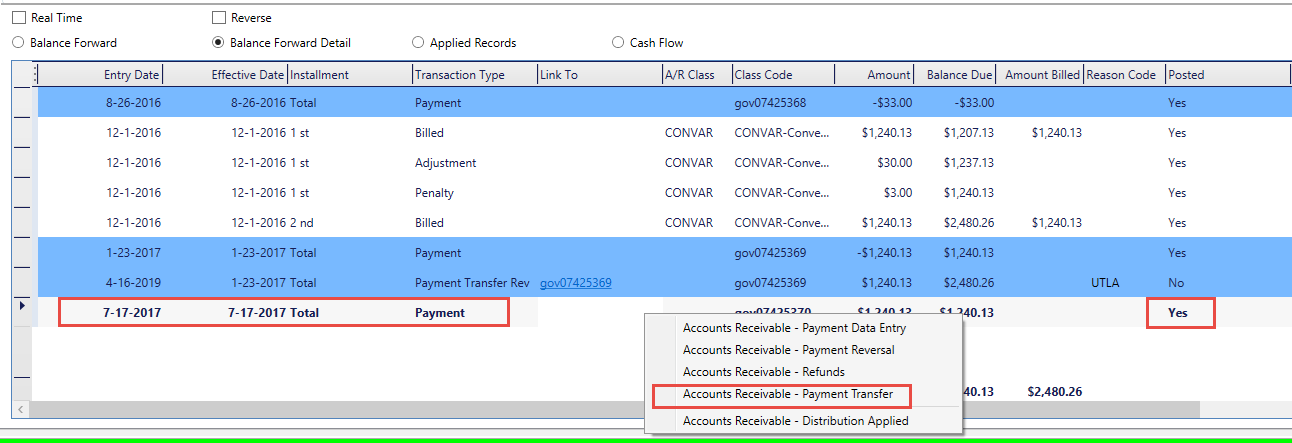
  2. In the A/R Inquiry screen right click on a Posted payment line item
  3. On the floating menu select Account Receivable – Payment Transfer

Read More...


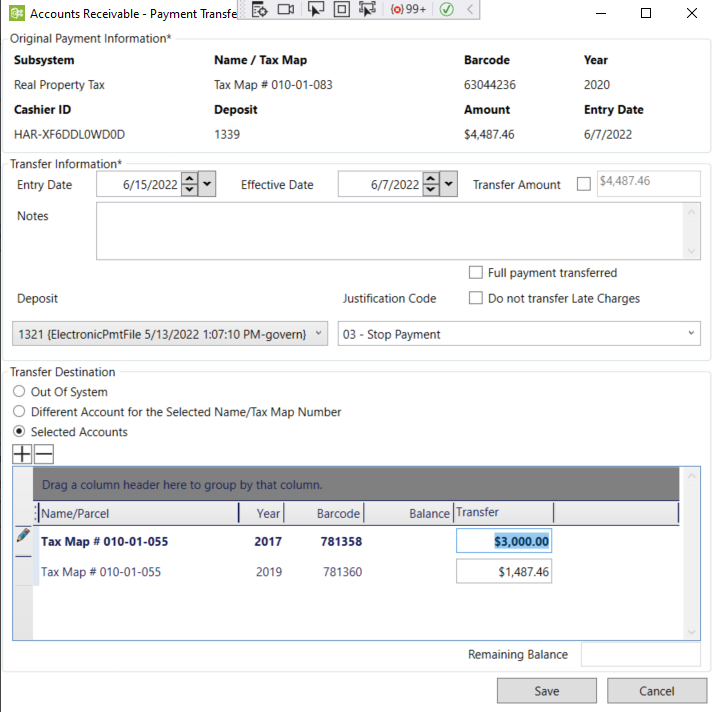
4. The Accounts Receivable – Payment Transfer form is displayed.

5. On the form click to select a transfer destination; Out Of System, Different Account for Selected Name/Tax Map Number, or Selected Accounts.

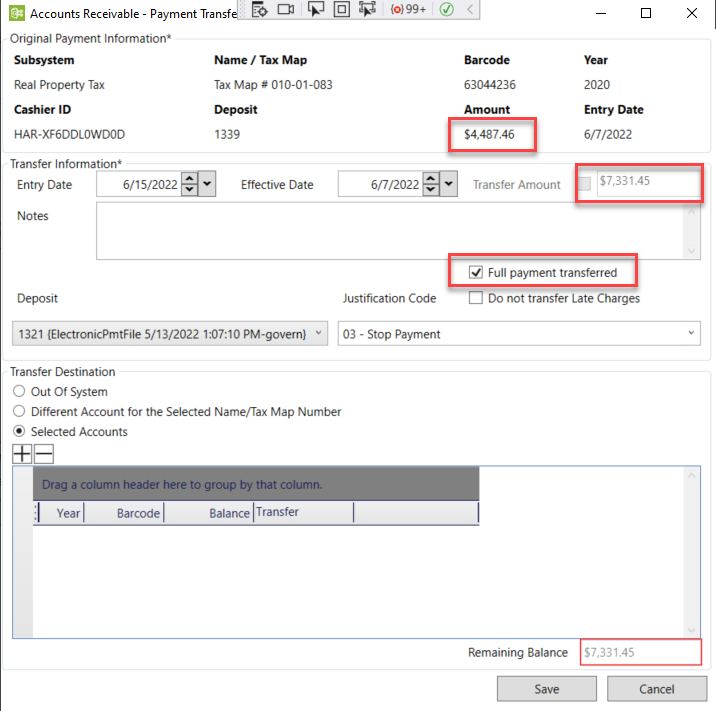
Full payment transferred

If the Full payment transferred option is checked…

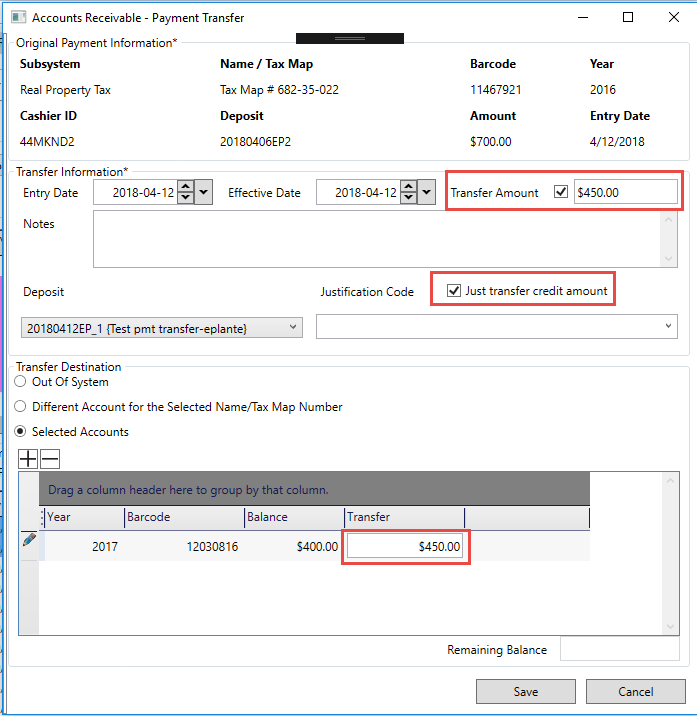
In the Original Payment Information, the Amount listed is for the selected AR_ID, which is not necessarily the full payment. If Full payment transferred checkbox is checked, in the Transfer Information section, the Transfer Amount is updated to reflect the full payment amount, including all AR_ID’s attached to the payment. The same is done to the Remaining Balance in the Transfer Destination area.

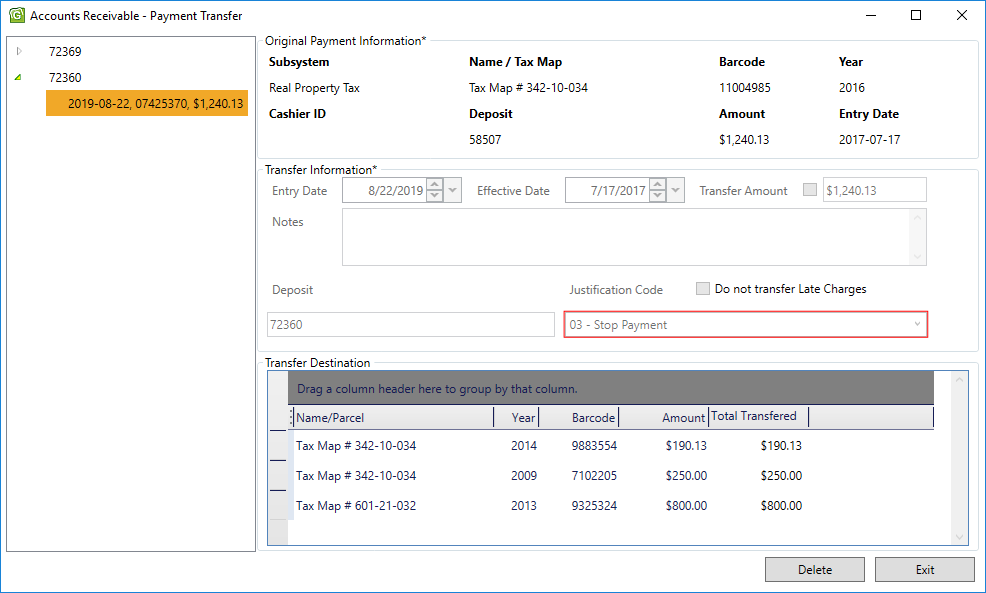
Changing a Payment transfer

Example: When a Payment only deletion is permitted.

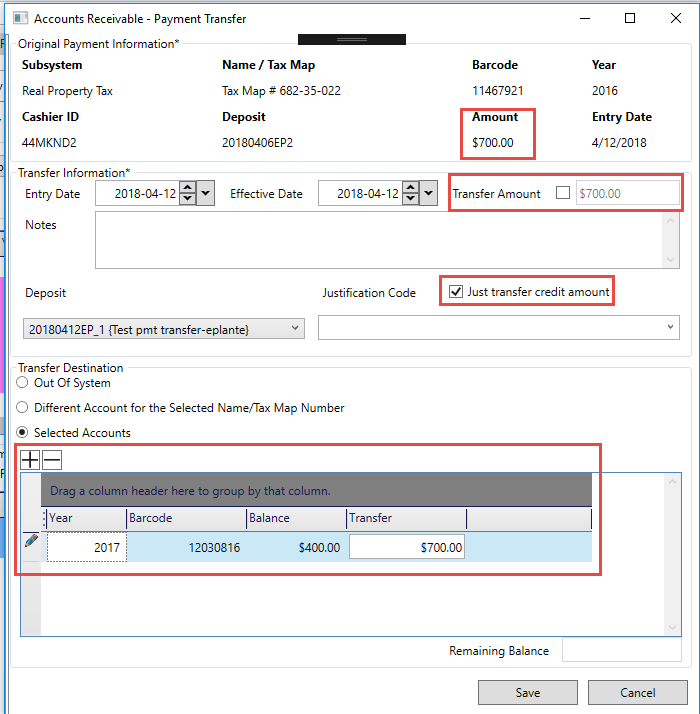
Do not transfer late charges (Just transfer credit amount)

When the Do not transfer late charges option is not selected, i.e. the default, both the principal and interest are transferred.

When the Do not transfer late charges option is selected, only the principal is transferred. This option is useful if the penalty and interest are calculated separately. There was a client that had that need.

NOTE: This applies to full payments, only. In instances of partial payments, the interest is not transferred, only the principal.


DEV NOTE: As stated above, a functionality of this feature when modified will only transfer the OCH part of the payment. Since partial payments do not transfer late charges by default a partial payment = OCH amount will do just that. If required by users, this change to functionality can be requested through Govern Customer Support.

Scenarios

Over-payment with Interests and penalties

Preparation

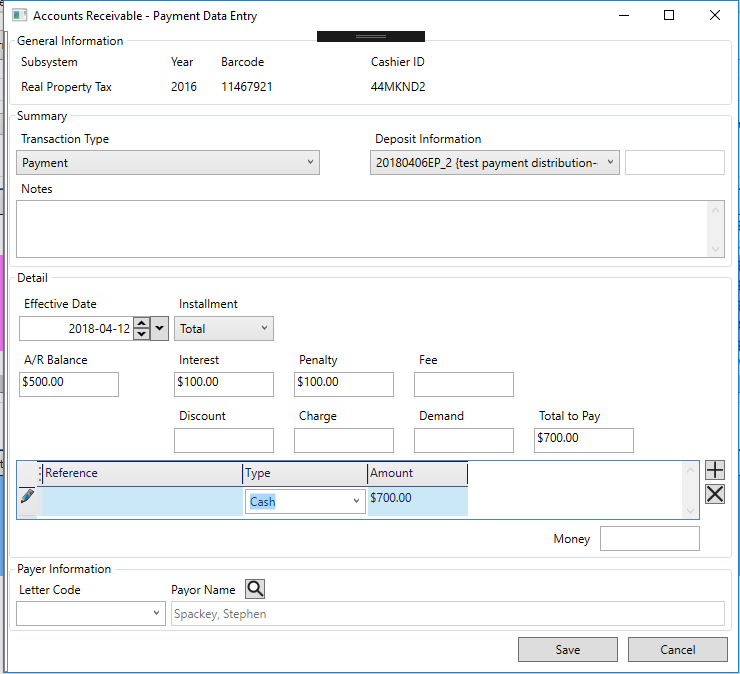
In this scenario, we have a balance of 400$. We add 100$ interests, 100$ penalties and add an extra 100$ to the now 600 balance which make the total amount 700$. Post the payment.

Test Do not Transfer late charges for a full Payment transfer

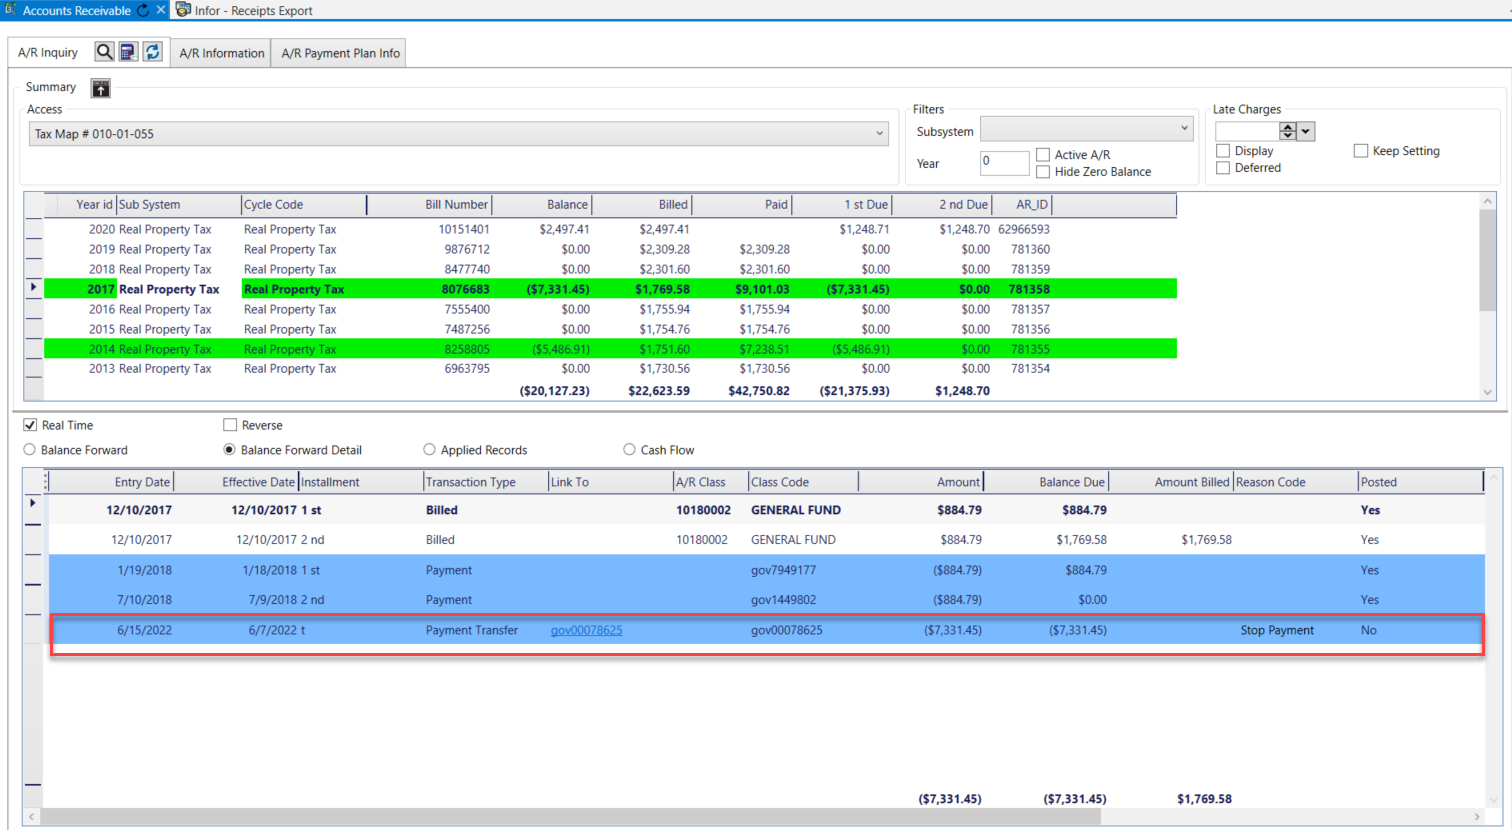
Result on Source Account. The result seems wrong since only 400$ should have been transferred.

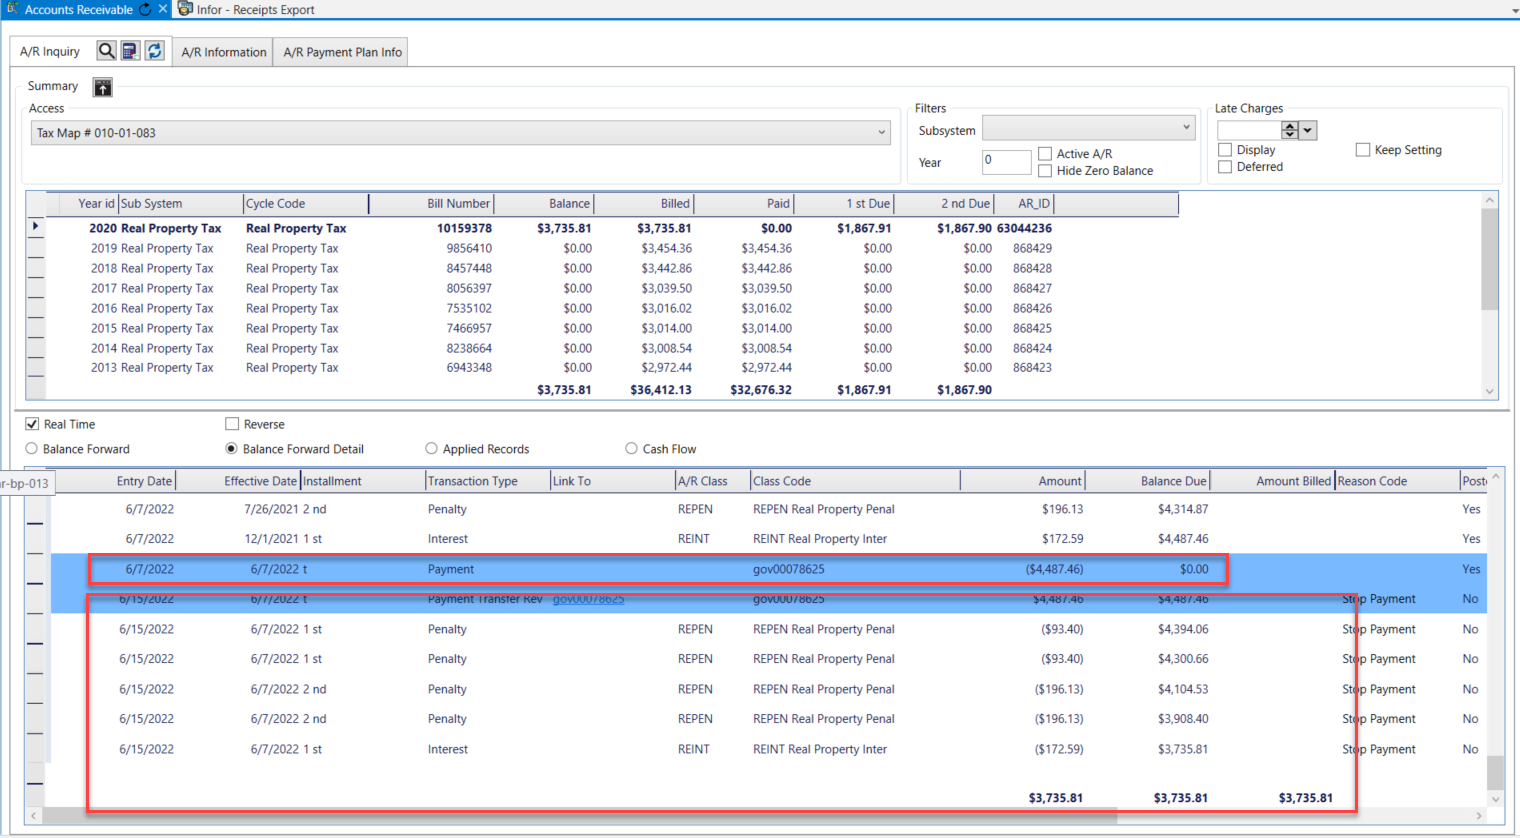
Result on Target Account.

Transfer Full Payment Option

Target Account Results

Source Accounts Result

Do not transfer late charges for a partial payment

Source Account Result

Target Account Result


Related Topics

Accounts Receivable (A/R) – Payment Transfer Data Entry

Accounts Receivable (AR) – What’s New


101-ar-fea-028


0 votes, average: 0.00 out of 50 votes, average: 0.00 out of 50 votes, average: 0.00 out of 50 votes, average: 0.00 out of 50 votes, average: 0.00 out of 5 (0 votes, average: 0.00 out of 5)
You need to be a registered member to rate this.
Loading...

Generic Import Editor (103-ed-024)

Generic Import Editor

Available in release 6.1.xxxx – (In Development)

Overview

The Generic Import Editor is a GNA Editor that will allow users to import

The function of the Generic Import Editor is as follows:

  • Allow import definitions to be stored in a configuration
  • Allow imports to be tracked and monitored from a single location.
  • Allow imports to be created faster with minimal coding required.
NOTE: This editor maintains records found in (Table: VT_USR_IMPORT_DEF).

Generic Import Editor Setup Parameters

T/C


GNA Product Map


103-ED-024


0 votes, average: 0.00 out of 50 votes, average: 0.00 out of 50 votes, average: 0.00 out of 50 votes, average: 0.00 out of 50 votes, average: 0.00 out of 5 (0 votes, average: 0.00 out of 5)
You need to be a registered member to rate this.
Loading...

Summary Record Card

Summary Record Card

Version 6.0.1903 / 6.1.1911

Overview

NOTE: This page is in development.

The Summary Record Card is configured to appear as a form within a Profile. This Summary Record Card form presents as a Header followed by a list of Summary Information with sections referred to as index cards. These index cards would display information related to a property’s individual components. For example, in the case of Mass Appraisal (MA), the MA Summary Record Card displays, amongst other things,  information for Building Structural Elements (BSE), Land information, Site information, and so on. The MA Summary Record Card may be placed within a profile for the city’s Assessor.

This form is currently available for the…:

  • Mass Appraisal (MA)
  • Property Control (PC)


Read More...


Presentation

As stated earlier, the Property Record Card will display as Govern form within a profile.

Click to view the image in a new tab.

Property Summary Record Card tab

On the Property Summary Card tab there are two (2) icons; one for printing the form, the other for maximizing the display within the form window.

Property Summary Record Card tab icons

  Print Form – Click the print form icon to display the print dialog window. Refer to the Printing the Summary Record Card section below for more detail about the print dialog window.

  Maximize / Minimize (F11) – You can maximize, i.e., enlarge the form to expand to the full area within the Govern application window. Click this icon again to restore the window size. Note that you can also perform this action with a click on the [F11] function key.

Property Summary Record Card Form

The form is composed of a series of specialized sectional or index “cards”. The summary record card is composed of a header and user configurable indexes.

Header Section

Containing general appraisal information about the property, e.g., Tax Map #, Parcel ID, Class, Property Type, Fiscal Year, School District, Roll Section, Size Total, Neighborhood, Zoning, and so on.

Information Displayed

The visibility of the indexes that are displayed in this section can be modified by the user.

Displaying Index Cards

As stated earlier, the visibility of the index cards can be configured by the user. The List Control button located in the middle of the lower part of the Header section displays a dashboard. The dashboard lists all sections that can be displayed or hidden on the Summary Record card.

The Dashboard

Dashboard Features

  Group – Click the Group checkbox to display the index cards in two (2) columns by logical groups. For example

Reset – Click Reset to Default to restore the original/default settings of the dashboard.

Hiding the Dashboard

  1. Click the List Control button to hide the dashboard.
NOTE: When printing, groups that are hidden will not be printed.

The dashboard lists the index cards that can be displayed in the Summary Record Card. On the upper left-hand side of the dashboard.

To configure the groups that are displayed in the Summary Record Card

  1. Click the list control button; a dashboard is displayed showing the sections that can appear in the form.
  2. Appearing on the dashboard is a list of the index cards and check boxes that can be displayed in the Summary Record Card. When the checkbox is selected, the section is displayed, i.e., visible.

Hiding Index Cards

  1. Click to uncheck a selected checkbox to hide the index card in the form.
  2. Uncheck the selected checkbox to hide the respective group.

Repositioning Index Cards – Method 1

If a specific order of appearance is required in the form, users can change the order of the Index Cards. The order change is made through the dashboard.

To change the order of index cards in the Record Card form…

  1. Click to highlight the index card that you would like to change.
  2. On the right-hand side of the dashboard, click the up arrow “^” to move the index card up.
  3. Alternatively, click the down arrow “v” to move the index card down.
NOTE: When the Group option is selected on the dashboard, you will not be able to rearrange / reposition index cards.

Repositioning Index Cards – Method 2

The index cards can also be changed on the dashboard by using the drag and drop method.

To change the order using a drag and drop technique…

  1. Use your mouse pointer to locate the index card that you would like to move.
  2. Click and hold the left mouse button (LMB) on the index card.
  3. Drag the pointer to the new location. Once the action is complete, verify the order.
  4. Click the List Control button to hide the dashboard.

Printing the Summary Record Card

Summary Record Card Print Window

The Summary Record Card form print window has features that allow you to print the information displayed on the form.

To display the Summary Record Card print preview window…

  1. Verify the sections that you want displayed in your printout.
  2. Click the print icon on the tab.
  3. The Property Summary Cards print window is displayed.

Along the top row of the window are icons that allow you to change your view of the document and print.

Summary Record Card Print Window icons

       Print (Ctrl + P) – Click to display the default Windows Print dialog box. You can access the printers that are configured for your computer.

       Increase the size of the content ( Ctrl -) – Click this icon to zoom out of the preview image.

       Decrease the size of the content (Ctrl +) – To zoom into the preview image, click this icon.

100% (Ctrl + 1) – To view the page at 100% in the area of the preview window, i.e., no scaling,  click this icon. Note that this is a function of the size of your monitor and your screen resolution.

Page Width (Ctrl + 2) – View only the full width of the preview document regardless of its height. You may need to scroll when this view is selected

Whole Page (Ctrl + 3) – A click on this icon will force the entire page into the area of the preview screen. This view option is at times referred to as “fit in page”.

Two Pages (Ctrl + 4) – When your document requires multiple pages, click this icon to view the pages as a “two-page spread”.

Search for a word or phrase in this document. – Should you need to find a word or phrase within the document that is in the preview window, click in this field and type the word.

NOTE: When using the print window, you will be permitted to access and print to resources that you already have access to under the Windows operating system.


Related Topics


101-std-frm-012


0 votes, average: 0.00 out of 50 votes, average: 0.00 out of 50 votes, average: 0.00 out of 50 votes, average: 0.00 out of 50 votes, average: 0.00 out of 5 (0 votes, average: 0.00 out of 5)
You need to be a registered member to rate this.
Loading...

Bill Messages Editor

Bill Messages Editor

Available in release 6.1.1911

Overview

The Bill Messages Editor allows you to edit and manage Bill Messages. With this editor, you can add a message to your next billing run using form. This message is valid for one billing only. The message is defined by Message Type and by Subsystem. For example, you can define a message to be printed on duplicate bills created for Real Property Tax.

NOTE: This editor maintains records found in (Table: VT_USR_BILL_MESSAGES).

Bill Messages Editor Setup Parameters

Subsystem: Select a Sub-system (Land Management, Real Property Tax, Special Assessment, Utility Billing, and so on) from the drop-down list (Table: VT_SYSTEM.SUBSYS).

Message Type: Select a Message Type from the drop-down list (Table: VT_USER.MESSBILL).

: Click the ellipsis to add additional Message Types. Click to display the User Validation Table Editor.

Message on Bill: In this field, enter the message that is to appear on the bill.


GNA Product Map


103-ED-023


0 votes, average: 0.00 out of 50 votes, average: 0.00 out of 50 votes, average: 0.00 out of 50 votes, average: 0.00 out of 50 votes, average: 0.00 out of 5 (0 votes, average: 0.00 out of 5)
You need to be a registered member to rate this.
Loading...

Govern Quick Search

Govern Quick Search

Release 6.0.1707 | 6.1 1707

Overview

An alternate search interface is available to the Govern user. The Quick Search differs from the traditional search interface in the sense that it bears a closer similarity to the search and results interface that is often associated with search engines. When correctly configured, this search interface is available through the Govern ribbon. Note that this search is in addition to the KB Search that is also located in the upper right hand corner of the interface.

NOTE: This feature should not be confused with the Self Reported Business Tax (ST) Save and Search feature, that may also be referred to as a quick search.

User Interface

Keyboard Shortcuts

The Quick Search and other search interfaces are accessible through the following keyboard shortcuts:

  • Quick Search: F3
  • Advanced Search: Alt + F3
  • Saved Datasets: Ctrl + F3
  • Query Tool: Shift + F3

Available Search Type (Views)

Standard Views are available to the user; these are part of Governs ViewsScripts.xml resource files. Standard views include a Search for Property records (V_INDEX_PROPERTY), a Search for Self Reported Tax records (V_INDEX_SRT), and a Search for Name records (V_INDEX_NAMES)

Conditions for Functioning of Views

The Quick Search is a standard Govern Control. In order for this control to function correctly, the associated views must adhere to the following standard rules:

  • The nomenclature of the View must begin with by V_INDEX_ for standard views and VW_INDEX_ for custom views
  • There must be a unique ID column
  • The View must have a Title column
  • Although the search will still search in the column, the description will use any column not ending with _h

Search results will be presented on 2 rows, the first will be the Title, the second a Description.

Configuration

The first requirement for installing the Govern Quick Search is to install the Elastic Search Service.

Installation of ElasticSearch

Details about the Elastic Search service can be found at the following link: https://www.elastic.co/guide/en/elasticsearch/reference/current/install-elasticsearch.html#install-elasticsearch
When installing with the MSI package option, you may use the following:
1. Download the MSI package and run it.

NOTE: Java is required in order for Elastic Search to run. If not installed, the installer will give a notification. If not installed, you can download the offline Java installer from the following location: https://java.com/en/download/manual.jsp. Install Java and re-execute the Elastic Search installer. Governs’ implementation of Elastic Search will support versions 11 through 15 of Java.

2. Install ElasticSearch with the default directories and ensure you select the Install as a service option. You may reference the screen shots in the Elastic Search Install Screens that can be found in the docuementation; see below.
3. For the Cluster Name you can keep the suggested name or make another selection. Note down the selected HTTP port, as it will be required later; the default is port 9200.
4. Ensure that the Network host value is completed. This is the name of the server. Note that none of the Plugins options are required.
Once the installation is completed, open Services in windows and make sure Elastic Search is configured as Automatic, and start the service.

About Java Support

As stated, Java is required in order for Elastic Search to run. Governs’ implementation of Elastic Search will support versions 11 through 15 of Java.

Configuration in the Govern New Administration (GNA)

GNA – General Settings Editor

For the next step, additional configuration is required in GNA. Open the GNA application…

  1. Open the General Settings Editor.
  2. Select General as the Registry Filter, and in the Search section locate the Elastic Search URL key. Enter a value like http:servername:9200, where the servername is that of the server where the service is installed, 9200 is the port that was chosen during the installation; Step 3// above.

GNA – Profile Editor

Index Refresh Batch Process

In order to have access to the Quick Search, you will need to setup and run the Quick Search Refresh (101-std-bp-010) batch process. This batch process is used to rebuild indexes used by the quick search. If this batch process is not present in the list under the Batch Processes tab in Govern, it will need to be added to the profile. This is done through the GNA Profile Editor. Refer to the Profile Editor page for instructions on how to add a batch process.
In Govern, by default, after running the Verify Database Process, the batch definition and the schedule to run the batch process is generated. The batch process is scheduled to run once a day in Full Mode, and every 5 minutes in Refresh Mode.
The batch process will search for all views created in the database that begin with V_INDEX or VW_INDEX, and refreshing them using the buffer parameter. Alternatively the process will completely build, or if already existing, rebuild the indexes.

Search Parameters

There are three (3) Search parameters that are required to be configured in the GNA Profile Editor.

Configuration of Profile Editor Search group parameters

Default eStyle – Selecting an eStyle will remove the selected eGroup.
Default eGroup – When an eGroup is selected, it will remove the selected eStyle.
Quick Search Index Group – The Quick Search Group is used for the Quick Search of the Profile.
NOTE: Additional Quick Search Index groups can be created using the Quick Search Index Group Editor.
When saving the profile, at least one of the searches must be selected.

NOTE: When exporting and importing a profile, indexes from the Quick Search Group associated with a Profile will be automatically exported/imported.

Govern Security Manager (GSM)

In order to provide security parameters for this feature, there is a new node for the Quick Search in the Govern Security Manager (GSM).
To locate the node to secure in the GSM, in the left hand pane, select Applications > Govern > Menu > View > Data Sources > Quick Search. Refer to the GSM page for instructions on how to secure an application.
When security is not enabled, i.e. OFF, Govern users will not see the Quick Search icon in the View (tab) > Data Sources (group) section in the Govern ribbon. Users without permissions that attempt to access the Quick Search, will be presented with the standard Govern restricted access screen.

Using the Quick Search

Differences between Search All vs Specific Index

The Search All option allows a user to perform a search on ALL indexes associated with the Profile. If a specific index was selected then the search will be performed only on that selected index.

NOTE: Search All will use the boost specified to an index in GNA to order the Search Results. You will see a tag to indicate which index the Search Result came from in the Search All option.

Switching between indexes

In order to switch between indexes, you must click on the index name. The currently selected index will be underlined. The index name that is displayed is the name of the view without the prefix and underscores and title cased.
For example if you create a view named VW_INDEX_COMPANY_ONLY then the display name will be Company Only.

Search within a Specific Index

Searching within a specific index allows users to restrict search results to a specific index as well allowing them to search a specific column.

Column Specific syntax

The Column Specific Search enables a user to specify on which column a text string should be search.
Syntax – Field followed by “:” then by the text string to search for.
If the user selects a specific index all available fields will be available in the search box context menu. The context menu can be displayed with a Right-Click within the area of the Search field.
For Example: the following… street:freeway
This is an indication that the text string “freeway” must be located in the street field. Therefore, even if there was a record with an email like “freeway@example.com”, the record will not be returned if the text freeway is not found in the street field.

Using special options

In addition to a normal text search, special characters such as Boolean operators or wildcards may be used to further narrow search results. Listed below are options that are available.

Operators

AND – A search for the results containing the words CRYSTAL AND LAKES. This means that result must contains both the words CRYSTAL and LAKES.
OR – Searching for results containing the words CRYSTAL OR LAKES. This means that result must contains either word, CRYSTAL or LAKES.
* (Wildcard Character) – The wildcard characteris used for performing searches for partially defined strings, e.g. RIVE*. This means that all records containing words starting with RIVE will be returned, e.g. RIVER, or RIVEN.
~ (Fuzzy Character) – The Fuzzy Character tilde (~), allows the search to be more relaxed with its results. Searching for the following string with the tilde, CRYSTEL~, will result in all records containing a word the “sort of” looks like CRYSTEL with a one character difference allowance. The resulting records could contain the following words: CRYSTEL, CRYSTAL, CYRSTEL, CRESTEL, CRYSTEN, and so on.

Clicking on a Search Result

A click on a specific search result will add the ID to the Govern Dataset Treeview, and set all Govern IDs specified by the search result. In addition, if the search result contains a field named “form“, the form with this code will also be opened.

TIP: If you want to know the origin of the information displayed in the search result, i.e. the field it is taken from, place your mouse cursor over the value and the tooltip will indicate which field it corresponds to.

Troubleshooting

Typically issues that may arise with the Govern Quick Search may be related to the installed ElasticSearch service, or port configuration issues with the Windows Firewall.

NOTE: The following troubleshooting actions can only be accomplished by users with administrator level access.

Verify ElasticSearch Service

If the Govern Quick Search is not working after configuration, the first step is to verify that the installed ElasticSearch service is running. This is done through the Windows Services screen.

Additional Verification of Service

Issues with Java

Issues have been known to arise with the setting of the variable JAVA_HOME when installing Java 32bit or 64 bit. Ensure that the correct path is being used as some applications, when installing, may set a path for the JAVA_HOME variable that may not be consistent with other installed applications.

Verify the JAVA_HOME variable

In Windows 7 on a system that had Java 1.7 then upgraded to Oracle Java 1.8 SDK (jdk-8u45-windows-x64.exe) the system JAVA_HOME differed from the JAVA_HOME in the elasticsearch manager and as such a different version of java was in the path. As a result, the ElasticSearch service install failed because the system was unable to load Java 8.
Resolution required the setting of the system JAVA_HOME to the correct folder:

  1. Open Windows File Explorer.
  2. Right-click My Computer
  3. Select Advanced system settings
  4. Select Environment Variables
  5. Select JAVA_HOME
  6. Edit JAVA_HOME to change the value to the correct root folder e.g. C:Progra~1Javajre1.8.0_45
  7. OK twice

Check that JAVA_HOME is set and java works:

  • java -version
  • echo %JAVA_HOME%

If this fails then eleasticsearch-service install won’t work. To fix in a DOS prompt:

  • set JAVA_HOME=C:Progra~1Javajre1.8.0_45
  • path=C:Program FilesJavajdk1.8.0_45bin;%path%

Check the JAVA_PATH value in Elasticsearch manager and fix it if required. Open the manager program from a DOS prompt:

  1. Run elasticsearch-service.bat manager from a DOS prompt.
  2. Click on the Java tab
  3. Click the … button to the right of %JAVA_HOME%binserverjvm.dll
  4. Select the correct JRE folder if required or set the value manually, e.g. C:Program FilesJavajdk1.8.0_45jrebinserverjvm.dll
  5. Click Apply
  6. Select the General tab
  7. Click Start.
  8. Click OK to close the ElasticSearch manager

Removing and re-adding the ElasticSearch service may be needed:

  • elasticsearch-service.bat remove
  • elasticsearch-service.bat install

Browser Verification

Open ElasticSearch in a browser using the settings in configelasticsearch.yml to check that it is running. The URL could be https://MyServer:9200. For example https://localhost:9200/
…where, depending on your configuration, “localhost” would be substituted with the name of the server that the ElasticSearch is running on.

Issues with Windows Firewall

When there are issues with configuring the ElasticSearch, these issue may exist with the Windows Firewall.

  1. When the Firewall Screen is displayed, click Show/Hide Console Tree.
  2. On the left hand pane, right click Inbound Rules and select New Rule.
  3. In the New Inbound Rule Wizard form, select Port, click Next.
  4. At the Protocol and Ports step, select TCP; click on Specific local ports and enter 9200.
  5. Click Next.
  6. At the Action step, select Allow the connection; click Next.
  7. Set the rule to apply for Domain, Private, and Public by selecting the check boxes.
  8. Click Next.
  9. At the name screen, enter a descriptive name for the rule; click Finish.

Modifying a Preexisting Rule

If a rule has already been created and it needs to be modified you can go back to the Windows Firewall screen. Typically the modification involves adding an additional port number.

  1. Open Windows Firewall.
  2. On the left hand pane, click Inbound Rules.
  3. Under the Inbound Rules pane, locate ElasticSearch Rule. Note that this is the name that was given to the rule when it was first created.
  4. Right click ElasticSearch Rule and select Properties from the floating menu.
  5. Click on the Protocol and Ports tab.
  6. Configure the Protocol type as TCP.
  7. Add another port specified for the ElasticSearch in the Local port parameter; select Specific Ports, and add 9300 to the 9200, separated by a comma and space.
  8. Click OK.

Documentation

Click here to link to the documentation for this feature:

Related Topics

Govern Search
Quick Search Index Group Editor
Govern Search Technical Specifications

Dynamic Search Objects
Dynamic Search Styles
Dynamic Search Groups
Govern New Administration (GNA)


101-std-fea-034


0 votes, average: 0.00 out of 50 votes, average: 0.00 out of 50 votes, average: 0.00 out of 50 votes, average: 0.00 out of 50 votes, average: 0.00 out of 5 (0 votes, average: 0.00 out of 5)
You need to be a registered member to rate this.
Loading...