AR Inquiry – Change Payer Name (101-ar-fea-027)

Accounts Receivable (AR) – Change Payer Name in AR Inquiry

Overview

The Accounts Receivable Inquiry form displays transaction details on the selected account, including historical data. This form is linked to the master file of each subsystem so that you can access all the A/R information available on a given property or taxpayer name and address record.

The Accounts Receivable Inquiry form includes a Summary and a Detail section. The Summary section lists the Accounts Receivable transactions for the selected record. The Detail section displays transaction details on each entry selected in the Summary section.

There are two (2) ways to change the payer name in AR Inquiry:

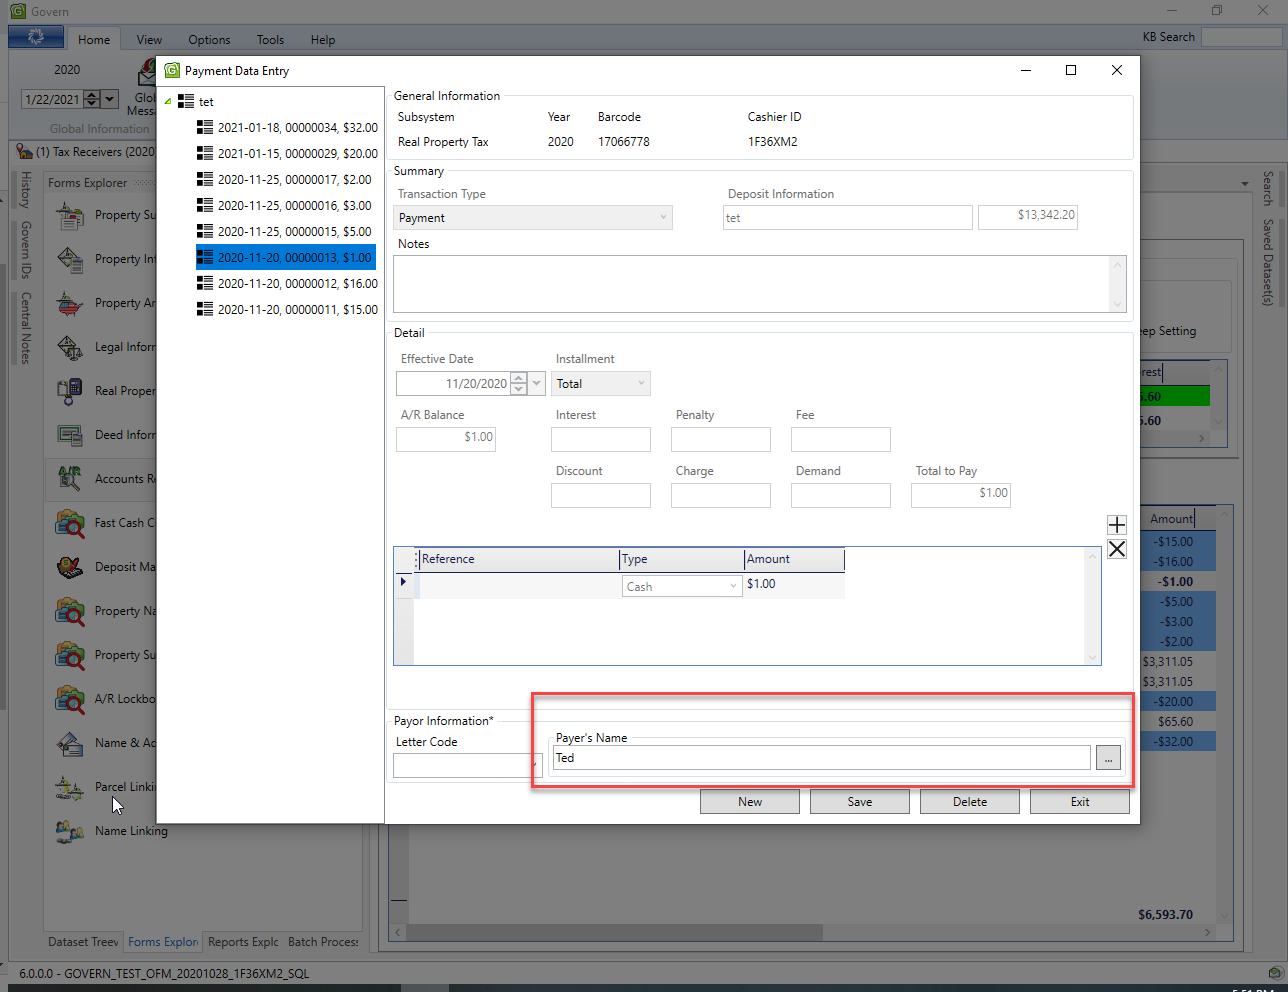
  • Payment Data Entry
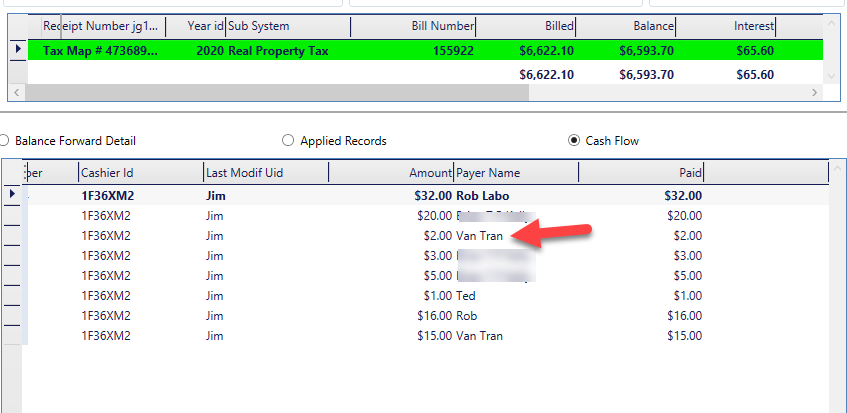
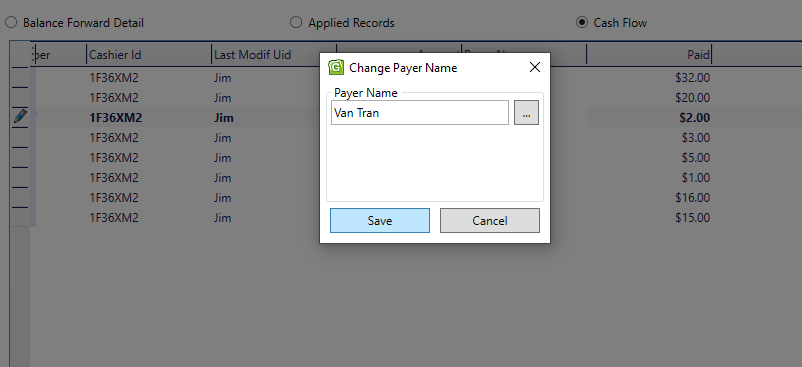
  • Double click on Payer Name row and column in Cash Flow

Functionalities

  • Payment Data Entry:

    The Payment Data Entry is using the CC Payor Name control
  • Double click on Payer Name row and column in Cash Flow

    Double clicking on row and column of Payer Name will open a window to change the payer name

Configuration

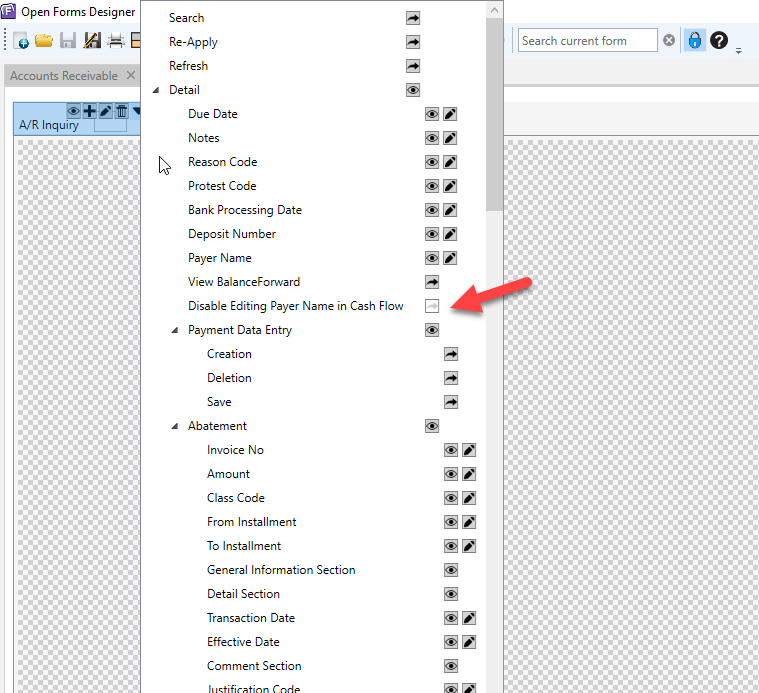
To be able to open the window to change the payer name in Cash Flow, the following setting must be set in the security of OFD in Accounts Receivable form:

The option “Disable Editing Payer Name in Cash Flow” must be disable to able to use the feature.

Related Topics

Accounts Receivable (A/R) – Payment Transfer Data Entry (101-ar-frm-027)

Accounts Receivable (A/R) – AR Inquiry form (101-ar-frm-001)

Accounts Receivable (AR) – What’s New


101-ar-fea-027


0 votes, average: 0.00 out of 50 votes, average: 0.00 out of 50 votes, average: 0.00 out of 50 votes, average: 0.00 out of 50 votes, average: 0.00 out of 5 (0 votes, average: 0.00 out of 5)
You need to be a registered member to rate this.
Loading...

AR – Justification Combo Box (101-ar-fea-029)

Accounts Receivable (A/R) Justification Combo box

Available in Release 6.0.1903

Overview

The Accounts Receivable Inquiry form displays transaction details on the selected account, including historical data. This form is linked to the master file of each subsystem so that you can access all the A/R information available on a given property or taxpayer name and address record.

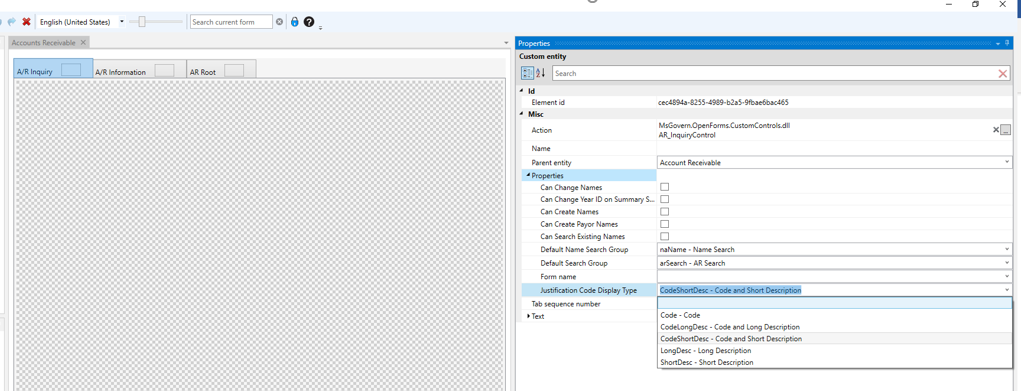
This is a combo box for specifying a Justification code or Reason code on the AR Inquiry form. This combo-box can be configured to show a Code and/or Description. This is the same as an Entity or GfW. If no entry is selected, the default entry will be the Short Description.

Configuration

NOTE: Before proceeding, ensure that you have updated to Govern Rel. 6.0.1903 and above.

This option is configured in the Govern OpenForms Designer (OFD).

To configure this feature…

1. As an administrator, open the OFD.

2. On the OFD ribbon click Open Form.

3. From the list, select the Accounts Receivable form (default AR008 – Accounts Receivable).

4. Click to select the A/R Inquiry tab.

5. On the left-hand side Properties pane, click to expand Properties.

6. Under the list of properties, click to select Justification Code Display Type.

7. Select the default preference for the combo-box.

8. Click Save to save your configuration.


Related Topics

Accounts Receivable (A/R) Inquiry

Accounts Receivable (AR) – What’s New


101-ar-fea-029


0 votes, average: 0.00 out of 50 votes, average: 0.00 out of 50 votes, average: 0.00 out of 50 votes, average: 0.00 out of 50 votes, average: 0.00 out of 5 (0 votes, average: 0.00 out of 5)
You need to be a registered member to rate this.
Loading...

AR – AR Inquiry Form (101-ar-frm-001)

Accounts Receivable (A/R) Inquiry

Overview

The Accounts Receivable Inquiry form displays transaction details on the selected account, including historical data. This form is linked to the master file of each subsystem so that you can access all the A/R information available on a given property or taxpayer name and address record.

The Accounts Receivable Inquiry form includes a Summary and a Detail section. The Summary section lists the Accounts Receivable transactions for the selected record. The Detail section displays transaction details on each entry selected in the Summary section.

The Detail section has three tabs:

  • A/R Detail providing details about the transaction selected in the Summary tab
  • Notes For entering notes or comments and additional information about the selected transaction
  • Payment Plan for entering payment plan information.

See Also Paid Under Protest in the Govern A/R User Guide.

Read More...

Documentation

For the complete reference guide, see Govern Accounts Receivable.
For the A/R Transaction Rules, see A/R Transaction Rules.

The following forms are opened in secondary windows from the A/R Inquiry form:

Payment Data Entry

The Payment Data Entry form is used for accepting and processing payments at the counter, by cash, check, credit card, debit card, or by any other user-defined method. The current owner of the account is automatically defined as the payer. A currently existing function, in the Payment Data Entry or in Cash Collection, is the ability for users to create a deposit on one or multiple A/R Accounts.
The feature also allows users to, Create a Deposit, Apply the Deposit, and Delete the Applied Deposit as needed. This feature is securable through the OpenForms Designer (OFD). See Securing Apply or Delete Applied Deposit in the Security section below.

A/R Transaction

The A/R Transaction form is used for a number of Accounts/Receivable transaction types, including abatements, charges, fees, and duplicate payments. It is used for viewing existing transactions, creating new ones, and for applying modifications to an account or bill. See A/R Transactions.

Abatements and Exemptions

Abatements are applied to reduce the amount owed on an account or to exempt an amount from payment. Typically, they are used to decrease property taxes and are applied after the real property tax assessment and levies are calculated.

Adjustments

The A/R Adjustment form is used to apply modifications to an account or bill and can be used to either increase or decrease the balance due on an account.

Charge, Demand, Fee, Interest, and Penalty Transactions

The transaction types in this section follow the same form as the A/R Adjustments. Select the applicable form for the transaction type. Then follow the procedures described under A/R Adjustments.

Refunds

The section describes the Refund transaction data entry form. Typically, refunds are used for over-payments and duplicate payments.

Payment Reversal

The section describes the Payment Reversal transaction data entry form. Typically, payment reversals are used for Non-Sufficient Funds (NSF) checks.

Payment Transfer

The section describes the Payment Transfer transaction data entry form. Payment transfers are used to transfer posted payments from one account to another. They can be used to correct payments that were posted to the wrong account. They can be made on posted payments only.

Deposit Management

Deposit Management is required in Govern OpenForms(TM). You can use either auto-assigned deposit numbers or create them manually on the Deposit Management form. Note that there are two Deposit Management forms, one for users with Full Access Rights who need to see the deposit number of all users. When creating the Profile, select the applicable form.

Functionality

Note that the function to apply a Deposit existed in Govern for Windows, but was not implemented in Govern for .NET. The Batch Process to apply a deposit was implemented in Govern for .NET, but the functionality was not added to the A/R Inquiry.

Creating a Deposit

  1. In the A/R Inquiry form, right click in the lower grid and select Accounts Receivable – Payment Data Entry.
  2. In the Accounts Receivable – Payment Data Entry form, select a Deposit Number and Transaction Type. (Set both to deposits)
  3. In the Detail group in the lower part of the form, set the type of deposit, e.g. Check.
  4. Click Save

When saving, both a Deposit, and a Payment will be saved in the account; this is to avoid changing the balance of the account because the deposit has not been applied yet; this is an old functionality.

  1. Apply the deposit on the account, this is done by posting the deposit. This is done through the Cash Collection Posting form. (Don’t forget to hit the refresh)
  2. Run the batch process to post the payment.
  3. Return to the A/R Inquiry form and Refresh.

The entry should be recorded as posted; look under the Posted column in the bottom grid.

  1. In the lower grid, right click on the entry and select the new Accounts Receivable – Apply Deposit function from the menu.

Selecting the Accounts Receivable – Apply Deposit will apply the deposit, if there are any interests or penalties, they will be also be applied, e.g. Late Charges.

NOTE: When selecting the Accounts Receivable – Apply Deposit function, posting does not occur immediately.

After applying the deposit, another deposit is created that pays the balance. Any Interests or Penalties are also applied.
At this point, an adjustment posting batch process can be run to post the entries, or a right click on the deposit displays the Accounts Receivable – Delete Deposit option. When selected, the deposit that was created will be deleted. The same behavior is observed in the Cash Collection form.

Self Reported Tax Subsystem Users
For the Self Reported Tax subsystem, the Govern system will only create a deposit on a Period, i.e. ST_ID, not on the account otherwise the system is not able to Apply it.

Security

Securing Apply or Delete an Applied Deposit

This feature in the Accounts Receivable form can be secured through the OpenForm Designer (OFD).
To secure the feature in the OFD…

  1. Open the Accounts Receivable form.
  2. Click to select the A/R Inquiry tab.
  3. Locate and click on the Padlock icon to to change to the Security Mode.
  4. Under the security pane, select the security By User radio button.

On the A/R Inquiry tab, click the black downwards pointing arrowhead to select the options for Apply Deposit and Delete Deposit.
For full details about using the Security Mode in the OFD, refer to the OFD user guide.

In the A/R Inquiry form, the system will display the Penalty and the Interest by installment for each A/R record. In (Table: AR_SUMMARY), 2 fields have been added.
· LATE_PENALTY
· LATE_INTEREST
These fields are updated based upon the Penalty or the Interest; note that this is the same process as the one that currently exists with a difference, the system now calculates late charges up to the installment, and then updates the LATE_CHARGE field. In addition, the system will also update the 2 new LATE_PENALTY and LATE_INTEREST fields.

What’s New!

Change Payer Name in AR Inquiry

NEW! There are two ways to change the payer name in AR Inquiry; Payment Data Entry, a double click on the Payer Name row and column in Cash Flow. See Change Payer Name in AR Inquiry for details.

A/R Class Codes Included in Balance Forward

After using the Govern Data Extraction Tool (DET),  a situation can result with the imports when there are multiple Class Codes. Imports into the same A/R Class can result in the same descriptions being used for different codes. As a result, the same A/R Class code would be added for different descriptions; currently there is no way to differentiate between records with the same description, but with multiple A/R Classes. See AR Class Code Included in Balance Forward for details.

For new features and functionalities in the Accounts Receivable module, see the A/R What’s New page.

Related Topics

Accounts Receivable (A/R) – Payment Transfer Data Entry

Accounts Receivable (AR) – What’s New


101-ar-frm-001


0 votes, average: 0.00 out of 50 votes, average: 0.00 out of 50 votes, average: 0.00 out of 50 votes, average: 0.00 out of 50 votes, average: 0.00 out of 5 (0 votes, average: 0.00 out of 5)
You need to be a registered member to rate this.
Loading...

Summary Record Card

Summary Record Card

Version 6.0.1903 / 6.1.1911

Overview

NOTE: This page is in development.

The Summary Record Card is configured to appear as a form within a Profile. This Summary Record Card form presents as a Header followed by a list of Summary Information with sections referred to as index cards. These index cards would display information related to a property’s individual components. For example, in the case of Mass Appraisal (MA), the MA Summary Record Card displays, amongst other things,  information for Building Structural Elements (BSE), Land information, Site information, and so on. The MA Summary Record Card may be placed within a profile for the city’s Assessor.

This form is currently available for the…:

  • Mass Appraisal (MA)
  • Property Control (PC)


Read More...


Presentation

As stated earlier, the Property Record Card will display as Govern form within a profile.

Click to view the image in a new tab.

Property Summary Record Card tab

On the Property Summary Card tab there are two (2) icons; one for printing the form, the other for maximizing the display within the form window.

Property Summary Record Card tab icons

  Print Form – Click the print form icon to display the print dialog window. Refer to the Printing the Summary Record Card section below for more detail about the print dialog window.

  Maximize / Minimize (F11) – You can maximize, i.e., enlarge the form to expand to the full area within the Govern application window. Click this icon again to restore the window size. Note that you can also perform this action with a click on the [F11] function key.

Property Summary Record Card Form

The form is composed of a series of specialized sectional or index “cards”. The summary record card is composed of a header and user configurable indexes.

Header Section

Containing general appraisal information about the property, e.g., Tax Map #, Parcel ID, Class, Property Type, Fiscal Year, School District, Roll Section, Size Total, Neighborhood, Zoning, and so on.

Information Displayed

The visibility of the indexes that are displayed in this section can be modified by the user.

Displaying Index Cards

As stated earlier, the visibility of the index cards can be configured by the user. The List Control button located in the middle of the lower part of the Header section displays a dashboard. The dashboard lists all sections that can be displayed or hidden on the Summary Record card.

The Dashboard

Dashboard Features

  Group – Click the Group checkbox to display the index cards in two (2) columns by logical groups. For example

Reset – Click Reset to Default to restore the original/default settings of the dashboard.

Hiding the Dashboard

  1. Click the List Control button to hide the dashboard.
NOTE: When printing, groups that are hidden will not be printed.

The dashboard lists the index cards that can be displayed in the Summary Record Card. On the upper left-hand side of the dashboard.

To configure the groups that are displayed in the Summary Record Card

  1. Click the list control button; a dashboard is displayed showing the sections that can appear in the form.
  2. Appearing on the dashboard is a list of the index cards and check boxes that can be displayed in the Summary Record Card. When the checkbox is selected, the section is displayed, i.e., visible.

Hiding Index Cards

  1. Click to uncheck a selected checkbox to hide the index card in the form.
  2. Uncheck the selected checkbox to hide the respective group.

Repositioning Index Cards – Method 1

If a specific order of appearance is required in the form, users can change the order of the Index Cards. The order change is made through the dashboard.

To change the order of index cards in the Record Card form…

  1. Click to highlight the index card that you would like to change.
  2. On the right-hand side of the dashboard, click the up arrow “^” to move the index card up.
  3. Alternatively, click the down arrow “v” to move the index card down.
NOTE: When the Group option is selected on the dashboard, you will not be able to rearrange / reposition index cards.

Repositioning Index Cards – Method 2

The index cards can also be changed on the dashboard by using the drag and drop method.

To change the order using a drag and drop technique…

  1. Use your mouse pointer to locate the index card that you would like to move.
  2. Click and hold the left mouse button (LMB) on the index card.
  3. Drag the pointer to the new location. Once the action is complete, verify the order.
  4. Click the List Control button to hide the dashboard.

Printing the Summary Record Card

Summary Record Card Print Window

The Summary Record Card form print window has features that allow you to print the information displayed on the form.

To display the Summary Record Card print preview window…

  1. Verify the sections that you want displayed in your printout.
  2. Click the print icon on the tab.
  3. The Property Summary Cards print window is displayed.

Along the top row of the window are icons that allow you to change your view of the document and print.

Summary Record Card Print Window icons

       Print (Ctrl + P) – Click to display the default Windows Print dialog box. You can access the printers that are configured for your computer.

       Increase the size of the content ( Ctrl -) – Click this icon to zoom out of the preview image.

       Decrease the size of the content (Ctrl +) – To zoom into the preview image, click this icon.

100% (Ctrl + 1) – To view the page at 100% in the area of the preview window, i.e., no scaling,  click this icon. Note that this is a function of the size of your monitor and your screen resolution.

Page Width (Ctrl + 2) – View only the full width of the preview document regardless of its height. You may need to scroll when this view is selected

Whole Page (Ctrl + 3) – A click on this icon will force the entire page into the area of the preview screen. This view option is at times referred to as “fit in page”.

Two Pages (Ctrl + 4) – When your document requires multiple pages, click this icon to view the pages as a “two-page spread”.

Search for a word or phrase in this document. – Should you need to find a word or phrase within the document that is in the preview window, click in this field and type the word.

NOTE: When using the print window, you will be permitted to access and print to resources that you already have access to under the Windows operating system.


Related Topics


101-std-frm-012


0 votes, average: 0.00 out of 50 votes, average: 0.00 out of 50 votes, average: 0.00 out of 50 votes, average: 0.00 out of 50 votes, average: 0.00 out of 5 (0 votes, average: 0.00 out of 5)
You need to be a registered member to rate this.
Loading...

MA – Summary Record Card

Mass Appraisal (MA) – Summary Record Card

Version 6.0.1903 / 6.1.1911 (In Development)

Overview

NOTE: This page is under development.

The Mass Appraisal (MA) Summary Record Card is a form that presents as a Header and a list of summary information, called “cards” in the MA module. This form displays components of a property where each component is grouped. For example, the MA Summary Record Card would display, amongst other things,  information Buildings Structural Elements (BSE), Land, Site, etc.

The Summary Record Card form is currently available for the following:

  • Mass Appraisal (MA)
  • Property Control (PC)


Related Topics


101-ma-frm-075


0 votes, average: 0.00 out of 50 votes, average: 0.00 out of 50 votes, average: 0.00 out of 50 votes, average: 0.00 out of 50 votes, average: 0.00 out of 5 (0 votes, average: 0.00 out of 5)
You need to be a registered member to rate this.
Loading...

AR – Class Code Included in Balance Forward

Accounts Receivable (AR) Class Code Included in Balance Forward

Overview

The A/R Inquiry Custom Control is used to display, create and maintain all transactions linked to an Account Receivable. In situations where there are multiple Class Codes, a situation can result with imports after using the Govern Data Extraction Tool (DET). This would be an import into the same A/R Class that would result in the same descriptions being used for different codes. As a result, the same A/R Class code would be added for different descriptions; currently there is no way to differentiate between the same descriptions, but with multiple A/R Classes.

In Govern, on the Accounts Receivable > A/R Inquiry sub tab, two (2) grids are present. In the lower grid. A click on Balance Forward Detail, will display the following:

User Interface

A new Column titled AR Class Code is now present in the A/R Inquiry Detail grid. There is now an A/R Class, and a Description column

This feature will be present when the following display options are selected:

  • Balance Forward Detail
  • Applied Records

Functionalities

The AR Inquiry form is made up of two principal areas, a Summary grid, and a Detail grid. Additional details of this form may be found in the A/R Inquiry form documentation. For this feature, the new columns, A/R Class Code and Description, are available when selecting the Balance Forward Detail, or the balance forward Applied Records.

NOTE: The columns are not available in the Balance Forward because this information is broken down by installment and transaction type. As a result there will be no information in the Class Code column, the breakdown is only by transaction type.


101-ar-fea-011


0 votes, average: 0.00 out of 50 votes, average: 0.00 out of 50 votes, average: 0.00 out of 50 votes, average: 0.00 out of 50 votes, average: 0.00 out of 5 (0 votes, average: 0.00 out of 5)
You need to be a registered member to rate this.
Loading...


GNA – General Connection Parameters

General Connection Parameters

Overview

Connection Pool

A Connection Pool is a collection of database connection objects. In order for a Govern application to communicate with a database, a connection must be established with a connection object from the Connection Pool.

Connection States

Connections can have two (2) states, Active, or Inactive. In the system, connections can exist in two (2) ways Physical and Logical. When created in the pool by a system request, the connection is Physically and Logically active. When a request for the connection to be closed is made by the system, the connection becomes Logically inactive, but Physically it is still active in the Connection Pool. Creation of a new connection is time intensive, therefore a happy medium must be maintained when configuring the parameters for the Connection Pool.

Connection Pool Polling Intervals

The Connection Pool is periodically checked, or Polled for inactive connections. This process is based upon a user defined interval or a built in system rule; inactive physical connections are removed from the connection pool during this set time interval or based upon this system rule.

Oracle Systems

Oracle systems have a polling interval of approximately 3 minutes. Every 3 minutes, the system will review the number of inactive connections in the pool. Based upon the Decrement Pool Size setting, the system will reduce the number of connection by the value, up to the minimum number that is specified in the Minimum Connection Pool Size parameter.

SQL Systems

The polling intervals for connections to SQL databases, is not user configurable. Maintenance of the number of Open connections are handled internally by the system, there are no user configurable parameters.
The parameters that are located in the Connection Key General Parameters Management form are set by default. Unless instructed by MS Govern Technical Support, do not modify these settings as they can impact the overall performance of the application.
To access the Connection Key General Parameters Management form…

  1. In the Govern New Administration (GNA) ribbon, select Utilities (tab) > General Connection Parameters
WARNING: The parameters in this form should only be modified by Administrators, and with the understanding that changes made will be system wide and will affect all users.

Parameters

General group

Connection Key General Management – General group Connection Pool (Minimum Size / Maximum Size)

From the Web, the .NET components access the database through a Connection Pool. Users are able to define the minimum and maximum number of connections for the pool.
• Minimum Connection Pool Size – Enter the minimum number of data connection objects to be established in the pool. (Default = 1)
• Maximum Connection Pool Size – Enter the maximum number of data connection objects that can be allocated in the pool in the Maximum Connection Pool Size field. (Default = 50)

NOTEUsers refer to the About Connection Pool Settings for additional details about Connection Pool Size settings.

Database Cache

The database cache uses system memory to store information that is read from the hard disk. The next time the same information is requested, it is read directly from memory. Increasing cache size can increase system performance, but always ensure that you have sufficient system memory to accommodate your settings. Cache sizes are specified in megabytes (MB)

Cache Size (Minimum Size / Maximum Size / Refresh Rate)

Minimum Cache Size: This is the minimum memory size that the system will allocate to the cache.
Maximum Cache Size: As the cache size is dynamic, this is the maximum memory space that the system will allow the cache to grow to.
Cache Refresh Rate: This is the frequency that the cache is refreshed. The unit is in seconds, therefore to set the rate to 5 minutes, you would enter a value of 300:

300 sec. / 60 sec. = 5 min.

NOTEThe above parameters are automatically set by the system and do not require user modification.


Oracle group

The parameters that are found in the Oracle group of the Connection Key General Parameters Management form are used to set the Pool Size increment and Pool Size decrement values. See Oracle Systems for details.
Increment Pool Size : The Pool Size Increment value determines the number of connections that will be automatically created when a request is made to access the database. For example, if a value of three (3) is entered in this parameter, even if a single connection is requested, three connections will be created in the pool.
Decrement Pool Size : The Pool Size Increment value will determine the number of connections that will be closed when a request is made. For example, a value of 5 is entered in this parameter. In a pool of 6 idle connections, when a request to close a single connection is sent, 5 of the 6 idle connections will be closed.

About Connection Pool Settings

The Minimum Connection Pool Size: and Maximum Connection Pool Size: fields are used to determine the number of connections that will be established with the server.
As an example, a user has a minimum setting of five (5) connections, and a maximum setting of ten (10) connections. In the instance of a single query request, all 5 requested connections will be created even if only one connection is required. When the query transaction has been completed, the created connections will be removed during the Connection Pool polling interval. Likewise, if 11 connections are required for a process, since the maximum specified was 10, the system will hold the last process and continuously check until a free connection is available in its assigned pool.

Performance Issues and Connection Pool Settings

In a multiuser environment, performance issues may be observed as a result of connection pool settings. For example, in a 10 user environment, each user has a minimum setting of 5 connections and a maximum setting of 100 connections. Should each user run a single query, there would potentially be 50 connections running simultaneously, i.e. (5 queries x 10 users = 50 connection). Should each user reach the maximum number of connections, 1000 connections would be created.

Connection Pool Settings for Web Sites

Determining the number of potential simultaneous connections is a part of the planning procedure for a Web site. Once the anticipated load on the site has been determined, the minimum size can be set accordingly. Administrators should keep in mind that each site will use one Data Access Block (DAB); therefore the parameter setting should be in reference to the number of connections. In addition the session Timeout settings for the Web server could also be adjusted to ensure that connections are periodically refreshed.
As individual Web site requirements will vary There is no minimum recommended setting for the Minimum Connection Pool Size: parameter for a Web site.


Recommended Single User Settings

The following are the recommended settings for the Oracle group for a single user access to the database:

General group

  • Minimum Connection Pool Size: 1
  • Maximum Connection Pool Size: 25
  • Minimum Cache Size: 50
  • Maximum Cache Size: 5000
  • Cache Refresh Rate: 300

Oracle group

  • Pool Size Increment: 1
  • Pool Size Decrement: 3


103-ut-003


0 votes, average: 0.00 out of 50 votes, average: 0.00 out of 50 votes, average: 0.00 out of 50 votes, average: 0.00 out of 50 votes, average: 0.00 out of 5 (0 votes, average: 0.00 out of 5)
You need to be a registered member to rate this.
Loading...