101-wm-upgrade

Workflow Management – Upgrade Notes

Module Overview, Configuration, Installation, OpenForms References, What’s New, wiki Map … Last Updated February 6th, 2017
VERSION 6.1 Under development
Upgrade Information
This page is intended for a master upgrade information page for existing customer upgrades to Workflow Management 6.1 OpenForms Technology.

UPGRADE PATH
For upgrades (prior to OpenForms Technology V6.1 or Govern for Windows)

  • 6.1 Module upgrade path requires OpenForms Technology v6.0 version
  • 6.1 GNA Conversion Utility from 6.0 to 6.1

TECHNOLOGY

  • Formulas and Logical Operands transformed to new Expressions
  • Transforming activity numbers to GUID (wikipedia)

See also

Module Impact Assessment | Upgrade | Install | Install from Scratch |

101-wm-frm-004

Workflow Management Form – Name Links

Version 6.1 (In Development)

Overview

The Name Links workflow form business entity (tab separator) provides all the different names that are linked to a workflow record (i.e Property Owner, Workflow Applicant, Primary Contact, etc.)

  • The types of links are user definable (see Link Type Editor).
  • The types of links available for a workflow Kind & Category are predefined by category (see Kind & Category Application Parameters – Supported Links)
  • Some links are created automatically when a Workflow record is created (new) if the option is setup (see Kind and Category Application Parameters) based on the Workflow (new)

The Form Name Links is the same as the Form Other Links for other properties, departments, buildings, workflows, inspections, hearings, miscellaneous billing, self reported tax, and personal property) and the only difference depends on the Form Entity Tab Controller properties MISC Configuration where Filter by Constants is added for names (Attribute ID Type is equal to NA_ID)

Name Links Entity (Tab Separator)

The workflow links controller adds a central location for all links associated with a workflow. There are two categories for these links:

  • Links to Names
  • Links to Everything Else: This category includes other properties, departments, buildings, workflows, inspections, hearings, miscellaneous billing, self reported tax, and personal property.

Configuration

See Link Type Editor and Workflow Linking Feature

Documentation

Workflow Linking Feature
101-wm-feature-Links.pdf
This document describes the following topics:

  • Configuring Links
  • Configuring links in the OpenForms Designer
  • Creating Link Types in GNA
  • Using Links in Govern


See Also

Workflow Other Links 101-wm-frm-005


101-wm-frm-004


0 votes, average: 0.00 out of 50 votes, average: 0.00 out of 50 votes, average: 0.00 out of 50 votes, average: 0.00 out of 50 votes, average: 0.00 out of 5 (0 votes, average: 0.00 out of 5)
You need to be a registered member to rate this.
Loading...

101-wm-frm-005

Workflow Management Form – Other Links

VERSION 6.1 Under Development

Overview

The workflow form Other Links tab is used to link the workflow to parcels, other sub-systems, other workflow, etc.
Click here to return to the main workflow form

Link Types Configuration

The available link types that can be used on the workflow forms are defined in Govern Administrator, Application Configuration, Workflow Management, Link Types

Link Types Supported:

  • P_ID
  • ST_ACCT_ID
  • MB_ID
  • UB_ID
  • PP_ID
  • BLDG_ID and SEQ
  • WM_ID


Other Links

Under development

See Also

Workflow Management


101-wm-frm-005


0 votes, average: 0.00 out of 50 votes, average: 0.00 out of 50 votes, average: 0.00 out of 50 votes, average: 0.00 out of 50 votes, average: 0.00 out of 5 (0 votes, average: 0.00 out of 5)
You need to be a registered member to rate this.
Loading...

WM – Installation Queries

Workflow Management Installation Queries

Version 6.1 (In Development)

Overview

This page is intended for System Administrators, Business Analysts and Technical Service.
The following queries are used in OpenForms when installing or configuring the Workflow Management module.

System Queries for Workflow Management

For the complete list, see 101-wm-install-queries …

Navigation

The queries and views used to set up the workflow eSearch and the Tree Views.

  • Search Group, Styles, Objects
  • Tree Views

Workflow Form Link Types

Controller used to create workflow links to names (applicants, contacts, names, etc.) and other references (parcels, buildings, other workflow, etc.)
For examples of queries, click here (101-wm-install-queries-linktypes)
Suggested list results

Workflow View Query

Can be used on a form Tab, link, action button or on the Profile Cool Bar. This query needs to be customized in order to change its presentation in Govern.


101-wm-install-queries


0 votes, average: 0.00 out of 50 votes, average: 0.00 out of 50 votes, average: 0.00 out of 50 votes, average: 0.00 out of 50 votes, average: 0.00 out of 5 (0 votes, average: 0.00 out of 5)
You need to be a registered member to rate this.
Loading...


WM – Table OFR – wm_parm_step

Workflow Management Table (wm_parm_step)

Version 6.1 (In Development)

Overview

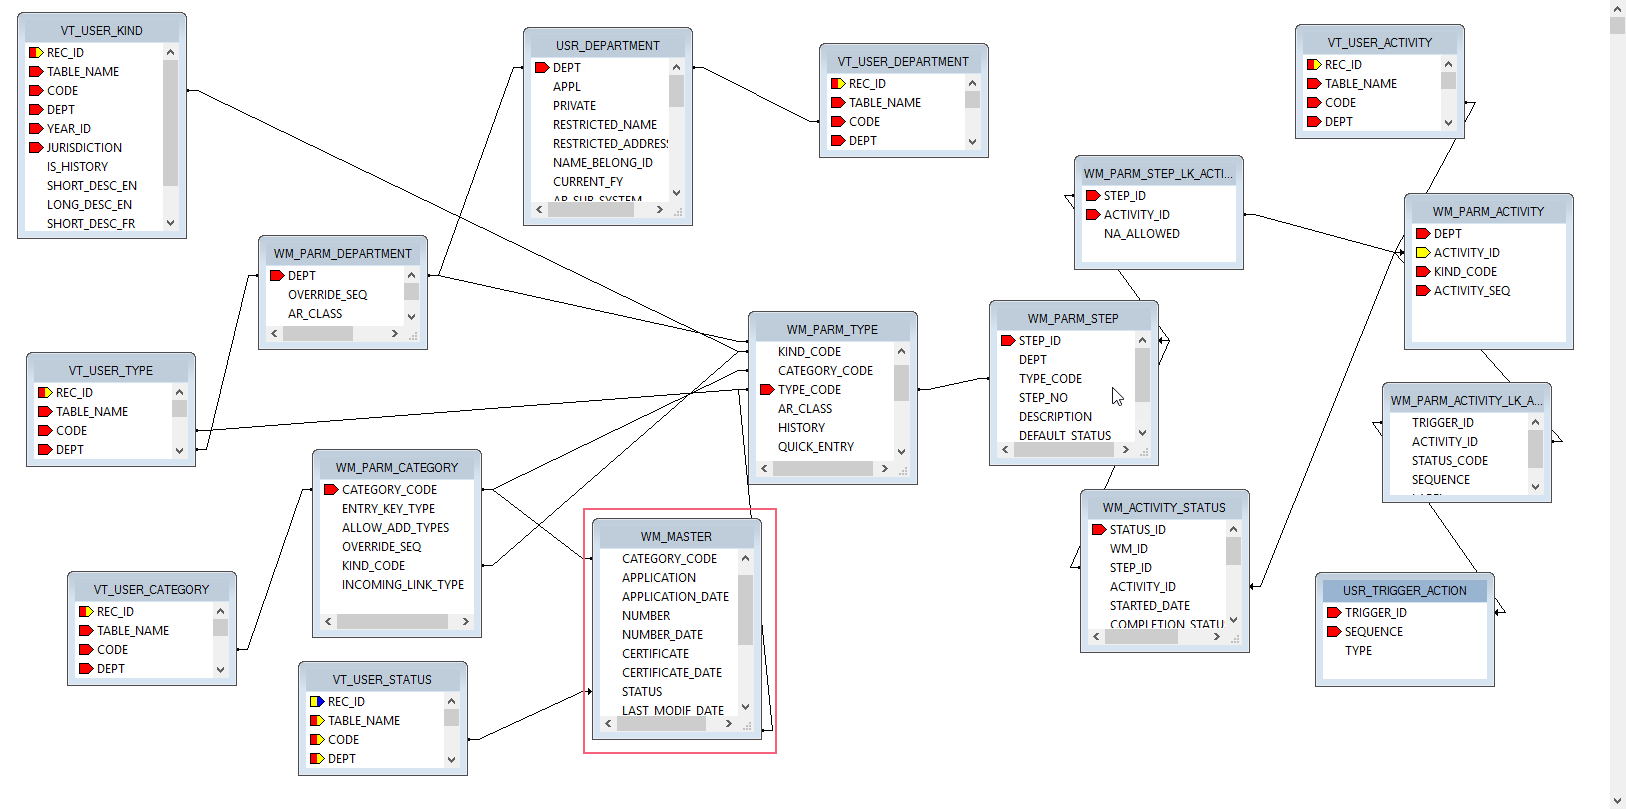
This page is intended for internal use. It provides the structure of the standard tables related to STEPS creation. wm_parm_step SQL table structure.

WM_PARM_STEP

<table name=”WM_PARM_STEP” description=”Workflow step parameter table” action=”add” gnaaversion=”6.1.0.0″ dbversion=”10.8″>
<column name=”STEP_ID” type=”varchar” length=”36″ nonull=”true” action=”add” gnaaversion=”6.1.0.0″ dbversion=”10.8″ description=”Step Id” />
<column name=”DEPT” type=”varchar” length=”2″ nonull=”true” action=”add” gnaaversion=”6.1.0.0″ dbversion=”10.8″ description=”Workflow Department Code” />
<column name=”TYPE_CODE” type=”varchar” length=”15″ nonull=”true” action=”add” gnaaversion=”6.1.0.0″ dbversion=”10.8″ description=”TYPE Code (WM_PARM_TYPE.TYPE_CODE)” />
<column name=”STEP_NO” type=”smallint” nonull=”true” action=”add” gnaaversion=”6.1.0.0″ dbversion=”10.8″ description=”Step number Unique for a DEPT and a TYPE CODE” />
<column name=”DESCRIPTION” type=”varchar” length=”30″ nonull=”False” action=”add” gnaaversion=”6.1.0.0″ dbversion=”10.8″ description=”Description of Step” />
<column name=”DEFAULT_STATUS” type=”smallint” length=”” nonull=”False” action=”add” gnaaversion=”6.1.0.0″ dbversion=”10.8″ description=”DEFAULT_STATUS previously known as default_branch” />
<column name=”AUTO_INIT_NEXT” type=”smallint” length=”” default=”0″ nonull=”true” action=”add” gnaaversion=”6.1.0.0″ dbversion=”10.8″ description=”AUTO_INIT_NEXT” />
<index name=”GV_WM_DEPT_TYPE_STEPNO” unique=”True” primarykey=”true” columns=”DEPT, TYPE_CODE, STEP_NO” action=”add” gnaaversion=”6.1″ dbversion=”10.8″ />
<index name=”PK_WM_PARM_STEP” unique=”True” primarykey=”True” columns=”STEP_ID” action=”add” gnaaversion=”6.1.0.0″ dbversion=”10.8″ />
</table>

WM_PARM_STEP_LK_STATUS

In the table WM_PARM_STEP_LK_STATUS we have the field STATUS_SEQ. Is it better to change the field COMPLETION_STATUS_SEQ to STATUS_SEQ in the table WM_ACTIVITY_STATUS ?
For COMPLETION_DATE I suppose we should not change it as we have STARTED_DATE field also ? – TO BE DETERMINED

WM_PARM_STEP_LK_ACTION

<table name=”WM_PARM_STEP_LK_ACTION” description=”Link between Workflow actions and steps” action=”add” gnaaversion=”6.1.0.0″ dbversion=”10.8″>
<column name=”TRIGGER_ID” type=”varchar” length=”36″ nonull=”true” action=”add” gnaaversion=”6.1.0.0″ dbversion=”10.8″ description=”Trigger Id from USR_TRIGGER” />
<column name=”STEP_ID” type=”varchar” length=”36″ nonull=”true” action=”add” gnaaversion=”6.1.0.0″ dbversion=”10.8″ description=”Step Id from WM_PARM_STEP_LK_STATUS” />
<column name=”STATUS_SEQ” type=”smallint” nonull=”true” action=”add” gnaaversion=”6.1.0.0″ dbversion=”10.8″ description=”Status sequence from WM_PARM_STEP_LK_STATUS” />
<index name=”PK_WM_PARM_STEP_LK_ACTION” unique=”True” primarykey=”True” columns=”STEP_ID, TRIGGER_ID, STATUS_SEQ” action=”add” gnaaversion=”6.1.0.0″ dbversion=”10.8″ />
</table>


101-wm-ofr-wm_parm_step


0 votes, average: 0.00 out of 50 votes, average: 0.00 out of 50 votes, average: 0.00 out of 50 votes, average: 0.00 out of 50 votes, average: 0.00 out of 5 (0 votes, average: 0.00 out of 5)
You need to be a registered member to rate this.
Loading...

103-wm-parm-Action11-LinkInspectionType

Workflow Management ACTION – Link Activity to Inspection Type

Version 6.1 (In Development)

Overview

The function of the Link Activity to an Inspection type action is to bring the ability to link an Activity action with an Inspection. This is an action that creates an Inspection Action. When used in the context of Workflows, users can create actions that are related to steps. Configuration is set in the Govern New Administration (GNA).

Configuration

Configuration steps are the same as those used for a standard action. There are three (3) parameters to complete after selecting the Action. In the Options group there are options for:

  • Department – Set the department for the action.
  • Scheduled Inspection – Specify the default as a scheduled inspection
  • Allow user to override the Types – Select this option to allow the user to override the selected inspection types when they are presented with the action when it is executed. When this option is selected, an inspection type is not required to be selected.

In the list of inspection types, users may select one or more inspection types with a check box in the list.
To configure the action select from the GNA ribbon…

  1. Select Application Configuration (tab) > Workflow (group) > Workflow Management > Departments.
  2. Select a department from the list of departments on the LHS.
  3. Click the Types tab.
  4. Under the Types tab, select a type from the grid; click Steps.
  5. Select a step from the list.
  6. Add a new action that will be associated with the step.
  7. In the Add a new action form select Create Inspection in the Action combo box.
  8. Set the required parameters; click Save.
  9. You will be returned to the Steps form.

Multiple Actions

It is possible to have multiple actions on an Activity. For example you can set a Completion Status 2 – Set the Permit on hold, and Completion Status 1 – Generate the permit number.

Saving Actions

Saves are made with the Save icon at the top of the interface.
After configuring multiple actions, when a save is made, the results that are presented in the Actions grid will be sorted on the contents of the Trigger column.

Presentation in Govern

Open Govern to view the presentation of the action when configured. Note that this action is executed in the context of a workflow. For our example, an action is executed on initiation of a step.
When the action is triggered, e.g. at initiation or at whatever step the activity is set to be executed, the user can be presented with the option of overriding the Types; note that this option must be selected during the configuration of the action.
Upon the save the following tables are updated:

  • WM_INSPECTION.IN_ID and WM_INSPECTION.STATUS
  • WM_INSPECTION_INSPECTION_TYPE.INSPECTION_TYPE
  • WM_INSPECTION_INSPECTION_LINKED_IDS.IN_ID (Entry key point for the inspection will be the same as that of the workflow, e.g. P_ID).


Tables

The following table(s) were implicated in the implementation of this feature:

  • WM_INSPECTION
  • WM_INSPECTION_TYPE
  • WM_INSPECTION_LINKED_IDS


Other Action Options

To view available Workflow Actions, click here for the complete Workflow Actions list.

See Also


103-wm-parm-Action11-LinkInspectionType


0 votes, average: 0.00 out of 50 votes, average: 0.00 out of 50 votes, average: 0.00 out of 50 votes, average: 0.00 out of 50 votes, average: 0.00 out of 5 (0 votes, average: 0.00 out of 5)
You need to be a registered member to rate this.
Loading...

WM – Action – Display a Form

Workflow Management ACTION – Display a Form

Version 6.1 (In Development)

Overview

This is an action trigger intended for use with the Govern Workflow. This action trigger will allow a user to display a form in a modal window, or in a tab item within Govern. The form that can be displayed by this action is either an existing form, or one that has been created in the OpenForm Designer (OFD).

Action form parameters

The following parameters appear in the Add a new action form:
Trigger – This is the status point at which the action is triggered, e.g. At Initialization, All Status, and so on; this field is not modifiable at this point.
Action – This is the list of available actions that are available to be configured; select Display a Form.
Label – This appearance of this parameter is conditional. It will only appear if the trigger point that the action is being configured in is On Request.

Action form – Options group

When the Display a Form action is selected, the following option(s) are displayed:

NOTE: Ensure that the form that is being configured is, both present in the profile that is being referenced, and is accessible to the user, i.e. security access has been given.

Form – Click to select the form that will be displayed from the combo box.
Display the form in a Modal Window – Select this option to display the form in a modal window. See When to use a Modal Window below.

NOTE: Ensure that the user has access to the form or they will be presented with the Security Lock screen.

Configuration

NOTE: Users will note that actions that are added to the ‘On Request’ section in the Options group will have a Label parameter to name the link that will invoke the action. Any actions that are executed On Request require a link.

As this is a standard action that is used in the context of a Workflow, it is configured through the Govern New Administration (GNA).
Prior to configuring the action in the GNA, you will need to create a new form in the OFD, or verify that you have access to an existing form that is to be displayed. Configure a workflow to display a form. Refer to current documentation for details about setting up a Workflow in the GNA.

To configure the action in the GNA…

  1. From the GNA ribbon select Application Configurations > Workflow (group) > Workflow Management > Departments.
  2. In the pane on the left hand side (LHS), select a department, e.g. W1-Permitting.
  3. Click the Types tab.
  4. Select a Type from the list.
  5. Click the Steps button.

Steps form – Options group

At Initialization – All actions that are configured in this section are automatically executed at the initialization of this step. When there are two or more actions, the order of initialization may be changed with a click and drag action.

Changing the order of initialization

  1. Click the vertical ellipsis symbol that appears in front of the step number.
  2. Drag to reposition above or below another action within the group.

All Status – The actions that are configured in this section are automatically executed after the completion of any available statuses, e.g. Initialization, Completion, and so on.
On RequestSee On Request Actions below.

On Request Actions

(Available in release 6.1.1702)
Typically an action is called automatically on Initiation or on Completion, actions may also be added to the On Request section. The actions in this section are executed manually; i.e. users will have to click on the button link that will trigger the action.

Adding the Action

To add the Action in the Steps form…

  1. On the Steps form select a step on the LHS and select a step.
  2. On the Right Hand Side (RHS), add an action.
  3. On the Add a new action form, add an action through the Action combo box; select the Display a form option.
  4. In the Options group, select the form that is to be displayed from the combo box.
  5. Indicate whether the form is to be displayed in a modal window. See When to use a Modal Window below.

Add a new action Form parameters (On Request trigger)

Label – On the Add a new action form there is a mandatory 25 character alphanumeric label that is used for the action link. Completion of the Label parameter is mandatory; this will be the name of the link that will invoke the action.

User Interface

Presentation in Govern

When correctly configured, the actions will be executed based upon their configuration in the GNA.
The Display a Form action will display the form in Govern as a new tab. If the modal window option is configured, the form will be presented in a modal; closing the window will close the form.

On Request triggers

Triggers that were configured to be executed as “On Request” will be presented as links on the right hand side (RHS) Available Actions group under the Activity tab. These links will be presented in the Available Actions group, in the order that the actions were entered. Available Actions that correspond to each step can be viewed with a click on the step; they will be presented in the group. With the group, to change the order, they will need to be rearranged in the options group, saved, and refreshed in the GNA.

When to use a Modal Window in Govern

A modal window is a graphical control element that disables the main window and keeps whatever window that is displayed visible. The users must complete the actions required by the modal window before they are allowed to return to main application. Use this option when you want the user to address the requirements of the window before moving on.


NOTE: Always ensure that the user will have security access to the form that is to be displayed.

Tables

The following table(s) were implicated in the implementation of this feature:

  • USR_TRIGGER_ACTION.

Other Action Options

To view available Workflow Actions, click here for the complete Workflow Actions list.

See Also


103-wm-parm-Action20-DisplayForm


0 votes, average: 0.00 out of 50 votes, average: 0.00 out of 50 votes, average: 0.00 out of 50 votes, average: 0.00 out of 50 votes, average: 0.00 out of 5 (0 votes, average: 0.00 out of 5)
You need to be a registered member to rate this.
Loading...