103-ac-parm-CopytoYear

Copy Parameters to Year
Overview

Note: Functionality available in version 6.0.1505

Overview

The main purpose of this option is to copy all Year base parameter to another year. It will validate if the destination year exist, and if so, the user will have a warning message to override the data before executing the copy.

Furthermore, the copy will be refused if an Original Audit record is found in the AUDIT information (Entry_code = ‘original’)

101-std-fea-043

Standard Module (STD) – Form Action Button Send Email
Govern Standard Module Overview, Configuration, Installation, OpenForms Reference, What’s New, wiki Module Map … Last modified July 21st, 2017
Version 6.1 (1706)

Table of Contents

Overview

Overview

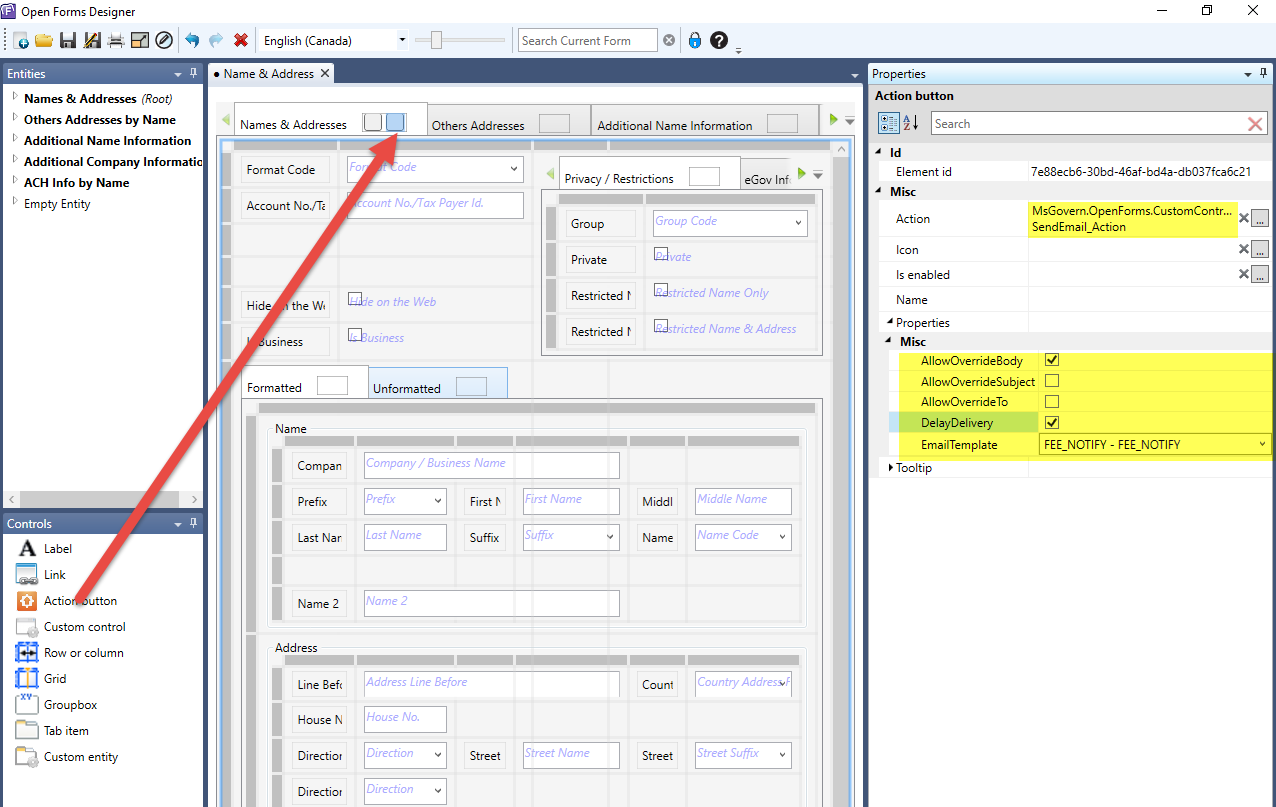
New standard Action Button feature allows the users of a form to send an email based on a given email template with predefined parameters.
Custom Control Name: SendEmail_Action

  • This action button is securable in OFD
  • There are 5 properties that can be set:
    • AllowOverrideBody: Allows the user to override the body of the message
    • AllowOverrideSubject: Allows the user to override the subject of the message.
    • AllowOverrideTo: Allows the user to override the To of the message.
    • DelayDelivery. If checked, the email will not be sent immediately. It will be marked to be delivered later. Currently NOT AVAILABLE (roadmap)
  • Email Template

For technical details, see Sending emails from a template Technical information

101-std-fea-043-ui-setup.png
Action Button Setup (OpenForms Designer)

101-std-fea-044

Standard Module (STD) – Form Action Button Print a Generic Report
Govern Standard Module Overview, Configuration, Installation, OpenForms Reference, What’s New, wiki Module MapLast modified May 2, 2018
Version 6.1 (1706)

Overview

This Action button when configured will allow users to export reports using Crystal Reports and Word templates.

Configuration

Configuring in the OpenForms Designer (OFD)

Technical Documentation for this feature can be obtained at the following URL. Note that you must have access to the Confluence document server to view this document. https://harrisgovern.atlassian.net/wiki/spaces/govrd/pages/83656866/Govern+OpenForms+Word+Integration+-+Action+Button+-+Export+Report+Action

This button can be configured as a standard action button, i.e. useable in most modules, and can be launched from a form tab in the profile. Configuration is through the OFD
NOTE: The Action button cannot be added to the tab of a custom entity.

To configure the action button in the OFD…

  1. Select a profile that the Action button will be added to.
  2. Click the tab to activate it.
  3. From the Controls group, drag an Action button to the tab.
  4. Click the newly added action button to display Properties on the right hand side (RHS).
  5. Configure the properties as in the grid below.
  6. Click Save to save the configuration.
  7. Close the OFD.
PROPERTIES Information
Action Button
Id
ElementID System Generated
Misc
Action MsGovern.OpenForms.CustomControls.dll
ExportReport_Action
Select the Assembly and Class
Icon Navigate to an icon for the form.
Is Enabled
Name
Properties
PrinterName
ReportCode reportName.rpt – Sample Report Select a report from the list of available reports.
ReportExportFormat Select the report export format.
Tooltip Optional
En
Fr

Govern New Administration (GNA)

Ensure that the form that was modified in the OFD has been configured in the GNA. This is done in the GNA Profile Editor. Once verified, no additional configuration is required in the GNA.

User Interface

Presentation in Govern

The action button will display in the tab that it was configured under in the OFD. For our example, the Action button has been added to the Name and Address form (NA001).

Security

Security of the action button is managed from the OFD Designer. Refer to OpenForms Designer User Guide for details about security.

Documentation

Click on link to view or download the document.
101-std-fea-044_Action_Button-Print_Report.pdf

See Also

Govern Standard Map

101-std-fea-045

What-If Scenario Feature
Module Overview, Configuration, Installation, OpenForms References, What’s New, wiki MapLast Updated Mar. 20, 2018 …
VERSION 6.1 GA1706

Overview

The feature of “What If” simulations was integrated in 6.1. The thought behind the simulations is to allow users to make projections on records. These projections will have no impact on any current records. After reviewing their projections, their current record are placed in their scenario.
Govern users will note that the Govern Audit and “What If” features create historical records that use Frozen ID’s. The Mass Appraisal (CAMA) and Tax (TX), PP, and PC modules have the same frozen id, (ID = -32765). Available in release 6.0.1611 and later.

Functionality

What-If simulations are essentially an Audit with a Frozen ID that is used exclusively by the feature. It still uses the audit table and its functionalities; the reserved Frozen ID is (ID =-32764). Refer to the Audit documentation for more details.
NOTE: For Governs versions prior to 6.1.1706, the Frozen ID remains the same for all sub-systems, i.e. (-32765). Versions after 6.1.1706 have their own Frozen ID.

Configuration

The What-If Scenario feature is available for the following Govern sub-systems:

  • Aircraft (AC) Link
  • Business Tax (BT) Link
  • Mass Appraisal (MA) Link
  • Motor Vehicle (MV) Link
  • Personal Property (PP) Link
  • Real Estate (RE) Link

NOTE: Configuration for the What-If Scenario is specific to each subsystem that it is available in.

Documentation

Click below to view the user documentation
101-std-fea-045_Govern_What_If_Scenario.pdf

See Also

101-std-frm-010

101-std-frm-010 #stdfrm #std

Standard Feature – Multimedia Document Queue
Module Overview, Configuration, Installation, OpenForms References, What’s New, wiki Map … Last Updated March 22, 2017

Table of Contents

Overview
Functionalities
Example
Configuration
OpenForms Designer (OFD)
OFD Properties
Extension Selector
Govern New Administration (GNA)
User Interface
Queue group – parameters (center)
Queue grid Columns
Queue grid Columns
How to refresh the Queue grid
Multimedia Type – Name
Details group
Preview
Actions group
Scan Settings subgroup
Adding to the Queue
Documentation
See Also

VERSION 6.1 Under Development

Overview

The purpose of the document queue is to serve as a placeholder for Multimedia documents that are to be added to a record at a later time. For example, a lineup of applicants are waiting to apply for permits or licenses, as the forms are filled out there may not be sufficient time to go through the process of scanning their required support documents for the application. As their record is completed, the scanning or importing attachment process for their multimedia documents are sent to the scanning queue. The will be attached at a later time. When the attachment process is ready to be completed, the Multimedia Scanning Queue presents the list of documents. Each document is selected on the list, and the scanning/import is performed. As each item on the list is processed, it is removed from the queue.

NOTE: The driver for the scanner being used must be Windows Image Acquisition (WIA compliant)

Functionalities

The Multimedia Scanning Queue is a custom control that allows users to “build up”, or “Queue up” a list of required documents for any Govern module. Although the title reads as Workflow Multimedia Scanning Queue, in actuality the feature is not dependent on the Multimedia function and can be used without the Multimedia control.
The Multimedia Scanning Queue action generates a multimedia document for the scanning queue that is related to a workflow. This action is performed according to the parameters defined in the Govern New Administration (GNA).

NOTE: This is not a generic action, and can only be invoked in the context of a workflow. This action is only functional when the category’s entry key type is a P_ID, or an NA_ID. USER_ID or DEPT_ID are not used.

The Multimedia function may be configured to work in together with the Multimedia Scanning Queue in Govern. This function can be used to control individual scans, or to control scanners that perform bulk scanning duties; the condition is that the installed driver for the scanner is WIA compliant.
The Multimedia scanning queue is a grid that displays a list that will require documents to be attached to them.

Example

As an example in a Workflow that results in the generation of a license, users can create a principal form workflow permit type. In addition to the principal form, the form will consist of two custom entities, the Multimedia entity, and the Multimedia Scanning Queue entity.

NOTE: Placing the Multimedia and Multimedia Scanning Queue custom entities together on the same form is not a requirement for functioning. As mentioned earlier, the Multimedia Scanning Queue entity can function independently of the Multimedia custom entity.

Configuration

OpenForms Designer (OFD)

As stated, Multimedia, and Multimedia Scanning Queue are both custom entities. When configuring the Multimedia entity, you would need to choose a parent entity, and set the selected multimedia type, e.g. in OFD configuration, the value of SelectedMultimediaType = Workflow, in the case of the Multimedia Scanning Queue, the configuration of a Parent Entity, or Property is not required.

OFD Properties

Properties Value
Custom Entity
ID
Element ID Generated by system
Misc
Action MsGovern.OpenForms.CustomControls.dll
MultimediaScanningQueue_Control
Name
Parent Entity – Not Required –
Properties
Tab sequence number – Not Required –
Text Multimedia Scanning Queue
(User defined name)

Extension Selector

This is displayed when the ellipsis button [ … ] at the end of the Action parameter is selected

Assembly Class
MsGovern.OpenForms.CustomControls.dll MultimediaScanningQueue_Control

Govern New Administration (GNA)

In the Department Maintenance form when defining Multimedia codes, note that one of two data types can be used for scanned requests. The data types that can be scanned are as follows:

  • I (Image) – Image files that are stored within the database.
  • P (Picture Link in the database) – Links to files that are external to the database.
NOTE: Picture (P) data types are associated with the External Document (Permanent Path) option.

external image image2017-2-27_13-53-14.png?version=1&modificationDate=1488221594276&api=v2

User Interface

When correctly configured, the Multimedia Scanning Queue form is presented with three (3) main groups. On the tab is a Refresh button

Queue group – parameters (center)

Queue grid Columns

Multimedia Type – Select one of two options Name, or Parcel. The initial default value is dependent upon whether the profile is based on a NA_ID, i.e. Name, or a P_ID, i.e. Parcel. This value can be changed to view the items in the queue.

Queue grid Columns

This grid is populated as a result of a query and will display a list of the multimedia documents that are to be scanned in the queue. There are two (2) queries that are used to populate the Queue grid. Which query used is determined by the value selected in the Multimedia Type parameter located above the grid. Consequently the columns displayed will be dependent on a selection of the Parcel (P_ID) or Name (NA_ID).

How to refresh the Queue grid

Users may refresh the grid containing queued items at any time. This can be done with a click on the refresh button that is displayed on the immediate right of the tab label.

Multimedia Type – Parcel
Entry Date – This column will display the entry date of the record
Document Type – The Document Type is the multimedia code that was assigned to the record when it is being queued. These codes are created in the Department Maintenance form under the Multimedia Codes tab.
Parcel Info – A certificate number is displayed in this column. If a certificate number is not present, then the application number is displayed.
Workflow # – When appropriate, this column will display the Workflow number associated with the record.

Multimedia Type – Name

Entry Date – This column will display the entry date specified for the queued record
Document Type – The Document Type is the multimedia code that was assigned to the record when it is being queued. These codes are created in the Department Maintenance form under the Multimedia Codes tab.
Name – This parameter displays the content of free_line_1 from the NA_NAMES table name (NA_ID) associated with the record.
Workflow # – When appropriate, this column will display the Workflow number associated with the record.

Details group

Info Type – This is the document type assigned to the requested file.
Details – Displays parcel or name information
Request Date – If available, this is the set date requested for the document
Document Type – The requested document type is indicated in this field. This is description of the document.
Image Type – This is the classification of the image.

Preview

Document Type – Description of the document.
File Type – This is the type of file, e.g. .jpg, .png, .bmp, .doc, .pdf, and so on.

Actions group

Import – Click to display the file selection window; navigate to and select the file that is to be imported.
Scan – To scan directly from Govern click this button. When the scan is complete the image will be displayed in the Preview group. No interim UI is displayed.
Save – A click on Save will save the file with the record. When the save is complete, the record will be removed from the scan queue.

Scan Settings subgroup

There is a combo-box that displays the WIA compliant scanner that is configured on the system.
Scan with the integrated UI – When this option is selected, the interface will default to the scanner manufacturers interface. When selected, all options in this form will be disabled.

Adding to the Queue

Items are added to the queue either directly through the Multimedia form, or as a result of actions that are associated with an activity. When the item has been added to the queue as a request, they can then be selected one at a time from the list. The required multimedia file is then acquired to be added to the request through a file import, or an import as a result of a scanner acquisition. When the imported document as been saved, i.e. associated with the queue request, the file is removed from the queue.

Documentation

101-std-frm-010 Workflow Multimedia Scanning Queue.pdf

See Also

Workflow Management ACTION – Generate Multimedia Image Queue
Multimedia
Workflow Management Wiki Map

Copy to Next Year Feature

Standard Feature – Copy to Next Year

Overview

The Copy to Next Year batch process is used to copy data from one year to the next. For example in the case of the Utility Billing (UB) module, the system will create the new Utility Billing Services and all related Codes from the current year displayed at the bottom of your screen to the year entered. Recent modifications expand the scope of the data that is copied from a source to a destination year.

Functionality

There are two (2) main modifications that have been made to the Copy to Year batch process. First for each Copy to Year Batch Process, the Govern system now copies the Constants, Shared Expressions, Queries, and the VT_USER from regular Workflows and Property Control. Secondly, in the Real Property Tax module; the Copy to Year functionality has been brought in line to match the same functionality that is found in the Mass Appraisal or Miscellaneous Billing, in order to be able to use the same batch process.
This batch process will duplicate data from the selected year to the target year, for the following tables:

  • All tables that are prefixed by TX_PARM_ and have the “YEAR_ID” column name
  • TX_MODIF_STAMP

In addition the process as of release 6.1.1803.0034 / 6.1.1804.0054, will copy data from the following…

  • (Table: VT_USER) of type Regular, Workflow and Property Control
  • (Table: USR_CONSTANT)
  • (Table: USR_QUERY)
  • (Table: USR_EXPRESSION)

User Interface

Selection Criteria group

From – Select the year that contains the data you want to copy in the From combo-box.
To – Enter the year to which you want to copy the data in the To text box.

NOTE: The To year must be greater than the From year.

Tables Not Related to Subsystems group

Delete destination data before copy – When the Delete destination data before the copy check box is selected, the batch will delete existing records for the target year. If this option is not selected, copied data will be appended to existing ones.

Deleting Data in the Destination Year

When selected, a confirmation window will be displayed, requesting whether you would like to delete the data in the destination year.

NOTE: Selecting Yes will not result in the immediate deletion of the destination year data. The data is only deleted upon initiation of the batch process.

Tax group

Delete destination data before copy – Select Delete destination data before the copy check box to delete existing records for the target year.

NOTE: This is a preexisting option; the functionality has not been modified.

Configuration

Govern New Administration (GNA)

In GNA this batch process is configured through the Batch Process Definition Editor form. Configuration parameters are standard for Govern batch processes.
For parameter details, refer to the Govern Batch Process Definition Editor documentation.

Documentation

103-tx-bp-105_Copy_Constant_to_Next_Year.pdf



101-std-fea-026


0 votes, average: 0.00 out of 50 votes, average: 0.00 out of 50 votes, average: 0.00 out of 50 votes, average: 0.00 out of 50 votes, average: 0.00 out of 5 (0 votes, average: 0.00 out of 5)
You need to be a registered member to rate this.
Loading...


Govern Knowledge Base Help

Govern Help

Overview

What is Govern Help

The Govern Help is the term used to describe one or more technologies that are available for users of the Govern suite of applications. The Help system is an alternate implementation of the end-user Online Help found with Govern for Windows. In prior releases, Help came in the form of PDF files that required the installation of the Adobe AcrobatTM Reader.

Govern Help is invoked with the standard F1 key. This keystroke will invoke Govern Web Help. Web Help will display the contextual help information related to the feature or form within the Govern application. Govern Web Help displays help information through a Web browser. This browser must have access to the Govern Knowledge Base web site located at (http://kb.harrisgovern.com).

User Customized Help

In some instances, as in the case of the Govern application, there is a user configured Help feature. User configured help is initiated through the Ctrl + F1 key combination. When properly configured by the user, depending on the Govern application, Ctrl + F1 invokes the help document that has been configured by the user.

Availability

Unless otherwise stated, Govern Help is available in Release 6.0.1509 and Release 6.1.1509; the level of detail that will be provided to the user is found in the following grid.

NOTE: If Help information for the specific area of the application is not available, the top level information will be displayed by default.

Read More...

Govern Application Location Level of information
provide to user
Command Key
DeployEZ Help button (upper right hand side) or command key Top level – General application information F1
Govern New Administration (GNA) Help icon (in the ribbon under Help tab) Top level and select utilities and tools F1
Govern Security Manager (GSM) Ribbon (in the Help group) Top level – General application information F1
OpenForms Designer (OFD) Help button on ribbon Top level – General application information F1
Business Entity Designer (BED) Help button (upper right hand side) or command key Top level and application panes F1
Govern Help button under Help tab in the ribbon Top level – General application information Ctrl + F1 (F1 invokes PDF Help)
Govern Scheduler (GS) Help Menu (Help > Show Help) Top level – General application information F1
Query Tool (QT) Button on ribbon Top level – General application information F1

Troubleshooting

Although the requirements for Governs’ Web Help are basic, i.e. the installed Govern application and any one of the supported Web browsers, occasionally issues may arise. Resolution to some Web Help related issues will be listed below.

Access to the Knowledge Base

The most common error that is encountered with Govern Web Help is to ensure that you have an account to access the Govern Knowledge Base. If you do not have an access account, contact Govern Support.

Related Topics

R&D Developers – How to set-up new codes PRODUCT_RD 101-std-fea-027


101-std-fea-027


0 votes, average: 0.00 out of 50 votes, average: 0.00 out of 50 votes, average: 0.00 out of 50 votes, average: 0.00 out of 50 votes, average: 0.00 out of 5 (0 votes, average: 0.00 out of 5)
You need to be a registered member to rate this.
Loading...