Accounts Receivable (A/R) OpenForms Reference
Overview
This information will be posted as it becomes available.
101-ar-ofr
 (0 votes, average: 0.00 out of 5)
You need to be a registered member to rate this.
 Loading...

This information will be posted as it becomes available.
101-ar-ofr
(0 votes, average: 0.00 out of 5)Loading...
| Error Code | Description |
|---|---|
| 1 | Invalid AR ID Property |
| 2 | Save without Append (No A/R Detail found) |
| 3 | Invalid A/R Class Code Property |
| 4 | Invalid Subsystem code in A/R Parameters |
| 5 | Missing Required PID Property |
| 6 | Missing Required NAID Property |
| 7 | Missing Required Cycle Code |
| 8 | Missing Required Key ID Or Key Type |
| 9 | Missing Required UBID |
| 10 | Move Next After EOF |
| 11 | Invalid Transaction Type |
| 12 | Detail Object Contains Existing Transactions |
| 13 | Missing Required CCID Property |
| 14 | Missing Required A/R ID Property |
| 15 | Missing Subsystem Property |
| 16 | Missing Installment |
| 22 | Class Code and Transaction Type Incompatible |
| 25 | Invalid Fiscal Year |
| 26 | Invalid Amount |
| 27 | Can’t get a system key index |
| 28 | Invalid G/L Distribution Amount |
| 29 | Transaction Already Posted |
| 30 | Cannot delete because the subsequent transaction is not posted |
| 32 | Invalid or Missing PP_ID |
| 33 | Invalid or Missing MV_ID |
| 34 | Invalid or Missing BT_ID |
| 35 | This A/R record is inactive and unavailable |
| 36 | No Right of Access |
101-ar-ref-ErrorPostingCodes
(0 votes, average: 0.00 out of 5)Loading...
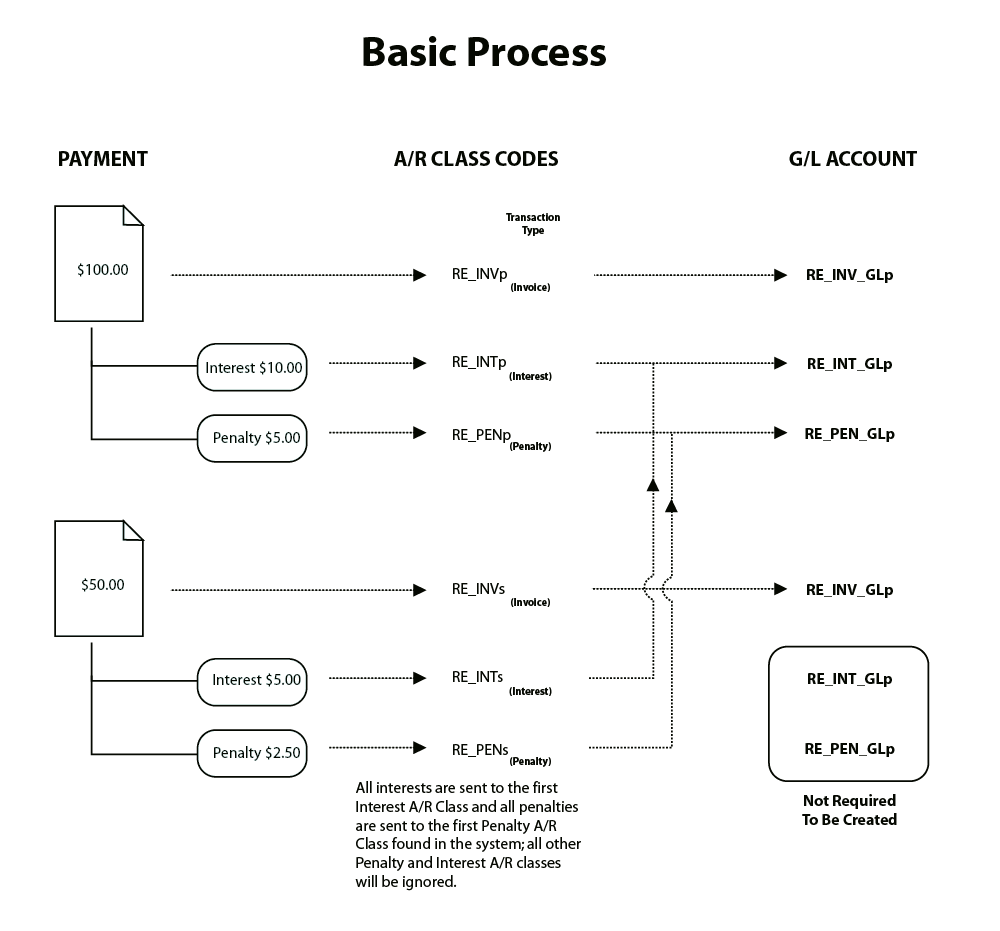
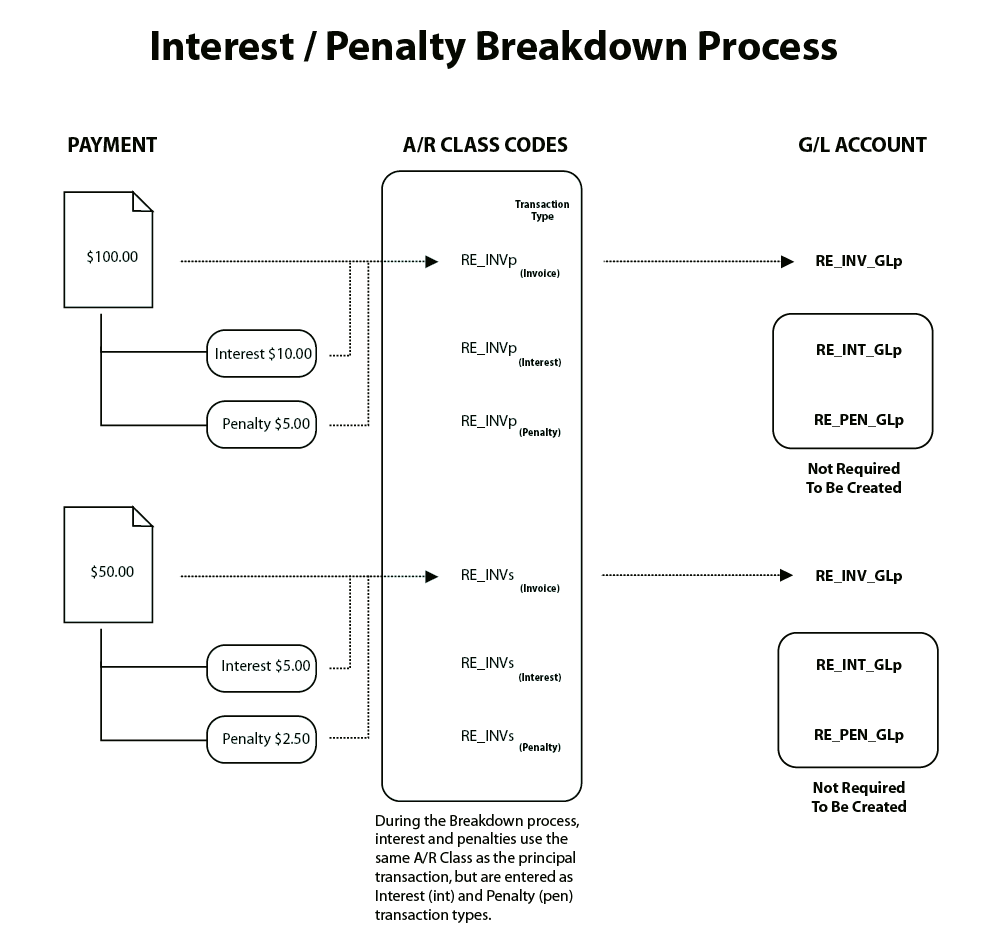
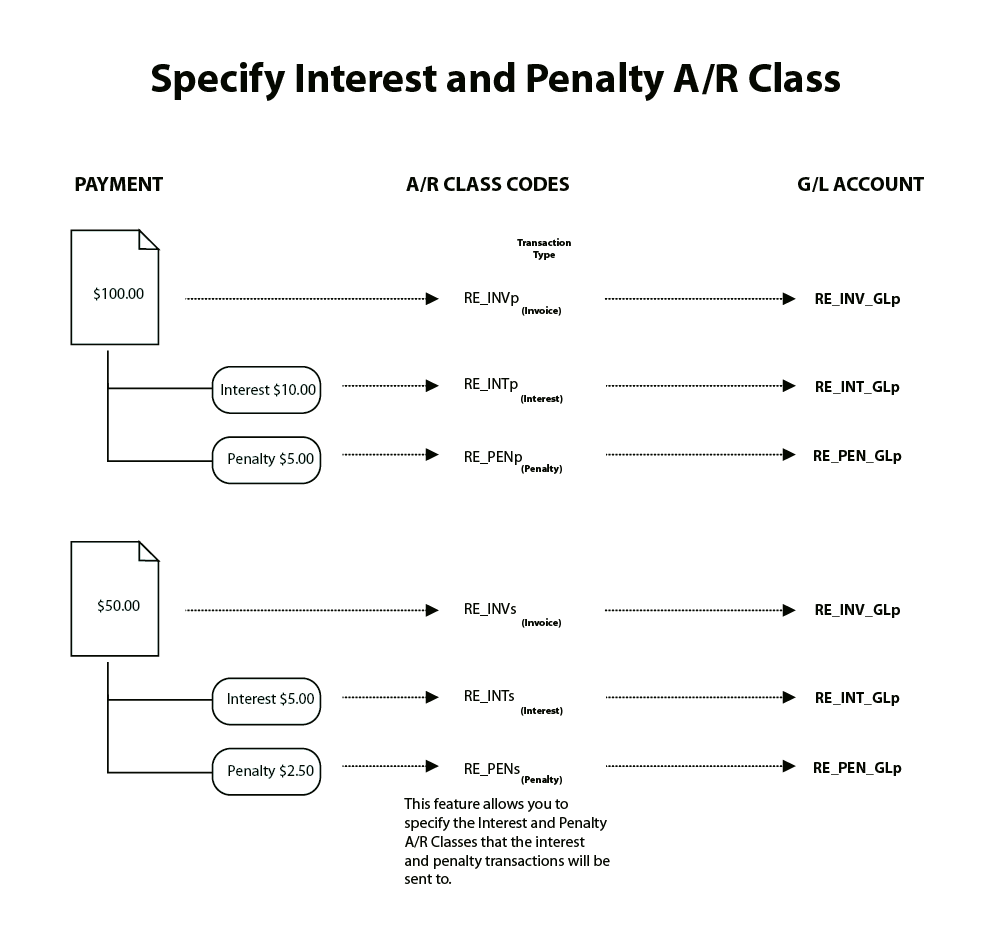
When an AR transaction is posted (confirmed), G/L entries are created for accounting and audit purposes.
For each transaction, a debit and a credit is created.
For each posting, Total Debit = Total Credit
The debit and credit entries generated depend on the nature of the transaction, and on the:
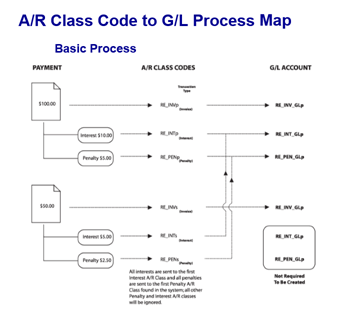
The following shows the different processes (basic, interest/penalty breakdown, specific A/R Class and penalty). Click on the thumbnails to enlarge or click here for a printable version.
|
|
|
G/L Accounting Business Rules by AR Transaction Type
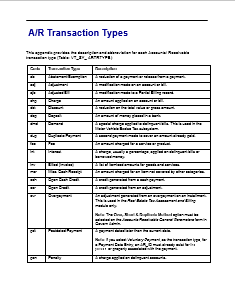
This table lists the valid G/L Accounts for each transaction type. Click here for a PDF copy.
| Transaction Type | G/L Accounting |
| Abatement | Accounts Receivable, Revenue, Deferred Revenue |
| Adjustment | Cash, Accounts Receivable, Revenue, Deferred Revenue |
| Adjusted Bill | Cash, Accounts Receivable, Revenue, Deferred Revenue |
| Charge | Cash, Penalty: Accounts Receivable, Penalty: Revenue, Penalty: Deferred Revenue |
| Discount | Accounts Receivable, Revenue, Deferred Revenue, Discount |
| Deposit | N / A * |
| Demand | Cash, Penalty: Accounts Receivable, Penalty: Revenue, Penalty: Deferred Revenue |
| Duplicate Payment | Cash, Accounts Receivable, Revenue, Deferred Revenue |
| Fee | Cash, Penalty: Accounts Receivable, Penalty: Revenue, Penalty: Deferred Revenue |
| Interest | Cash, Penalty: Accounts Receivable, Penalty: Revenue, Penalty: Deferred Revenue |
| Billed / Invoice | Cash, Accounts Receivable, Revenue, Deferred Revenue |
| Miscellaneous Cash Receipt | Cash, Accounts Receivable, Revenue, Deferred Revenue |
| Open Cash Credit | Cash, Accounts Receivable |
| Open Credit | Accounts Receivable, Revenue, Deferred Revenue |
| Over Payment | Cash, Accounts Receivable, Revenue, Deferred Revenue |
| Postdated Payment | N / A * |
| Penalty | Cash, Penalty: Accounts Receivable, Penalty: Revenue, Penalty: Deferred Revenue |
| Payment | N / A * |
| Payment Reversal | Cash, Accounts Receivable, Revenue, Deferred Revenue |
| Refund | Cash, Accounts Receivable, Revenue, Deferred Revenue |
| Over & Short | Cash, Accounts Receivable, Revenue, Deferred Revenue |
| Tax Deferral | Cash, Accoutns Receivable, Revenue, Deferred Revenue |
| Transfer to Tax (Interest, Penalty) | Cash, Penalty: Accounts Receivable, Penalty: Revenue, Penalty: Deferred Revenue |
| Tax Title Lien | Cash, Accounts Receivable, Revenue, Deferred Revenue |
| Tax Title Lien (Interest) | Cash, Penalty: Accounts Receivable, Penalty: Revenue, Penalty: Deferred Revenue |
| Transferred Principal | Cash, Accounts Receivable, Revenue, Deferred Revenue |
| Trans.(Interest, Penalty) | Cash, Penalty: Accounts Receivable, Penalty: Revenue, Penalty: Deferred Revenue |
| Transfer to Tax | Cash, Accounts Receivable, Revenue, Deferred Revenue |
| Sales Tax 1 | Cash, Accounts Receivable, Revenue, Deferred Revenue |
| Sale Tax 2 | Cash, Accounts Receivable, Revenue, Deferred Revenue |
| Voluntary Payment | N / A * |
| Note(s): The Deposit, Postdated Payment, Payment and Voluntary Payment transaction types are not distributed to Govern’s G/L |
 |
 |
| AR G/L Accounting Process Schema (click to enlarge) |
AR Transaction Type |
101-ar-ref-GLAccountingRules
(0 votes, average: 0.00 out of 5)Loading...
The A/R Information tab of the A/R Inquiry form includes a section for ACH Information.
This is updated automatically when you run the Prepare Data for ACH and the ACH Generate File batch process. For details, see
ACH Batch Processes
101-ar-frm-004
(0 votes, average: 0.00 out of 5)Loading...
The A/R Inquiry Payment Plan is used for defining a payment and calculating when payments are due. The form provides some flexibility. Payments can be received between dates and made for less than the amount specified in the Amount per Period field. The Next Payment Date field is updated when the full amount for the period has been paid.
For the complete reference guide, see Govern Accounts Receivable.
For the A/R Transaction Rules, see 101-ar-001-AR-TransRulesGL.
If you run the A/R Refund Posting or A/R Reversal Posting batch processes for a payment made through the Payment Plan, start with the last payment entered.
| NOTE: Running one of these batch processes on a payment prior to this may corrupt the Payment Plan data. |
To indicate that a payment plan is associated with an account, the text for the record is displayed in red in the Summary Detail.
Save: Click Save to save the payment plan record.
Delete: If no payments have been made on the current payment plan, you can remove it by clicking Delete.
Show Detail:
Click Show Detail to display the payment plan details. This button is enabled after the record is saved at least once.
Plan Option (On/Off)
Select the On or Off option according to the status of the project. If required, you could set up all the payment plan parameters; then, turn on the plan when all conditions are agreed upon.
Payment Option: The Payment option is displayed if the ACH (PAP) Supported via Payment Plan option is selected in GNA.
Payment Period: Select an option for the payment period from the drop-down list, according to how often payments are to be made:
Number of Payments: Enter the number of payments required for the plan.
Periodic Budget: Enter the amount of the budget that is agreed upon for the selected period. This field is disabled when the Other option is selected in Payment Period.
Starting Date : Enter the date the payment plan starts. By default, the current date is displayed.
First Payment Date : Enter the date the first payment is due.
Final Payment Date: Enter the date the final payment is due. This field is active when the Other option is selected in Payment Period.
Next Payment Date: The next payment date is automatically displayed when the first payment is made and after each subsequent payment.
Last Payment Date: The last payment date is automatically displayed when the first payment is made and after each subsequent payment.
Last Payment Amount: The last payment amount is displayed when the first payment is made and after each subsequent payment.
Not Subject to Delinquent Charges: Select this option to exclude the current record from interest, penalties, and other delinquent charges.
Effective Date: Enter the date that the interest comes into effect.
Ending Date: Enter the last date that interest can be charged.
Resolution Number: Enter a resolution (reference) number for the record.
Reason: Select a reason from the drop-down list. Reasons are user defined. Examples include Credit Memo, Debit Memo, Duplicate Payment, and Overpayment (Table: VT_USR_AR_ REASON).
Authorized By: Enter the name of the person authorizing the payment plan.
When you click the Show Detail icon the Payment Plan Detail window opens.
This window displays information about the total amount due and the details for each pay period within the plan. For example, if the total is $12,000 and the payment period is monthly, 12 payment periods of $1,000 each are listed.
Amount Due: This field displays the total amount owing on the account.
Amount Distributed: This field displays the amount that is spread across the payment periods.
Difference: This field displays the difference between the Amount Due and the Amount Distributed.
The information in the grid is automatically calculated based on the amount due and the number of payment periods. The first column displays the number of the payment period. If there are 12 periods, the numbers 1 to 12 are displayed.
Due Date: This field displays the due date for each period. The dates are automatically calculated based on the starting date and the number of periods. Select a date and click the Calendar icon to change a due date if required.
Period Amount: This field displays the amount calculated for each period. This is based on the amount due and the number of periods.
Amount per Period: Enter the amount to be paid for each payment period.
| NOTE: If you run the A/R Refund Posting or A/R Reversal Posting batch processes for a payment made through the Payment Plan, start with the last payment entered. Running one of these batch processes on a payment prior to this may corrupt the Payment Plan data. |
The semi-annual payment plan will calculate the payment dates starting from the starting date, i.e. Begin Date, and then taking into account the user specified Number of Payments, calculate the dates of payment every six (6) months. For example, if we were to create a payment plan, specify the Payment Period to Semi-annual, with the number of payments entered as five (5). The plan will break down the amount owed into a Periodic Budget of five (5) payments that are to be made Semi-Annually, i.e. every six (6) months.
For example in the Govern A/R Module, we have an amount due of $1,585.14, the Begin Date is 08/15/2017, when we set the Payment Period to Semi-annual, and the Number of Payments to 5, Govern will determine the following first and final payment dates as:
In Govern, locate an account via its AR_ID in the Govern search form. When the record has been located, click the A/R Payment Plan Info tab.
When the Number of Payments parameter is entered as 5, the First Payment Date and the Final Payment Date will be indicated. The details for our payment plan have been entered.
The full details of the payment schedule are displayed as follows:
| Period | Due Date | Period Amount | Amount Paid |
|---|---|---|---|
| 1 | 2/15/2018 | $317.03 | |
| 2 | 8/15/2018 | $317.03 | |
| 3 | 2/15/2019 | $317.03 | |
| 4 | 8/15/2019 | $317.03 | |
| 5 | 2/15/2020 | $317.02 |
The Periodic Budget amount is the system calculated payment amount. This amount is displayed in the Periodic Budget parameter. When a payment is made, after the click to save the payment, the Cash Collection dialog box will appear displaying a log of the transaction. This will include the Account No., the Account Name, and the Minimum to Collect. Situations may arise where the system generated Periodic Budget amount cannot be paid. In such instance a supervisor can give permission to allow a lower amount to be paid.
Configuration of this temporary transferring of permission is performed in the OFD. See the Enable Supervisor Permission Transfer for Minimum Payment in the Security section.
NEW! When the option to “Allow to pay less than minimum to collect” is set in the OFD, an authorized user can enter their password and override the system requirement for a minimum payment. To use the supervisor override, after the prompt of the Cash Collection confirmation screen…
After the Supervisor enters the Username and Password, click the Save icon to confirm the permission transfer for the minimum payment.
| NOTE: If a payment type is not selected, a Cash Collection dialog box will be displayed indicating that a “Payment Type is Required”; click OK. Choose a payment type, e.g. Cash. Unless the user option to “Allow to pay less than minimum to collect” is set in the OFD, the minimum payment will be required to be entered. |
NEW! Security for this feature can be set by Role or by User. Enabling or disabling security options must be performed by a user with administrator level rights.
Typically this option is enabled for a Supervisor or user that has administrator rights.
Accounts Receivable Module
Accounts Receivable – What’s New
Accounts Receivable Configuration
A/R Inquiry Payment Plan
101-ar-frm-005
(0 votes, average: 0.00 out of 5)Loading...
Deposit Management is mandatory for all A/R transactions in Govern OpenForms. You can use either auto-assigned deposit numbers or create them manually on the Deposit Management form.
For the complete reference guide, see 101-all-001-GovernAccountsReceivable-(man)-(6.0).
For the A/R Transaction Rules, see 101-ar-001-AR-TransRulesGL.
Deposit numbers are organized under the following transaction types:
For each transaction type, you can create as many deposit numbers as required. For example, you may want to create a new deposit number for each deposit, for each day, or for each user.
There are two levels of security for Deposit Management forms. The first is typically assigned to users, such as administrators and supervisors, who need to see the deposit number of all users. The second is assigned to users who need to see their own deposit numbers only.
To access this form:
The following icons are displayed at the top of the Deposit Management form.
This scenario describes how to create separate deposit numbers for credit card payments. Administrative Setup
A new deposit number is automatically created for credit card payments if the Separate Credit Card for Deposit Numbers option is selected in Govern Admin.
To select this option:
A new deposit number is automatically created for credit card payments if the Separate Credit Card for Deposit Numbers option is selected on the General Settings Editor in GNA.
To select this option:
For the credit card setup, you need to create a deposit number for the type of payments you are processing. Typically, this is Payment.
To create a deposit number for payments:
| NOTE: The For Credit Card Payment Only option is automatically selected if the payment was made by credit card. It cannot be modified from this form. |
The procedure for entering a deposit on credit card payments is the same as for any other type of payment. However, you need to ensure that you select the deposit number for credit cards that you created in the previous step.
To process a payment with a deposit for credit cards:
101-ar-frm-006
(0 votes, average: 0.00 out of 5)Loading...
The Payment Data Entry form is used for accepting payments at the counter, by cash, check, credit card, debit card, or by any other user-defined method. The current property owner associated with the account is automatically defined as the payer.
For the complete reference guide, see Govern Accounts Receivable.
For the A/R Transaction Rules, see A/R Transaction Rules.
The following transaction types can be accepted and processed through the Payment Data Entry form.
Payment: Money given in exchange for goods or services.
Deposit An amount of money placed in a bank.
Postdated Payment: A payment dated later than the current date. Note: For a posted payment, you can create a payment transfer. A payment transfer is similar to a payment reversal.
Voluntary Payment / Advance Payment: An amount that is paid before the bill is received; for example, a taxpayer may forward a payment to cover bills during a predicted absence. Note: If you select Voluntary Payment, as the transaction type, for a Payment Data Entry, an AR_ID must already exist for the person or property associated with the payment.
For details on the A/R Transaction Types, see A/R Transaction Rules.
The Payment Data Entry form is divided into four sections:
Subsystem: This field displays the subsystem for the record selected on the A/R Inquiry form.
Year: This field displays the fiscal year of the transaction.
Bar Code: This field displays the bar code or A/R ID in the Bar Code field.
Cashier ID: This field displays the Cashier ID defined on the Cash Collection Parameters form in GNA.
Select one of the following transaction types from the Transaction Type drop-down list:
Deposit Information: These fields display the current Deposit Number and the total amount of the deposit.
Notes: Enter any notes or comments that are applicable to the payment.
The data entry field for the Deposit transaction type are different from the fields for the Payment transaction Type.
This section describes the data entry fields for the Payment, Postdated Payment and Voluntary or Advance Payment Transaction Types.
The fields at the top of the Detail section are automatically populated. You can modify them only if you have full access rights to the function. The Reference, Type, Amount, and Money fields are available for user input.
Effective Date: This field displays the date of the payment. By default, this is the current date. To change the date, click the calendar beside the field and select a new date.
Installment: For payments by installment, this field displays the installment number: 1st, 2nd, 3rd, 4th, or Total.
A/R Balance: This field displays the amount to apply to the bill. By default, this is the balance due and the field is read-only.
Interest: This field displays the current Interest owing on the account.
Penalty: This field displays the current Penalty owing on the record.
Fee: This field displays the current fee.
Discount: This field displays the current discount if applicable.
Charge: This field displays the current charge.
Demand: This field displays the current value of the Demand to apply on the A/R Balance amount.
Note: Changes to values are displayed when the record is saved.
Total to Pay: This field displays the total amount due on the bill. This total includes the amounts from all fields in this section.
For example, interest charges, penalties, fees, and discounts are added to the value in the Total to Pay field.
You can modify the value in the Total to Pay field. Your modification is applied to the A/R Balance.
This section describes the parameters for the Deposit Transaction Type.
Effective Date: This field displays the date of the payment. By default, this is the current date. To change the date, click the calendar beside the field and select a new date.
Installment: For payments by installment, this field displays the installment number: 1st, 2nd, 3rd, 4th, or Total.
Total to Pay: This field displays the total amount due on the bill. This total includes the amounts from all fields in this section.
By default, the Payer information fields display the name of the taxpayer and a code that identifies the type of letter to be issued with the bill.
To modify the payer information:
1. Click C beside the Payer information field to change the name. This displays the Search screen with the following options:
2. Enter the required information on the search screen. Then, select the applicable record.
3. Select a code from the Letter Code field to identify the type of letter the payer receives, such as, duplicate payment, over payment or payment reversal (Table: VT_USR_LETER_C).
4. Click Save.
For a posted payment, you can create a payment transfer. A payment transfer is similar to a payment reversal.
101-ar-frm-020
(0 votes, average: 0.00 out of 5)Loading...