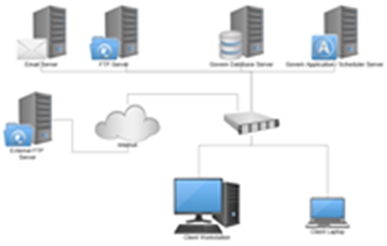
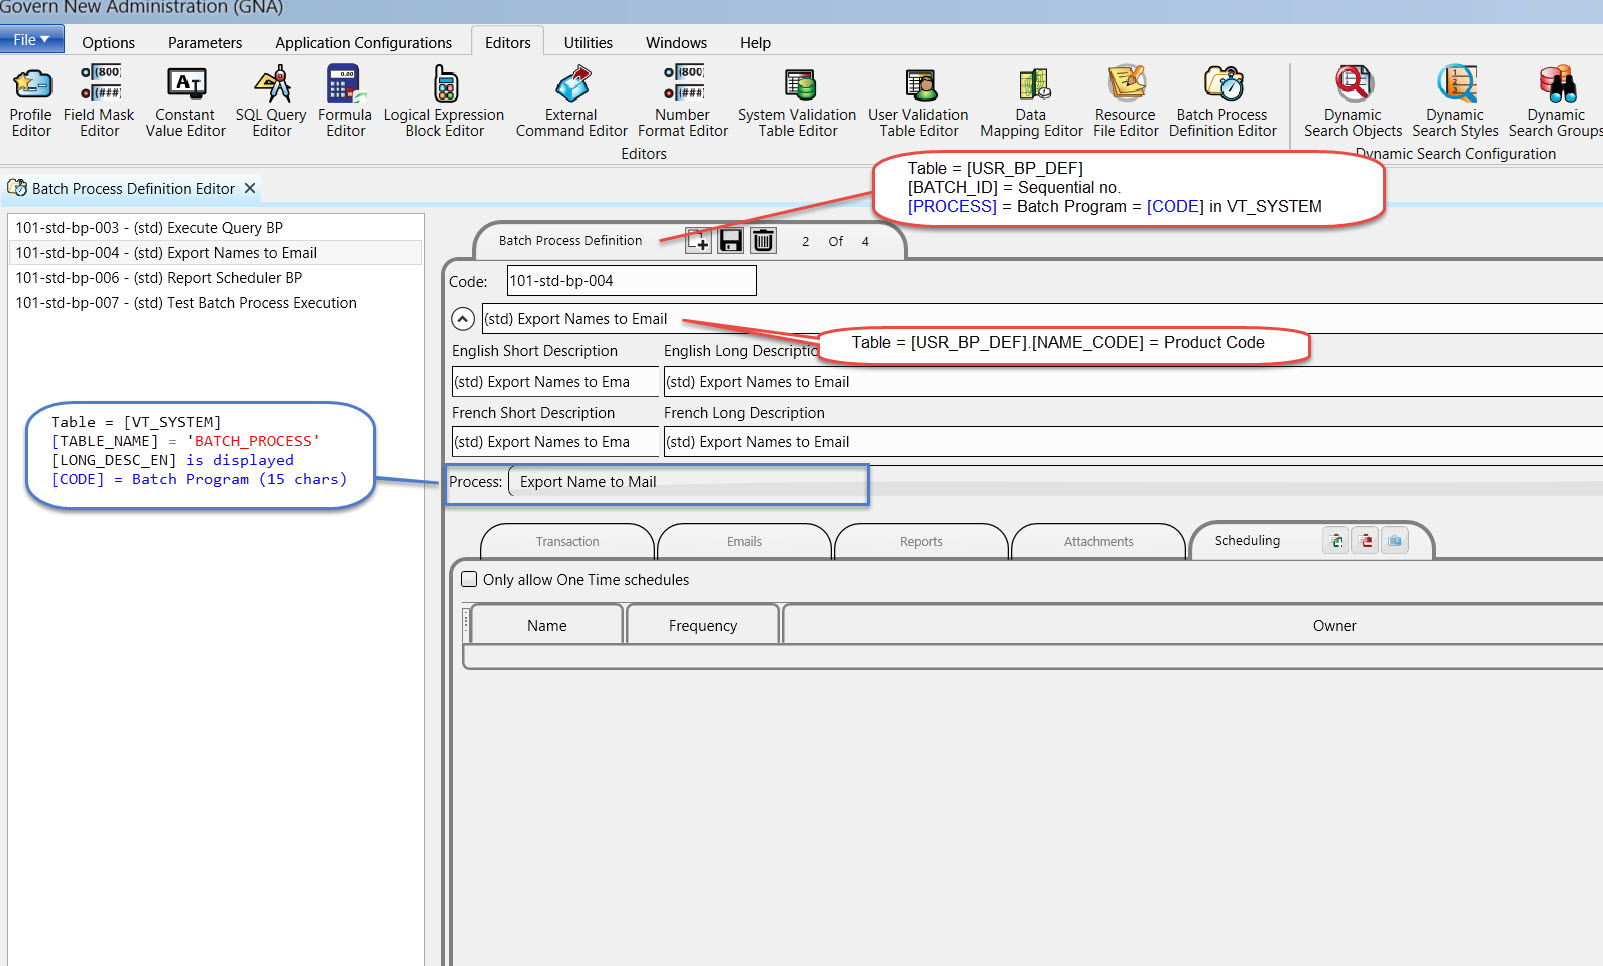
TX – BP Load LockBox Entries (101-tx-bp-005)

Load LockBox Entries Batch Process

Release 6.1.1912 | 6.0.1904 | 6.0.1903

Overview

This batch process will load a payment lockbox file from a third party to Govern.

Documentation

When available a link to documentation is located here.

Configuration

This Batch Process uses the standard BP configuration.


TECH NOTE: Process code: GWF_LOCKBOX


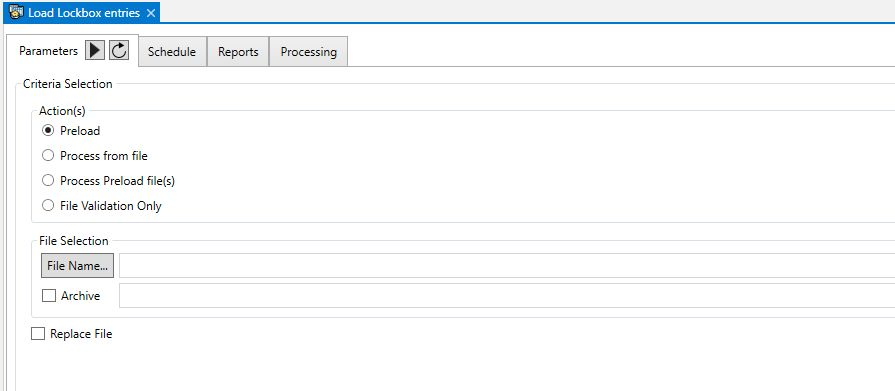
Load LockBox Entries batch process Parameters

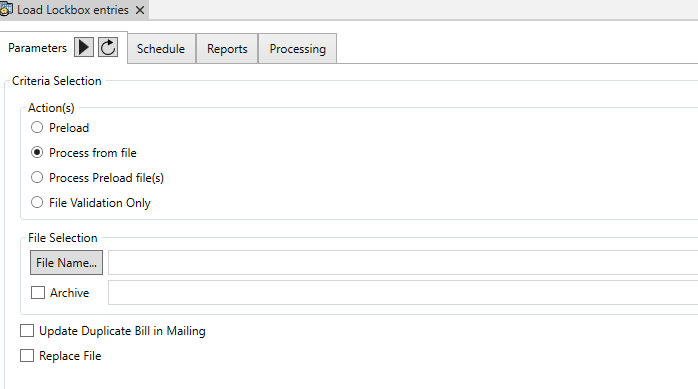
Preload: Create a record in table AR_LOCKBOX_HEADER and load all records from selected file to table AR_LOCKBOX_DETAIL

  • Replace File: if the file already loaded, a message will show ” and won’t let you load the file. If you want to delete the previous file and reload it, you need to check this option.

Process From File: Preload the file to table and load the payments

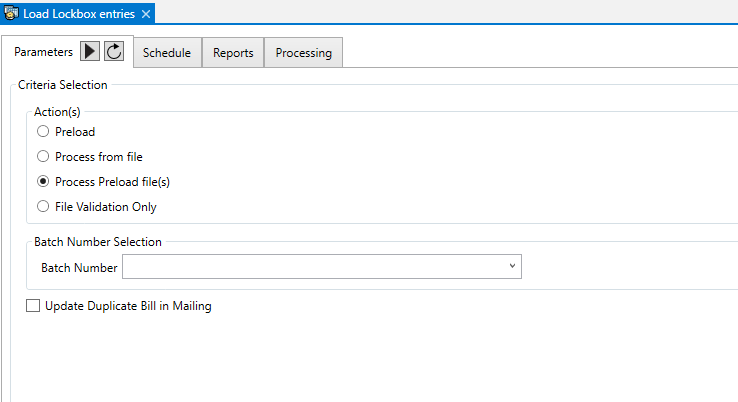
  • Update Duplicate Bill in Mailing: after loading the payment, the field DUPLICATE_BILL will be updated to -1

Process Preload file(s): Load the payments from (Table: AR_LOCKBOX_DETAIL) from the selected batch number.


NOTE: The batch number is required.


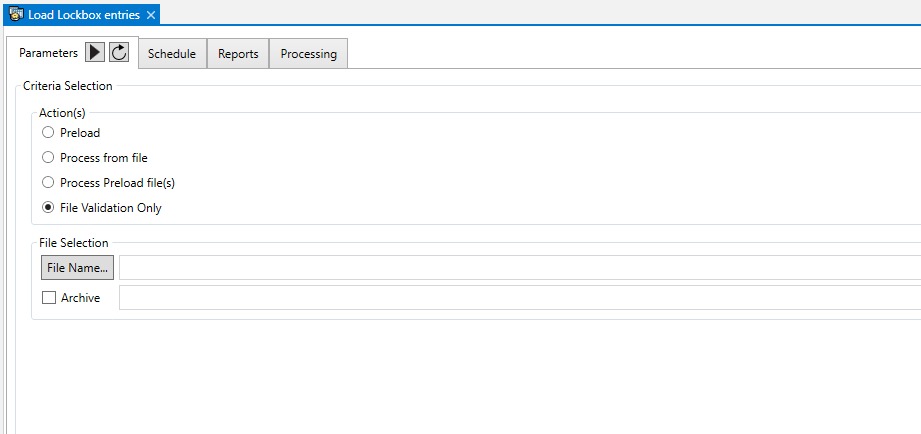
File Validation Only: Select this option to go through all records from the file, simulate the load of payment and list all error(s).


Scheduler Configuration

To process a payment, the Accounts Receivable (AR) needs a department; when run in Govern the process will use the Profile department.

If the batch process is run through the Scheduler, there is no Department set. At the location indicated below, select a department configuration that the Lockbox will use when it is run in the Scheduler:


Applicable Business Rules


101-tx-bp-005


0 votes, average: 0.00 out of 50 votes, average: 0.00 out of 50 votes, average: 0.00 out of 50 votes, average: 0.00 out of 50 votes, average: 0.00 out of 5 (0 votes, average: 0.00 out of 5)
You need to be a registered member to rate this.
Loading...

MB – Lien Transfer Batch Process

Miscellaneous Billing (MB) – Lien Transfer Batch Process

Specification Overview

Purpose

Run the batch Miscellaneous Billing Lien Transfer process to transfer outstanding balances from the Accounts / Receivable to the Real Property Taxation sub-system. This process will only transfer Balances from MB Accounts that have a parcel linked to it. The balances will be transferred as an Override Levy on the Parcel so it can be included on the next Property Tax billing.

Identification

  • Process Name: MB_LIEN_
  • Requirement Number: 16117

Records to be processed:

  • See Selection Criteria

Batch Processing:

  • The batch program can be scheduled to run periodically.
  • The transaction Mode “Roll Back If One Transaction Failed” is not supported. It will be “Continue If One Transaction Failed” by default
  • Refer to the Standard Batch Process details Batch Program Setup or Govern Scheduler for more details


Read More...


Batch User Interface

The following parameters and options are available:

Selection Criteria

Year

  • Enter the year by which the records are saved.
  • Note: This field appears only if A/R Master by Fiscal Year is selected for the Miscellaneous Billing subsystem on the A/R General Parameters form in Govern Admin.

Minimum Balance Due

  • Enter the minimum balance due. Accounts with a balance due less than this amount are not transferred.

Billed Up to

  • Enter the last billing date that will be able to be transferred. Any invoices billed after that date will not be included.

A/R Class Code

  • Select an A/R Class Code from the drop-down list (Table: VT_USR_AR_CLASS) to be used to Add a Lien charge to the existing balance. The default amount in the AR Class code setup it used for the Charge. Would be nice to have a parameter to enter the Charge amount on the Batch screen.


Batch Variables

A/R Reason Code

  • Select a justification for the transfer, from the drop-down list (Table: VT_USR_ARREASON). This will be included in the AR_DETAIL records created on the MB subsystem for the credit charges.


Batch Execution

The batch program can be executed on demand or scheduled with Govern Scheduler.

During the execution, warning and error messages will be presented in the batch result grid.

  • On error, the misc. billing account id will be displayed in the message – to verify
  • For any error, double-click on the message to access the full text

Once completed, information will be displayed, that includes:

  • A unique batch audit ID
  • Application name and version, such as Govern Batch Processing, 6.0
  • Batch process name with any additional notes, such as parameters loaded
  • User ID
  • Date and time the process was started
  • Date and time the process was completed
  • Parameters and Options used
  • Total number of records read
  • Total number of records processed
  • Indication as to whether the process was successful or not

Lien Transfer Log
A log of Miscellaneous Billing Accounts Transferred will be generated.


Batch Processing (Technical)

Before Executing Subprocesses:

  • Select all parcel ID and frozen ID related to the year (or all year if none selected) the jurisdiction, or the neighborhood or the saved dataset if chosen.

Execute Subprocess

  • For each batch process

Error Reporting
In addition to the standard Batch Processing standard error reporting, any additional validations will be listed below:


Troubleshooting

The following is to help troubleshoot the batch process.

  • After changes, it is always best to compute for a single year and small dataset
  • The parcel id is listed in the error message
  • Turning on the Govern Diagnostic Tool
  • Turning on the SQL Profiler Tool (system administrator)


Related Topics

The following information may be of interest:


101-mb-bp-003


0 votes, average: 0.00 out of 50 votes, average: 0.00 out of 50 votes, average: 0.00 out of 50 votes, average: 0.00 out of 50 votes, average: 0.00 out of 5 (0 votes, average: 0.00 out of 5)
You need to be a registered member to rate this.
Loading...


MB – Recurring Batch Codes Parameters

Miscellaneous Billing (MB) – Recurring Batch Codes Parameters

Overview

The Miscellaneous Billing Recurring Batch Codes form is used for defining the codes for miscellaneous billing items that are invoiced on a regular basis. The schedule for sending the codes is defined. The recurring invoice is then defined in Govern using the same category and item definitions as the standard invoices. Recurring invoices are sent to the invoices when the batch process is run.

Effective dates are defined by the recurring invoice in Govern. Therefore, the Miscellaneous Billing Batch Codes are not defined by year.


Read More...


Creating Miscellaneous Billing Recurring Batch Codes

To create the Miscellaneous Billing Recurring Codes:

  1. Launch GNA.
  2. Select Application Configurations > Miscellaneous Billing > Recurring Batch Codes.
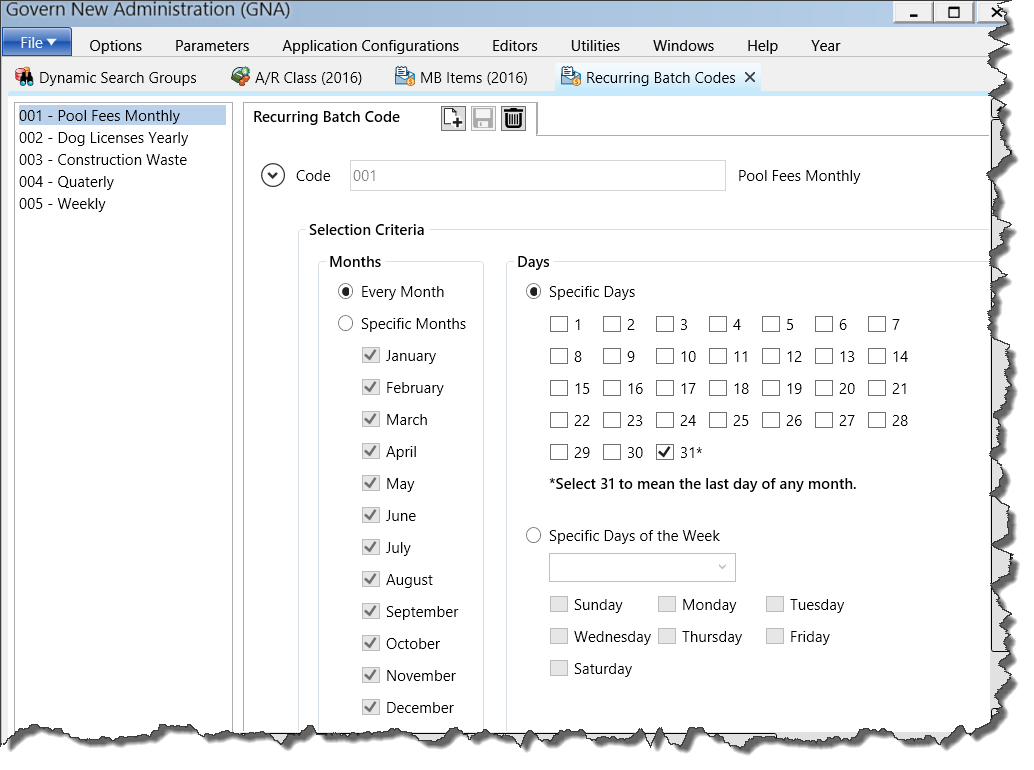
  3. Enter a code for Recurring Batch Code in the Code field. This is a required field.
  4. Expand the description fields and enter descriptions in the English and French Short and Long Description fields.
  5. Select one of the following under Months:
    Every Month
    The months that you want to schedule under Specific Months.
  6. Select one of the following under Days.
    103-mb-parm-recurring-UI.png
    Miscellaneous Billing Recurring Batch Codes Parameters

    The days under Specific Days.
    Select 31 if you want to send the code on the last days of every month or of the months selected in the left column.
    One of the following from the drop-down list under Specific Days of the Week:
    – Every Week
    – First Week
    – Second Week
    – Third Week
    – Fourth Week
    – Select the day: Sunday, Monday, Tuesday, Wednesday, Thursday, Friday, Saturday.

  7. Click Save.


103-mb-parm-Recurring


0 votes, average: 0.00 out of 50 votes, average: 0.00 out of 50 votes, average: 0.00 out of 50 votes, average: 0.00 out of 50 votes, average: 0.00 out of 5 (0 votes, average: 0.00 out of 5)
You need to be a registered member to rate this.
Loading...

Batch Process Definition Setup V5

Batch Process Definition Setup – Version 5

Version 6.x | Version 5 and lower

Overview

The GNA Batch Process Definitions form is used to define how you want your batch processes to appear and run in Govern. This includes setting up the menus and submenus for organizing your batch processes, configuring whether each process is run on a single server or on multiple servers, associating one or multiple reports, and synchronizing the batch process definitions and adding permissions. When complete, the batch processes are displayed in Govern.
This procedure has two major steps:

  • Configuring Batch Process Definitions
  • Adding Batch Processes Definition to Govern.


Read More...


Configuring Batch Process Definitions

Configuring Batch Process Definitions describes the following topics:

Batch Process Definitions User Interface

This section provides a tour of the Batch Process Definitions UI. The interface is comprised of a treeview, the definition form, and a secondary window for creating the menus and submenus or categories.
To access the Batch Process Definitions form:

  1. Launch Govern New Administration (GNA).
  2. Select Batch Process > Definitions.

Once you create menus and define batch processes, the selected items are listed in a treeview on the left of the form. You can display or hide the treeview according to your preference.

About Batch Process Definitions

You can view, add, or modify a batch process definition, as described later in this section.
To display or hide the English and French long and short descriptions, click on the arrow beside the text box at the top of the form.

About the Menu Manager

The Menu Manager form is used for creating the menus and submenus for organizing your batch process definitions in Govern.NET.
To access the Menu Manager

  1. Launch Govern New Administration (GNA).
  2. Select Batch Process > Definitions.
  3. Click the ellipsis button beside the Category text box.

If categories are already created, they are listed on the left. You can expand a category to view secondary levels if they exist. The name of selected menu is displayed on the right. You can expand the name to view the English and French short and long descriptions.

Creating a Batch Process Category

The first step is to create categories for your batch processes. The categories are used for displaying the batch processes in the Govern .NET menu. Create as many categories as required in order to facilitate user input.
To create a Batch Process:

  1. Launch Govern New Administration (GNA).
  2. Select Batch Process > Definitions.
  3. Click the ellipsis button beside the Category text box. This opens the Menu Manager.The Menu Manager is used for creating categories for the batch processes. You can have multiple levels. For example, you could group batch processes by module, such as: Accounts / Receivable, Tax Billing, and Mass Appraisal. Then, you could add another level that groups processes according to when they need to be run; i.e., daily, monthly, or yearly. You can create any type of category that is useful for your organization.
  4. Enter a name for the category in the text box at the top right. This is automatically added to the English Long Description field.
  5. Click the button to the left of the text box where you entered the category name. This expands a menu with additional descriptions.
  6. Add an English Short Description and French Short and Long Description as required. These fields are optional.
  7. Click Save to add the category to the menu.

If you click the Select button without saving your new category, a confirmation message appears:

Deleting a Menu Category

To delete a menu category from the Menu Manager:
1. Launch Govern New Administration (GNA).
2. Select Batch Process > Definitions.
3. Click the ellipsis button beside the Category text box to open the Menu Manager.
4. Expand the applicable menu.
5. Select the category from the Menu list on the left.
6. Click the Delete button in the menu at the top right.
7. When the confirmation message appears, click Yes to delete the record.

Selecting a Category for the Batch Process

You need to define the processes under the categories to which they are assigned and will appear in Govern. Before defining a batch process, select the menu category where it will be saved.
To select a Batch Process:

  1. Launch Govern New Administration (GNA).
  2. Select Batch Process > Definitions.
  3. Click the ellipsis button beside the Category text box to select the category for the batch process. This opens the Menu Manager.
  4. Expand the root menu to display the submenus.
  5. Select the applicable submenu or category.
  6. Click the Select button .

The root menu and all submenus are displayed in the Category text box and in the Parent Path text box. The existing batch processes are listed on the left.

Defining a Batch Process

Use the following process to name the definition and to associate it with a Govern Batch process.

NOTE: You need to define the processes under the category to which they are assigned and will appear in Govern.

To define a Batch Process:

  1. Select the category where you are defining the process as described under Selecting a Category for the Batch Process. The batch processes already defined for the category are displayed in the treeview on the left.
  2. Click the New button.
  3. Enter a code for the new batch process definition. This is a required field.
  4. Select a Govern batch process from the Process drop-down list. This is a required field.
  5. Enter a name for the record in the text box at the top right. This is automatically added to the English Long Description field.
  6. Click the button to the left of the text box where you entered the name. This expands a menu with additional descriptions.
  7. Add an English Short Description and French Short and Long Description as required. These fields are optional.
  8. Click the Save button to add the category to the menu.
    If you click the New button without saving your modifications, a confirmation message appears:

Defining the Transaction Type
The Govern batch processes can be run synchronously or asynchronously. If they are run synchronously, they are run on the same server. If run asynchronously they are run on multiple servers at the same time.
Select Synch or Asynch as required. For processes with multiple transactions, it is recommended to use asynchronous processing as this spreads the load over multiple servers and makes for faster processing time.
Pool #: For Asynchronous processes only, enter the maximum number of transactions to be handled by the client servers at any one time.
This works as follows: If you are running asynchronous batch processing, there is one master server that manages all the transactions and is responsible for sending them to the client servers. The value In the Pool # field indicates the maximum number of transactions to send out by the master server at any one time.

Scenario: Running a Batch Process Asynchronously
The following scenario illustrates how asynchronous batch processing works.
The parameters are as follows:

  • Master server: one
  • Client servers: five
  • Transactions: 50,000
  • Pool #: 50

The master server sends out the first 50 transactions to the client servers. Each server is responsible for ten transactions. As soon as a server completes one transaction, the master server sends it another. This continues until all transactions have been processed. However, there are never more than 50 transactions being handled by the client servers at any given time.

Defining the Transaction Mode

Select one of the following transaction modes for the process.

  • Break If One Transaction Failed: the process terminates when the transaction fails.
  • Roll Back If One Transaction Failed: the process terminates when a transaction fails and all the transactions that were completed are cancelled. Computations are returned to the starting point.
  • Continue If One Transaction Failed: Continue to run the process even if a transaction fails.

Adding a Report

Use the following procedure to associate one or more reports with the selected batch process.
To add a report: to the batch process:

  1. Launch the Batch Process Definitions form.
  2. Select the category for the process as described under Selecting a Category for the Batch Process.
  3. Select the batch process from the treeview on the left.
  4. Click Add Reports.
  5. Select one or more reports from the Choose the Reports menu.
    TIP: You can select multiple reports using the left mouse button.
  6. Click Select Reports.

The selected reports are displayed in the List of Reports text box. The parameters for the report are displayed in the Report Parameters list box.
The List of Parameters text box displays the parameters that can be included in the report and that can be used to build an external report; for example, these could include Date To and Date From fields. The purpose is to give you the exact reference and wording of these fields.

Deleting a Batch Process Definition

To delete a batch process:

  1. Launch the Batch Process Definitions form.
  2. Select the category for the process as described under Selecting a Category for the Batch Process.
  3. Select the batch process from the treeview on the left.
  4. Click the Delete button .


Adding Batch Processes Definition to Govern

When you have defined your batch processes, you need to add them to Govern.NET. In order to do this, you need to launch the Govern Security Manager and synchronize your new processes between GNA and Govern. Then, you need to assign access permissions.

Synchronizing Batch Process Definitions

When you have synchronized your new batch process definitions, they appear on the Govern.NET menu.
To synchronize the new batch processes:

  1. Launch the MSGovern Security Manager (GSM).
  2. Select your database connection key.
  3. Right-click on Applications and select Synchronize menu from the dropdown list. A confirmation message appears.
  4. Click Yes on the confirmation message.

Permissions and Batch Processes

Use the following procedure to assign access permissions to the new batch process definitions. You can grant permissions by batch process, batch process menu, or by batch process definition.

  1. Launch the MSGovern Security Manager (GSM).
  2. Select your database.
  3. Expand Applications > MSGovern.NET > Batch Process > Batch Process.
  4. Continue to expand the menus until you are the level where you want to grant permission.
  5. Right-click on the item that you want to secure.
  6. Define the permissions and exclusions as required and as described in the Govern Security Manager.

See Also

Govern New Administration (GNA)


103-ed-013-v5


0 votes, average: 0.00 out of 50 votes, average: 0.00 out of 50 votes, average: 0.00 out of 50 votes, average: 0.00 out of 50 votes, average: 0.00 out of 5 (0 votes, average: 0.00 out of 5)
You need to be a registered member to rate this.
Loading...

GNA – Batch Process Definition Editor

Batch Process Definition Editor

Version 6.x | Version 5 and less

Overview

The GNA Batch Process Definitions editor is used to define how you want your batch processes to appear and run in Govern. This includes setting up your batch processes, configuring each process, associating one or multiple reports, and synchronizing the batch process definitions and adding permissions. When complete, the batch processes are displayed in Govern.
This procedure has two major steps:

  • Configuring Batch Process Definitions
  • Adding Batch Processes Definition to Govern.
  • Configuring Sequential Batch Processes (101-std-fea-046)
  • Configuring Sequential Batch Processes (101-std-fea-046)


Read More...

Configuration

Configuring Batch Process Definitions

Configuring Batch Process Definitions describes the following topics; locate the appropriate sections on this page:

  • User Interface
  • Defining a Batch Process
  • Defining the Transaction Type
  • Defining the Transaction Mode
  • Adding a Report
  • Deleting a Batch Process Definition

Batch Process Definition – User Interface

This section provides a tour of the Batch Process Definitions UI. The interface is comprised of a treeview (left hand side), the definition form (main central area), and a secondary window for creating the menus and submenus or categories.
To access the Batch Process Definitions form:

  1. Launch Govern New Administration (GNA).
  2. Select Batch Process > Definitions.

Once you create menus and define batch processes, the selected items are listed in a treeview on the left of the form. You can display or hide the treeview according to your preference.

About Batch Process Definitions

You can view, add, or modify a batch process definition, as described later in this section.
To display or hide the English and French long and short descriptions, click on the arrow beside the text box at the top of the form.

About the Menu Manager

The Menu Manager form is used for creating the menus and submenus for organizing your batch process definitions in Govern.NET.
To access the Menu Manager

  1. Launch Govern New Administration (GNA).
  2. Select Batch Process > Definitions.
  3. Click the ellipsis button beside the Category text box.

If categories are already created, they are listed on the left. You can expand a category to view secondary levels if they exist. The name of selected menu is displayed on the right. You can expand the name to view the English and French short and long descriptions.

Defining a Batch Process

Use the following process to name the definition and to associate it with a Govern Batch process.

NOTE: You need to define the processes under the category to which they are assigned and will appear in Govern.

To define a Batch Process:

  1. Select the category where you are defining the process as described under Selecting a Category for the Batch Process. The batch processes already defined for the category are displayed in the treeview on the left.
  2. Click the New button.
  3. Enter a code for the new batch process definition. This is a required field.
  4. Select a Govern batch process from the Process drop-down list. This is a required field.
  5. Enter a name for the record in the text box at the top right. This is automatically added to the English Long Description field.
  6. Click the button to the left of the text box where you entered the name. This expands a menu with additional descriptions.
  7. Add an English Short Description and French Short and Long Description as required. These fields are optional.
  8. Click the Save button to add the category to the menu.
    If you click the New button without saving your modifications, a confirmation message appears:

Defining the Transaction Type
The Govern batch processes can be run synchronously or asynchronously. If they are run synchronously, they are run on the same server. If run asynchronously they are run on multiple servers at the same time.
Select Synch or Asynch as required. For processes with multiple transactions, it is recommended to use asynchronous processing as this spreads the load over multiple servers and makes for faster processing time.
Pool #: For Asynchronous processes only, enter the maximum number of transactions to be handled by the client servers at any one time.
This works as follows: If you are running asynchronous batch processing, there is one master server that manages all the transactions and is responsible for sending them to the client servers. The value In the Pool # field indicates the maximum number of transactions to send out by the master server at any one time.
Scenario: Running a Batch Process Asynchronously
The following scenario illustrates how asynchronous batch processing works.
The parameters are as follows:

  • Master server: one
  • Client servers: five
  • Transactions: 50,000
  • Pool #: 50

The master server sends out the first 50 transactions to the client servers. Each server is responsible for ten transactions. As soon as a server completes one transaction, the master server sends it another. This continues until all transactions have been processed. However, there are never more than 50 transactions being handled by the client servers at any given time.

Defining the Transaction Mode

Select one of the following transaction modes for the process.

  • Break If One Transaction Failed: the process terminates when the transaction fails.
  • Roll Back If One Transaction Failed: the process terminates when a transaction fails and all the transactions that were completed are cancelled. Computations are returned to the starting point.
  • Continue If One Transaction Failed: Continue to run the process even if a transaction fails.

Adding a Report

Use the following procedure to associate one or more reports with the selected batch process.
To add a report: to the batch process:

  1. Launch the Batch Process Definitions form.
  2. Select the category for the process as described under Selecting a Category for the Batch Process.
  3. Select the batch process from the treeview on the left.
  4. Click Add Reports.
  5. Select one or more reports from the Choose the Reports menu.
    TIP: You can select multiple reports using the left mouse button.
  6. Click Select Reports.

The selected reports are displayed in the List of Reports text box. The parameters for the report are displayed in the Report Parameters list box.
The List of Parameters text box displays the parameters that can be included in the report and that can be used to build an external report; for example, these could include Date To and Date From fields. The purpose is to give you the exact reference and wording of these fields.

Deleting a Batch Process Definition

To delete a batch process:

  1. Launch the Batch Process Definitions form.
  2. Select the category for the process as described under Selecting a Category for the Batch Process.
  3. Select the batch process from the treeview on the left.
  4. Click the Delete button.

Adding Batch Processes Definition to Govern

When you have defined your batch processes, you need to add them to Govern.NET. In order to do this, you need to launch the Govern Security Manager and synchronize your new processes between GNA and Govern. Then, you need to assign access permissions.

Synchronizing Batch Process Definitions

When you have synchronized your new batch process definitions, they appear on the Govern.NET menu.
To synchronize the new batch processes:

  1. Launch the MSGovern Security Manager (GSM).
  2. Select your database connection key.
  3. Right-click on Applications and select Synchronize menu from the dropdown list. A confirmation message appears.
  4. Click Yes on the confirmation message.

Permissions and Batch Processes

Use the following procedure to assign access permissions to the new batch process definitions. You can grant permissions by profiles and grant permissions to the Batch Process Editor application in Govern Administrator.

  1. Launch the MSGovern Security Manager (GSM).
  2. Select your database.
  3. Expand Applications > MSGovern.NET > Batch Process > Batch Process.
  4. Continue to expand the menus until you are the level where you want to grant permission.
  5. Right-click on the item that you want to secure.
  6. Define the permissions and exclusions as required and as described in the Govern Security Manager.

What’s New


Related Topics

Govern New Administration (GNA)
Batch Processing in OpenForms


103-ed-013


0 votes, average: 0.00 out of 50 votes, average: 0.00 out of 50 votes, average: 0.00 out of 50 votes, average: 0.00 out of 50 votes, average: 0.00 out of 5 (0 votes, average: 0.00 out of 5)
You need to be a registered member to rate this.
Loading...


Standard Batch Process – Email Notification

Standard Batch Process – Email Notification

Overview

The Email Message Template editor is designed for creating email messages that can serve as templates for later use within Govern. These are the messages that can be used in Govern modules that have an email functionality. This Email Notification Batch Process is designed to send an email message based upon a user’s queries. This process is configured in the GNA Batch Process Definition editor.
Using a Batch Process, it is possible to configure a SELECT query that will then use an email template. When the batch process is run, each record retrieved from the query will trigger a “Send Email” action. As an example, a query can be written that will retrieve outstanding overdue A/R records. Each record then sends an email message to the associated recipient indicating that they have an account in arrears.

Functionality

The purpose of this batch process is to send an email message based upon the records that are returned by a user designed query. Queries can be written to extract relevant Govern ID’s for tasks such as late payment notifications, impending due dates, and so on. A user with administrator status can design a SELECT query that will retrieve a recordset. The resulting recordset is processed, with each record triggering the sending of an email message. The formatted messages sent will use the email template created in the GNA Email Template Editor.


Read More...

Configuration

NOTE: For a listing of the queries used as examples, refer to the List of Queries in the Appendix section below.

The recommended approach for correct implementation is to take the following steps:

1. Design your email template

Determine the format that your email message will take in the GNA Email Template Editor. In the Parameters Expression field, build the expression that will be used to extract the parameters needed for your email message. For example a message that is pertaining to overdue accounts might require some of the following pieces of information.
From and To fields for the email, account holder names and account numbers, dates, and so on.
Refer to the Email Template Editor Wiki page or user guide for details about using the editor.
As indicated earlier, build your query in the parameters expression, it is here that you will determine the required Govern ID’s.
For example…:
{
To = Query(‘naNameInfo’, ‘EMAIL’);
Name = Query(‘naNameInfo’, ‘FULLNAME’);
AccountNumber = Query(‘stAccountNo’, ‘ACCOUNT_NO’);
Category = Query(‘stCategoryCode’, ‘SHORT_DESC_EN’);
PeriodeCode = Query(‘stPeriodCode’, ‘SHORT_DESC_EN’);
PeriodeNumber = Query(‘stPeriodNumber’, ‘SHORT_DESC_EN’);
DueDate = Query(‘stDueDate’, ‘DUE_DATE’);
}
In the above expression, we need the NA_ID’s for name information, ST_ID’s for ST account information and due dates, and so on.

NOTE: Each required query must be created. Refer to the Appendix section below for a listing of queries.

The SELECT query is now written to retrieve the Govern ID’s that are needed in the email template.

NOTE: A message will also need to be created under the Message sub tab in order to be able to save your Email Template; see the Sample Email Message below for an example message

2. Design Your Query

The SELECT Query

It is within the SELECT query being used that you set the Govern ID’s.
Looking at the following query…:
SELECT top 100 f.st_acct_id,
f.na_id,
f.st_id
FROM st_filing_master f
INNER JOIN NA_NAMES n ON n.na_id=f.na_id
WHERE f.unfiled <> 0 AND
f.due_date < GETDATE() AND
(n.email IS NOT NULL AND n.EMAIL <> ‘ ‘)
ORDER BY f.st_acct_id, f.st_id;
The above query was designed in the Select Query Editor in GNA. It will list all filings that are late. An email will be sent to the NA_MAILING address. For the purpose of this example, only the top 100 records are selected.

NOTE: No entities or Govern ID’s are used in the above query. When it is run in the Scheduler or Govern, no ID’s will be set except for the user ID’s and the run date.

3 – Define a New Batch Process

Define a new Batch Process in the GNA Batch Process Definition Editor. This batch process will be initiated through Govern.

  1. Create a new Code.
  2. Complete the Short and Long Description fields.
  3. in the Process parameter, select the “Send Email From Template” option
  4. Click the Save icon on the Batch Process Definition tab.
TIP: Ensure that the newly defined Batch Process has been added to the required profile so that it will be accessible under the Govern Batch Processes Explorer tab.

4 – Design or Select an Email Template

As mentioned earlier, email templates are designed in the GNA Email Template Editor. In the email template parameter expressions can be used. Refer to the About Parameters Expression Field section.
For our example, an email message will be sent to all mailing addresses with a late filing. The information that is required will be retrieved by the Govern ID’s. Each record returned by the query will look through each column to see if it corresponds to a Govern ID; if this is the case, the Govern ID will be set. Then when the email is being sent via the template, the Govern ID will be passed to the template to be used directly within the email, or as a Parameter Expression that is passed to another query. This expression can be designed in the Expression selector.
In our example, another query has been designed to extract information such as the naNameInfo, EMAIL, FULLNAME, ACCOUNT_NO, and so on.

Batch Process Parameters

Selection Criteria group parameters

Looking at the batch process in Govern, the parameters are the standard that are required to be completed.
Select Query – This is the list of available SELECT queries.
Email Template – All email templates in the system.

Run the Batch Process

Once the batch process has been run, each email message will be formatted with the extracted information. All parameters have been replaced with the values requested.

Troubleshooting

Any issues that are associated with this Batch Process that fall under the heading of troubleshooting will be listed in this section.

APPENDIX

List of Queries

The following queries were used as examples for demonstration purposes. They can used as a starting point and modified for other purposes.

— Query Expression:

— To be used in the Parameters Expression field of the Email Template
{
To= Query(‘naNameInfo’,‘EMAIL’);
Name = Query(‘naNameInfo’,‘FULLNAME’);
AccountNumber = Query(‘stAccountNo’,‘ACCOUNT_NO’);
Category = Query(‘stCategoryCode’,‘SHORT_DESC_EN’);
PeriodeCode = Query(‘stPeriodCode’,‘SHORT_DESC_EN’);
PeriodeNumber = Query(‘stPeriodNumber’,‘SHORT_DESC_EN’);
DueDate = Query(‘stDueDate’,‘DUE_DATE’);
}

— Sample Email Message

The following is a sample email message that can be modified as required:

Dear @Name,
The following Account #@AccountNumber has registered a late payment for the @PeriodeCode period of @PeriodeNumber in the @Category.
The actual due date was @DueDate.

— naNameInfo

SELECT EMAIL,
CASE
WHEN FORMAT_CODE=‘c’THEN COMPANY
ELSE FIRST_NAME ||‘ ‘|| LAST_NAME
ENDas FULLNAME
FROM NA_NAMES
WHERE NA_ID=@idna_id

— stAccountNo

SELECT ACCOUNT_NO
FROM ST_MASTER
WHERE ST_ACCT_ID=@idst_acct_id

— stCategoryCode

SELECT VT_USER.SHORT_DESC_EN
FROM ST_FILING_MASTER
INNERJOIN VT_USER ON VT_USER.YEAR_ID=ST_FILING_MASTER.YEAR_ID AND
VT_USER.DEPT=ST_FILING_MASTER.DEPT AND
VT_USER.CODE=ST_FILING_MASTER.CATEGORY_CODE
WHEREST_FILING_MASTER.ST_ID=@idst_idAND
VT_USER.TABLE_NAME=‘ST_CATEG’

— stPeriodCode

SELECT (CASEWHEN ST_FILING_MASTER.PERIOD_CODE =‘ST_INACTIVE_PER’THEN‘Inactive’ELSE VT_USER.SHORT_DESC_EN END)AS SHORT_DESC_EN
FROM ST_FILING_MASTER
INNERJOIN VT_USER ON VT_USER.YEAR_ID=ST_FILING_MASTER.YEAR_ID AND
VT_USER.DEPT=ST_FILING_MASTER.DEPT AND
VT_USER.CODE=ST_FILING_MASTER.PERIOD_CODE
WHEREST_FILING_MASTER.ST_ID=@idst_idAND
VT_USER.TABLE_NAME=‘ST_PER’

— stPeriodNumber

SELECT VT_USER.SHORT_DESC_EN
FROM ST_FILING_MASTER
INNERJOIN VT_USER ON VT_USER.YEAR_ID=ST_FILING_MASTER.YEAR_ID AND
VT_USER.DEPT=ST_FILING_MASTER.DEPT AND
VT_USER.CODE=(ST_FILING_MASTER.PERIOD_CODE +‘_’+CAST(ST_FILING_MASTER.PERIOD_NB ASVARCHAR))
WHEREST_FILING_MASTER.ST_ID=@idst_idAND
VT_USER.TABLE_NAME=‘ST_PER_DETAIL’

— stDueDate

SELECT DUE_DATE
FROM ST_FILING_MASTER
WHERE st_id=@idst_id
 

Related Topics

Email Template Editor
OpenForms Batch Processing
Govern New Administration (GNA)


100-bp-EmailNotification


0 votes, average: 0.00 out of 50 votes, average: 0.00 out of 50 votes, average: 0.00 out of 50 votes, average: 0.00 out of 50 votes, average: 0.00 out of 5 (0 votes, average: 0.00 out of 5)
You need to be a registered member to rate this.
Loading...

Standard Batch Processes

Standard Batch Processes

Overview

Batch programs are used to calculate and update multiple records at the same time, to post records to the General Ledger accounts, to delete records that are not posted, to apply pending amounts and penalties, to extract or compute amounts for a specific date, and to close a fiscal period or year. This page provides general information on batch processes that applies to all modules and systems.

Batch processing in OpenForms Systems:


  • Govern (Standard User Feature)

    100-batchprocess-(ui)-diagram_small.png
    Click on the image to enlarge


  • Govern Administrator (Batch Process Editor and Schedule Creation)
  • Govern Scheduler
  • Govern Batch (Govern for Windows OpenForms Batch execution 6.0 and less)

Click here for installation and step by step information or for a tutorial presentation with print screens.


Read More...

Standard Features include:

Batch Naming

Distributed Batch Processes include:

Terms and Definitions:

  • Batch Program: Refers to standard or custom code developed in Govern to perform one or more actions for a selection of entries meeting predefined conditions (business rules) and/or user defined parameters.
  • Batch Process Name: Identifies the method or class name executed in code when launched, stored in the VT System, Table Name = ‘BATCH_PROCESS’ as a code
  • Batch Process Definition: A batch process definition is used to setup the batch process options and execution parameters.
  • Audit Batch ID: Once a batch process definition is launched, a batch audit ID sequence is assigned and errors, warnings and information is recorded for the batch ID in the Batch Audit Table
  • Batch ID: When a batch process definition is created, it is assigned a batch id. Listed in the Batch Audit Result window and in the Import/Export EMT function.

Restrictions:

  • Expressions used in the batch process cannot use the Display function for the attributes of type Lookup. The reason being that the lookup information is not loaded for the batch process in this case.

Harris Developers, click here to access the techno page.

Batch Process Setup

System Validation Table

Process Names are updated automatically the first time Verify Database is executed after having deployed a new release.

100-bp-setup-(ui).jpg
Click on the image to enlarge
  • To review, select Govern Administrator > Editors > System Validation Table Editor > and select in the Table list table name BATCH_PROCESS

Batch Process Editor

To create the batch process definition and execution parameters

Linking Batch Process Definitions to Profile
Each batch process definition must first be defined in GNA, and then linked to a profile.

  • To link a batch program to a profile, in GNA, select Editors > Profile > click on the [profile] to add the batch program > on the LINKS tab, click on ADD under Batch Processes

Security Setup

Batch Process Explorer Toolbox and View Menu Security (GOVERN General access)
Govern Security Manager (GSM)

  • To access, select Applications > Govern > MENU > View > View > ‘Batch Process’ and richt-click for permissions
  • With no execute access to this function, it will be impossible to run a batch process – T/C If linked function

Batch Process Editor Security (GNA Editor access)
Govern Security Manager (GSM)

  • Access permissions (execute, insert…) can be provided to the Batch Process Editor by role and user.
  • To access, select Applications, Govern Administrator (GNA), select Editors > Editors > Batch Process Definition Editor – T/C Security Settings

Batch Process Definitions by Profile (linked to)
Govern Administrator (GNA)

  • Each batch process definition must first be defined in GNA, and then linked (added) to a profile.
  • To access, in GNA, select Editors > Profile > click on the [profile] to add the batch program > on the LINKS tab, click on ADD under Batch Processes

Batch Process Definition Security (GNA
Govern Security Manager (GSM)

  • Permissions by batch process definition can be set by profile, role and user, after a batch definition has been added to a profile and a SYNCHRONIZE has been executed in GSM
  • To access, select Applications > Govern > PROFILES > click on [profile] to set > Batch Processes > click on the [batch process definition] to set and right-click for permissions

Tables/Fields & Naming Standards

The following tables and fields are used in batch processing

Batch Process Name

  • Recorded in [VT_SYSTEMS] codes where [TABLE_NAME] = BATCH_PROCESS
  • Note to Developers:
    • Standard Batch Process Names for module applications should not be more than 11 characters (15-4) in case we need to add a customer code (Ex: WPG_postar)
    • System Core Features Batch Process start with CO_

Batch Process Definitions

  • Batch Process Definitions are recorded in the following files by BATCH_ID
    • [USR_BP_DEF] Contains general information, email information, etc.
    • [USR_BP_DEF_SCHEDULE] Contains the schedule setup
    • [USR_BP_DEF_SCHEDULE_RUN_LOG] Contains the start and end date
    • [USR_BP_DEF_SCHEDULE_RUN_DTL] Contains the log details and serialized information

User Batch Audit

  • When a batch definition is executed, information, warnings and errors are recorded in this table:
    • [USR_AUDIT_BATCH] by AUDIT_BATCH_ID
    • IMPORTANT: Archiving schedule should be discussed – T/C best practices

Product Code for Batch Programs

  • Standard Govern Batch Program = System + Module + BP _ Sequence (ex: 101-ar-bp-001)
    • See Standard and Module product maps for the list of batch processes distributed
  • Stand Alone Custom Batch = Customer Number + Module + BP + Sequence (ex: 901-ma-bp-050)
  • Standard Batch Programs Customization (standard code with customized dependencies) = System + Module + BP+ Sequence + Client Code (ex: 101-ar-bp-001-WPG)

List of Standard Batch Processes

Click to view the List of Govern Standard Batch Processes.

Troubleshooting

Service keeps shutting down / Port is used elsewhere

  • Once you install the service, if it keeps stopping after restarting it, most likely the port is used elsewhere in the organization.
  • A message stating Missing Parameters will be listed on the Service Tab of the Scheduler console
  • Uninstall the service, change the port and re-install.

The service is not running

  • In the event the machine where the local service is installed is rebooted, the service might not be restarted.
  • Check the extended service details and make sure the STARTUP TYPE is set to AUTOMATIC.
  • The service is listed under Govern Scheduler [CONNECTION KEY]

The application and the service are not compatible

  • You are trying to install the BSS from a different major release. Download the correct Install pack and start again

Restarting the Service after it was stopped

  • You can start the service directly in Govern Scheduler from the Services Tab or from the Task Manager Service Tab.

Report does not exists

  • When you add a report in a batch definition (rpt scheduler only perhaps), it does not check if it exists or not.
  • If this is the case, you might get a time out or the system will seem to be frozen. Check the report path setup in the General Parameters (SY_REGISTRY) and make sure report exists.
  • After the setup, open the Batch Process Definition in Govern and look in the report tab to validate there is not errors.

Batch Scheduler Service (BSS) Firewall is blocking access

  • If the machine running the Batch Scheduling Service is remote, firewall settings are needed to provide access to the port used.

Existing Service exists for a different connection key

  • Uninstall the service(s) using the SC delete SERVICE NAME (GovernSchedulerService_Connection Key) from the Command Prompt Editor (run as Administrator). Reinstall service.

Access Denied to Path

  • If you get this error message in the batch log, you will need to make sure the folder (log path and other ) has READ/WRITE Access. To validate

Best practices

Clean-Up Unused Applications

  • Unused Govern OpenForms applications should be uninstalled (mandatory for Deploy-EZ)
  • To uninstall applications, Select Program and Features from the Control Panel, locate the program and click uninstalled.


100-batchprocess


0 votes, average: 0.00 out of 50 votes, average: 0.00 out of 50 votes, average: 0.00 out of 50 votes, average: 0.00 out of 50 votes, average: 0.00 out of 5 (0 votes, average: 0.00 out of 5)
You need to be a registered member to rate this.
Loading...