Quick Search Index Group Editor

Quick Search Index Group Editor

Available in release 6.0.1804 and 6.1.1804

Overview

The Quick Search Index Group Editor will enable users to create groups of indexes that can be used with a Profile, or be made available as a Quick Search Definition in custom controls like generic links. When configuring, i.e. grouping the indexes that are required by users, a “boost” value can be specified for the indexes within a group. The boost value helps to control how the index search results are presented.

Configuration – Quick Search Index Group Editor

In order to create the required table and fields required, users must run the GNA Verify Database process. No additional configuration is required.

Read More...

Provide Access to the Quick Search Index Group Editor

Administrators that need to provide or restrict user access to the Quick Search Index Group Editor, can do so through the Govern Security Manager (GSM). In the GSM, under the left hand pane, locate the Quick Search Index Group Editor node. Refer to the GSM user guide for details about securing nodes.

Using the Quick Search Index Group Editor

In order to access to the Quick Search Index group Editor, in the GNA ribbon…

  1. Select Editors (tab) > Editors (group) > Dynamic Search Configuration > Quick Search Index Group Editor.

Creating a new Quick Search Index Group

When there are no existing search groups, opening the editor will, by default, create a blank form that is ready to be configured. To create a new group, click Create a new item. Parameters for new groups are validated; a code is required and the group must contain at least one index.
All available indexes will be displayed in the Available Indexes pane. Administrators will need to select the checkboxes beside the indexes that they want to include in the group.

Quick Search Index Group – Boost Factor

Upon selecting an index, the user will also be allowed to specify a “boost” value for the index. By default, the index will be assigned a boost factor value of 1. The boost factor influences how results from this index will appear in the Quick Search tab in Govern.
Search results from indexes with higher boost factors will be displayed before search results from indexes with lower boost factors. However, if the searched text string in index is a perfect match, and a partial match in index (B) search results from an index (A) with a lower boost factor may appear above another index (B) with a higher boost factor

Changing the Order of indexes within a group

Selected indexes can be re-positioned with a drag and drop action. The sequence number is displayed at the left of the index. The sequence number corresponds with the order it will appear in the Govern Quick Search pane. Click on the index text, and drag to the space between the indexes.

NOTE: Only selected indexes can be re-ordered.

Documentation

Click to here to the documentation for the Govern Quick Search for details.

Related Topics

Govern Search
Govern Quick Search
Quick Search Index Group Editor
Govern Search Technical Specifications

Saved Datasets
Dynamic Search Objects
Dynamic Search Styles
Dynamic Search Groups
Govern New Administration (GNA)


103-ED-022


0 votes, average: 0.00 out of 50 votes, average: 0.00 out of 50 votes, average: 0.00 out of 50 votes, average: 0.00 out of 50 votes, average: 0.00 out of 5 (0 votes, average: 0.00 out of 5)
You need to be a registered member to rate this.
Loading...

Keyboard Shortcuts

Keyboard Shortcuts

Overview

Although the Govern User Interface (UI) is designed for use with a mouse, users may also use a series of keyboard shortcuts. These shortcuts can speed up user interaction with the interface when performing certain tasks.

The following shortcuts are for the Govern Release 6.x UI.

Govern

Key or Combination Action
F1 Select the Help Ribbon
F2 Select the Home Ribbon
F3 Select the auto-hide Predefined Search pane
Alt + F3 Advanced Search / Quick Search pane (Toggle)
Ctrl + F3 Select the auto-hide Saved Dataset pane
Shift + F3 Select the Query Tool (Only valid if the Query Tool is installed)
Ctrl + F4 When a form is selected, it will close the current active form
F5 Refresh an Open Form
F6 Go to Previous record in the Treeview pane
F7 Go to the Next record in the Treeview pane
F11 Maximize, i.e. display current form in full screen mode (double click on window title bar to restore)
Ctrl+F9 Go to the First record
Ctrl+F10 Go to the Previous record
Ctrl+F11 Go to the Next record
Ctrl+F12
Ctrl+N
Ctrl+S
Alt +Del
Shift+Esc
Go to the Last record
Create a New record
Save a record
Delete
Cancel a Save
Ctrl + Tab Cycle forward between open Profiles
Ctrl + Shift + Tab Cycle backwards between open Profiles
Ctrl + H Display Entity Audit screen
Ctrl + F Search for a string within an OpenForm or Browse pane
Right Mouse Button (Click) Expand or contract the browse pane of an OpenForm with a grid

OpenForms Designer (OFD)

Key or Combination Action
Ctrl + O Open a new Entity
Ctrl + S Save a change
Ctrl + N Create a new Form
Ctrl + F Find
Ctrl + U Undo
Ctrl + (Up cursor arrow) Zoom in
Ctrl + (Down cursor arrow) Zoom out

Mass Appraisal – Buildings

Key or Combination Action
Not implemented Move First record of a parent entity from a Child Entity
Ctrl + Shift + F10 Move Previous record of a parent entity from a Child Entity
Ctrl + Shift + F11 Move Next record of a parent entity from a Child Entity
Not implemented Move Last record of a parent entity from a Child Entity

General

Key or Combination Action
Ctrl + T Enter current date (i.e. Today) in Date field
(Specific to Date fields)

Configuration of Shortcuts

Link to Configuration of Keyboard Shortcuts (101-std-fea-030) – Updated for Release 6.0.1603

Printable Version

Click below to select a printable .PDF version of the above shortcuts.

101-std-fea-021-GOV60-KybdShortcuts.pdf

Related Topics

Configuration of Keyboard Shortcuts
Govern Search
Govern Quick Search
Quick Search Index Group Editor

Govern New Administration (GNA)

Expand or contract the browse pane of an OpenForm with a grid


101-std-fea-021


0 votes, average: 0.00 out of 50 votes, average: 0.00 out of 50 votes, average: 0.00 out of 50 votes, average: 0.00 out of 50 votes, average: 0.00 out of 5 (0 votes, average: 0.00 out of 5)
You need to be a registered member to rate this.
Loading...

101-std-fea-024-ofr

OpenForms Standard Feature – Form Generic Link Controller Setup

Version 6.0 / Version 6.1

Overview

This standard OpenForms Controller can be added to a form to provide a Link to another Form. Two (2) versions of the controller exists, depending on the underlying business rules and whether it is allowed to delete a link once it has been established.

  1. Without Delete Capabilities (CO_GenericLink_Control)
  2. With Delete Capabilities (CO_GenericLinkWithDelete_Control)

Prerequisites

The following conditions are required for form setup in order to enable the Controller.OpenForms Designer Setup:

  1. The Form’s ID Setters Properties must contain the Linked to Form Govern ID (i.e. NA_ID, P_ID, ST_ID, AR_ID, and so on…)
  • The Govern ID must be displayed in the search GRID used for the Linked Form

Profile Security

  • The Linked to Form must be available in the profile (GNA)
  • The user must have security access (GSM) to the profile’s form.

Configuration

Configuration of this controller occurs in the Govern OpenForms Designer (OFD) application. Two (2) versions of the controller exist. The version used will be dependent on the underlying business rules required; i.e. whether once the link has been established, will be allowed to be deleted.

Control to use

Link without Delete

  • Without delete capabilities (CO_GenericLink_Control)

Link with Delete

  • With delete capabilities (CO_GenericLinkWithDelete_Control)

For more information, refer to the following:

OpenForms Designer (OFD)

Controller Setup

Adding a Custom Control to a Form

To add the Custom Control…
1. In the OpenForms Designer (OFD), drag the Custom Control Icon to the desired area (row or column, group.. ) on the form.
Custom Control Form Configuration
2. Once the Custom Control is displayed on the form, click on the inserted control object to configure it. The following parameters are to be completed:
Layout

  • Height
  • Horizontal alignment
  • Margin
  • Text style
  • Vertical alignment
  • Width

Action

  • Assembly Name = Msgovern.OpenForms.CustomControls.dll (by default)
  • Class Name = CO_GenericLink_Control OR CO_GenericLinkWithDelete_Control

Custom Control Properties

  • Allows the selection of current ID (Will automatically show the current Govern ID item and the user will be allowed to select it)
  • Current ID Description
  • Header Override
  • Selected Description
  • Selected Form Name
  • Selected ID Code (na_id, pid, …)
  • Selected Search Group
  • Selected Search Style
PROPERTIES Setting Description
ID
Element ID N/A (set by system) System generated information
Layout
Height Height of the form
Horizontal alignment Stretch Aligns the text at the top and left of the cell. Increases the width
of the column if the text is long and requires more space.
Margin 7,3,7,3 Margins are used to ensure that there is space between
items on the user forms. Defaults are for the right, top, left,
and bottom margins.
Text style Expression to specify the text style
Vertical alignment Stretch Aligns the text at the top and left of the cell. Increases the
width of the column if the text is long and requires more
space.
Width If required, enter a value for the width of the label inside
the cell in the Width text box.
Misc
Action MsGovern.OpenForms.CustomControls.dll
CO_GenericLink_Control
Is enabled Hidden on load Hidden on Load hides the Browse screen from view when the
record is loaded to the form.
Is tab stop Checkbox is selected if a tab sequence number is entered.
If deselected the tab sequence number is removed.
Is visible Selected Select the checkbox
Name CO_GenericLink_Control
Properties
AlternateAttributeName This is optional. By default, we use an attribute with the same
name as SelectedIdCode to get the id we want to link to. If we
want to use a different attribute we can set it here. For example,
if we want to use the attribute REF_ID.
NEW!AutoCloseModalWindowExpression This will allow the setup of an expression that can automatically
close the modal
window when clicking on: Save button or Cancel button
CurrentIdDescriptionQueryName This query gives the description to use for the CurrentId option
when using AllowSelectCurrentId.
DefaultSelection
FastNameCreation
HeaderOverride This is optional. It sets the control header.
NEW! OpenFormAsModal Opens the link as a modal window. When using this, a new
instance of GovernIds is used so that the current profile
GovernIds won’t be affected by the modal form when open.
QuickSearchIndexGroup
SelectedDescriptionQueryName Description that is displayed for the selected ID.
SelectedFormNameInProfile Form to open.
SelectedIdCode The Govern ID that is set when the link is clicked.
SelectedSearchGroup Search group
SelectedSearchStyle Search style
SuggestedLinksQueryName Select a query for the description (Optional)
Tab sequence number


Specific Configurations

In the OFD, depending on the controller use, configure the target form as illustrated below.

Generic Link Controller

PROPERTIES Information
Browse
Columns Click to edit
Hidden on load
Show on left
Size 150
Controller
Controller MsGovern.OpenForms.CustomControls.dll
CO_GenericLink_Controller
Controller properties
Misc
SelectedIdCode na_id – name id
SelectedSearchGroup
SelectedSearchStyle stAccountByName – Retrieve ST Account

Linked to Name Controller

PROPERTIES Information
Browse
Columns Click to edit
Hidden on load
Show on left
Size 150
Controller
Controller MsGovern.OpenForms.CustomControls.dll
LinkedToName_Controller
Controller properties
Misc
SelectedSearchGroup naName – Name Search
SelectedSearchStyle

Linked to Self-Reported Tax Controller

PROPERTIES Information
Browse
Columns Click to edit
Hidden on load
Show on left
Size 150
Controller
Controller MsGovern.OpenForms.CustomControls.dll
LinkedToSelfReportTax_Controller
Controller properties
Misc
SelectedSearchGroup
SelectedSearchStyle stAccountByName – Retrieve ST Account

Troubleshooting

The following are some issues that may arise during configuration, their possible resolution.

Issue: Form was designed for a different Govern ID access (P_ID, NA_ID), but the setup is the same.
Possible Resolution:

  • The ID Setters properties for the entity must be configured.
  • The Govern ID must be displayed in the GRID

Issue: The form does not work.
Possible Resolution:

  • Form was designed for a different Govern ID access (PID_ NA_ID, and so on…) than the controller property.
  • The form’s ID Setters properties must be configured on the form

Issue: Cannot select existing name or property
Possible Resolution:

  • The select existing feature requires to have the Govern ID displayed in the GRID of the search result


Related Topics

Govern OFD MANUAL Govern OpenForms Designer, version 6.1 see Chapter 3 – Links
Standard Feature Overview


101-std-fea-024-ofr


0 votes, average: 0.00 out of 50 votes, average: 0.00 out of 50 votes, average: 0.00 out of 50 votes, average: 0.00 out of 50 votes, average: 0.00 out of 5 (0 votes, average: 0.00 out of 5)
You need to be a registered member to rate this.
Loading...

Govern Added Fields

Govern Added Fields

Version 6.0 | Version 6.1

Overview

It is possible to add user controlled fields in different Govern Application Modules including Mass Appraisal, Workflow Management, Self-Reported Business Tax, and so on. The following explains this functionality.

Added Fields Form

When adding a field, a form is presented and contains the following information.

Column Properties

New Column Name (Attribute)

  • Column Name that will be created in the Database Table

Description (Attribute)

  • Field description that will be recorded in the business entity and system dictionary

Column Type

  • Attribute type: Currency, Date and Time, Memo, Numeric (single), Numeric no decimals (integer), Text

Size

  • Attribute size: If Text is selected, you will need to specify the length of the field. The maximum text size for fields created automatically is 15 (v6.0) and 30 (v6.1).
  • Attribute size if Look-up table is used: The maximum text size for fields created is 15 if fields is used for user tables as the TABLE NAME is recorded as a CODE in the VT_USER and SYSTEM tables. – validate exceptions

Important Note

  • Once the added field is created, it is no longer possible to change its properties. Create with care!

Validation Rules

Column Name

  • Must be unique in the Table and Business Entity
  • Maximum length of Column Name
    • Version 6.0 = 15
    • Version 6.1+ = 30
  • Must Meet the Column Name Database constraints:
  • Maximum length of Column
  • Must start with a letter, can only contain letters, numbers and the special character underscore

101-std-fea-041-UI-Error Message.png

Column Size

  • Must be within the range of 1 to 8000

Column Description

  • Maximum length of Column Description = 50 — See Roadmap

System Dictionary

User added fields are recorded in the system dictionary table when creating Added Fields.
See 101-std-fea-040 for more information.

Workflow Added Fields

On save of KIND and CATEGORY, the fields are created in SY_DICT_DESC under table name = WM_KIND_(code) and WM_CATEGORY_(code)

User Added Fields Configuration

Once the field has been created, additional information can be setup in the Business Entity Designer system. See 104-all-bed for more information.

See Also

This section will contain related topics.


101-std-fea-041


0 votes, average: 0.00 out of 50 votes, average: 0.00 out of 50 votes, average: 0.00 out of 50 votes, average: 0.00 out of 50 votes, average: 0.00 out of 5 (0 votes, average: 0.00 out of 5)
You need to be a registered member to rate this.
Loading...

Govern Standard Module Configuration

Govern Standard Module Configuration

Overview


101-std-config


0 votes, average: 0.00 out of 50 votes, average: 0.00 out of 50 votes, average: 0.00 out of 50 votes, average: 0.00 out of 50 votes, average: 0.00 out of 5 (0 votes, average: 0.00 out of 5)
You need to be a registered member to rate this.
Loading...

AR Copy Parameters to Year

Copy Parameters to Year

Overview

The main purpose of this option is to copy all Year base parameter to another year. It will validate if the destination year exist, and if so, the user will receive a warning message to override the data before executing the copy.


103-ar-parm-CopytoYear


0 votes, average: 0.00 out of 50 votes, average: 0.00 out of 50 votes, average: 0.00 out of 50 votes, average: 0.00 out of 50 votes, average: 0.00 out of 5 (0 votes, average: 0.00 out of 5)
You need to be a registered member to rate this.
Loading...

Standard A/R Controller Configuration (101-ar-fea-022-ofr)

Standard Accounts Receivable (A/R) Controller – Create A/R (Configuration)

Overview

This standard OpenForms Controller can be added to a form to provide an Action Button to create Accounts Receivable for new accounts.
This controller is available in GA Release 1606

  • For more information on the functionality, see Product Information (101-ar-fea-022).

Configuration

Prerequisites

The following conditions are required in order to enable the Controller in OpenForms Designer Setup

Action Button Controller Properties

Read More...

Profile Security

  • The organization is licensed for the Accounts Receivable Sub-System to setup
  • The configuration for the Accounts Receivable has been completed
  • The Form’s ID Setters Properties must contain the …
  • The Govern ID must be …
  • The user must have security access (GSM) to the profile’s form.

Controller Setup

Adding a Custom Control to a Form

  • In OFD, drag the Action Button Control Icon to the Account Entity Tab on the form.

Custom Control Form Configuration

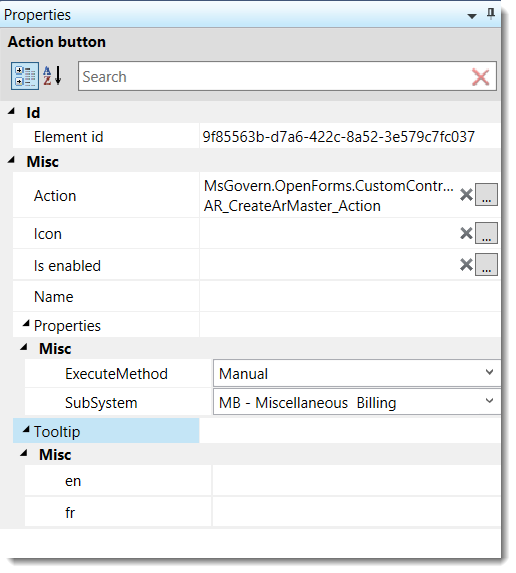
Once the Custom Control is displayed on the form, click on the object to configure the:

  • Assembly Name = Msgovern.OpenForms.CustomControls.dll (by default)
  • Class Name = AR_CreateARMaster_Action

User Interface (UI)

  • Icon
  • Is enable: An expression can be added to control the enabling (Can be executed) of the button.

Controller Properties

The following controller properties need to be set:

Execute Method

There is 2 options for the Action Button Controller

  • Manual: The user will need to click on the button
  • After Save: As soon as the record is saved, the A/R will be created automatically

Sub-System

  • Select the sub-system for which the A/R Summary Record needs to be created.

Related Topics

For more information, see:

Troubleshooting

  • The Organization must be a licensed user of the A/R Sub-System selected.


101-ar-fea-022-ofr


0 votes, average: 0.00 out of 50 votes, average: 0.00 out of 50 votes, average: 0.00 out of 50 votes, average: 0.00 out of 50 votes, average: 0.00 out of 5 (0 votes, average: 0.00 out of 5)
You need to be a registered member to rate this.
Loading...