308-icloud

Integration – Invoice Cloud

Version 6.0

Overview

Governs’ Invoice Cloud integration provides an invoice presentation / payment solution using Invoice Cloud. With Invoice Cloud integration Govern users have 24/7 access to on-line bills and flexible payment options that include all major credit/debit cards and eChecks.
Invoice Cloud consists of 2 major areas. Batch Functions that can be scheduled to send Billing Information reports to Invoice Cloud and the AR & CC Cash Collection Service.

Requirement

Integration needed with invoice cloud. We need to make a new service that:
1. Allows Payments
2. Allows Payment Reversal
3. Update Paperless status for Mailing Index
4. GetArBalances
See AR/CC Web Service

The following actions are also needed:
1. Generate a Summary Account Balance and send it to an FTP
2. Generate a Detail Account Balance (bill) and send it to an FTP

Tax & UB Bill

Tax and Utility Billing PDF Bill

Account Balance Extract

Account Balance Extract is created and push to the FTP.
Work Order for Code: WALGOL1202
Crystal reports that show the balance for each NA_ID

Batch Processes

Consists of 2 batch process that generate reports in CSV format.

1) Batch process – Invoice Cloud Balance :
UI : ComboBox SubSystems (only RE, PP, UB)
Nb. Activity days Add to the report all entries in AR_Master having activities (all activities in AR_DETAIL except payment from InvoiceCloud) in the X last days of activity.

2) Batch Process – Invoice Cloud Invoice :
. UI : ComboBox SubSystems (only RE, PP, UB) ComboBox SubSystems (only RE, PP, UB)

a) subsystems : RE, PP :
UI : Year, Installment
File Name to generate : XXXXXX_RE_TimeStamp.csv or XXXXXX_PP_TimeStamp.csv

b) Subsystem : UB :
UI : ComboBox : Posting ID – Posting Date (From table UB_POST_MASTER)
File Name to generate : XXXXXX_UB_TimeStamp.csv

The Total Billed should be the Sum of Amounts from AR_DETAIL where type = ‘INV’ and having Creation_Date = Posting_Date

Supporting Documents

Click on the links below to view the .PDF document.

Right-click on the links below to down the view the .PDF document.

To download the Excel files below, either right click on the link and select “Save Link As…” from the menu, or click directly and select the option to open in Microsoft Excel.

To download the .CSV files below, right click on the link and select “Save Link As…” from the menu. The file may then be opened in an application like Microsoft Excel.

SQL for the INVOICE

SELECT "AR_MASTER"."SUB_SYSTEM", "AR_MASTER"."YEAR_ID", "AR_SUMMARY"."INSTALLMENT", "AR_SUMMARY"."AR_ID", "NA_MAILING_INDEX"."NA_ID", "NA_NAMES"."FREE_LINE_1", "NA_NAMES"."STREET", "NA_NAMES"."CIVIC", "NA_NAMES"."PRE_DIR", "NA_NAMES"."S_SUFFIX", "NA_NAMES"."POST_DIR", "NA_NAMES"."SEC_ADD_IND", "NA_NAMES"."UNIT", "NA_NAMES"."CITY", "NA_NAMES"."STATE", "NA_NAMES"."ADD_LINE_A", "NA_NAMES"."ZIP_POSTAL", "NA_NAMES"."EMAIL", "NA_NAMES"."NAME_2", "AR_MASTER"."SORT_KEY", "AR_SUMMARY"."PRINCIPAL", "NA_MAILING_INDEX"."SUB_SYSTEM", "NA_MAILING_INDEX"."PRIMARY_INDEX"
FROM (("Waltham"."dbo"."AR_MASTER" "AR_MASTER" INNER JOIN "Waltham"."dbo"."AR_SUMMARY" "AR_SUMMARY" ON "AR_MASTER"."AR_ID"="AR_SUMMARY"."AR_ID") LEFT OUTER JOIN "Waltham"."dbo"."NA_MAILING_INDEX" "NA_MAILING_INDEX" ON ("AR_MASTER"."P_ID"="NA_MAILING_INDEX"."REF_ID") AND ("AR_MASTER"."SUB_SYSTEM"="NA_MAILING_INDEX"."SUB_SYSTEM")) LEFT OUTER JOIN "Waltham"."dbo"."NA_NAMES" "NA_NAMES" ON "NA_MAILING_INDEX"."NA_ID"="NA_NAMES"."NA_ID"
WHERE "NA_MAILING_INDEX"."PRIMARY_INDEX"=-1 AND "NA_MAILING_INDEX"."SUB_SYSTEM"='UB'
ORDER BY "AR_SUMMARY"."AR_ID"

SQL for the BALANCE

SELECT "AR_MASTER"."SUB_SYSTEM", "AR_MASTER"."YEAR_ID", "AR_SUMMARY"."INSTALLMENT", "AR_MASTER"."AR_ID", "AR_SUMMARY"."AR_ID", "NA_MAILING_INDEX"."NA_ID", "NA_MAILING_INDEX_1"."NA_ID", "AR_SUMMARY"."BALANCE", "NA_MAILING_INDEX"."SUB_SYSTEM"
FROM (("Waltham"."dbo"."AR_MASTER" "AR_MASTER" INNER JOIN "Waltham"."dbo"."AR_SUMMARY" "AR_SUMMARY" ON "AR_MASTER"."AR_ID"="AR_SUMMARY"."AR_ID") LEFT OUTER JOIN "Waltham"."dbo"."NA_MAILING_INDEX" "NA_MAILING_INDEX" ON ("AR_MASTER"."P_ID"="NA_MAILING_INDEX"."REF_ID") AND ("AR_MASTER"."SUB_SYSTEM"="NA_MAILING_INDEX"."SUB_SYSTEM")) LEFT OUTER JOIN "Waltham"."dbo"."NA_MAILING_INDEX" "NA_MAILING_INDEX_1" ON ("AR_MASTER"."UB_ID"="NA_MAILING_INDEX_1"."REF_ID") AND ("AR_MASTER"."SUB_SYSTEM"="NA_MAILING_INDEX_1"."SUB_SYSTEM")
WHERE "NA_MAILING_INDEX"."SUB_SYSTEM"='RE' AND "AR_MASTER"."YEAR_ID"=2012 ORDER BY "AR_MASTER"."AR_ID", "AR_SUMMARY"."INSTALLMENT"

Installation of Web Services

Invoice Cloud Web Service (Release 5.1)

To install the following are the installation steps for the Invoice Cloud Web Service:

  1. Deploy the Release 5.0.9 of the Resources Files.
  2. Install and configure the WCF Accounts Receivable API [Filename: WCFAccountsReceivableAPI.zip].
  3. Modify the web.config file to use the GoverNetConfig.xml of the deployment [Location: In the root of the specific deployment folder]
  4. When installing Release 5.1 of the web service, administrators will need to manually create the following table in (Table: NA_NAMES: WEBPROFILEACCESSRT (Smallint, Allows Null). This field was added to provide support for the eGov and is used in the business rules of the Names.

Verification of the Service

The WcfTestClient.exe application is used to test the web service. This application can be obtained on the Govern FTP site or from Govern Technical Support: WCF Test Application.zip. For additional details regarding testing Govern Web Services

What’s New!

Release 6.0
The two (2) Govern batch processes that are associated with the Invoice Cloud process for Real Property and Personal Property modules have been modified to allow them to identify required InvoiceTypeID’s that match with AR Cycle codes for Real Property (RE) and Personal Property (PP). Release 1703.06

Prior to release 6.0 of the Govern Web service, manual changes were required to be made during the installation of the Invoice Cloud Web Service:

  • Modify the web.config to use the GovernNetConfig.xml file located in the deployment root directory.
  • Create (Table: NA_NAMES.WEBPROFILEACCESSRT), with properties set to (smallint, allow NULLS).

The above steps are no longer required, they are automatically created when the Database Verification process is run in the Govern New Administration (GNA).

Related Topic(s)

Govern API and Service


308-icloud
 

0 votes, average: 0.00 out of 50 votes, average: 0.00 out of 50 votes, average: 0.00 out of 50 votes, average: 0.00 out of 50 votes, average: 0.00 out of 5 (0 votes, average: 0.00 out of 5)
You need to be a registered member to rate this.
Loading...


Oracle Synonyms

Oracle Synonyms

Overview

Using Synonyms in Oracle (Best Practices)

An Oracle synonym basically allows you to create a pointer to an object. This object can exist in the same database, or in another database. Oracle synonyms are used because, by default, when you are logged into Oracle, it will look for all objects being queried within your schema, i.e. accounts.
A synonym allows a database administrator to define alternate names for existing database objects from other schemas.

Configurable Searches and External queries

With Govern Open Forms, you can build customized queries, open forms, Dynamic Searches, etc. based on data in different schemas and/or external databases.

Data in a different Schema but same Database Instance

When using a synonym to access data in a different schema but within the same database, it is recommended that you add the synonyms directly in the govern schema. For example, in a schema called MANTA, if you need to work with the tables, it is recommended that you create synonyms with a Govern prefix, in the Govern schema for the required tables.


Govern Schema MANTA Schema
Govern.PC_PARCEL
Govern.MA_MASTER Manta.External_table2
Govern.PC_ADDRESS Manta.External_table3
Manta.External_table4 (*Synonym)_ Manta.External_table4
Manta.External_table5 (*Synonym) Manta.External_table5
Manta.External_table6 (*Synonym) Manta.External_table6


NOTE: When creating synonyms, one limitation is that it is essential that the name used by the synonym is the same as that of the original.

Data in a different Database or Server

When using a synonym to access data in a different database or on a different server, there are two (2) methods that can be used.

Method 1

When the data is located in a different database, a connection key will need to be generated to access this database. To ensure success, you will need to be able to create stored procedures that will be used by Govern, within the database and schema. Note that this may not be the preferred methodology for System Administrators as this mixes different information within the same schema.
An alternative is to create a Govern schema within the other database, and use the synonyms to point to the desired tables. When this method is used, stored procedures will be created in the Govern Schema along with the synonyms. This is a recommended practice.

Method 2

This second method allows you to connect to an external database or server. Once a connection has been established, the synonym can be used in your current Govern database and schema.

Example of a database link

The following is an example of the commands that can be used to establish a database link.
CREATE DATABASE LINK manta.manta_server_name

CONNECT TO the manta database, IDENTIFIED BY manta_password

USING ‘manta_service_name’;

The above connects to the ‘manta’ database using the net service name ‘manta_service_name’, and is connected with a username of ‘manta’ and a password of ‘manta_password’.

With this, you can do a
SELECT * FROM upload_address@manta.manta_server_name

This will allow you to retrieve the rows from the upload_address table on the manta database residing on the manta_server_name Oracle server.

Creating the Synonym

You can also create a synonym in the following manner:

CREATE SYNONYM upload_address for upload_address@manta.manta_server_name
So that now you can do a SELECT * FROM upload_address.

Syntax

Create synonym [SYNONYM_NAME] for [SCHEMA].[TABLE_NAME] Example: CREATE synonym [UPDATE]

Using Synonym for table residing on same Server but different Schema

The following steps are for using a Synonym for a table that is on the same Server, but in a different Schema.

  1. Create a synonym for the MANTA.UPLOAD_PROPERTY table and name it GOVERN.UPLOAD_PROPERTY.
  2. Start the Business Entity Designer (BED)
  3. Create the UPLOAD_PROPERTY Business Entity (BE); create all required attributes and ensure that each attribute matches the MANTA.UPLOAD_PROPERTY table.
  4. Select the ParcelInfo Business Model (BM) and add the UPLOAD_PROPERTY business entity to it.
  5. Click on the ENTITIES (relationship) tab (A) and select PC_ParcelInformation as the parent entity and UPLOAD_PROPERTY as the child entity
  6. Under the same tab (A), define the relationship between the TAX_MAP_UFMT and ROLL_NUMBER attributes
  7. Start the Model Object Designer (MoD) and open the PC (Property Information) model.
  8. Expand the ParcelInfo item in the loaded Business Model section. You will now see the UPLOAD_PROPERTY Business Entity at the end of the list.
  9. Drag the UPLOAD_PROPERTY business entity to the property information model.
  10. Select the UPLOAD_PROPERTY cell to change it’s position.
  11. Change the Row sequence to 1 and cell sequence to 2.
    NOTE: You may also add action buttons to the UPLOAD_PROPERTY model to save/delete/etc…
  12. Click Save to save the model.
  13. Start the Govern Security Manager (GSM). Right click on Applications (A) and select Synchronize Profiles from the floating menu.
  14. Expand the applications node (A) and confirm that UPLOAD_PROPERTY is now present in the Property Control profile (B).
    NOTE: For details about the synchronization process, refer to the Govern Security Manager (GSM) release 5.0 for details.

Verification in Govern

After the synchronization process, the presence of the new tab can be verified in Govern.

  1. Start Govern and go to the Property Control profile.
  2. Open the Property Information openform.
  3. Search for and edit the Property Information for tax map number 13092095000. You will now have a tabbed document for the UPLOAD_PROPERTY business entity.
  4. Click on the UPLOAD_PROPERTY tab and the related data from the UPLOAD_PROPERTY business model will be displayed.

All editable fields can be edited and saved.

Using a Synonym for a Table residing on another Server and Schema

The following steps are for using a Synonym for a table that is on another Server with a different Schema.

  1. Create a database link to where the remote tables reside.
  2. Test and validate the new database link
    NOTE: The test must be successful.
  3. Export the DDL (save to worksheet) of the synonym UPLOAD_PROPERTY that we created earlier.
  4. Edit the DDL to add a reference to the database link to the server that we are linking to by specifying ‘@WPG11G’ as a suffix to the table name.
  5. Run a test query to verify that the link is working.

We are now querying (and joining), transparently, tables that reside on separate Oracle servers. If you run the MS Govern application, at this point, you will obtain identical results.

A Note about Security for Synonyms

In order for a synonym to function correctly, it is essential that the security be set to have access to the external tables that are pointed to by the synonym. For example to, to access a MANTA schema, you must have security access to the MANTA tables in question..

See Also

Oracle


381-Synonyms


0 votes, average: 0.00 out of 50 votes, average: 0.00 out of 50 votes, average: 0.00 out of 50 votes, average: 0.00 out of 50 votes, average: 0.00 out of 5 (0 votes, average: 0.00 out of 5)
You need to be a registered member to rate this.
Loading...

Web Browser Integration

Web Browser Integration (WBI)

Overview

The OpenForms Application Browser form technology is a form that is based on the Web Browser OpenForms technology. This form can be used as a container for simple, e.g. Web Browser, to complex integrations such as MATIX, a GIS solution from Harris Govern.
An unlimited number of forms can be set up to meet the requirements for displaying spatial, and tabular content of profile users. In addition, an unlimited number of Application Browsers can be configured in a form. Forms can be set up with options that can include the following Key Types, e.g. Parcel ID, Name ID as well as Unformatted Tax Map). Other options include configuration by GIS Server URL, through Synchronization Options, and by Viewing Tabular Data.

Form basic integration, Web Browser Integration (WBI) can be used for adding an interactive website to Govern OpenForms. For example, you could use WBI to add a Geographic Information Services (GIS) web browser interface, such as the Govern GIS Explorer, to a Govern user form and Profile. You could then select records in Govern and view them on the GIS interface. You could also select records on the GIS interface and load them to the Govern Treeview, with the option to set up manual or automatic synchronization between Govern and the website.

The WBI control is added to a custom entity in the Govern OpenForms Designer (OFD). All the configuration is performed in the OFD including any related security settings.

WBI is supported by most websites. It is fully integrated with Govern. It implements predefined commands to add the following functionalities:

  • Loading all records from the Govern treeview to the website
  • Loading the active record in Govern to the website
  • Replacing all records in the Govern treeview with a list provided by the website
  • Replacing the active record in Govern with a list provided by the website

Configuration

Custom entities are used for adding specific predefined controls to a Govern form. In this case, a custom entity is used for adding Web Browser Integration (WBI) functionality. A custom entity cannot stand alone. It needs to be added to an existing form. The form must be added to Profile.
You can add the same custom entity to multiple forms, and add the forms to multiple Profiles, if required.

You need to select a Parent Entity for your new custom entity. Usually, this is the Root Entity.

The following rules apply:

  • The WBI control must be added to a custom entity.
  • The custom entity must be added to an existing form.
  • The form must be added to a Profile.
  • The Dataset Type Code for the Profile must be set to Parcel ID (P_ID) or the Name ID (NA_ID), and must correspond to the value set for the SelectedKeyType.
  • The Dataset Type Code is shown in the following screen shot:

Documentation

Click on the link below to view a .PDF containing details about Web Browser Integration and configuration procedures.
Adding and Configuring WBI

Video Demonstrating Test Tool

A video demonstrating how to test the  integration will be be posted below shortly.

Click here to view the How To demo video

What’s New!

Web Browser Integration (WBI) was introduced in Govern 6.0. As of Govern OpenForms version 6.0.1405, it is used for integrating the Govern GIS Explorer with Govern.

NOTE: The WBI control is used for integrating GIS functionality with Govern as of Govern OpenForms 6.01.1405

Troubleshooting

Any issues that may be related to the Web Browser Integration form will be listed below.

No Access to the Wiki (Log In Error)

Symptom

This error displays a Script Error screen which appears on top of a Wikispaces sign in screen.

Resolution

A solution to resolving this error is to log in to the Wiki prior to launching Govern. When you have successfully logged into the Wiki, start Govern and open the form with the Web Browser Integration form.

Related Topics


101-std-frm-003-WebBrowserIntegration


0 votes, average: 0.00 out of 50 votes, average: 0.00 out of 50 votes, average: 0.00 out of 50 votes, average: 0.00 out of 50 votes, average: 0.00 out of 5 (0 votes, average: 0.00 out of 5)
You need to be a registered member to rate this.
Loading...

SSRS – How to Install

How to Install SSRS

The following are the steps required to install Microsoft SQL Server Reporting Services. After successful installation you will be able to use SSRS reports in Govern.

Installation Steps

To proceed you will first need to obtain SQL Server Reporting Services from the Microsoft website.

NOTE: Before any installation, ensure that you have Administrator access to the target computer.
  1. Download Microsoft SQL Server Reporting Services from the following URL: https://www.microsoft.com/en-us/download/details.aspx?id=55252
  2. To install SSRS, click on SQLServerReportingServices.exe.
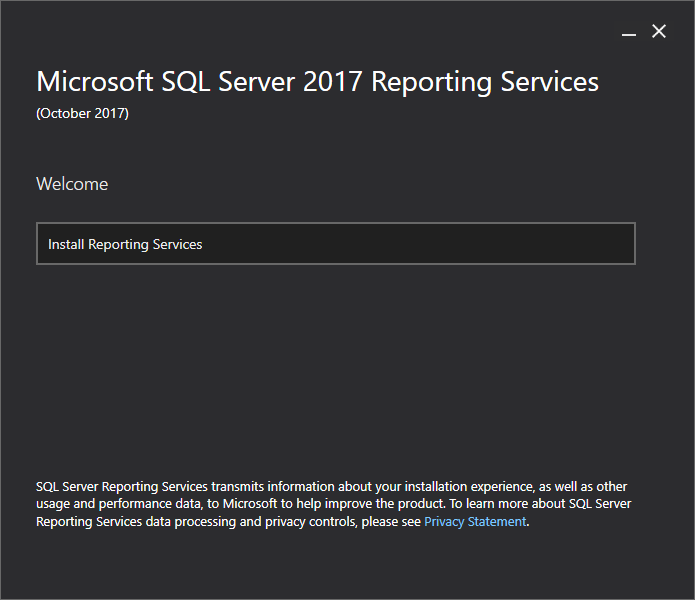
    • At the first screen click Install Reporting Services.
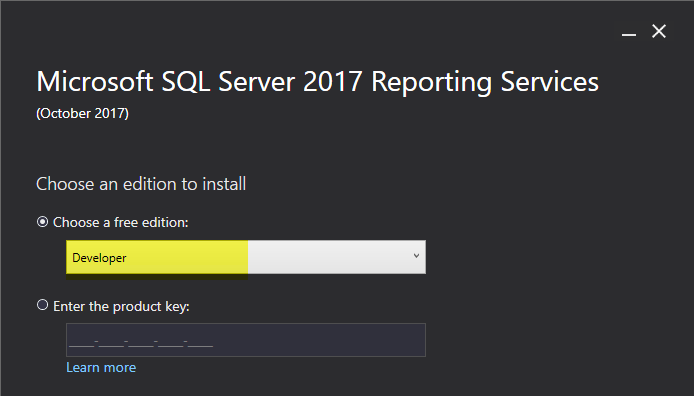
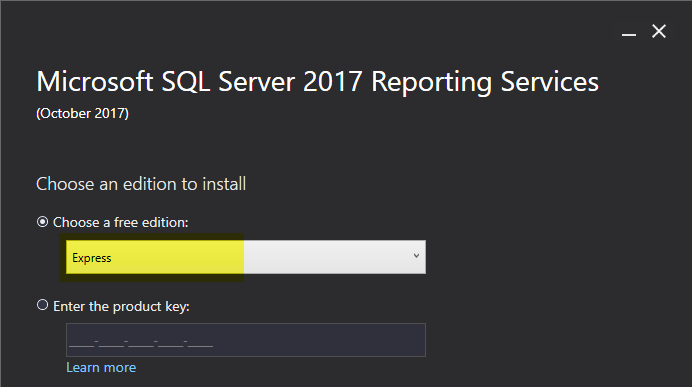
    • Click to select an edition – select Free: Developer or Free: Express).

      OR

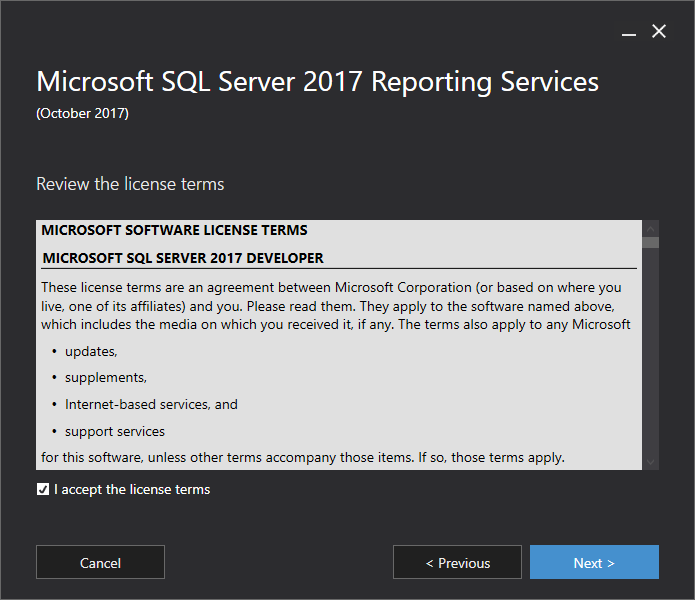
    • Accept the License Terms and click Next.
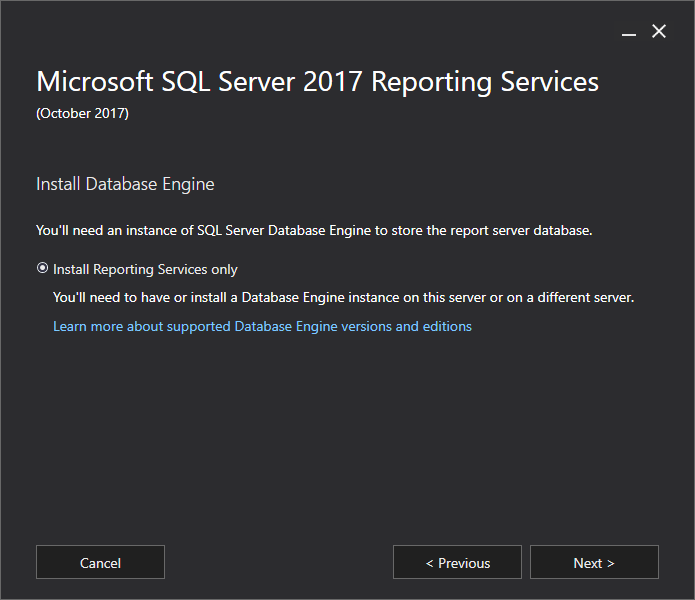
    • At the Install Database Engine option select Install Reporting Services only. Click Next.
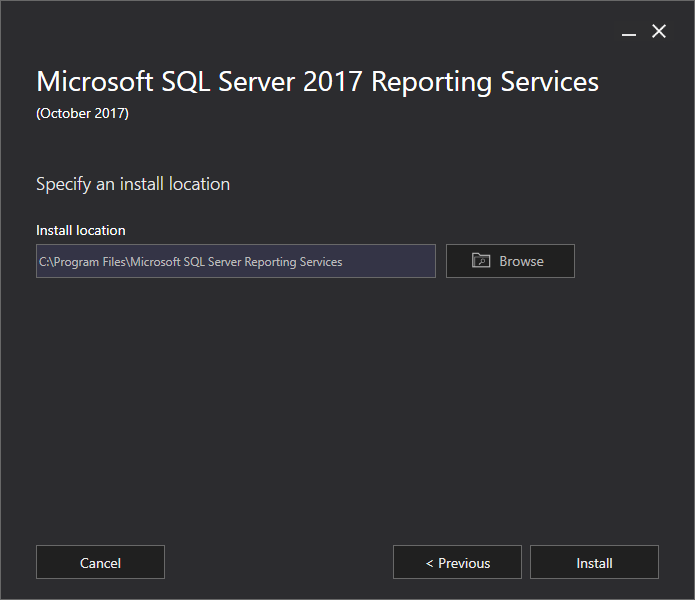
    • At the Specify an install location screen, use the default, or select a path. Click Install.
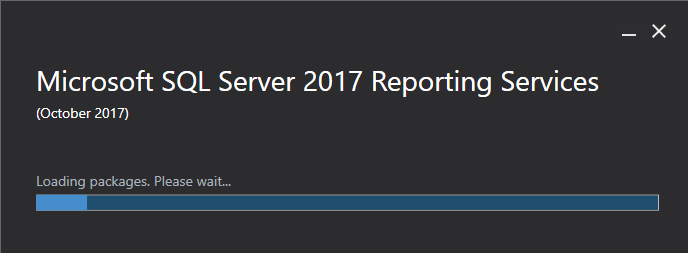
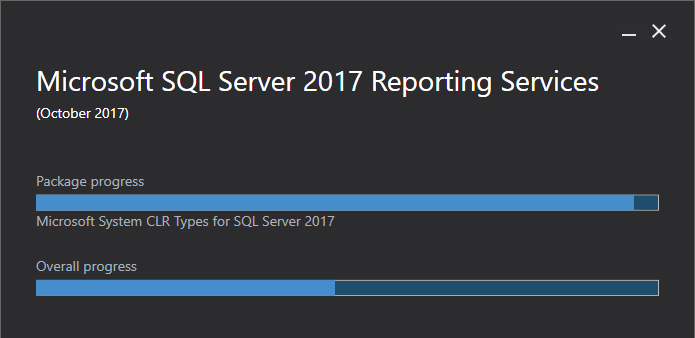
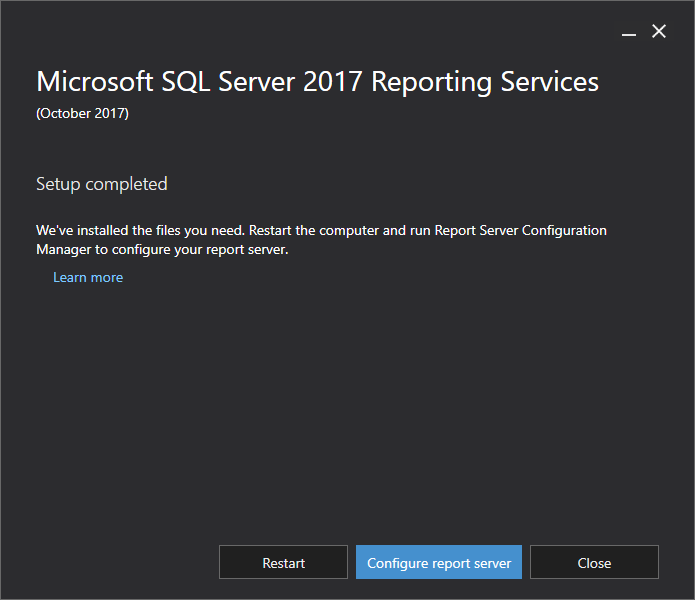
    • SSRS will be installed.

    • When the installation has completed, restart your computer and prepare to install the Report Server Configuration Manager.
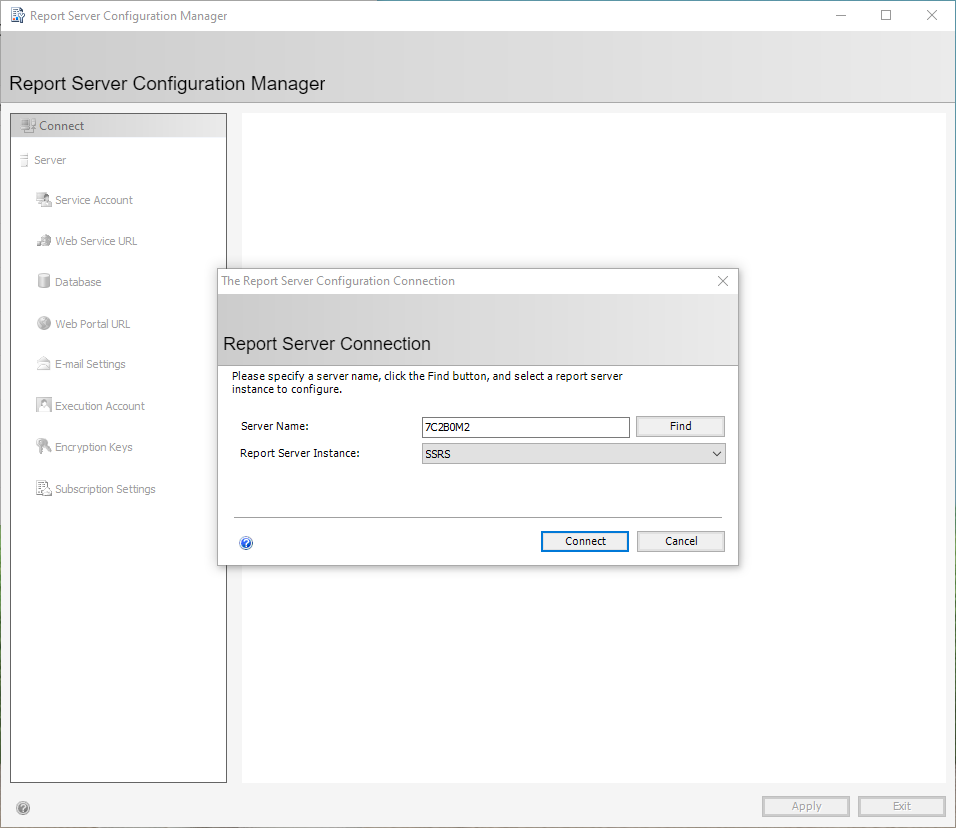
  3. After the system restart, open the Report Server Configuration Manager from the Windows menu.

    1. In the Report Server Configuration Manager screen, at the Report Server Connection prompt, select a server name. This should be the server that contains the SSRS installation.
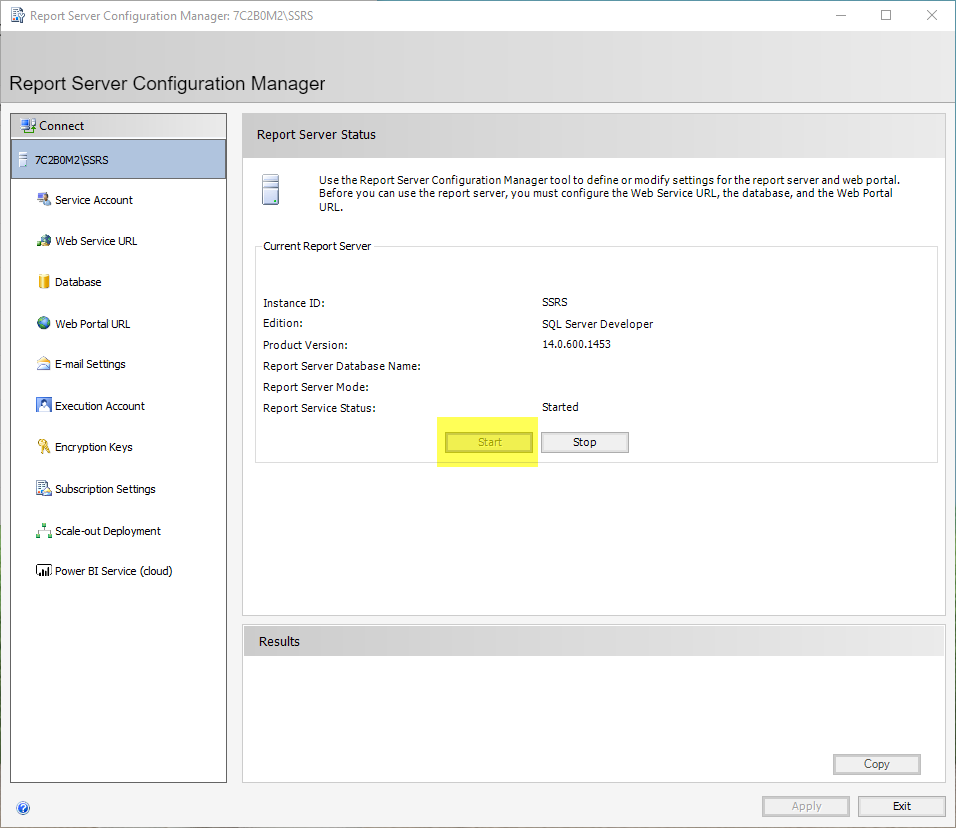
    2. After the server name has been specified, start the server. Click to select the server on the left hand pane of the Report Server Configuration Manager, and on the right-hand side (RHS), click Start.
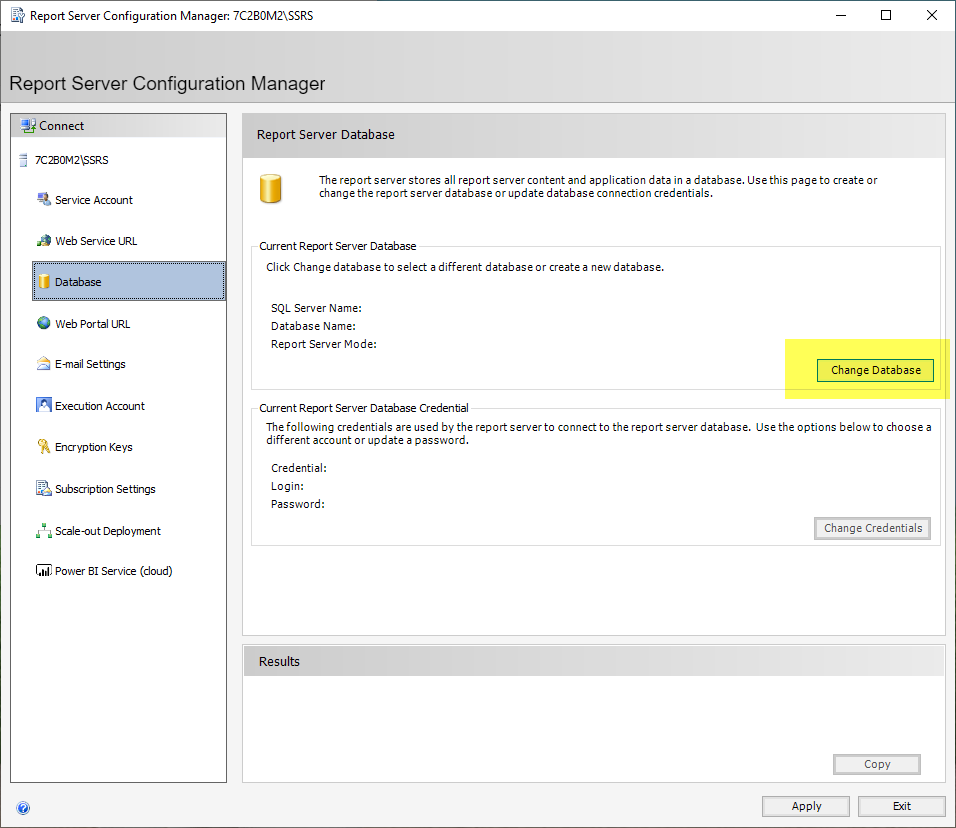
    3. At the Report Server Database screen, specify the Report Server Database server.
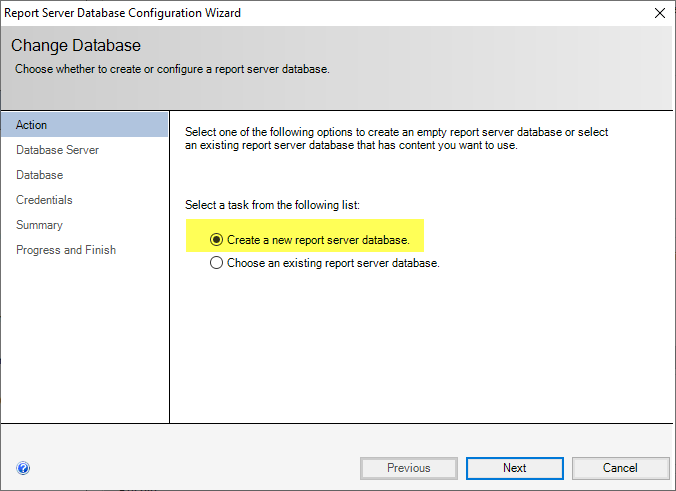
    4. Next select the option to Create a new report server database.

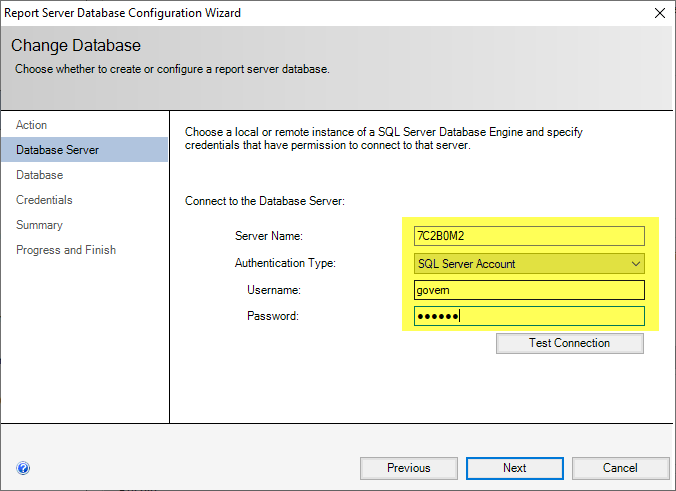
      At the Change Database prompt, click Database Server on the left hand side. Enter the Server Name, Authentication Type, Username, and Password to test your connection.

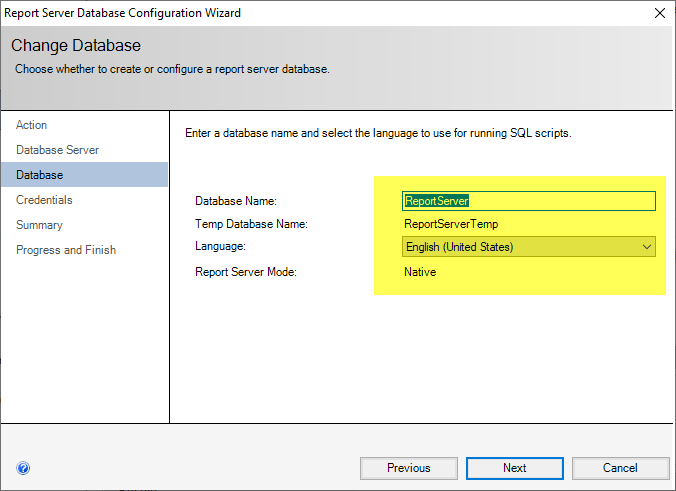
      In the Change Database screen, click Database then either use the default or select a name.

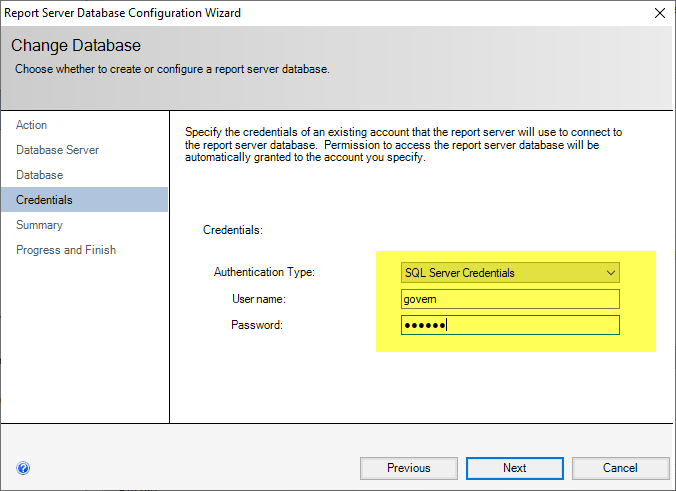
      Click Credentials to get the prompt, select an Authentication Type, enter a Username, and a Password.

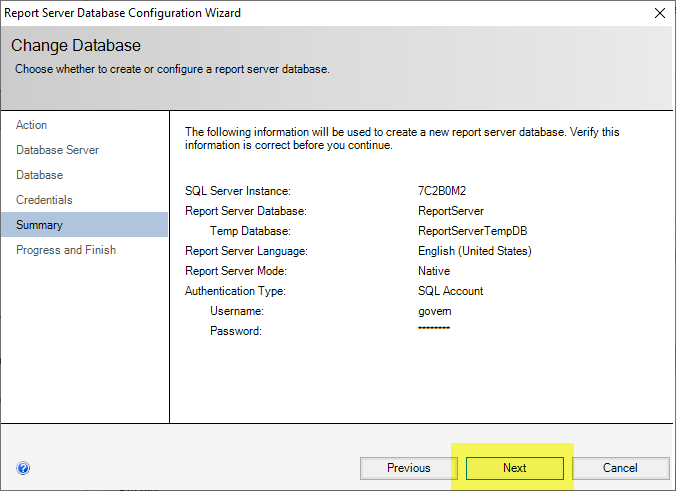
      Summary of the database, click on next if everything is correct

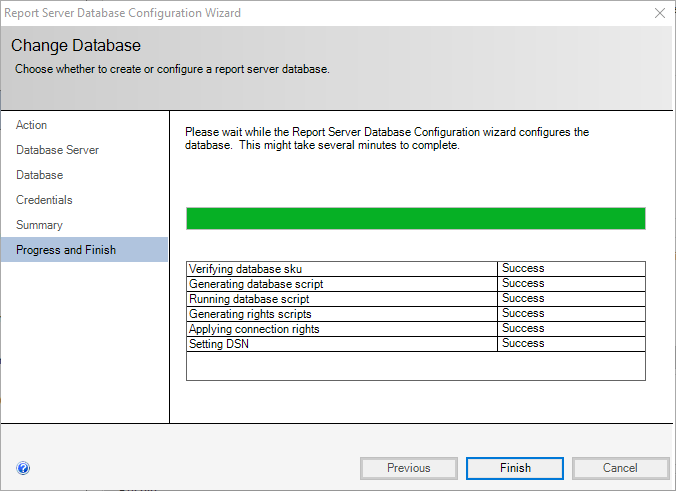
      On Progress and Finish, click Finish to finish the process.

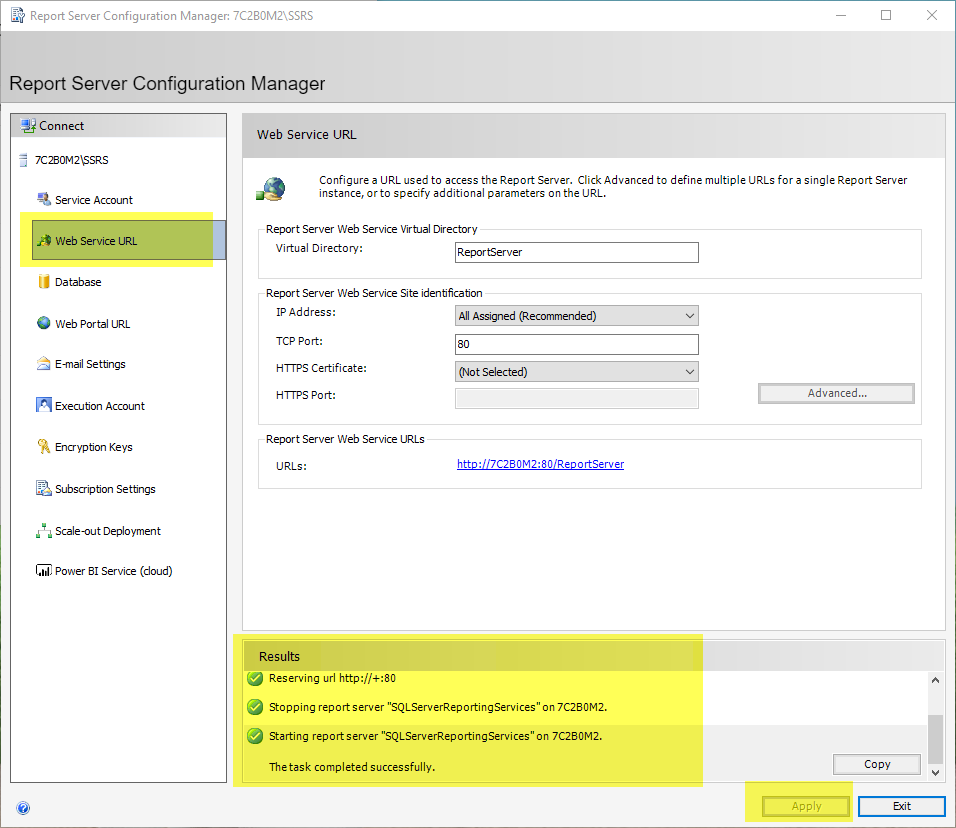
    5. Select Web Service URL and click on the button Apply

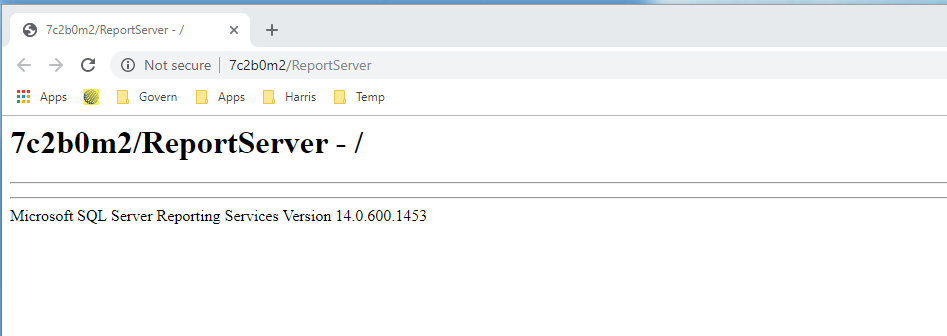
    6. Click on the URL link

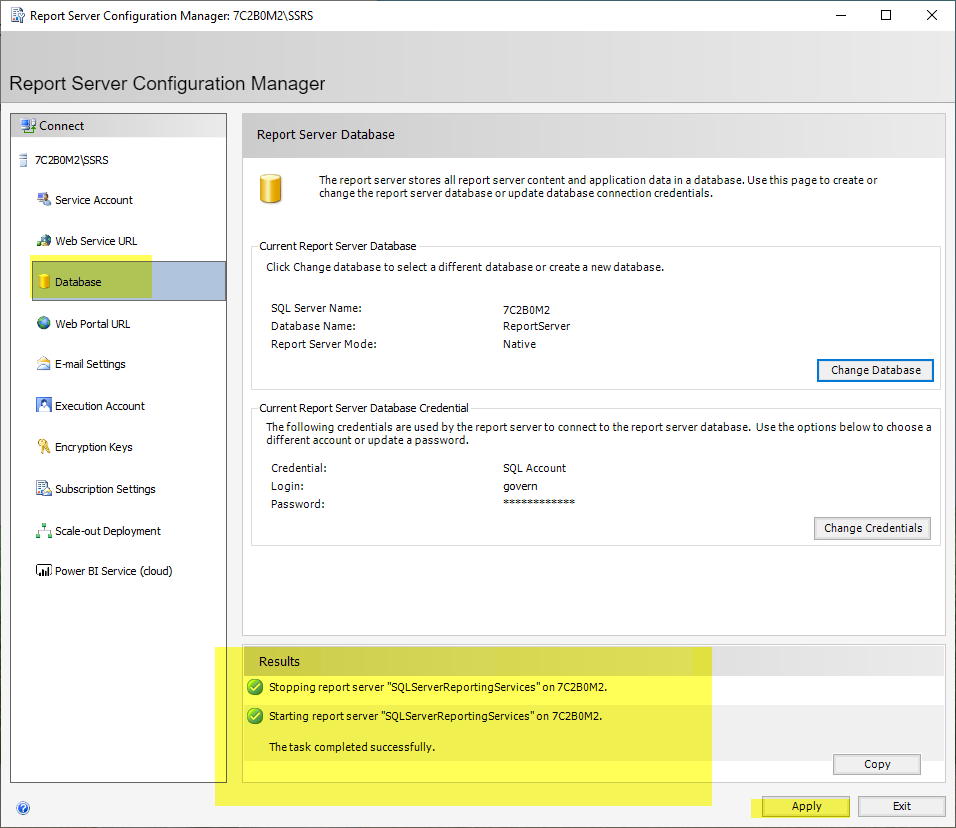
    7. Select Database and click on the button Apply
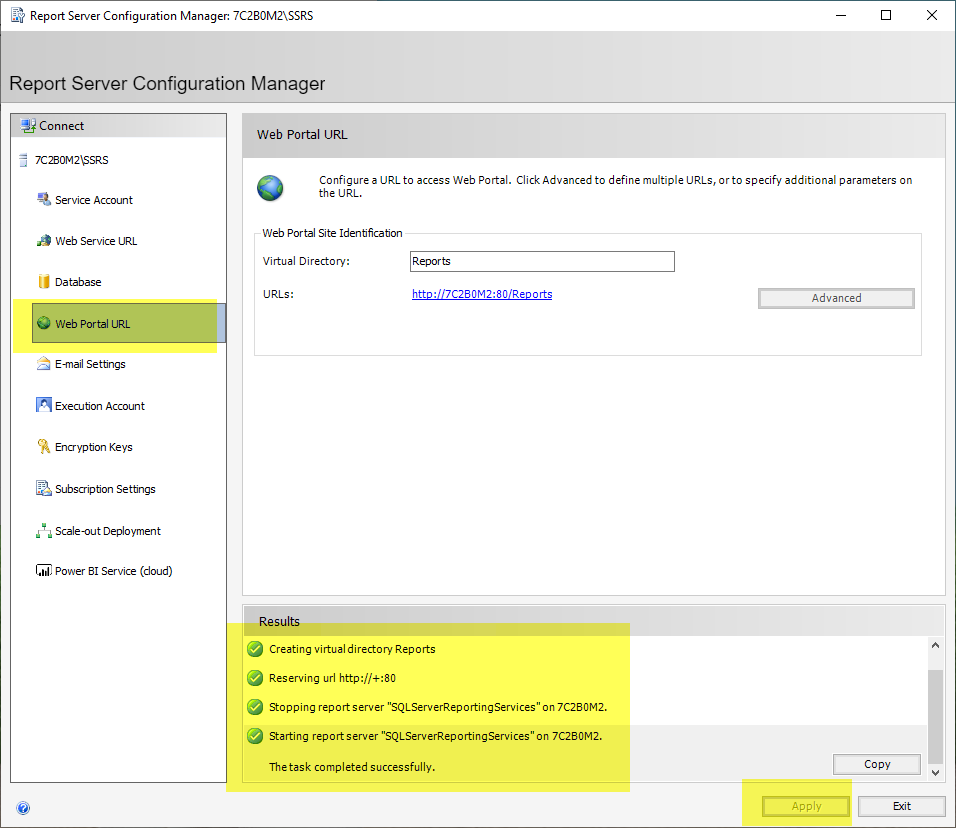
    8. Select Web Portal URL and click on the button Apply
    9. Click on the URL link
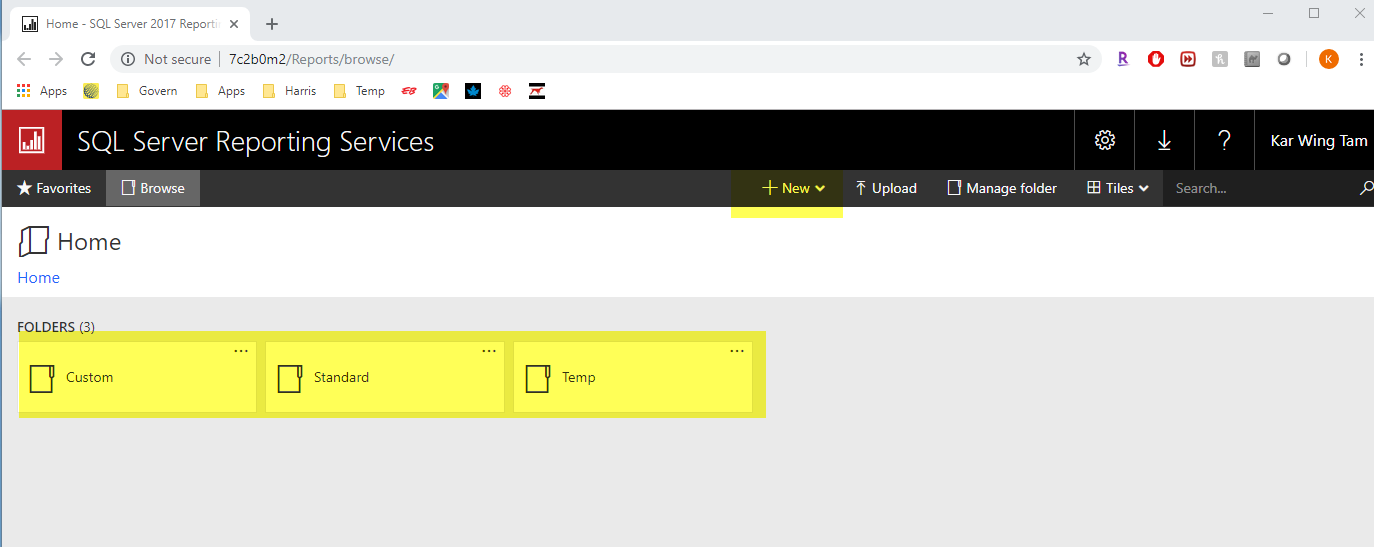
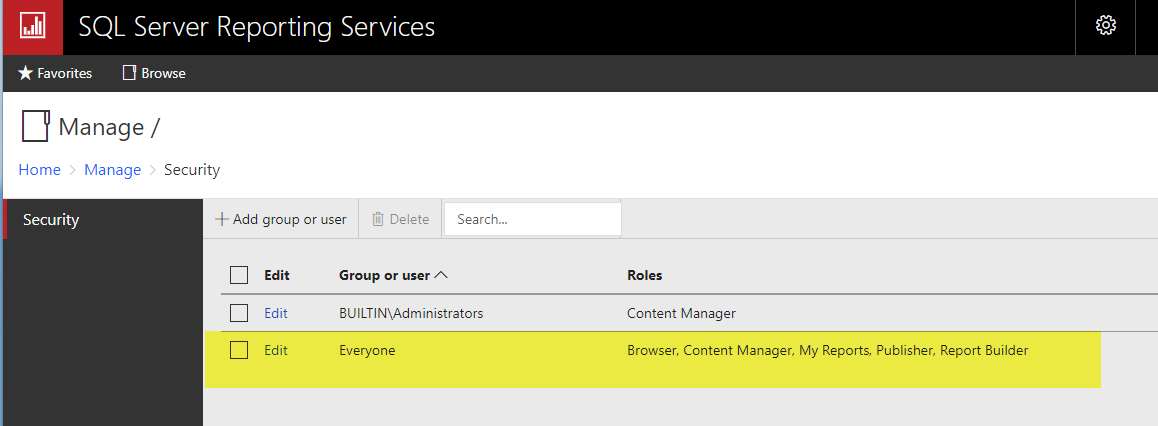
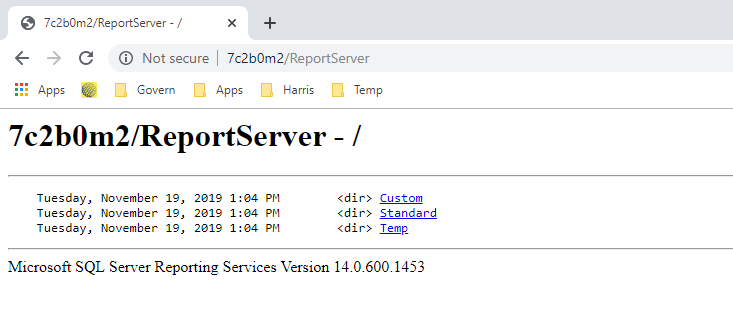
    10. Create 3 folders (Standard, Custom and Temp)
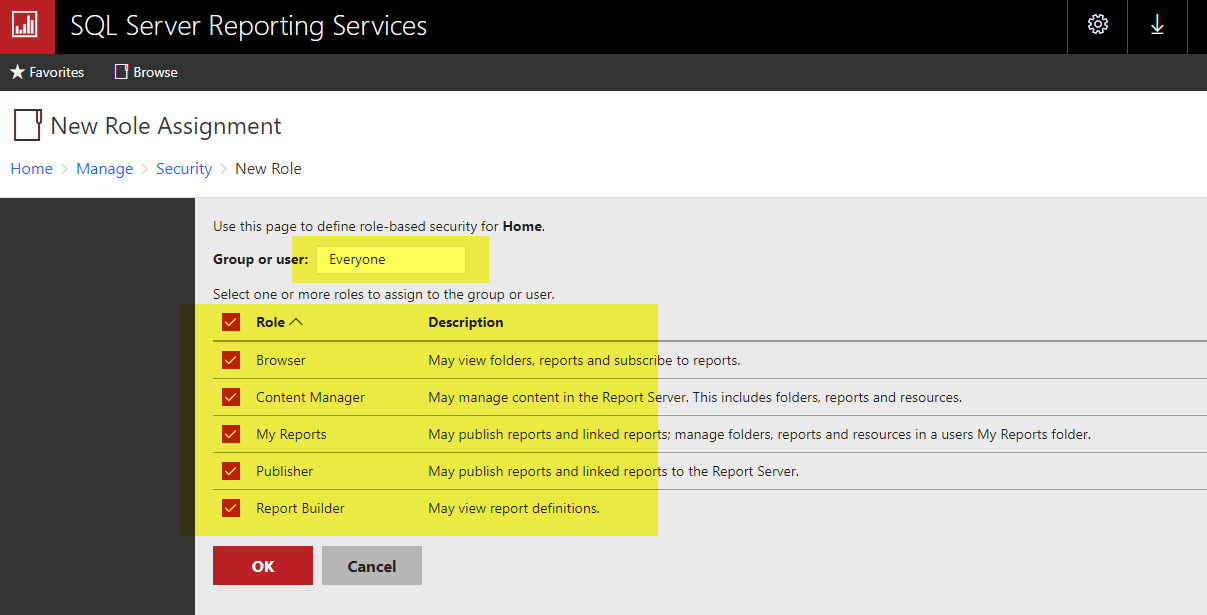
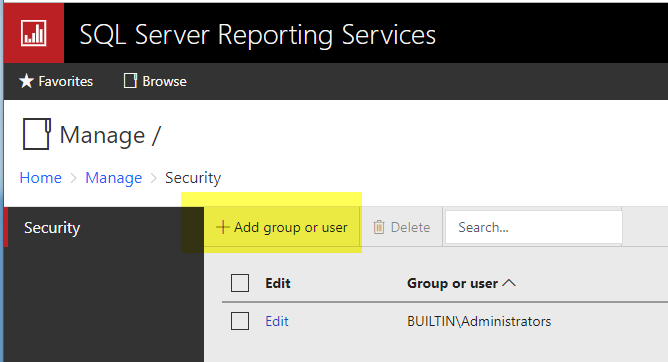
    11. Manage folder by adding security to everyone
    12. Refresh the Report Server site, you will see 3 folders
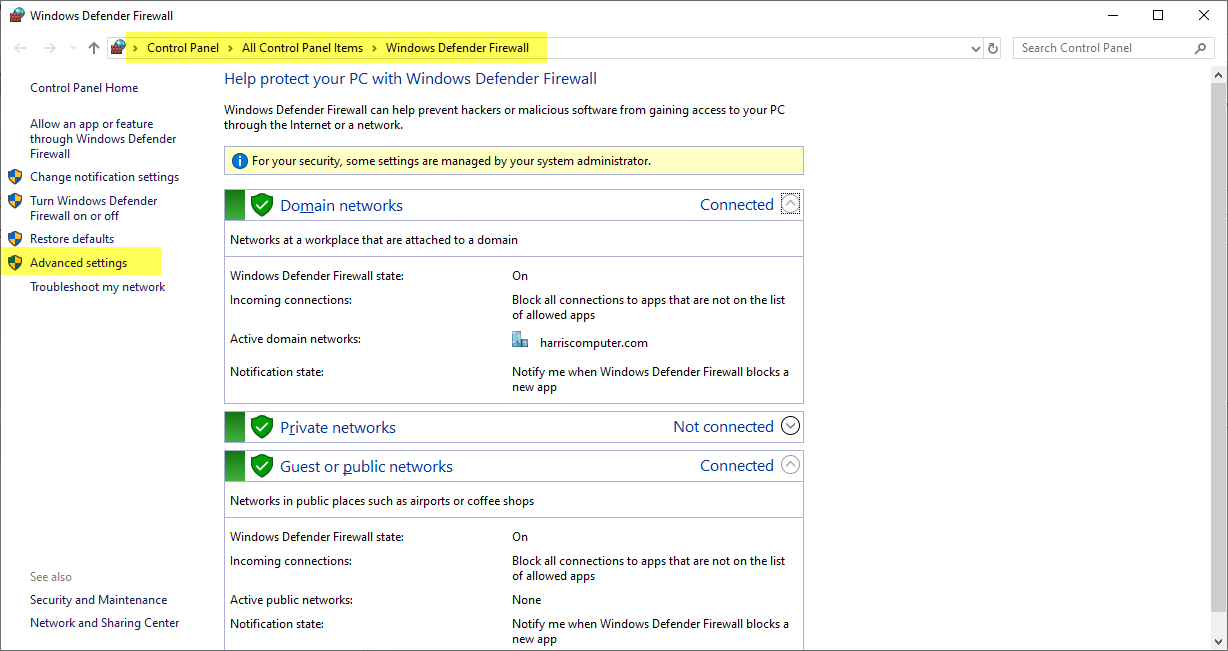
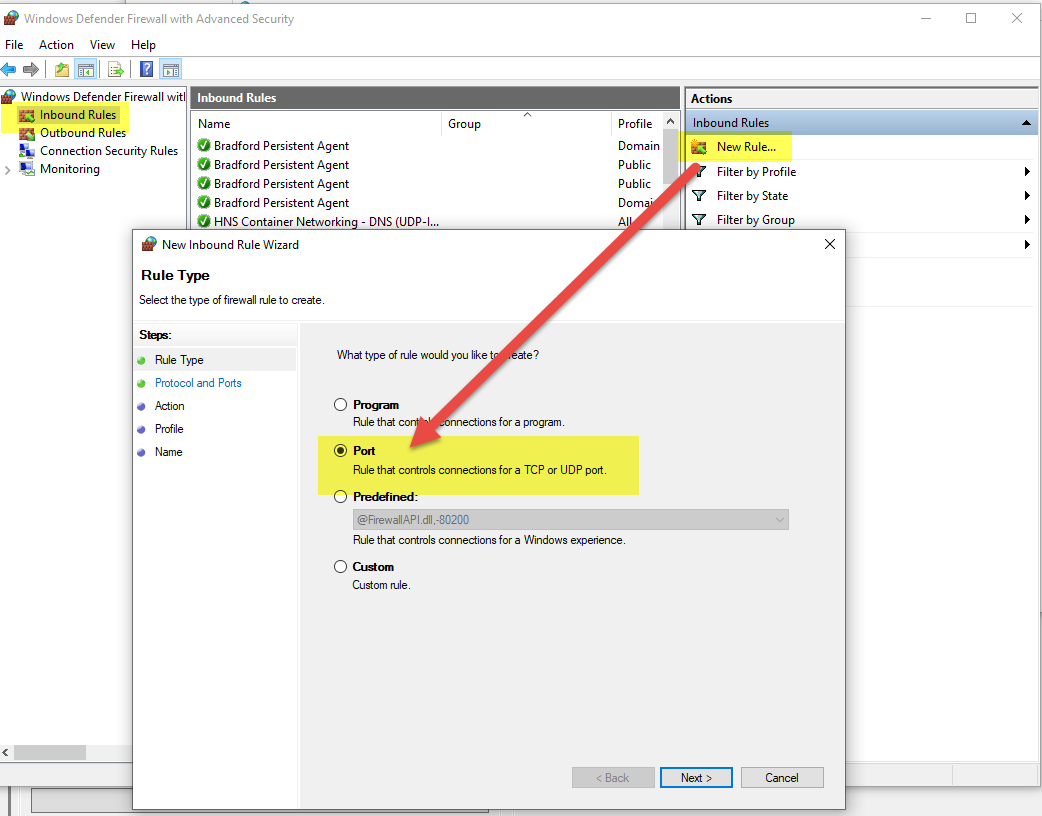
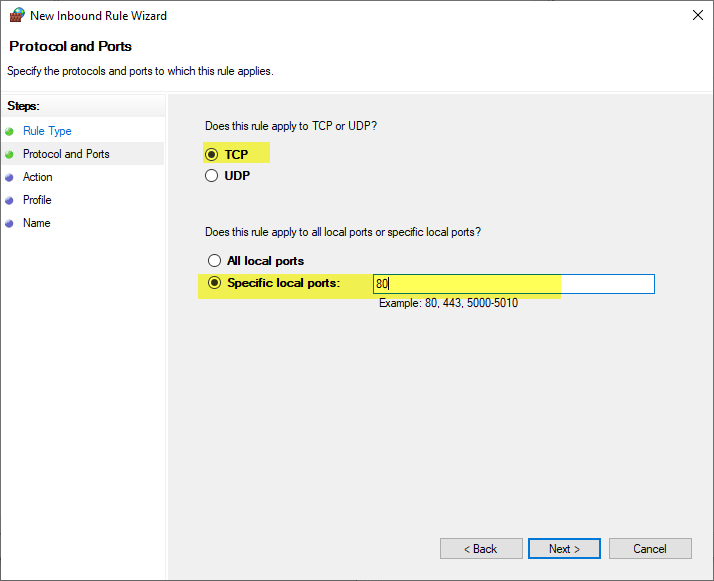
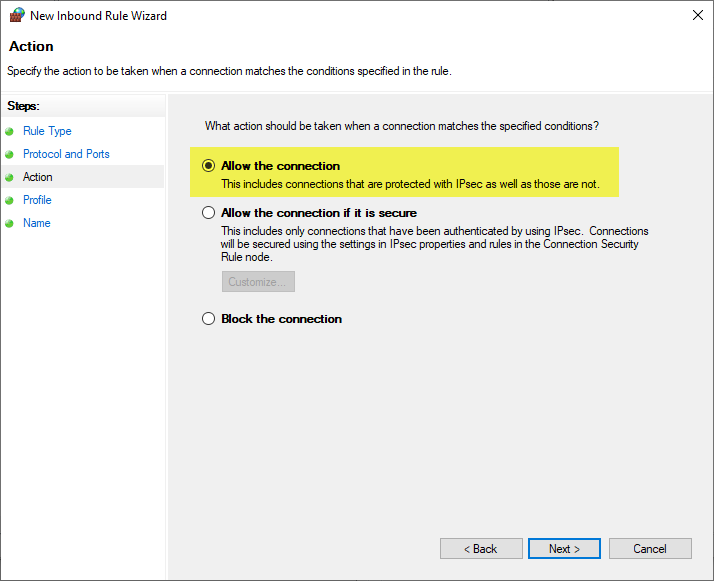
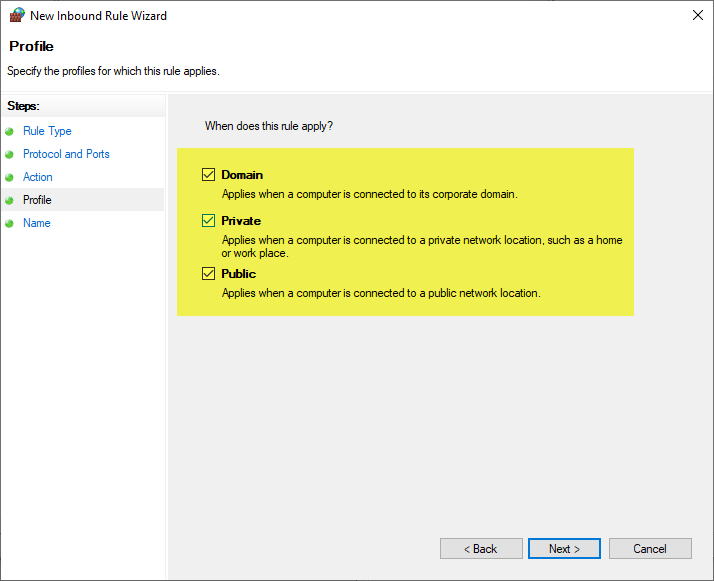
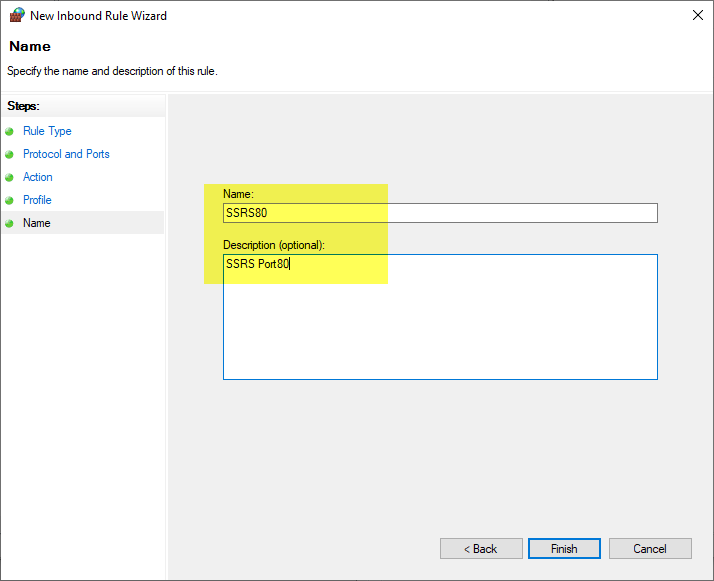
    13. Open the port
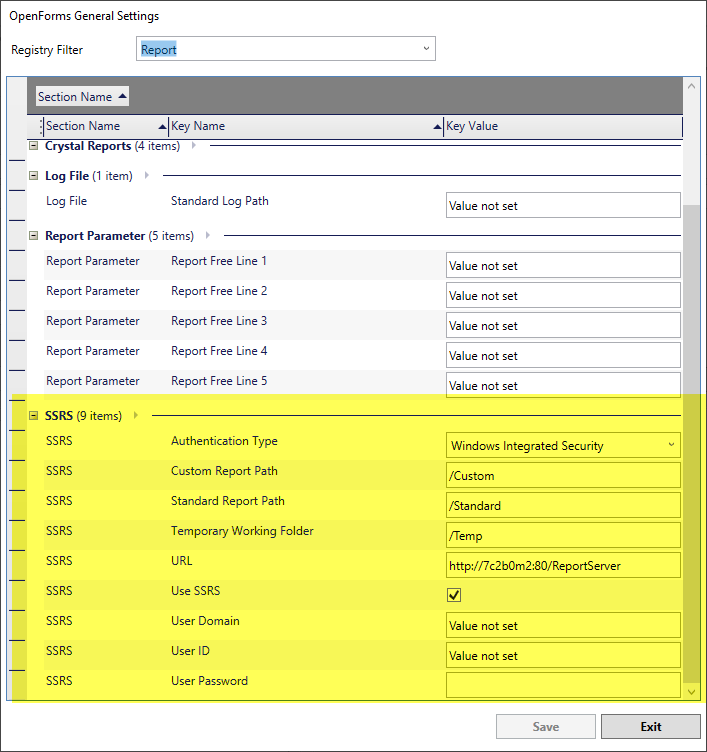
    14. Setup SSRS in GNA, go to Parameter\General Settings Editor, choose Report as Registry Filter.
  • Authentication Type – Use the windows integrated security
  • Custom Report Path – Set with the folder named “Custom” created in SSRS previously
  • Standard Report Path – Set with the folder named “Standard ” created in SSRS previously
  • Temporary Report Path – Set with the folder named “Temp” created in SSRS previously
  • URL – The Report Server Web service URL from SSRS
  • Use SSRS – Must be checked to be able to see the menu SSRS in GNA
  • User Domain / User ID / User Password – Will be empty (no need to be set)
You will need to install the Report Builder to be able to change/edit SSRS reports. At the moment you will need to install the version 2014 otherwise you may not be able to edit a Report: https://www.microsoft.com/en-us/download/details.aspx?id=42301


301-ssrs_how-to-install


1 vote, average: 5.00 out of 51 vote, average: 5.00 out of 51 vote, average: 5.00 out of 51 vote, average: 5.00 out of 51 vote, average: 5.00 out of 5 (1 votes, average: 5.00 out of 5)
You need to be a registered member to rate this.
Loading...

Matix – Override Layer Map Extent

Matix GIS Integration – Override Layer Map Extent

Overview

The map extent is the limit of the geographic area displayed on a map. This area is usually defined by a rectangle. In the case of a dynamic map display, map extent may be changed by the zoom or pan action. The Override Layer Map Extent is a feature that will override the default Layer Map Extent parameters. Each layer has its specific defined extent. When system errors are caused by defined extent values, provisions are now available to override and reset them.

Functionalities

The rectangular extent limits (XMin, YMin and XMax, YMax), and spatial reference, i.e. the value required to display your data in the correct geographic location, of the defined area are displayed near the bottom left hand side of the ArcGIS REST Services Directory. The following is an example of a path that may be used: AppServerName > arcgis > rest > services > Parcels

In instances where issues arise as a result of the defined extent values, there is a tool that can be used to override and reset these values.

For Example:

In a situation where the map extent default values are:

  • XMin: 133998.98780000024
  • YMin: 5427385.8651
  • XMax: 766054.8088999996
  • YMax: 6633853.2072
  • Spatial Reference: 26913 (26913)

The above values are generating an error. When these values are overridden, the error is resolved. The following override values need to be entered:

  • XMin: -2.00375
  • YMin: -195164.8
  • XMax: 2.00375
  • YMax: 1.997186
  • Spatial Reference: 3857 (3857)

Configuration

Map Extent group – Override Map Extent

A group box has been added to the Matix Server Configuration tab. The Map Extent group contains the parameters required to modify map extent values.

After the override values have been entered, the Reset the default values button that is located beside the group label Map Extent will be enabled. To reset the default values…

  1. Click Reset the default values.
  2. A confirmation window will be displayed, with the confirmation message, “Reset the default map extent?”.
  3. Click Yes to accept and reset the values.
  4. When the values have been reset, the Reset the default values button will be disabled.

Viewing the results in Govern

When the extent values have been reset, return to the Matix GIS interface in Govern. An indication that the issue has been reset is the presence of the Distance Scale at the bottom of the map is an indication of the correction, in addition the map projection will be flat.

Documentation

Click to view the PDF version of this page.


222-std-fea-005


0 votes, average: 0.00 out of 50 votes, average: 0.00 out of 50 votes, average: 0.00 out of 50 votes, average: 0.00 out of 50 votes, average: 0.00 out of 5 (0 votes, average: 0.00 out of 5)
You need to be a registered member to rate this.
Loading...

322-forte

ForteTM Payment Processor

Overview

Available in General Availability Release (GA) 6.0.1606
The ForteTM Payment Processor allows Govern users to accept credit card payments at their Point of Sale (POS) using the Forte POS credit card terminal. Forte is a 3rd party integration option consisting of both a hardware, i.e. POS terminal with customized firmware, and a software component. The Forte POS terminal along with payment processing gateways, make up the Govern Forte Payment Integration.
The following Govern modules are required for the integration:

Configuration

In order to implement this solution, configuration is required at two levels:

322-ui-forte.png
Test Credit Card & eCheck RT Information – Click to Access


  1. Hardware and software configuration of the Forte POS credit card terminal.
  2. Configuration in the Govern system registry with the Govern New Administration (GNA).

Hardware & Software Configuration of Forte Terminal

Installation and connection instructions for the Forte terminal are bundled with the shipping package. This terminal is to be connected with the workstation that is configured with the Govern application.
Connection options are Ethernet, or USB. Software with instructions, intended for use with the Terminal is also included. This hardware and software pre-configuration must be completed prior to any Administrator configuration in Govern.

Configuration in GNA

The following system registry settings need to be configured.
To begin the configuration in GNA:

  1. Launch GNA.
  2. On the GNA ribbon click Parameters (tab) > General Settings Editor.
  3. Select Cash Collection from the Registry Filter combo box.
  4. Configure the required key values in the related Key Name columns

Key Name Columns

There are four (4) parameters that are required to be configured in the SY Registry in GNA.
Forte Merchant ID – This value will be provided by Forte.
Forte Password – Enter the password that was provided by Forte.
Forte Response Time-out (Seconds) – Enter a value of 70.
Point of Sale Provider – Select Forte from the combo box.

Setting up the Forte Payment Processor

Installation of the Forte Hardware

It is recommended by the Verifone Device supplier that the driver installation should occur before connecting the device. Typically users will connect a device prior to installation of the drivers.

NOTE: If you have already connected the device, and Windows detected new hardware, simply cancel any dialog screens indicating that new hardware has been found. Disconnect the Verifone Device, and proceed with the software installation.
– Installation MUST be performed by a user with administrative privileges.

Documentation

Click below to download or view the documentation.

Forte Pos Integration

322-FORTE_POS_Integration.pdf

Forte Web eGovern Integration

322-Forte_eGovern_Processor_Payment.pdf

Forte Web eGovern Payment Process (UPDATED)

322-Forte_eGovern_Processor_Payment.pdf

Forte Test Credit Card and eCheck RT Information

322-Forte-(Test Credit Card and eCheck Information).pdf

Troubleshooting

The section is reserved for any troubleshooting information related to installing and configuring the FORTE payment processor.
The following should be verified prior to connecting the payment device:

  • All installations MUST be performed by users with administrator rights.
  • When performing the driver installation, running the silent.bat file is the preferred option.
  • The software driver installation must be performed prior to connecting any hardware devices.

Issues with Freezing of the Forte Application

When there are issues with the Forte Application freezing, e.g. the terminal will stay frozen on the WELCOME screen. If the terminal “hangs”, it typically means that it is having a problem with one of its connections.
RESOLUTION – One possible resolution involves users trying the following steps:

  1. Enter the Forte application without anything but the power connected to the terminal.
  2. If successful, then connect either the miniUSB or the Ethernet cable and reboot the terminal.
  3. Now enter the Forte application again. If the terminal “hangs”, it typically means that it is having a problem with one of it’s connections.

Related Topics

Point of Sale (POS) Processing


322-forte


0 votes, average: 0.00 out of 50 votes, average: 0.00 out of 50 votes, average: 0.00 out of 50 votes, average: 0.00 out of 50 votes, average: 0.00 out of 5 (0 votes, average: 0.00 out of 5)
You need to be a registered member to rate this.
Loading...


100-ChangesDBStructure

Changes in Database Structure

Version 6.0 and 6.1

Overview

Standard Functions and Features

System and User Validation Tables

Version 6.0 and 6.1

  • Changes to VT_USER and VT_SYSTEM tables. System and User Tables are now validated and compared against the standard structure XML file.


Read More...

Userfile

Version 6.0

  • New GLOBAL KEY to allow us to link Workflow and global messages to users.
    • U_ID field added to USR_USERFILE.

User Profiles

Version 6.0.1412

  • Fields removed from USR_PROFILE
    • ORG_NBR
    • GROUP_CODE
    • JURISDICTION_CODE
    • OWNER_MM
    • OWNER_YY
    • NB_REC_WARN
    • NB_MIN_ROLLBACK

Roll Forward Exclusion Tables

Version 6.0

  • New tables added to support the roll forward exclusion of fields.
    • SY_ROLLFORWARD_EXCLUSION
    • SY_ROLLFORWARD_EXCLUSION.TABLE_NAME [PK]
    • SY_ROLLFORWARD_EXCLUSION.COLUMN_NAME [PK]

User Audit Trail New Tables (3)

Version 6.0 – see User Audit for more info [std-fea-017]

  • USR_AUDIT_OPENFORMS
    • AUDIT_ID
    • AUDIT_ACTION
    • ENTITY_ID
    • FORM_CODE
    • USER_ID
    • AUDIT_DATE
    • IP_ADDRESS
    • SOURCE_COMPUTER_NAME
    • REMOTE_COMPUTER_NAME
  • USR_AUDIT_OPENFORMS_CHANGE
    • AUDIT_ID
    • ATTRIBUTE_ID
    • TABLE_NAME
    • COLUMN_NAME
    • OLD_VALUE
    • NEW_VALUE
  • USR_AUDIT_OPENFORMS_KEY
    • AUDIT_ID
    • ATTRIBUTE_ID
    • KEY_NAME
    • KEY_VALUE
    • IS_PRIMARY_KEY
NOTE: The legacy table USR_AUDIT_TRAIL will be kept for modules running in prior releases, but developers should note the new modifications and table structures impact for custom processes.

Property Control (PC)

PC Parcel

Version 6.1

  • NON_PARCEL_FLAG and VIRTUAL_PARCEL cannot be set to null.

PC Sales
Version 6.0

  • PC_SALES is no longer used, only MA SALES

Accounts Receivable & Cash Collection (CC)

Version 6.0

Payer Name

  • PAYER_NAME added to CC_MASTER (name was previously kept in CC_MASTER_NOTES) – 6.0 and 6.1

Mass Appraisal (MA)

For the specification document, click on Appraisal Detail Specification for listing.

Building Changes

Version 6.1

  • Current_P_ID was added to MA_BUILDINGS
  • VT_SY_DRAWCMD is no longer used

Site Changes

Version 6.1
Site changes to support new override methodology

  • These columns were added:
    • LAND_VALUE_OVERRIDE (money)
    • LAND_AG_VALUE_OVERRIDE (money)
    • BLDG_VALUE_OVERRIDE (money)
    • MISC_VALUE_OVERRIDE (money)
    • INCOME_GRM_VALUE_OVERRIDE (money)
    • INCOME_DIR_VALUE_OVERRIDE (money)
    • MRA_VALUE_OVERRIDE (money)
    • PP_VALUE_OVERRIDE (money)
  • These columns were dropped : (No longer used in v6.1)
    • TEMPLATE_CD
    • TEMPLATE_VA
  • A misc. correction script was added to move :
    • LAND_VALUE to LAND_VALUE_OVERRIDE when LAND_OVERRIDE = -1
    • LAND_AG_VALUE to LAND_AG_VALUE_OVERRIDE when LAND_AG_OVERRIDE = -1
    • BLDG_VALUE to BLDG_VALUE_OVERRIDE when BLDG_OVERRIDE = -1
    • MISC_VALUE to MISC_VALUE_OVERRIDE when MISC_OVERRIDE = -1
    • INCOME_GRM to INCOME_GRM_VALUE_OVERRIDE when INC_GRM_OVERRIDE = -1
    • INCOME_DIR_VALUE to INCOME_DIR_VALUE_OVERRIDE when INC_DIR_OVERRIDE
    • MRA_VALUE to MRA_VALUE_OVERRIDE when MRA_OVERRIDE = -1
    • PP_VALUE to PP_VALUE_OVERRIDE when PP_OVERRIDE = -1
  • A misc. correction script was added to move :
    • All XXX_VA values to XXX_OV_VALUE when XXX_OV = -1
    • – XXX_OV_VALUE should be created as well.

Income Changes

Version 6.1
Income changes to support new override methodology

  • These columns were added in MA_Income.
    • Building_Value_Override
    • DIR_Rate_Amount_Override
    • GRM_Rate_Amount_Override
    • Gross_Effective_Override
    • Gross_Rent_PCT_Override
    • Gross_Rent_Value_Override
    • Land_Value_Override
    • Misc_Value_Override
    • Net_Dir_Override
    • Net_GRM_Override
    • Net_Value_Override
    • Rent_Units_Override
    • Vacancy_PCT_Override
    • Overall_ADJ_VAL_Override
  • These columns were added in MA_Income.
    • Ma_Income_Group

Income changes to support new calculation method and configuration

  • Income Fields added
    • Ma_Income_Record_Type
  • Income Table added
    • For Added Fields – to be validated


Miscellaneous Billing

Available in GA Release 6.1.1606
To offer more flexibility, the misc. billing parameters are now year base.
As such the YEAR_ID was added to the following tables:

  • MB_INVOICE and MB_INVOICE_DET
  • MB_RECURRING and MB_RECURRING_DET

In prior versions, only the AR Class Code was used for the invoice and invoice detail. To simplify data entry and offer more flexibility, the following tables were added.

  • MB_PARM_CATEGORY (contains a category that will be used to link the detail invoice items)
  • MB_PARM_ITEM

New Database Fields

  • LAST_RECUR_DATE was added to the MB_INVOICE_REC table
  • BATCH_ID was added to the MB_INVOICE table

Self Reported Business Tax (ST)

When the fields for ST forms are created, the following USR_FIELDS_XXXXX tables, are no longer used.

  • USR_FIELDS_DEF
  • USR_FIELDS_LABEL
  • USR_FIELDS_MASK
  • USR_FIELDS_NUMERIC_FORMAT (Added for 6.0 and 6.1)
NOTE:The data in the above have been copied to (Table: ST_PARM_CATEG)

New Field added in ST_MASTER

  • NAICS (Varchar 15) MANDATORY when using Estimated Filings.
NOTE: This field is now a Standard System Field and may need to be converted if it was created as an Added Field.

New Tables added for Estimated Filings

  • ST_ESTIMATE_ID

New Table added for Corporate Account

  • ST_CORP_ACCOUNT

Name and Address (NA)

For ACH processing and field encryption, the following changes have been made:

  • NA_ACH_INFO.ACH_DESC (new field)
  • NA_ACH_INFO.BANK_ACCOUNT_NO (new field length = 44)
  • NA_ACH_INFO.TRANSIT_NO (new field length = 32)

OpenForms Tables

Version 6.0

Tables Removed from versions: 6.0.1411.0106 and 6.1.1411.0106
1. OF_SE_APP_TYPE replaced by an object in memory
2. OF_DE_MODELCONTENT was used only for MOD
3. OF_MD_UPDATER was used only for MOD
4. OF_LK_PROFILE_OF1 was used only for MOD to establish the link with a profile.

Tables Removed from versions: 6.0.1411.0017 and 6.1.1411.0021
The tables defined in MSGDatanaseStructMods.xml (so also in OPENFORMS_REFERENCE_60):

  • 1. OF_BE_MAPEXPR
  • 2. OF_BE_MAPTYPE
  • 3. OF_BE_NAVIGATION
  • 4. OF_BE_SERIALIZATION
  • 5. OF_BE_VALRULE_ATTB
  • 6. OF_BE_VALRULE_PARM
  • 7. OF_CTRL_TO_COLUMN
  • 8. OF_LK_ATT_VALRULE
  • 9. OF_MODEL_PERSONALIZATION
  • 10. OF_SE_ACCESSRIGHTS (notion still useful but the table has been replaced by an enumeration in the code)
  • 11. OF_SE_AUDIT
  • 12. OF_SE_LK_ROLE_USER
  • 13. OF_SE_USER_EXCL
  • 14. OF_UI_MAPTABLE (notion still useful but the table has been replaced by CLR objects in the code)

Release 5.x

Version 5.x

  • PC_LK_PARCEL has been replaced with PM_LK_MASTER

See Prior Database Changes (ref. v6.1.1508)

Related Topics

Govern Database DiagramsRefer to the List of Changed Tables section


100-ChangesDBStructure


0 votes, average: 0.00 out of 50 votes, average: 0.00 out of 50 votes, average: 0.00 out of 50 votes, average: 0.00 out of 50 votes, average: 0.00 out of 5 (0 votes, average: 0.00 out of 5)
You need to be a registered member to rate this.
Loading...