Govern Ribbon Search

Standard Feature – Ribbon Search

Release 6.0.1903.0374 (Govern only) | 6.0.1904.0515 (Govern only)
Release 6.1.1911.0497 (All applications) | 6.1.1912.0513 (All applications)

Overview

The Govern Knowledge Base (KB) Search has been incorporated into the Govern Ribbon as part of the Help online help feature. This KB Search field is visible over all Govern suite applications for release 6.1. In addition, the display of the search field is persistent even if the ribbon is minimized.

NOTE: Users must ensure that they have internet access, a compatible browser, and an active account to access to the Knowledge Base.

Configuration

Govern New Administration (GNA)

In order to display the Ribbon Search field, it is necessary for an Administrator to run the Verify Database process in the Govern New Administration (GNA).

Security Manager (SM)

It will then be necessary to have the Security option in GSM configured to allow the user to see the KB Search in the ribbon.

The security applied is the same for all applications, except for the OpenForms Designer (OFD) which does not offer a securable node.

Presentation

This KB Search is available in the following applications (for the versions 6.1.1911 and 6.1.1912 only):

  • Govern (Ribbon)
  • GNA (Ribbon)
  • GSM (Ribbon)
  • QT (Ribbon)
  • BED (ToolBar)
  • BSC (ToolBar)
  • OFD (ToolBar) – Note that the presentation of the KB Search field is slightly different in the OFD. The text label appears as KB Search in comparison to the other suite applications where the field label reads as Knowledge Base. The behavior is the same in all applications

Using the Knowledge Base (KB) Search

The steps to use the KB Search are as follows:

  1. Enter a keyword in the Search field located at the upper right-hand side of the ribbon.
  2. Press Enter or if you are using version 6.1, click on the magnifier icon.

Your default browser is launched and you will be transferred to the search page of the Govern Knowledge Base website (https://kb.harrisgovern.com/), the results of the keyword(s) you have searched for are displayed in your browser.

NOTE: This Help search field is placed at the top level of the ribbon, and it is visible when any of the top-level tabs are selected, e.g. Home, View, Options, and so on.

Related Topics

Govern Search
Govern Quick Search
Quick Search Index Group Editor
Govern Search Technical Specifications

Saved Datasets
Dynamic Search Objects
Dynamic Search Styles
Dynamic Search Groups

Govern New Administration (GNA)


101-std-fea-047


0 votes, average: 0.00 out of 50 votes, average: 0.00 out of 50 votes, average: 0.00 out of 50 votes, average: 0.00 out of 50 votes, average: 0.00 out of 5 (0 votes, average: 0.00 out of 5)
You need to be a registered member to rate this.
Loading...

Govern Scheduler Version 5

Overview

NOTE: The following page is intended for version 5 and lower of the Govern Scheduler Console (SC) application.

The Govern OpenForms product suite gives you a lot of flexibility for setting up and running batch processes. You can now:

  • Customize the list of batch processes that appear in Govern.
  • Add as many or as few batch processes as are required for your organization.
  • Set the transaction type and mode.
  • Add automatic e-mail messaging.
  • Add reports or attachment.
  • Define a network path or FTP site for saving or uploading the attachment.
  • Set up schedules to run processes at a later time or on a regular basis.
  • Apply security so that only authorized users can view certain batch processes.

With the Govern Scheduler, you can:

  • Monitor and track your Govern batch processes in one central location.
  • View the progress of batch processes as they run.
  • Modify or delete any scheduled process to which you have access permissions.
  • View logs and details on previously-run batch processes.
  • View reports generated from previously-run processes.
  • Monitor the Govern Scheduler Services

Installation

For details on installing the Govern Scheduler, see Installation.

Documentation

Govern Scheduler guide version 5.1

Technical Info

The Govern OpenForms System Requirements on this site 100-SystemReq apply to the Govern Scheduler.

Govern Batch Scheduler Technical Sheet and Installation [106-TechSheet]

Testing with SMTP4Dev

To test the e-mail notification, developers and BA’s may want to use SMTP4Dev. Download the Installer and set it up to launch automatically at login.

NOTE: Internal users can select the following link and obtain the installer on \\FSERVER\sharedPG\SMTP4Dev\

106-(tech)-SMTP Server for Testing Purpose (smtp4).docx
Details
Download
128 KB

Alternatively, you can use the Harris e-mail Server
mail.harriscomputer.com

https://206.191.12.18/

Related Links

Govern Product Suite

Internal Material

BSS Installation Material – PKO –

  • 106-Batch Services.pptx
  • Details (
    Download (537 KB)


106-all-sc-v5


0 votes, average: 0.00 out of 50 votes, average: 0.00 out of 50 votes, average: 0.00 out of 50 votes, average: 0.00 out of 50 votes, average: 0.00 out of 5 (0 votes, average: 0.00 out of 5)
You need to be a registered member to rate this.
Loading...


SC – Govern Scheduler Application – What’s New

Govern Scheduler Console (SC) – What’s New

Version 6.0 | 6.1

Overview

The following is a non-exhaustive compilation that lists recently updated topics related to the Govern for OpenFormsTM Scheduler application.


What’s New!

Govern Ribbon Search

Standard Feature – Ribbon Search Release 6.0.1903.0374 (Govern only) | 6.0.1904.0515 (Govern only) Release 6.1.1911.0497 (All applications) | 6.1.1912.0513 (All

Posted in BED, General, GNA, Govern, OFD, QueryTool, Scheduler, Security Manager | Tagged , , , , , , , , | Leave a comment

Standard Feature – Sequential Batch Process

Standard Feature – Sequential Batch Process Version 6.0 and Version 6.1 Overview Available in Release 6.0 and 6.1 A standard

Posted in Batch Process, Feature, Scheduler | Tagged , , , , , , , , , , , | Leave a comment

Batch Scheduler Service Installation

Batch Scheduler Service Installation Version 6.0 and 6.1 Overview Step by step Govern Batch Scheduler Service installation procedure. Before Getting

Posted in Configuration, Scheduler | Tagged , , , , , , | Leave a comment


Old News

Read More...

Release 6.0

[6.0.1603] Batch Process Definition will be maintained in the OpenForms Reference database and distributed
[6.0.1603] Archive Path was added to keep a copy of the source documents after having been processed

[6.0.1603] When a batch process is executed, the Current System Date and the Tool Box are disabled so that you cannot change the dates and year used by the batch process.

[6.0] Batch Processes are linked to Profiles. Users access the Govern Batch Processes in the same way that they access the user forms.
[6.0] Batch Processes Categories (nodes) are deprecated.
[6.0] Automatic Update when a new version is installed

  • The Scheduler Service is updated automatically when the deployment is updated. You do not need to manually stop and restart the service.
    • To know if an update is needed, it compares the TimeStamp in BSS with the BSC folder date … (Click to view illustration)
    • Automatic update (stop, deploy, restart service) starts only if time allows before the next scheduled batch program (Minutes to Update parameter)
[6.0] Minutes to Update (new SY Registry Parameter)

  • Minutes needed before the next scheduled batch before redeploying the batch service (Default is 15 min)
[6.0] Single Deployment/ Connection Key per Windows Service – Appender Services to add connection keys is deprecated
[6.0] Uninstalling Batch Scheduler Service is now done in an Administrator Command Prompt, using the SC DELETE command. See Batch Scheduler Installation for more information
[6.0] System Registry Default Log file path for reports and logs is deprecated – Paths are defined in the Batch and Report Definitions
[6.0] New system generated trailer connection key (copy of original with NO CONNECTION TIME OUT LIMIT) is used in batch processing to prevent time out errors. Depending on the type and mode of execution (i.e roll back), SQL transactions may be committed to the database in a large group where the processing time may exceed the normal time out parameter.


See Also


106-all-SC-wnew


0 votes, average: 0.00 out of 50 votes, average: 0.00 out of 50 votes, average: 0.00 out of 50 votes, average: 0.00 out of 50 votes, average: 0.00 out of 5 (0 votes, average: 0.00 out of 5)
You need to be a registered member to rate this.
Loading...

Standard Feature – Sequential Batch Process

Standard Feature – Sequential Batch Process

Version 6.0 and Version 6.1

Overview

Available in Release 6.0 and 6.1

A standard feature that is available in version 6.0 and 6.1 of the Scheduler Console is sequential batch process scheduling. This feature may be configured to allow users to execute multiple batch processes without human interaction. This feature is convenient for launching batch processes during periods where there is less impact on users accessing the network. As an example, these sequenced batch processes could be initiated and set to run overnight, over a weekend, or through the extended periods of a holiday.

The Sequential Batch Process feature allows users to configure a list of Schedules in order to create a linked sequence of Batch Processes in the Govern New Administration (GNA). As each batch process is successfully completed, i.e. no errors generated, it will automatically initiate the next pre-configured batch process in the user defined sequence.

NOTE: Sequential Batch Processes are initiated, and monitored in the Govern Scheduler (SC). The status of the execution of each batch process is displayed through the console of the Govern Batch Scheduler application.

Example of a Sequential Batch Process

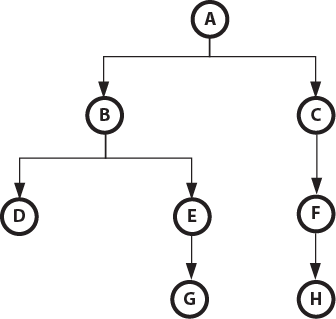
The following is an example of a possible Sequential Batch Process. The example will demonstrate a basic batch process that, upon successful completion, will initiate two (2) child batch processes. Each of the two child processes will in turn trigger other processes, and so on. Refer to the example below.

Example

  1. Batch process A is configured to run daily.
  2. When Batch process A ends it will initiate batch processes B and C
  3. Batch process B initiates batch processes D and E
  4. Batch process E initiates batch process G
  5. Batch process C initiates batch process F
  6. Batch process F initiates batch process H

All batch processes B, C, D, E, and F are configured to be triggered upon successful completion.

https://kb.harrisgovern.com/wp-content/uploads/2019/01/Sequential_Flowchart00.png

Configuration

Read More...

Sequential batch processes are configured in the Govern New Administration (GNA). Preview and execution of the batch processes are presented in the Govern Scheduler.

For further detail Govern batch process scheduling, refer to the Govern Schedule user guide for details (106-gs-all-GovernScheduler.60.pdf).


https://kb.harrisgovern.com/wp-content/uploads/2019/01/Sequential_Flowchart01.png

Govern New Administration (GNA)

To configure Sequential Batch processes it will be necessary to first create a new batch process or use an existing one. You would next need to create a schedule for that Batch Process. This batch process will then be configured to, upon completion, trigger the next batch process in the sequence.

TIP: When planning sequential batch processes, it is recommended that a flowchart of sorts is sketched out to use as a guide to visualize your setup. In addition, as each schedule is associated with a batch process, the batch process used should also be noted.


Using the example flowchart of schedules, i.e. A, B, C, D, E, and F, we will say that Batch Process A is associated with Schedule A.  Batch Process B will be associated with Schedule B, and so on.

Parent Schedule

With our flowchart drawn out for our example, we will say that the Batch Process A schedule will be called Schedule_A. Schedule A is also the parent batch process that will trigger all subsequent processes. As the parent process its configuration is different from all subsequent processes.

Creating the Parent Schedule

To create the first schedule called Schedule A in the GNA…

  1. On the GNA ribbon, click Editors (tab) > Batch Process Definition Editor.
  2. In the Batch Process Definition Editor select the batch process that will be the parent.
  3. On the Batch Process Definition tab, either select an existing batch process, or click Create a new item to create a batch process.
  4. Click to select the Scheduling sub tab.
  5. Click Add.
  6. The form to configure the schedule is displayed.
NOTE: If the batch process requires parameters to be configured, this must be completed first. The save action is required before you can schedule the batch process.
  1. Click to select the Schedule
  2. Enter a Name, and a Description.
NOTE: Name and Description are required parameters; you will not be able to save without completing them.
  1. In the Settings group below, set a frequency for the schedule; select One time, Day, Week, or Month. Additional settings allow you to specify a Start Date, and expiration date, i.e. Expires on:. For our example, this will be a one time schedule so select One time.
NOTE: As this is the first batch process, the option for Triggered should not be selected.
  1. Click Save Changes on the Schedule.
  2. Click the Close button [X] in the upper right hand corner to close the form.

Creating the Child Schedule

Configuring B and C

Referring back to our flowchart, we see that the Children batch processes, B, and C, are at the same level and are triggered by batch process A. We will need to configure Schedule B to trigger batch process D, and E. Batch process C will trigger batch process F. As batch processes B and C are both at the same level, they will be run simultaneously.

To create any Children schedules, e.g. Schedule B, C, and all other subsequent processes…

  1. On the GNA Batch Process Definition Editor, click to select the batch process that will be designated as Schedule B.
  2. On the Batch Process Definition tab, click to select the Scheduling sub tab.
  3. Click Add to display the Schedule
  4. If the batch process requires parameters to be configured, this must be completed first. The save action is required before you can schedule the batch process.
  5. Select the Schedule
  6. Enter a Name and a Description for the schedule; for our example we will use Schedule B, and “Schedule B triggered by Schedule A” for the Name and Description:

We now need to specify that Schedule B is to be triggered by the successful completion of the batch process that is attached to Schedule A.

  1. In the Settings group, click the Triggered radio button.
  2. In the Parent group, select the batch process for Schedule A from the combo box, i.e. Batch Process A.
  3. Select the Schedule; the combo box will display Schedule A.
NOTE: If the batch process is also associated with other schedules, they will also be listed. It is important that you select the correct schedule.
  1. On the Schedule tab, click Save Changes, to save the setup.
  2. Click the [X] in the upper left hand of the form to close the form.

Configuring Sequential Schedules D and E

Referring back to the workflow sketch, we see that Schedule C / Batch Process C is at the same level as Schedule B, it will be necessary to select the batch process that will be associated with Schedule C. For the Parent you will specify Schedule A. For the configuration, it will be necessary to repeat all steps for configuring a Child Schedule; see above steps. Schedule D / Batch Process D and Schedule E / Batch Process E are triggered by Batch Process B, and should be configured accordingly.

Govern Scheduler Console Preview and Execution

Viewing the setup in Govern Scheduler

When complete the final sequential batch processes can be seen in the Govern Scheduler group of the Govern Scheduler console. Looking at the interface, we can see that Schedule A is at the top of the list as the parent process. Schedule B and Schedule C are at the same level, both have their sub processes which they will trigger. Schedule D and Schedule E will be triggered by Schedule B, and Schedule F is triggered by Schedule C. Finally Schedule G is triggered by Schedule E, and Schedule F triggers Schedule H.

If a Batch Process fails…

During execution of the batch processes, if a batch process in the sequence fails, all subsequent children processes in that chain will not be executed. For example, if Batch Process B for Schedule B fails to execute, it will need to be corrected. After rectifying the error with the process, it will be necessary to execute Batch Process B again. After which all subsequent processes will then be triggered. It is not necessary to execute the entire process flow again, i.e. Schedule A.

Executing the Batch Process

To execute the Batch Processes in the Scheduler Console

  1. Click to select the process in the console.
  2. Click Execute.
NOTE: Refer to the Govern Scheduler user guide for additional configuration details, and running Batch Processes.

Business Rules

Deletions of Processes in Batch Scheduler and GNA

In the Batch Scheduler or in GNA, trying to delete a schedule with Child schedules will generate an error message. This message will indicate that in order to proceed, you must first delete the child schedules before you can delete the parent.

Deleting Parent Schedules in the Batch Scheduler

An error will be generated when attempting to delete parent schedules that are linked to sub schedules, i.e. schedules that they trigger.

Documentation

Click to view the .PDF document detailing this feature. (101-std-fea-046_SequentialBatchProcesses.pdf)


101-std-fea-046


0 votes, average: 0.00 out of 50 votes, average: 0.00 out of 50 votes, average: 0.00 out of 50 votes, average: 0.00 out of 50 votes, average: 0.00 out of 5 (0 votes, average: 0.00 out of 5)
You need to be a registered member to rate this.
Loading...

Batch Scheduler Service Installation

Batch Scheduler Service Installation

Version 6.0 and 6.1

Overview

Step by step Govern Batch Scheduler Service installation procedure.

  • Before Getting Started (Requirements, Prerequesites)
  • Step by Step Installation

See What’s New in Govern Batch Scheduler
If you are installing the Batch Scheduler Service for OpenForms Version 5 and less, click here (106-all-SC-v5).

Before Getting Started

Validate Requirement

A dedicated server is strongly recommended. To maximize execution speed, the most important factors are:

  • Memory (Quantity and Type)
  • Network (Speed and Routing)

Govern System Requirements

Email Notification Server Information

SMTP Server Information

The batch scheduler generates email. To enable this option, you will need to supply SMTP server and account information for the organization.

  • Host Name
  • Port Number
  • Username & Password

SMTP4Dev Test Server setup (Optional)

  • For testing purposes, you can Install SMTP4Dev, a dummy SMTP server that sits in the system tray and does not deliver the received messages. This Open Source Software is distributed by Code Plex. For more information or to download, see smtp4dev.codeplex.com

Step by Step Installation

Step 1 – Deploy Binaries and Services

Refresh the source environment. The deployment/connection key for which we want to have a scheduler service.

  • Deploy the latest binaries, services and installation pack
    • Binaries
      • Resources
      • Custom Control
      • System Files
      • Govern Scheduler
    • Services
      • Govern Scheduler Service
      • Govern WCF Services
    • Install Pack
  • Run a Database Verification

Step 2 – Install / Verify Email setup

In Govern Administrator, in General Settings Editor (SY REGISTRY)

  • Select Registry Filter Section = General | Section Name = SMTP
    • Host:
    • Port: Any port that is not currently in used (ex:6666)
    • Connection User and Password
    • Default Sender Address
TESTERS: Click here to download and install a Test SMTP Server


Step 3 – Install the Batch Scheduler Service

On the server where you will be installing the Govern Scheduler application:
Execute (double-click) BatchSchedulerServiceSetup.exe located on the deployment server INSTALL > VERSION > Batch Scheduler Service Setup Folder

  • Supply the Deployment Configuration Path
    • GovernNetConfig.xml Path: Located in the source DEPLOYMENT Folder (Note: Use UNC path if typed in)
  • The following information will auto-fill
      • Base Installation Path:
      • Full Installation Path:
      • Deployment Name:
      • Connection Name:
      • Service Name: GovernSchedulerService_[Connection Key]
        • NOTE: Copy the name to notepad or word as the service name will be needed later during the installation
  • Enter the Failure Alert Configuration
    • Email Address: Provide one or more e-mail addresses in order to have key users receive e-mail alerts when a program failure occurs. The default message that you enter is sent
    • SMTP Server
    • Email Subject and Email Body
  • Click Start and once completed, you can exit.

Once completed, in Task Manager, Services, you should have the following service running

  • GovernSchedulerService_[Connection Key]

Step 4 – Configure Govern Scheduler in GNA

In Govern Administrator, in General Settings Editor (SY REGISTRY) – to be validated

  • Select Registry Filter Section = Batch Process | Section Name = Scheduler
    • Scheduler Service Port Number: Any port that is not currently in used (ex:6666)
    • Scheduler Service Machine Name:
    • Minimum Batch Process Interval for Update (minutes): Number of minutes needed for upgrade (will not auto-upgrade if a batch is schedule to be executed in X minutes) – usually 15 minutes
  • Select Registry Filter Section = Batch Process | Section Name = Batch Process
    • Worker Service Address – see roadmap

Step 5 – Launch Govern Scheduler

Double-click on the shortcut to install the Govern Scheduler

  • Verify there are no error messages and that the service is listed on the second tab

Step 6 – Test Service

In order to ensure the Batch Scheduler Service is installed properly:
Setup and execute the standard Batch Test Process

  • Setup the Batch Process Test Service GNA > Editors > Batch Process Definition
  • Setup Batch Definition
    • Email Notification: TIP: Use groups for email alerts
    • Report
    • Schedule: in 5 minutes
  • Setup Second Batch Definition
    • Schedule: in 15 minutes


Uninstalling the Govern Scheduler Service

In version 6.0, you need to run the Command Prompt CMD as ADMINISTRATOR to uninstall.

  • sc delete [service name]
    • NOTE: The service name listed may not be the actual service name, check in TASK MANAGER, SERVICES and right-click for PROPERTIES or to OPEN SERVICE to validate. The name listed there is the name to use in the command.
    • SERVICE NAME = GovernSchedulerService_DEPLOYMENT NAME
    • example: C:\Windows\System32> sc delete GovernSchedulerService_ARVADA_MTL-SQL2014

Troubleshooting

Verify that no other Service is running

  • Open Task Manager, Services and click on the name column to sort the services by name.
  • Check if any other services for GovernSchedulerService …

Verify that the Windows Service is running

  • Open Task Manager, Services and find the Service Name

Verify Services Tab in Scheduler

  • Verify Error Messages in Govern Schedule (History Log)

Firewall

  • If the server is protected by a firewall, verify that incoming traffic is allowed on the port you have configured in GNA

Path for Files

  • If you get an error during the batch execution for ‘Access to the Path is denied’ you need to make sure the folder has Read/Write access.

VERSION 5 Installation

For more detail information, see the following extract from the Govern Scheduler Guide [pdf] Getting Started and Installation – to be reviewed

See Also


106-install


0 votes, average: 0.00 out of 50 votes, average: 0.00 out of 50 votes, average: 0.00 out of 50 votes, average: 0.00 out of 50 votes, average: 0.00 out of 5 (0 votes, average: 0.00 out of 5)
You need to be a registered member to rate this.
Loading...

Govern Scheduler (SC)

BSC60_Start_Icon_Big.png  Scheduler Console (SC)

Overview

The Govern OpenForms product suite provides the flexibility required for setting up and running batch processes. With key applications users can:

  • Customize the list of batch processes that appear in Govern.
  • Add as many or as few batch processes as are required for your organization.
  • Set the transaction type and mode.
  • Add automatic e-mail messaging.
  • Add reports or attachment.
  • Define a network path or FTP site for saving or uploading the attachment.
  • Set up schedules to run processes at a later time or on a regular basis.
  • Apply security so that only authorized users can view certain batch processes.

With the Scheduler Console, you can:

  • Monitor and track your Govern batch processes in one central location.
  • View the progress of batch processes as they run.
  • Modify or delete any scheduled process or process history to which you have access permissions.
  • View logs and details on previously-run batch processes.
  • View reports generated from previously-run processes.
  • Monitor the Govern Scheduler Services


Read More...


Installation

Documentation

Click to view the latest version of the user guide. (106-all-sc61.pdf)

Videos

Click on this video link to learn more about the Scheduler Console.

What’s New

Refer to the What’s New! page to find out about any new developments with the Govern Scheduler Console.

See Also


106-all-SC


0 votes, average: 0.00 out of 50 votes, average: 0.00 out of 50 votes, average: 0.00 out of 50 votes, average: 0.00 out of 50 votes, average: 0.00 out of 5 (0 votes, average: 0.00 out of 5)
You need to be a registered member to rate this.
Loading...