AR – Controller Config – Create AR Payment

Standard Accounts Receivable (A/R) Controller – Create A/R Payment (Configuration)

Overview

This standard OpenForms Action Button controller can be added to a form to provide an Action Button to create the Accounts Receivable payment.

This controller is available in GA Release 1706

  • For more information on the functionality, see Product Information (101-ar-fea-024).

Prerequisites

The following conditions are required in order to enable the Controller in OpenForms Designer Setup

  • The organization is licensed for the Accounts Receivable Sub-System to setup
  • The configuration for the Accounts Receivable has been completed
  • The Form’s ID Setters Properties must contain the …
  • The Govern ID must be …

Profile Security

  • The user must have security access (GSM) to the profile’s form.


101-ar-fea-022-ofr-UI.png
Action Button Controller Properties


Controller Setup

Adding a Custom Control to a Form

  • In OFD, drag the Action Button Control Icon to the Account Entity Tab on the form.

Custom Control Form Configuration

Once the Custom Control is displayed on the form, click on the object to configure the:

  • Assembly Name = Msgovern.OpenForms.CustomControls.dll (by default)
  • Class Name = AR_CreateARMaster_Action

User Interface (UI)

  • Icon
  • Is enable: An expression can be added to control the enabling (Can be executed) of the button.

Controller Properties

The following controller properties need to be set:

Sub-System

  • Select the sub-system for which the A/R Summary Record needs to be created.

Related Topics

For more information, see:

Troubleshooting

  • The Organization must be a licensed user of the A/R Sub-System selected.


101-ar-fea-024-ofr


0 votes, average: 0.00 out of 50 votes, average: 0.00 out of 50 votes, average: 0.00 out of 50 votes, average: 0.00 out of 50 votes, average: 0.00 out of 5 (0 votes, average: 0.00 out of 5)
You need to be a registered member to rate this.
Loading...


AR – Configuration

Accounts Receivable (A/R) Configuration

Overview

This section provides an overview of the A/R administrative forms. For the complete reference guide, see 101-all-001-GovernAccountsReceivable-(man)-(6.0).
For the A/R Transaction Rules, see 101-ar-001-AR-TransRulesGL.

Parameters

General Parameters

  • The General Parameters are used for setting default A/R parameters for all subsystems.
  • See the A/R 101-ar-001-AR-AdmGnrlPrmtrs document.

A/R Class Parameters

  • A/R Class Codes are associated with transaction types and linked to G/ L account numbers. You can define penalty and interest computation methods.
  • See the A/R Class Codes wiki page and the 101-ar-001-AR-AdmClassCodes document.

A/R Method

  • A/R Methods are used for calculating penalty and interest charges. They are linked to A/R Class Codes.

G/L Distribution Parameters

G/L Transaction Setup

Cash Collection Parameters

A/R Subsystem Priorities

  • The A/R Subsystem Priorities form is used for setting the order in which centralized cash collection and lockbox payments are made.

Copy to Year

  • Use the A/R Copy to Year form in order to copy the following A/R data from one fiscal year to another: A/R Class Codes, A/R Methods, and G/L Distribution Parameters. All data are copied. See the 101-ar-001-AR-CopytoYear document.

Deposit Type

Security

Security for A/R Forms

  • In order to complete the security setup for Accounts Receivable in Govern OpenForms v6, access to GNA, the GSM, and the OFD is required.
  • Because the A/R Inquiry form is built on a custom control, the security is different from other user forms. See the 101-ar-001-AR-AdmOpenFormsSecurity document.


101-ar-config


0 votes, average: 0.00 out of 50 votes, average: 0.00 out of 50 votes, average: 0.00 out of 50 votes, average: 0.00 out of 50 votes, average: 0.00 out of 5 (0 votes, average: 0.00 out of 5)
You need to be a registered member to rate this.
Loading...

AR Feature – Payer Name Custom Control

Using the Payer Name Custom Control

Version 6.0 | Version 6.1 (In Development)

Overview

The Payer Name custom control can be added to any Govern user form. By default, it is added to the Cash Collection and the A/R Lockbox forms. You can add a payer name on the fly or you can configure a direct link to the Name and Address form. This greatly facilitates the task of adding payer name information to a form. This control:

  • Displays the last five payers to facilitate data entry
  • Adds a search for an existing name.
  • Permits the entry of a name without creating an entry in the database (Table: NA_NAMES)
  • Provides a direct link to the Name and Address form so that you can create a new name.

Note: NA_NAMES can be opened in Modal Mode or as a standard user form in the Profile.

This page describes the following topics::
Configuring the Payer Name Control

  • Configuring the Payer Name in the Business Entity Designer (BED)
  • Configuring the Payer Name in the OpenForms Designer (OFD)

Using the Payer Name Control in Govern

  • Searching for an Existing Name and Address Record and Adding It as the Payer Name
  • Completing the Name and Address Information After Saving an A/R Record
  • Completing the Name and Address Information Before Saving the Record
  • Opening the Name and Address Form in Modal Mode
  • Adding a New Payer Name On The Fly

Documentation

To view this information in pdf format with screen shots and examples, click on the following link.

PayerName.pdf

Configuring the Payer Name Control

The configuration for the Payer Name Control is described in two sections:

  • Configuring the Payer Name Control
  • Using the Payer Name Control in Govern

Configuring the Payer Name in the Business Entity Designer (BED)

This section is for informational purposes. There are no required steps.

The following attributes are included in the Payer Name custom control:

  • NA_ID
  • PAYER_NAME
  • ARIDLIST

ARIDLIST is a calculated field that provides the list of A/R IDs for the last payers.

Configuring the Payer Name in the OpenForms Designer (OFD)

The following configuration is required for the Payer Name. You can set the properties for the following

  • Viewing / Adding the Payer Name Custom Control
  • Defining the Actions

Viewing / Adding the Payer Name Custom Control

To view the payer name custom control properties:

  1. Launch the OpenForms Designer (OFD).
  2. Open a form that includes the Payer Name custom control, such as ARLockbox (AR036).
    Alternatively, open the form to which you want to add this control.
  3. Select the entity, such as Lockbox Detail, that contains CC_PayerName_Control.
    Alternatively, open the entity to which you want to add this control.
  4. Expand the first Misc. in the Properties explorer.
  5. Click the ellipsis button in the Action parameter.
  6. Ensure that MsGovernOpenFormsCustomControl.dll is selected in the left column.
  7. Select CC_PayerName_Control is selected in the right column.
  8. Click OK on the Extension Selector.

Defining the Actions in the OFD Property Explorer

The properties in this section are used to define the actions that are triggered by the Payer Name custom control. These properties are used to add options to the Payer Name menu in Govern. There are a maximum of three options:
The menu appears when you click the ellipsis button in the Payer Name parameter on the Govern user form.
To define these properties:

  1. Expand Properties > Misc in the Property Explorer.
  2. Define the properties as described under the following headings:
  3. Click Save on the OpenForms Designer after completing the actions to save the modifications.

Creating Names

  • CanCreateNames: Select this option to add the New Name option to the Payer Names menu on the Govern form. This option is required for the FastNameCreation and SelectedFormNameinProfile options.
  • Deselect this option to remove the New Name option from the menu. Note, the new payer name option is independent.

Creating Payer Names

  • Select the CanCreatePayerNames option to add the New Payer Name option to the Payer Name menu. When this option is selected, you can create a new payer name on the fly.
  • Deselect this property to remove the option from the menu.
NOTE: The user can enter a payer name on the form, only if the Payer Name option appears in the pop-up menu.
Otherwise, if this option is not displayed, the parameter is disabled.

Searching for Names

  • Select CanSearchExistingNames: to add the ability to search for a name in the Govern database. The Search appears in the Payer Name menu on the Govern form, when you click the ellipsis button.
  • Deselect this option to remove the search option and functionality.

Adding a Header

  • Enter text in the Control Header parameter.
    The text you enter appears on the form above the custom control in Govern. Payer Name is the default.

Creating a Name Before Saving the Record

  • Select FastNameCreation to open the Name and Address form when the user selects New Name in the Payer Name field on the Govern user form. A scenario follows. This is recommended for Cash Collection. If this option is selected, CanCreateNames must be selected, as well.
  • Deselect this option if you do not need to open the Name and Address form directly. This is recommended for the Lockbox.

Opening a Form in Modal Mode

  • OpenFormAsModal: Select this option to open the Name and Address from in Modal Mode.
  • The modal form opens in a secondary window.
  • The focus is on the modal form. No actions can be performed on other forms until the modal form is closed.
  • Deselect the OpenFormAsModal option if you want to open the Name and Address form as a standard user form in Govern.

Adding a User Form

SelectedFormNameInProfile: Select the user form from the that you want to open when the user clicks New Name. Typically, this is the Name and Address form.

Adding the Search Group and Style

  • SelectedSearchGroup: Select the Search group to launch from the Payer Name > Search option.Typically, this is the Name Search.
  • SelectedSearchStype: Select the Search style to launch from the Payer Name > Search option.
  • For example, if you selected the Name Search as the Search Group, you could select the Name ID, naNameID, as the search style.

Alternatively, leave this option blank to display all the name search styles in the list.

Using the Payer Name Control in Govern

For the examples in this section, the Payer Name Control is added to the A/R Lockbox. Possible actions include:
Selecting the

  • Searching for an Existing Name
  • Creating a Name and Address After Saving the Record
  • Creating a Payer Name On the Fly
  • Creating a New Name and Address Before Saving the Record
  • Opening the Name and Address form in Modal Mode

The required properties for each action are listed.


What’s New

6.0 Payer name will now be recorded in CC_MASTER_PAYOR_NAME instead of NOTES.
6.0 The Mailing index Owner of Record is no longer used as a default

Related Topics


101-ar-fea-021


0 votes, average: 0.00 out of 50 votes, average: 0.00 out of 50 votes, average: 0.00 out of 50 votes, average: 0.00 out of 50 votes, average: 0.00 out of 5 (0 votes, average: 0.00 out of 5)
You need to be a registered member to rate this.
Loading...

CC – Cash Collection Configuration

Cash Collection Configuration

Overview

The configuration steps for Cash Collection are as follows:

  • Preliminary Setup
  • Cash Collection Parameters
  • A/R Parameters & AR Class Codes
  • A/R Subsystem Parameters and Priorities

Preliminary Setup

Department Setup

  • A/R Subsystems Allowed: The subsystems used for Cash Collection must be selected for the department.

Profile Editor

Multiple Profiles can be set up for Cash Collection. Different security permissions can be defined for each Profile. Different user forms and batch processes can be linked to each Profile.

  • Dynamic Queries and Default Access
  • The following forms need to be added to the profile (Links Tab):
    • CC001 (Cash Collection)
    • NA001 (Name and Address) Linked Form Controller You can search for and select names without adding this form to your Profile. However, if you want to link to the Name & Address form in order to create a new name, the form must be linked to the Profile.
    • AR008 (A/R Inquiry) Required for opening A/R Inquiry form directly from the selected A/R record in the payment data entry grid (double-click).
    • Any other Form used as a link General Link Controller (custom setup)
  • The following reports need to be added:
    • 101-cc-rpt-058
  • The following batch programs need to be added to the profile (depending on security setup)
    • 101-ar-bp-020 – Cash Collection Payment Posting

Validation Tables

User and System Validation Tables

The following tables are used in Cash Collection:

  • Default Payment Collection Type (Cash, Checks, Money Order…) CCTYPE — is now a SYSTEM Table
  • USER Table CCTYPE Previously used in Govern Form Windows for CC Access Type (upgrade requirement)
  • AR Transaction Types Deposit ART2TYPE
  • CC Receipt table CCPMT
  • CC Default Deposit Format DEPOSIT
  • LETTER_C Letter code used to flag the payment record.
  • MCR_GRP Miscellanous Cash Receipt Group (AR Class linked to MCR Group)

Dynamic Search Queries

  • Dynamic Search Groups that will be used for the Quick Search Controller setup on the Cash Collect Payment Data Entry
    • The distributed form default search group is Payment Data Entry
  • Dynamic Search Style linked to the Group

Cash Collection Parameters

The Accounts Receivable Cash Collection Parameters are used for setting the defaults for the Govern OpenForms Cash Collection Payment Data Entry form and for the cash collection receipts.

The default Cash Collection Parameters can be defined at the following levels:

  • Computer Name: If you define settings by computer name, all users logged in to the computer have the same defaults.
  • User ID: If you define settings by user ID, the defaults are specific to the user.

If parameters are defined at multiple levels, the settings defined at the user level override those defined at the computer. Parameters defined on the workstation override those defined on the server, in a Terminal Server environment.

For details on the Cash Collection Parameters, see:
SettingUpCashCollectionParameters.pdf

General A/R Parameters

All A/R Parameters

Module A/R Parameters

Cash Collection Parameters

This information is currently not available.

Business Entities Configuration (BED)

See OpenForms Setup for more info (101-cc-ofr)

  • Used by Query Tool Property – Model (CC-001)
  • Note is Required on Creation – Entity (AR_DEPOSIT)
  • Note is Allowed on Modification
  • Note is Required on Creation – Entity (CC_MASTER)
  • Note is Allowed on Modification

OpenForms Designer (OFD)

Form Configuration (OFD)

See OpenForms Setup for more info (101-cc-ofr)

Search Group

Payment Data Entry Controller CCPaymentDataEntry_Control

  • Click on the Payment Data Entry Tab
    • Click on the CC PaymentDataEntry_Control
    • In the Properties, expand Properties, expand Misc
    • Select the Dynamic Group to use in the Quick Search form

Payer Name Controller

  • Can Create Properties
  • Selected Search Group and Name and Address Form

Enable Auto-Launch of A/R form (Drill Down to A/R Inquiry)

As of Release 6.0.1603.262 the Cash Collection Payment Data Entry grid can configured to exhibit a new behavior when the user double clicks on a line item.

To obtain this new behavior, configuration will need to occur in the Payment Data Entry tab of the Cash Collection OpenForm. This configuration is carried out using the OpenForms Designer (OFD). To make this change in the OFD…

  1. Open the CC001 – Cash Collection Form
  2. Click to select the Payment Data Entry tab
  3. Locate and click on the CCPaymentDataEntry_Control.
  4. On the right hand side, Properties pane, locate and expand the Misc section; set the ArInquiryForm parameter to AR008 – Accounts Receivable.
  5. Click Save.

Behavior in Govern

In Govern, when users are in the Cash Collection form, click on the Cash Collection Data Entry tab. A double click on a line item in the grid will load the Accounts Receivable (AR008) form
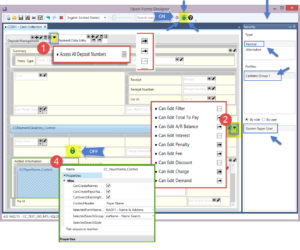
Form Security (OFD)

Deposit Management Controller

  • Security Access to all Deposit Numbers
    OFD Configuration

Payment Data Entry

  • Payment Data Entry Date Controller Security
  • Payment standard fielkds Notes, letter form, etc.

Payment Data Entry Controller CCPaymentDataEntry_Control

  • Security Access to change the following fields in the payment grid:


Key Resources Fields Notes
CC CC_PaymentDataEntry,TotalToPayColumnPermissions Can Edit Total To Pay
CC_PaymentDataEntry,ArBalanceColumnPermissions Can Edit A/R Balance
CC_PaymentDataEntry,InterestColumnPermissions Can Edit Interest
CC_PaymentDataEntry,PenaltyColumnPermissions Can Edit Penalty
CC_PaymentDataEntry,FeeColumnPermissions Can Edit Fee
CC_PaymentDataEntry,DiscountColumnPermissions Can Edit Discount
CC_PaymentDataEntry,ChargeColumnPermissions Can Edit Charge
CC_PaymentDataEntry,DemandColumnPermissions Can Edit Demand
CC_PaymentDataEntry,SelectedDitributionFilterColumnPermissions Can Edit Filter The purpose of this filter is to select ST periods to pay or
tax installments. See roadmap for more information


IMPORTANT: By default, all users have access changing the collection fields


Profile, Role & User Security (GSM)

Application – Govern Profiles

  • Execute Form CC001
  • Execute Form NA001
  • Execute Form AR008

Troubleshooting

After importing Forms.xml

  • Once the import is completed, it is a good practice to refresh the entities in the Business Entity Designer, then to review the forms in OFD.
  • GSM Synchronize (after setup of new imported items or profile links)

A/R Sub-systems are not all showing

  • Organization License Serial Number is invalid

A/R Payment Application Object Errors


101-cc-config


0 votes, average: 0.00 out of 50 votes, average: 0.00 out of 50 votes, average: 0.00 out of 50 votes, average: 0.00 out of 50 votes, average: 0.00 out of 5 (0 votes, average: 0.00 out of 5)
You need to be a registered member to rate this.
Loading...

WM – ACTION – Add Links from Query or Dataset

Workflow Activity/Step ACTION – Add Links from Query or Dataset

Version 6.1

Actions

This action will allow users to add links to an existing workflow from records that are the result of the execution of a query, or the content of a saved dataset. This is a non-generic action that can only be invoked in the context of a workflow. This action may also be invoked via an action button.

NOTE: This action is only applicable at the STEPS level, not the ACTIVITIES level. Actions may also be invoked via an Action button. See Action Button Configuration in the section below.

Functionality

Link Functionality (Automatic bidirectional Workflow Links)

NEW!The functionality to link a workflow type has always existed in prior versions of Govern for OpenForms. The main characteristic was that when a link was established, it was unidirectional in nature. For example, when Workflow A is linked to workflow B, and Workflow B is linked to workflow A, because of the unidirectional nature of the feature, when the Workflow A link to Workflow B is deleted, the link from Workflow B to Workflow A was not automatically deleted. This may also be referred to as two (2) way linking.

This new enhancement to the linking feature is a change to the unidirectional functionality of the Workflow Link. When a link is deleted on one side, the corresponding link will also be deleted.

Required Settings

In order to establish the link, when a link is selected, the system will take the default type that has been selected in the Default type for incoming links parameter of the Kind and Categories form in GNA.
Location: In GNA select Application Configurations > Workflow group > Workflow Management > Kind and Categories > Categories tab > General sub-tab

NOTE: As a result of this change, a default type must always be selected from the Default type for incoming links parameter. This parameter is now required. As links are established in a bidirectional manner, when they are deleted, the deletion is also bidirectional.


NOTE: When used, this action creates records in (Table: WM_LINKED_IDS).

Release Version

This feature is available for the following version: 6.1.1702.0652

GNA Default Link Type of Category Overridden by Type

NEW! Looking at the two way Workflow, i.e. a workflow wherein one workflow is linked to another workflow. Then the other Workflow links back to the first Workflow with the link type of the category in the Default type for incoming links parameter set in the Workflow Kind and Categories > Workflow – Kind > Categories (tab) > General (sub tab). Now one is able to use the incoming link type of the type for the Workflow.
When a Work Flow is created as a result of a Batch Process that imports the payments, the system will also create the other links in the opposite direction with a custom link type. But when the action does the same as the batch process, we use the default that was set on the category.
When users are on a particular Work Flow and you have a step with an action generating other Work Flows, you have an option when you’re picking the type to link back to the master Workflow. Instead of going with the default, you can specify a different type link.

Business Rules

This functionality adheres to the following business rules:

  • Users cannot create or delete Departments so both are disabled.
  • When a modification is cancelled the record will revert to its original value if one was present, if not the field will remain empty.
  • Saved changes create or update a record in (Table: WM_PARM_DEPARTMENT)
  • Overriding the dynamic keys will create or update the following three (3) key names in (Table: USR_KEY_DYNAMIC) :
    • APPLICATION[DEPARTMENT:<CODE>]
    • NUMBER[DEPARTMENT:<CODE>]
    • CERTIFICATE[DEPARTMENT:<CODE>]
NOTE: Otherwise, the keys are deleted from the table.

For additional configuration details, refer to the Technical Documentation in Confluence (RESTRICTED LINK)
Release Version
This feature is available for the following version: 6.1.1706

Configuration

OpenForms Designer (OFD)

Action Button

The action button can be configured in the OpenForms Design (OFD). As an example we will place the action button on the OpenForm tab.

  1. Open your target form in the OFD.
  2. Locate and click to select the tab that the action button will configured on.
  3. In the OFD > Controls pane, drag the action button to the tab.
  4. Select the action button and look at the Properties tab on the right hand side (RHS)

Configure the Button as follows:

  • AssemblyMsGovern.OpenForms.CustomControls.dll
  • ClassWM_LinkToWorkflow_Action
  • Icon – [Select an icon]
  • NameAdd Link
  • TooltipAdd Links from Query/Dataset
  1. Click Save to save the configuration.
NOTE: After saving the configuration, it will be necessary to click Refresh in Govern, or close and reopen the application

Govern New Administration (GNA)

Configuration in the GNA is the same as configuring any other Action. When configuring, the Link Type that is supported by the corresponding category defined in the Kind and Categories editor.

  1. In the GNA ribbon, select Application Configurations (tab) > Workflow (group) > Workflow Management > Department.
  2. In the Workflow Department form, on the left hand side (LHS) pane click to select a department.
  3. In the center pane, click the Types tab.
  4. Click the Steps button on the tab.
  5. On the Steps form, click to add a new action.
  6. In the Add a new action form select the Add Links from Query/Dataset action.
  7. In the Options group, select a Link Type.
NOTE: If at some point, the category defined in the action is not one of the supported links, as indicated in the Workflow – Kind form > Categories (tab) > Supported Link (group), the system will not immediately display a warning in Govern, or display an error in the GNA.

In Govern when the link selected is not part of the list of supported links in GNA, an error message will be displayed the next time you execute the action step in Govern. For example the warning will display as follows:
Step {stepNumber}
Error while executing the action {Add Links from Query/Dataset}:
The link type {Contact} is not supported by the category {Building Permit}

In the above Error example, the link category called CONTACT, was removed as a supported link, after the step action had been defined. If the Query option is required, a query will need to be selected.

NOTE: When selecting a query for the From Query parameter, the ellipsis […] button will be enabled to allow the configuration of a defined query.

Tables

The following is a list of table(s) that have been modified to enable this action.
This action creates records in the following table(s):

  • WM_LINKED_IDS

Documentation

Click below to view the current documentation.
101-wm-fea-108_Activity_Action08.pdf

Related Topics

Workflow Management Actions
What’s New in Workflow Management
Main Workflow form
Workflow Management Overview
Workflow Management Installation
OpenForms Reference (Configuration) Setup Information
Workflow Management – Workflow Form Controller & Workflow Type Custom Control
Workflow Management – Additional Types
Workflow Management OpenForms Reference
Workflow Management Business Rules
Workflow Management Wiki Map


103-wm-parm-Action08-CreateWorkflowLinks


0 votes, average: 0.00 out of 50 votes, average: 0.00 out of 50 votes, average: 0.00 out of 50 votes, average: 0.00 out of 50 votes, average: 0.00 out of 5 (0 votes, average: 0.00 out of 5)
You need to be a registered member to rate this.
Loading...

WM Form – Additional Types

Workflow Management Form – Additional Types

Version 6.1 (In Development)

Overview

When there is a business requirement to allow multiple types on a single workflow , Category Allow Additional (Multiple) Types is checked, the Workflow Form will contain an additional separator or business entity for Workflow Additional Types. For example on a property base workflow record for a building permit, users may want to add sub-types required for this permit like foundation, rough-in, electricity, plumbing, etc. Otherwise, different workflow records will be created for each.

Additional Type Form Entity

This form entity (tab seperator) contains the Additional Type Controller (Combo box for selection) and the Category added fields.

Additional Type(s) Selection

When creating a new workflow record, the user will select the additional workflow types to include with the main workflow.
This controller WM_Additional_Types_Controller was designed with the following principals:

  • The controller is used for a Workflow Open Form which allows additional types.
  • It must be set for the secondary entity, i.e. the one that manages the additional types.

Fields (Columns) Displayed

The fields normally showed on this form entity are the Category User Added Fields.

  • These fields can be setup in groups that will be enabled (visible) or disabled (invisible) with an expression based on the workflow type. For instance, if Type = Plumbing, display only the plumbing related category added fields, if Type =Electrical, display only the electrical related category added fields, etc.

Presentation in Govern

When the Open Form is initialized, for the entity that manages the types, the form will be presented in the following manner:

  • The Additional Type(s) Combo Box selection is available on NEW
  • The Form Entity New button is not visible
  • The Form Entity Delete button is not visible
  • The following attributes are Read Only:
    • WM_ID
    • TYPE_CODE
    • IS_MASTER
    • LAST_MODIF_UID
    • LAST_MODIF_DATE

When additional types are added to the same Workflow record, they will be indicated on the mini-browse indicator that is on the tab of the form (See OpenForms Designer Configuration).

Configuration

Business Entity Designer (BED)

Open Forms Designer (OFD)

For full configuration instructions, refer to the technical documentation 101-wm-frm-001-Workflow Additional Types Controller.pdf.

Related Links

What’s New in Workflow Management
Main Workflow form
Workflow Management Overview
Workflow Management Installation
OpenForms Reference (Configuration) Setup Information
Workflow Management – Workflow Form Controller & Workflow Type Custom Control
Workflow Management – Additional Types
Workflow Management OpenForms Reference
Workflow Management Business Rules
Wiki Map


101-wm-frm-002


0 votes, average: 0.00 out of 50 votes, average: 0.00 out of 50 votes, average: 0.00 out of 50 votes, average: 0.00 out of 50 votes, average: 0.00 out of 5 (0 votes, average: 0.00 out of 5)
You need to be a registered member to rate this.
Loading...

101-wm-install-wm_activity_status

Workflow Management Form Controller – WM Activity Controller

Version 6.1 (In Development)

Overview

This page is intended for System Administrators and Business Analysts to create a Workflow form and configure the form controllers.

  • The Workflow Activity control is used to process activities and steps in govern.
  • The Workflow Activity Control execute the activities which are in a list of steps.

The activities are a list of actions and validations contained in a bunch of steps which are performed in some order depending on the responses given its activities.
So each activity and step process some actions for a workflow.
Activities can be Initiated and after that completed by giving a response result for the completed action.

Activity Controller Configuration

The following is the configuration of the main activity custom control object properties.In addition, since multimedia can be embedded in workflow, setup will be required.
There are 2 OFD properties (MultimediaWindowHeight and MultimediaWindowWidth) to control the Size of the Multimedia Window.
When in Govern, by clicking on the Multimedia Hyperlink in the Activity Panel or by Double Clicking on the small Multimedia picture in the Tree View this will open the Multimedia control to manage the linked multimedia documents of the selected activity.

Workflow Custom Control (WM_ACTIVITYSTATUSHIERARCHY_CONTROL)

First you need to drag the Custom Entity control object to the form header then click on the tab header to set the properties.

Element Property Setup
Misc. Action WM_ACTIVITYSTATUSHIERARCHY_CONTROL
Name n/a – Maintain by System
Parent Entity The form Root Entity
Is Visible n/a
Name Maintain by System
Properties
Misc. MultimediaWindowHeight To control the size of the Multimedia Window
Suggested size =
MultimediaWindowWidth To control the size of the Multimedia Window
Suggested size =
Tab Sequence Tab Stop Sequence Number Standard OpenForms
Text
Misc En Enter the name that will be displayed for the form entity
i.e Activity
Internal Element Instructions
Not applicable


Activity Controller OFD Security

The following security options are available for the controller

  • Allow Completed Response Modification
  • Allow Re-Initiate Steps
  • Allow Multimedia Links
  • Assign to
  • Target Date
  • Total Time Spent
  • Note


101-wm-install-wm_activity_status


0 votes, average: 0.00 out of 50 votes, average: 0.00 out of 50 votes, average: 0.00 out of 50 votes, average: 0.00 out of 50 votes, average: 0.00 out of 5 (0 votes, average: 0.00 out of 5)
You need to be a registered member to rate this.
Loading...