GNA Department Maintenance

GNA Department Maintenance

Overview

This form is used to define the profile for each department. This includes the fiscal year used by the department, access to the Govern data entry functions and access to Accounts / Receivable data. This form also contains the Multimedia Parameters and Multimedia Codes.
To access this form, from the Govern New Administration (GNA)…

  1. Select the System Parameters tab in the GNA ribbon.
  2. Click to select Department Maintenance..

Command buttons

Browsing Records: In the Department Maintenance form, the list of existing department profiles can be seen on the left hand side (LHS).
Creating a Department: Click New to clear the form and create a new department profile.
Canceling Changes / Creation of a Department: To cancel the creation of a Department, click Cancel changes icon. This icon is similar to the Create a New Item icon during the creation process. A confirmation message appears if there are any unsaved modifications.
Saving a Department Record: Click Save the Current Item to save a new department profile or modifications to an existing one.
Deleting a Department: Click Remove the Current Item to remove the current department record.

Read More...

General tab parameters

Department Code: This code is used to Identify the department. All links to this department will use this code. All alphanumeric characters are valid.
English Short Description: In the English Short Description field (or the Short Description field for your first language), enter a description using a maximum of 25 characters.

NOTE: When a Short Description is entered and you click in the Long Description field, it is copied into the Long Description field.

English Long Description: In the English Long Description field, enter a description up to a maximum of 50 characters. French Short Description: In the French Short Description field (or the Short Description field for your first language), enter a description using a maximum of 25 characters.

French Short Description: In the French Short Description field (or the Short Description field for your first language), enter a description using a maximum of 25 characters.

NOTE: When a Short Description is entered and you click in the Long Description field, it is copied into the Long Description field.

French Long Description: In the French Long Description field, enter a description up to a maximum of 50 characters.
Any modifications to a record, or creation of a record are presented with the option to Save. Click Yes to accept the changes. When there are Validation issues with the record, the Validation Errors form is presented. Click OK to continue.
Fiscal Year: This field will display the fiscal year that the current department will work in; when creating a new department, this will be the fiscal year that the department will be working in.

NOTE: This field must be modified manually when the department changes to a new fiscal year.

Owner as of Month / Plus (+) or Minus (-) Years

The Owner as of Month feature allows you to specify the month that the system will register new owners. For example, the assessor’s office might use the date of March 1 as their annual registration date. This means that if a parcel is sold after March 1 plus a day, i.e. March 2, 3 etc., the previous owner will still be considered as the Owner because they were in possession as of March 1.
Owner as of Month: Specify the (as of) month to be used when creating new property owners.
+ or – Years: Specify the number of years added, or subtracted, from the fiscal year, relative to the last assessment.
For example, if the last assessment was performed in the year 2007, and the current year is 2009, we would enter –2, i.e. (2007-2009 = -2), in the + or – Years parameter.

Modifying the Fiscal Year

To modify the Fiscal Year value, click in the field, select the existing year and overwrite the value.

Privacy / Restrictions for Names

Name Group Code: You can create a Name Sharing Group in order to extend access rights to the name and address records, created by your department, to one or more of the other departments, within your organization.
Use the options in this group to set up access rights for Name and Address records; to do this you need to define the following:
To create a Name Sharing Group…

  1. In the form, enter a code of one or two characters in this field. Then, enter the same code when you set up the other departments in this group.
  2. Select one of the following options to define the access rights for the departments included in the Name Sharing Group and for those outside of it.

The code of the Name Sharing Group and the type of security permissions are displayed on the Name and Address Maintenance function in Govern, unless the records are private to another department. If the name is restricted, it is grayed out and cannot be modified. Similarly, if the address is restricted, it is also grayed out and cannot be modified.

There are four (4) levels of security for name and address records.

  • No Restrictions – There are no restrictions to the Name and Address portions of the records, they can be searched, modified, or deleted. Other users are equally unrestricted.
  • Private Names – Name and Address records, are private to the department or Name Sharing Group, where they were created. Other users can’t search, modify, or delete these names. They can only view them if they are already link to other Govern functions
  • Restricted Names – Names in the Name and Address records are restricted to the department or Name Sharing Group, where they were created. Other users can view the names can’t modify or delete them. They are still able to search for the records and modify the addresses.
  • Restricted Names and Addresses – Both the name and address portions, of the Name and Address records, are restricted to the department or Name Sharing Group where they were created. Other users can perform a search for these records but cannot modify or delete them.

What’s New!

Owner As of Month parameters in GNA

Available in GNA release 6.0.1611.0573
Addition of parameters to allows users to enter the “Owner as of Month” and “+/- Years” in the Govern New Administration (GNA) Department Maintenance form. See documentation below for details.
GNA_Department_Maintenance – Add Owner as of param.pdf

New Features in the Multimedia Codes form

Available in GNA release 6.0.1503
The Multimedia Codes form allows users to define multimedia codes for a department. The multimedia codes provide options for linking various document types to a Property, Name, Permit, Activity, Inspection, Sale, Building or Public Hearing record. The changes now allow the entering of file extensions for documents that are stored in the database, and for image types. (Table: PC_FREE_FORM).

Related Topics

Name & Address Group Security Rules Grid
User Maintenance

Now, We can set the extension for the file extension when the type of document is DB Document. Also, We can do the same for the image stored in database.


103-SY-003


0 votes, average: 0.00 out of 50 votes, average: 0.00 out of 50 votes, average: 0.00 out of 50 votes, average: 0.00 out of 50 votes, average: 0.00 out of 5 (0 votes, average: 0.00 out of 5)
You need to be a registered member to rate this.
Loading...

GNA User Maintenance

GNA User Maintenance

Overview

The User Maintenance form maintains user data. In this form, new users can be created, their access passwords can be set, or user profiles that are inactive can be removed.
Access rights can be set in the Govern Security Manager (GSM).

To access this form, from the Govern New Administration (GNA)…

  1. Select the System Parameters tab in the GNA ribbon.
  2. Click to select User Maintenance..

User Maintenance command buttons

Browsing User Records: In the User Maintenance form, the list of existing user profiles can be seen on the left hand side (LHS). Creating a User: Click New to clear the form and create a new user profile.

Canceling Changes / Creation of a User: To cancel the creation of a user, click the Cancel Changes icon. This icon is similar to the Create a New Item icon during the creation process. A confirmation message appears if there are any unsaved modifications.

Saving a User Record: Click Save the Current Item to save a new user profile or modifications to an existing one.

Deleting a User: Click Remove the Current Item to remove the current user record.

Read More...

User Maintenance parameters

These are the parameters that are located in (Table: USR_USERFILE).

ID: This informational field displays the unique user ID (U_ID) of the current record; this information cannot be modified.

Inactive From: Enter the expiration date for the account; i.e. the date after which the account is no longer active. Dates are entered in the following format: DD/MM/YYYY. The date may be entered manually, or the date control can be used. (Table: USR_USERFILE.INACTIVE_DATE)

User ID: The User ID is the user identification required for login. (Table: USR_USERFILE.USR_ID)

Password: Enter the password for the user; passwords will be cloaked, i.e. appear as an asterisk “*” when being entered. This value is encrypted in the database. (Table: USR_USERFILE.PWD)

Name: For this parameter, enter the full name of the user. This field supports up to 32 characters; spaces are included in the count. (Table:
USR_USERFILE.NAME)

Initial: Enter the initials of the user; a maximum of three (3) letters are supported. (Table: USR_USERFILE.INITIAL_NAME)

Email: Enter the email address contact for the user. This e-mail address is used in the Messaging System function within the Permits & Inspections subsystem. (Table: USR_USERFILE.EMAIL)

Any modifications to a record, or creation of a record are presented with the option to Save. Click Yes to accept the changes. When there are Validation issues with the record, the Validation Errors form is presented. Click OK to continue.


103-SY-004


0 votes, average: 0.00 out of 50 votes, average: 0.00 out of 50 votes, average: 0.00 out of 50 votes, average: 0.00 out of 50 votes, average: 0.00 out of 5 (0 votes, average: 0.00 out of 5)
You need to be a registered member to rate this.
Loading...


103-sy-008

Govern Standard Feature – User System Settings Action Button

Overview

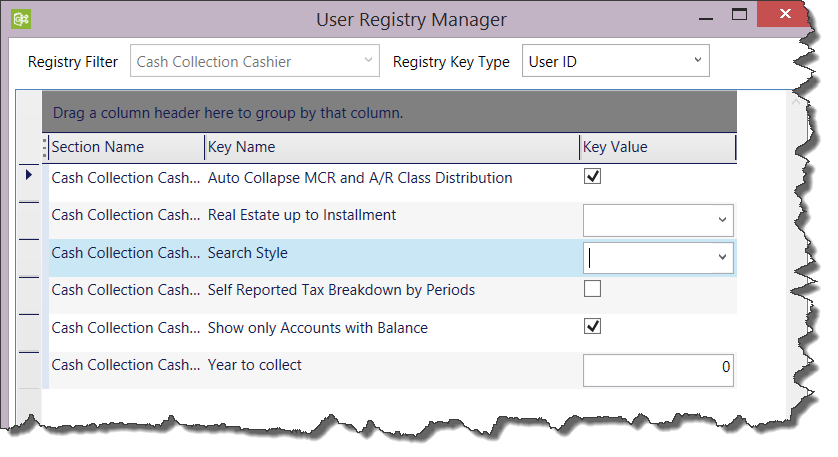
The following USER or CASHIER registry parameters are accessible on the active OpenForms by Registry SECTION. The following sections are available to use.

103-cc-parm-User-ui-button.png

103-cc-parm-User-ui-form.png
Click to enlarge

Cash Collection Cashier

The following parameters are available by User ID for the Cash Collection
Section name: [Cash Collection Cashier]
  • Auto-Collapse MCR and Payment Distribution by A/R Detail (Class Code)
  • Show only Accounts with Balance
  • Year to Collect

To be added (see roadmap)

  • Default Real Estate Up to Installment
  • Default Self Reported Tax Period
  • Default Search Style
  • Default Payment Collection Type (cctype) – check, credit …) – CURRENTLY setup in General User Parameters.

Matix Integration

The following parameters are available by User ID to change Application Browser Defaults.


103-sy-008


0 votes, average: 0.00 out of 50 votes, average: 0.00 out of 50 votes, average: 0.00 out of 50 votes, average: 0.00 out of 50 votes, average: 0.00 out of 5 (0 votes, average: 0.00 out of 5)
You need to be a registered member to rate this.
Loading...


103-ub-parm-CycleCode

Utility Billing Cycle Code Parameters

Overview

VERSION 6.0 and VERSION 6.1 – (Under Development)


103-ub-parm-CycleCode


0 votes, average: 0.00 out of 50 votes, average: 0.00 out of 50 votes, average: 0.00 out of 50 votes, average: 0.00 out of 50 votes, average: 0.00 out of 5 (0 votes, average: 0.00 out of 5)
You need to be a registered member to rate this.
Loading...

103-st-parm-Periods

Periods

Overview

Use the Self-Reported Tax Periods form to create periods in order to define the times that the self-reported tax is due.

User of the Self Reported Business Tax module will notice a change in the “Detail for Period …” parameter in the Period form. Now there are three (3) dates that will need to be provided for each period:

  • Start Date – The start date for the period
  • End Date – This is the end date for the period
  • Due Date – The date in which the filing is due.


Changes and Impact

CHANGE – ST_PARM_PERIOD table

Use of the (Table: ST_PARM_PERIOD) for Govern for Windows was changed to the newer (Table: ST_PARM_PERIOD_DETAIL); added in Govern release 5.1.

IMPACT – ST_PARM_PERIOD table

Users that are migrating from Govern for Windows Release 10.8 to Govern Release 6.0 should note the following changes:
There is a synchronization process that occurs when the DUE_DATE value in (Table: ST_PARM_PERIOD), i.e. in Govern for Windows was modified; the table is synchronized with Govern release 6.0’s (Table: ST_PARM_PERIOD_DETAIL).
NOTE: In Govern release 6.0 although (Table: ST_PARM_PERIOD) is still present it is now only being used as an access point to the details that are now in (Table: ST_PARM_PERIOD_DETAIL.).

See Also


103-st-parm-Periods


0 votes, average: 0.00 out of 50 votes, average: 0.00 out of 50 votes, average: 0.00 out of 50 votes, average: 0.00 out of 50 votes, average: 0.00 out of 5 (0 votes, average: 0.00 out of 5)
You need to be a registered member to rate this.
Loading...

103-st-parm-SystemEntityConfiguration

System Entity Configuration

Overview

The Business Tax System Entity Configuration form allows the linking of an entity with a levy. Thus, any expression that is created can then be evaluated.

Functionality

The Business Tax System Entity Configuration form is a screen in the Govern New Administration (GNA) that is used to configure the entity required for the Business Tax Filling. This entity is used to provide the Context ID for the expression control that is responsible for applying, or not applying a Levy. This form contains a combo box that lists all Govern system entities that are available for selection. This configuration form is used for Govern enhancements such as the Business Tax Transfer Filing. This feature allows Self Reported Business Tax users to transfer filings to any Unfiled Filing Period with the same Category. See Self Reported Business Tax Filing Transfer for details.

Linking an Entity with a Levy

To link an entity with a levy in GNA…

  1. From the GNA ribbon, click the Application Configurations (tab) > Business Tax > System Entity Configuration.
  2. In the Business Tax System Entity Configuration form, select the entity called ST_Filing – Self Reported Tax Filing.

In order to ensure that the most up to date forms are being used by the system, the following .XML files are required to be updated to the current Release 6.0 / 6.1 versions:

  • FormReference.XML – The latest version of the OpenForms Reference file
  • DynamicSearchReference.XML – A current version of the Dynamic Search Reference file

NOTE: As a rule, administrators should always ensure that they are using the latest versions of the two above .XML files. Updates are performed in the Govern New Administration (GNA) using the Import Data from File utility in the Import / Export Tools group. Refer to the Govern New Administration (GNA) user guide for details about using the import / Export tools Under the Utilities tab.

Related Topics


103-st-parm-SystemEntityConfig


0 votes, average: 0.00 out of 50 votes, average: 0.00 out of 50 votes, average: 0.00 out of 50 votes, average: 0.00 out of 50 votes, average: 0.00 out of 5 (0 votes, average: 0.00 out of 5)
You need to be a registered member to rate this.
Loading...


103-st-parm-Tables

System and User Tables Configuration

User Tables
(under construction)
Tables that play a role in the Self Reported Tax Configuration

  • CATEGORY TYPE [VT_usr]
  • PROPERTY CLASS or PROPERTY USE [VT_USR_PUSE]
  • Table Tax Districts (Levy Type in pp) [VT_USR_???]