AR – Posting Error Codes

Accounts Receivable (A/R) Posting Error Codes

Error Code Description
1 Invalid AR ID Property
2 Save without Append (No A/R Detail found)
3 Invalid A/R Class Code Property
4 Invalid Subsystem code in A/R Parameters
5 Missing Required PID Property
6 Missing Required NAID Property
7 Missing Required Cycle Code
8 Missing Required Key ID Or Key Type
9 Missing Required UBID
10 Move Next After EOF
11 Invalid Transaction Type
12 Detail Object Contains Existing Transactions
13 Missing Required CCID Property
14 Missing Required A/R ID Property
15 Missing Subsystem Property
16 Missing Installment
22 Class Code and Transaction Type Incompatible
25 Invalid Fiscal Year
26 Invalid Amount
27 Can’t get a system key index
28 Invalid G/L Distribution Amount
29 Transaction Already Posted
30 Cannot delete because the subsequent transaction is not posted
32 Invalid or Missing PP_ID
33 Invalid or Missing MV_ID
34 Invalid or Missing BT_ID
35 This A/R record is inactive and unavailable
36 No Right of Access


101-ar-ref-ErrorPostingCodes


0 votes, average: 0.00 out of 50 votes, average: 0.00 out of 50 votes, average: 0.00 out of 50 votes, average: 0.00 out of 50 votes, average: 0.00 out of 5 (0 votes, average: 0.00 out of 5)
You need to be a registered member to rate this.
Loading...

AR – GL – Accounting Business Rules

Accounts Receivable (A/R) General Ledger (G/L) Accounting Business Rules

Overview

When an AR transaction is posted (confirmed), G/L entries are created for accounting and audit purposes.
For each transaction, a debit and a credit is created.
For each posting, Total Debit = Total Credit

The debit and credit entries generated depend on the nature of the transaction, and on the:

  • Application Module setup
  • AR General Parameter setup
  • AR Class Code Parameter setup and use (specific or default)
  • AR transaction type being processed

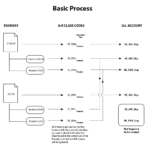
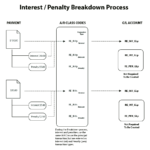
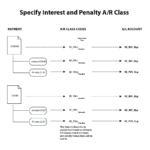
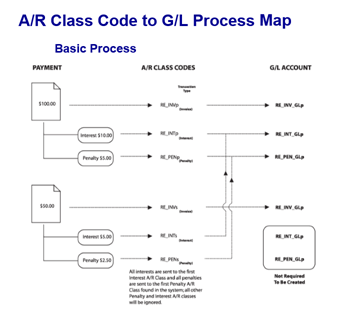
G/L Accounting Business Rules Process Schema

The following shows the different processes (basic, interest/penalty breakdown, specific A/R Class and penalty). Click on the thumbnails to enlarge or click here for a printable version.


Basic Process
Interest and Penalty Breakdown
Specified Interest & Penalty A/R Class

G/L Accounting Business Rules by AR Transaction Type


This table lists the valid G/L Accounts for each transaction type. Click here for a PDF copy.

Transaction Type G/L Accounting
Abatement Accounts Receivable, Revenue, Deferred Revenue
Adjustment Cash, Accounts Receivable, Revenue, Deferred Revenue
Adjusted Bill Cash, Accounts Receivable, Revenue, Deferred Revenue
Charge Cash, Penalty: Accounts Receivable, Penalty: Revenue, Penalty: Deferred Revenue
Discount Accounts Receivable, Revenue, Deferred Revenue, Discount
Deposit N / A *
Demand Cash, Penalty: Accounts Receivable, Penalty: Revenue, Penalty: Deferred Revenue
Duplicate Payment Cash, Accounts Receivable, Revenue, Deferred Revenue
Fee Cash, Penalty: Accounts Receivable, Penalty: Revenue, Penalty: Deferred Revenue
Interest Cash, Penalty: Accounts Receivable, Penalty: Revenue, Penalty: Deferred Revenue
Billed / Invoice Cash, Accounts Receivable, Revenue, Deferred Revenue
Miscellaneous Cash Receipt Cash, Accounts Receivable, Revenue, Deferred Revenue
Open Cash Credit Cash, Accounts Receivable
Open Credit Accounts Receivable, Revenue, Deferred Revenue
Over Payment Cash, Accounts Receivable, Revenue, Deferred Revenue
Postdated Payment N / A *
Penalty Cash, Penalty: Accounts Receivable, Penalty: Revenue, Penalty: Deferred Revenue
Payment N / A *
Payment Reversal Cash, Accounts Receivable, Revenue, Deferred Revenue
Refund Cash, Accounts Receivable, Revenue, Deferred Revenue
Over & Short Cash, Accounts Receivable, Revenue, Deferred Revenue
Tax Deferral Cash, Accoutns Receivable, Revenue, Deferred Revenue
Transfer to Tax (Interest, Penalty) Cash, Penalty: Accounts Receivable, Penalty: Revenue, Penalty: Deferred Revenue
Tax Title Lien Cash, Accounts Receivable, Revenue, Deferred Revenue
Tax Title Lien (Interest) Cash, Penalty: Accounts Receivable, Penalty: Revenue, Penalty: Deferred Revenue
Transferred Principal Cash, Accounts Receivable, Revenue, Deferred Revenue
Trans.(Interest, Penalty) Cash, Penalty: Accounts Receivable, Penalty: Revenue, Penalty: Deferred Revenue
Transfer to Tax Cash, Accounts Receivable, Revenue, Deferred Revenue
Sales Tax 1 Cash, Accounts Receivable, Revenue, Deferred Revenue
Sale Tax 2 Cash, Accounts Receivable, Revenue, Deferred Revenue
Voluntary Payment N / A *
Note(s): The Deposit, Postdated Payment, Payment and Voluntary Payment transaction types are not distributed to Govern’s G/L


101-ar-GLAccounting-(thumbnail).png 101-ar-TransactionType-(thumbnail).png
AR G/L Accounting Process Schema
(click to enlarge)
AR Transaction Type


101-ar-ref-GLAccountingRules


0 votes, average: 0.00 out of 50 votes, average: 0.00 out of 50 votes, average: 0.00 out of 50 votes, average: 0.00 out of 50 votes, average: 0.00 out of 5 (0 votes, average: 0.00 out of 5)
You need to be a registered member to rate this.
Loading...

AR – Transaction Types

Accounts Receivable (A/R) – Transaction Types

Overview

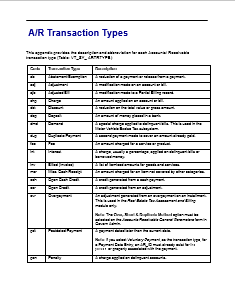
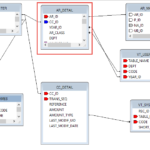
The following table provides a description and abbreviation for each A/ R transaction type. The transaction types are saved to VT_SY_ ARTRTYPE in the Govern database. They are used to populate the Transaction Type fields, on the A/R Class Parameters form on the A/R Transaction forms.

Click here for the pdf version.

The Transaction Type Codes are recorded in the AR Detail records.


Code Transaction Type Description
ab Abatement/Exemption A reduction of a payment or release from a payment.
adj Adjustment A modification made on an account or bill.
ajb Adjusted Bill A modification made to a Partial Billing record.
chg Charge An amount applied on an account or bill.
dct Discount A reduction on the total value or gross amount.
dep Deposit An amount of money placed in a bank.
dmd Demand A special charge applied to delinquent bills. This is used in the Motor Vehicle Excise Tax subsystem
dup Duplicate Payment A second payment made to cover an amount already paid.
fee Fee An amount charged for a service or product.
int Interest A charge, usually a percentage, applied on delinquent bills or borrowed money.
inv Billed (Invoice) A list of itemized amounts for goods and services.
mcr Misc. Cash Receipt An amount charged for an item not covered by other categories.
och Open Cash Credit A credit generated from a cash payment.
ocr Open Credit A credit generated from an adjustment.
ovr Overpayment

An adjustment generated from an overpayment on an installment. This is used in the Real Estate Tax module only.

Note: The Over, Short & Duplicate Method option must be selected on the Accounts Receivable General Parameters form in Govern Admin.

pdt Postdated Payment A payment dated later than the current date.
pen Penalty A charge applied on delinquent accounts.
pmt Payment Money given in exchange for goods or services.
rev Payment Reversal A correction made when an payment error has been entered and posted or a Not Sufficient Funds (NSF) check has been processed.
rf Refund An amount of money returned when an overpayment has been made.
sht Over & Short An amount generated from the Automatic Generation of Over & Short batch process.
td Tax Deferral A postponed tax payment.
tri Transferred To Tax (I/P) Interest and penalty charges transferred from the Special Assessment subsystem
tt Tax Title Lien A charge applied on property for the fulfillment of a debt or duty.
tti Tax Title Lien Interest The interest generated from the tax title.
tto Transferred Principal The amount of principal transferred to tax.
ttp Transferred (Interest and Penalty) The amount of interest and penalty transferred to tax.
ttx Transferred To Tax The total amount transferred, including principal and interest.
tx1 Sales Tax 1 A Sales Tax calculation method in which the first and second taxes are added together; then, applied to the bill.
tx2 Sales Tax 2 A Sales Tax calculation method in which the first tax is added to the bill; then, the second tax is calculated on this amount.
vp Voluntary (Advanced) Payment

An amount that is paid before the bill is received; for example, a taxpayer may forward a payment to cover bills during a predicted absence.

Note: If you select Voluntary Payment, as the transaction type, on a Govern user form, an AR_ID is required for the NA_ID or P_ID associated with the record.


NOTE: The Deposit, Postdated Payment, Payment, and Voluntary Payment transaction types are not distributed to Govern’s G/L


101-ar-ref-TransactionType


0 votes, average: 0.00 out of 50 votes, average: 0.00 out of 50 votes, average: 0.00 out of 50 votes, average: 0.00 out of 50 votes, average: 0.00 out of 5 (0 votes, average: 0.00 out of 5)
You need to be a registered member to rate this.
Loading...

AR – Cash Balancing Report

Accounts Receivable (A/R) – Cash Balancing Report

Overview

The report code for the Cash Balancing report is: ar-rpt-004.rpt

CashBalancingReport

Click to enlarge.


101-ar-rpt-004-CashBalancingReport


0 votes, average: 0.00 out of 50 votes, average: 0.00 out of 50 votes, average: 0.00 out of 50 votes, average: 0.00 out of 50 votes, average: 0.00 out of 5 (0 votes, average: 0.00 out of 5)
You need to be a registered member to rate this.
Loading...

AR – Payment Reversal Data Entry

Accounts Receivable (A/R) Payment Reversal Data Entry

Overview

Payment reversal transactions (rev) are adjustments that are used as corrections. They are run typically when NSF checks have been processed or records posted incorrectly
Run the Payment Reversal batch process in order to void a group of payment transactions. This is useful if there are payments that were made in error or that were paid from accounts with insufficient funds (NSF).

Documentation

For the complete reference guide, see Govern Accounts Receivable.
For the A/R Transaction Rules, see A/R Transaction Rules.

Payment Reversal Transactions and Processes

Read More...

Payment Reversal Transaction Type

Payment reversal transactions (rev) are used as corrections. They are run typically when NSF checks have been processed or records posted incorrectly.

Creating Payment Reversal Transactions

Payment Reversal transactions can be created individually or in a batch. Both methods create Payment Reversal Transactions, which can be viewed or deleted from the A/R Inquiry form.
It is faster to generate these transactions in a batch, especially if you have a large volume to process. However, if it is important to note the warnings that are described under the section. Running the Generate Payment Reversal Batch Process.
See Creating a Single Payment Reversal Transaction following this section.
See Generate Payment Reversal Batch Process: 101-ar-bp-041

Posting Payment Reversals

After generating Payment Reversal transactions, whether individually or in a batch, you need to post them. To post a payment reversal, run the Payment Reversal Posting batch process. See Posting Payment Reversal Transactions. See
Payment Reversal Posting: 101-ar-bp-026

Business Rules for Payment Reversals

All posted payment transactions can be reversed, with the following exceptions. The following payment transactions cannot be reversed:

  • Not posted Payment: If a payment is not posted, you can edit or delete it on the Payment Data Entry form. However, a payment must be posted before you can create a Payment Reversal transaction or include it in the Generate Payment Reversal batch process.
  • Payment Reversal (rev): If a Payment Reversal exists, the original payment is already reversed and a new payment reversal cannot be created.
  • Payment Refunded (rf): If a Payment Refund exists, the original payment is already refunded and a new payment reversal cannot be created.
  • Payment Transferred (tri or trp): If a Payment Transfer exists, the original payment is already transferred and a new payment reversal cannot be created.

For details on transaction types, see Transaction Types

Creating a Single Payment Reversal Transaction

Accessing the Payment Reversal Form

To access the Payment Reversal form:

  1. Open a Profile that includes A/R Inquiry.
  2. Open the A/R Inquiry form.
  3. Perform a search and load the required record to the tree view and form.
  4. Right-click on a record in the Summary section of the A/R Inquiry form.
  5. Select Payment Reversal from the drop-down list
  6. If multiple records are available the following screen appears:

The Payment Reversal form is divided into the following sections:

  • General Information
  • Detail
  • Comment
  • Payer Information

General Information

Subsystem: The subsystem for the record or entry selected on the A/R Inquiry form is displayed.
Year: This field displays the fiscal year of the record.
Bill Number: This field displays the bill number for the selected record.
Cycle Code: This field displays the Cycle Code associated with the record (Table: VT_USR_ ARCYCLE).
The Cycle Code is mandatory for the Real Property and Person Property Tax modules. It is used for tax billing cycles and is linked to the A/R Class Code in GNA.

Detail

Date: This field displays the entry date for the payment reversal. By default, this is the current date. To change the date, click the calendar beside this field and select a new date.
Effective On: By default this field is blank. If an effective date is applicable, click the calendar beside the field and select a new date. For example, you may want to enter the posting date.
Amount: This field displays the amount of the reversal.
Full Payment Reversal: A full payment reversal can be used when there are multiple records associated with a single name. For example, Bob’s Building Supplies owns three properties. Bob has made an overpayment of $10,000.00 on each property for a total of $30,000.00. You can create a full payment reversal to include all properties in the same payment reversal.
Select the Full Payment Reversal option. This displays the total for all property records.

Comment

Justification Code: Select a Justification Code to explain the reason for the payment reversal (Table: VT_USR_ARREASON).
Deposit Number: Depending on the options selected in GNA, deposit numbers can be automatically generated or user-defined.
Automatically generated deposit numbers are composed of one or two of the following fields: date, last deposit, and user ID. This number can be modified if security permissions allow.
If Deposit Management is activated, a drop-down list is added to the Deposit Information parameter. This is populated by the deposit numbers created in the Deposit Management form. See Deposit Management.
Do one of the following:

  • Enter a new deposit number if required.
  • Select a deposit number from the drop-down list.
NOTES: Enter any notes or comments applicable to the payment reversal.


Payer Information

Letter Code: Select a Letter Code that identifies the type of letter sent to the payer; for example, D: Duplicate Payment, O: Over Payment, RV: Payment Reversal (Table: VT_USR_LETER_C).
Payer’s Name and Address: This field is displays the payer’s name and address.
Click R to remove the displayed name and address record.
Click C to add a different name and address record. This opens the Name Search screen.


101-ar-frm-026


0 votes, average: 0.00 out of 50 votes, average: 0.00 out of 50 votes, average: 0.00 out of 50 votes, average: 0.00 out of 50 votes, average: 0.00 out of 5 (0 votes, average: 0.00 out of 5)
You need to be a registered member to rate this.
Loading...

AR – Payment Transfer Data Entry (101-ar-frm-027)

Accounts Receivable (A/R) – Payment Transfer Data Entry

Overview

Payment transfers are used to transfer posted payments from one account to another. Typically, they are used to correct an error such as a payment made and posted to the wrong account. For example, a client could make a payment intended for a utility bill that is somehow processed on a tax bill. To correct this error, you can create a Payment Transfer.

NOTE: Payment Transfers can be created on posted payments only.

If you transfer the full amount of the original payment, all the associated discounts and interest are transferred. However, if you transfer only part of the original payment, no discounts or interest are transferred.

When you create a Payment Transfer:

  • A Payment Transfer (trp) or Payment (pmt) transaction is automatically created in the account that received the transferred payment; i.e., the account to which the payment is transferred. In the preceding example, this is the utility account.
  • A Payment Transfer Reversal (trr) or Reversal (rev) is automatically created in the account from which the original payment is transferred. In the example, this is the tax account.

The Payment Transfer (trp) and Payment (pmt) transaction types are the same, as are the Payment Transfer Reversal (rev) and Reversal (rev) types. Separate transaction types can be useful for reviews and reports.
The transaction types are created automatically when the Payment Transfer record is saved. Whether the Payment Transfer (trp) and Payment Transfer Reversal (trr) or Payment (pmt) and Reversal (rev) transaction types are created depends on the setup in GNA.

Documentation

Read More...

For the complete reference guide, see Govern Accounts Receivable.
For the A/R Transaction Rules, see A/R Transaction Rules.

To see the information on this page as a pdf, click on the following link:
PaymentTransfer.pdf

Payment Transfer (trp)

The Payment Transfer (trp) or Payment (pmt) can be viewed in the Detail section of the A/R Inquiry form when you select the account to which the payment is transferred. In the example, this is the utility account. In the Link To column, you can click on a direct link to the Payment Transfer Reversal (trr) or Reversal (rev) in account from which the original payment was transferred, the tax account in the example.

Payment Transfer Reversal (trr)

Similarly, the Payment Transfer Reversal (trr) or Reversal (rev) can be viewed in the A/R Inquiry Detail section when you select the tax account. In the Link To column, you can click on a direct link to the Payment Transfer (trp) or Payment (pmt) in the account to which it was transferred.

Accessing the Payment Transfer Form

To access the Payment Transfer form:

  1. Launch Govern.
  2. Open a Profile that has the Accounts Receivable module.
  3. Open the Accounts Receivable form.
  4. Perform a search and load the required record to the tree view and the form.
  5. Select the record in the Summary section of the A/R Inquiry in order to view the details.
  6. Right-click on the payment you want to transfer in the Detail section.
    A context menu is displayed.
  7. Select Payment Transfer from the drop-down list This opens the Payment Transfer form.

The Payment Transfer form is described in the following sections:

  • Original Payment Information
  • Transfer Amount
  • Transfer Destination

Original Payment Information

The Original Payment Information provides general information about the original payment and includes the following fields:
Subsystem: The subsystem for the record or entry selected on the A/R Inquiry form is displayed. This is the original payment record that will be transferred during this procedure.
Name / Tax Map: This field displays the name or tax map number associated with the account to which the original payment was posted.
Bar Code: This field displays the bar code or A/R ID associated with the original payment.
Year: This field displays the fiscal year of the original payment record.
Cashier ID: This field displays the ID of the cashier who processed the original payment.
Deposit Number: This field displays the deposit number of the original payment.
Amount: This field displays the amount of the original payment.
Entry Date: This field displays the date the original payment was entered.

Transfer Amount

The Transfer Amount section displays details about the transferred payment.
Entry Date: This field displays the entry date for the payment transfer, not the original payment. By default, this is the current date. To change the date, click the calendar beside this field and select a new date.
Effective On: This field displays the date that the payment transfer is effective. By default this is the effective date of the original payment. To change the default date, click the calendar beside the field and select a new date. For example, you may want to enter the posting date.
Amount: By default, this field displays the full amount of the payment that you are transferring, the original payment. You can modify the amount if you want to transfer only part of the original payment.
Note: If you transfer the full amount of the payment, all discounts and interest are transferred.
If you transfer only part of the original payment, no discounts or interest are transferred.

To modify the amount of the payment that you are transferring:

  1. Select the check box beside Transfer Amount.
  2. Overwrite the amount that is displayed.

The amount displayed beside Remaining Balance is automatically updated.

Transfer Destination

Select one of the following options for the destination account; i.e., the account to which you want to transfer the payment:

  • Out of System: Select this option if you are transferring the amount to an external system.
  • When you select this option, only the Payment Transfer Reversal (trr) or Reversal (rev) transaction is created. A Payment Transfer (trp) or Payment (pmt) transaction is not created.
  • Different Account for Selected Name or Tax Map Number: Select this option if you are transferring a payment to another account associated with the same name or tax map number as the original payment.
  • Selected Accounts: Select this option to transfer the payment to any account that can be selected through the A/R Inquiry Search.

Transfer Options

Deposit Number

Depending on the options selected in the GNA, deposit numbers can be automatically generated or user-defined.

Automatically generated deposit numbers are composed of one or two of the following fields: date, last deposit, and user ID. This number can be modified if you have the required security permissions.

If Deposit Management is activated, a drop-down list is added to the Deposit Information parameter. This is populated by the deposit numbers created in the Deposit Management form.

Do one of the following:

  • Enter a new deposit number required.
  • Select a deposit number from the drop-down list.

Justification Code

Select a Justification Code to explain the reason for the transfer (Table: VT_USR_ARREASON).

Just transfer credit amount

When this option is not selected, which is the default, both the principal and interest are transferred.
When this option is selected, only the principal is transferred. This option is useful if the penalty and interest are calculated separately. There was a client that had that need.
This applies to full payments, only. For partial payments, the interest is not transferred, only the principal.

Out of System

Select this option if you are transferring the payment to another system that is external to Govern.
To transfer the payment outside the Govern system:

  1. Open the Payment Transfer form to the applicable payment.
  2. Select Out of System under Transfer Destination on the Payment Transfer form.
  3. Modify the default Entry Date, Effective Date, and Transfer Amount, if required.
  4. Click Save.
  5. Perform the Payment Transfer batch process to post the payment transfer in Govern A/R.

With this option, only the Payment Transfer Reversal (trr) or Reversal (rev) transaction is created. The Payment Transfer (trp) or Payment (pmt) transaction is not created.

Different Account for Selected Name or Tax Map Number

Select this option to transfer the payment to a different account, or barcode, associated with the selected name or tax map number.
To transfer the payment to a different account associated with the same name or property:

  1. Open the Payment Transfer form to the applicable payment.
  2. Select Different Account for Selected Name/Tax Map Number.
  3. Select the Transfer Amount checkbox if you are overriding the default amount and enter a new amount. Otherwise, accept the default.
  4. Select Different Account per Name / Tax Map Number.
    All the accounts for the selected name or property are loaded to the form.
    Account details include the balance; interest; other amounts, such as discounts and penalties; and the amount to be transferred. These are displayed under the Balance, Interest, Other Charges, and Transfer columns.
    By default, the amount displayed in the Transfer Amount text box is used to pay each account that is listed.
    The amount that is transferred to a selected account is displayed in the Transfer column. This is subtracted from the total Transfer Amount and the result is displayed in the Remaining Balance text box.(Remaining Balance) = (Total Transfer Amount) – (Transfer per Account)

    By default, all accounts, with a balance, that are listed for the selected name or tax map number are displayed.
    If multiple accounts are listed, the Transfer Amount is used to pay the amount owing on each one. The final amount is displayed in the Remaining Balance text box.
  5. Modify the default Entry Date, Effective Date, and Transfer Amount, if required, as described under Transfer Amount on page 181.
  6. Click Save.
  7. Perform the Payment Transfer batch process to post the payment transfer in Govern A/R.

Selected Accounts

You can transfer a payment to any account in the Govern A/R system that has a balance.
To transfer the payment to another account:

  1. Open the Payment Transfer form to the applicable payment.
  2. Select the Selected Accounts option.
  3. Select the Add an Account icon.
    The A/R Inquiry Search screen opens.
  4. Perform a search.
  5. Select and load the applicable account or accounts to the Payment Transfer form.
    All selected accounts are displayed in the grid.
    The account details include the balance; interest; other amounts, such as discounts and penalties; and the amount to be transferred. These are displayed under the columns: Balance, Interest, Other Charges, and Transfer.
    By default, the amount displayed in the Transfer Amount text box is used to pay each account that is listed.
    The amount that is transferred to a selected account is displayed in the Transfer column. This is subtracted from the total Transfer Amount and the result is displayed in the Remaining Balance text box.(Remaining Balance) = (Total Transfer Amount) – (Transfer per Account) If multiple accounts are listed, the Transfer Amount is used to pay the amount owing on each one.
    The final amount is displayed in the Remaining Balance text box.
  6. Modify the default Entry Date, Effective Date, and Transfer Amount, if required.
  7. Click Save.
  8. Perform the Payment Transfer batch process to post the payment transfer in Govern A/R.

Removing a Displayed Account

If you are using either the Different Account for Same Name / Tax Map Number or the Selected Accounts option, you can remove any of the listed accounts that you are not using, from the Payment Transfer form.

To delete a selected account:

  1. Open the Payment Transfer form.
  2. Load the required record to the form.
  3. Select the account.
  4. Click the Remove Account icon

Modifying the Amount Transferred to a Selected Amount

If you are transferring the original payment to one or more selected accounts, you can modify the amount transferred to each account.
To modify the amount in the Transfer column for an account:

  1. Select the account that you want to modify.
  2. Overwrite the amount in the Transfer column.

Payment Transfer Troubleshooting

This section describes two scenarios where a payment transfer would not be completed.

Remaining Balance is Less Than Zero

A Payment Transfer would not be completed if the remaining balance is less than or greater than the amount transferred. The transfer is completed only if the remaining balance is equal to zero, calculated as (Transfer Amount) – (Transfers for all accounts) = 0.
The transfer column displays the amount to be transferred to the selected account. This amount is subtracted from the Transfer Amount. The result is displayed in the Remaining Balance text box.
If the amount transferred to the selected accounts is greater than the original payment, the Remaining Balance is less than zero and a message is displayed.
Note: The Remaining Balance must be zero in order for the transaction to be completed.

Amount Transferred Is Less Than Amount Owed

Similarly, if the amount transferred to all the selected accounts is less than the amount of the original payment, an error message is displayed.
This could occur if you manually enter an amount in the Transfer text box that is less than the Transfer Amount.

NOTE: The Remaining Balance, must be zero in order for the transaction to be completed.


Related Topics

Accounts Receivable (A/R) Inquiry

Accounts Receivable (AR) – What’s New


101-ar-frm-027


0 votes, average: 0.00 out of 50 votes, average: 0.00 out of 50 votes, average: 0.00 out of 50 votes, average: 0.00 out of 50 votes, average: 0.00 out of 5 (0 votes, average: 0.00 out of 5)
You need to be a registered member to rate this.
Loading...


Standard A/R Controller Configuration (101-ar-fea-022-ofr)

Standard Accounts Receivable (A/R) Controller – Create A/R (Configuration)

Overview

This standard OpenForms Controller can be added to a form to provide an Action Button to create Accounts Receivable for new accounts.
This controller is available in GA Release 1606

  • For more information on the functionality, see Product Information (101-ar-fea-022).

Configuration

Prerequisites

The following conditions are required in order to enable the Controller in OpenForms Designer Setup

Action Button Controller Properties

Read More...

Profile Security

  • The organization is licensed for the Accounts Receivable Sub-System to setup
  • The configuration for the Accounts Receivable has been completed
  • The Form’s ID Setters Properties must contain the …
  • The Govern ID must be …
  • The user must have security access (GSM) to the profile’s form.

Controller Setup

Adding a Custom Control to a Form

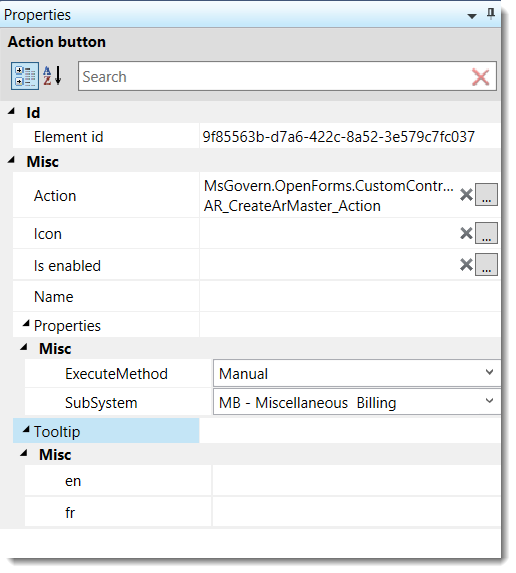
  • In OFD, drag the Action Button Control Icon to the Account Entity Tab on the form.

Custom Control Form Configuration

Once the Custom Control is displayed on the form, click on the object to configure the:

  • Assembly Name = Msgovern.OpenForms.CustomControls.dll (by default)
  • Class Name = AR_CreateARMaster_Action

User Interface (UI)

  • Icon
  • Is enable: An expression can be added to control the enabling (Can be executed) of the button.

Controller Properties

The following controller properties need to be set:

Execute Method

There is 2 options for the Action Button Controller

  • Manual: The user will need to click on the button
  • After Save: As soon as the record is saved, the A/R will be created automatically

Sub-System

  • Select the sub-system for which the A/R Summary Record needs to be created.

Related Topics

For more information, see:

Troubleshooting

  • The Organization must be a licensed user of the A/R Sub-System selected.


101-ar-fea-022-ofr


0 votes, average: 0.00 out of 50 votes, average: 0.00 out of 50 votes, average: 0.00 out of 50 votes, average: 0.00 out of 50 votes, average: 0.00 out of 5 (0 votes, average: 0.00 out of 5)
You need to be a registered member to rate this.
Loading...