TX – BP Load LockBox Entries (101-tx-bp-005)

Load LockBox Entries Batch Process

Release 6.1.1912 | 6.0.1904 | 6.0.1903

Overview

This batch process will load a payment lockbox file from a third party to Govern.

Documentation

When available a link to documentation is located here.

Configuration

This Batch Process uses the standard BP configuration.


TECH NOTE: Process code: GWF_LOCKBOX


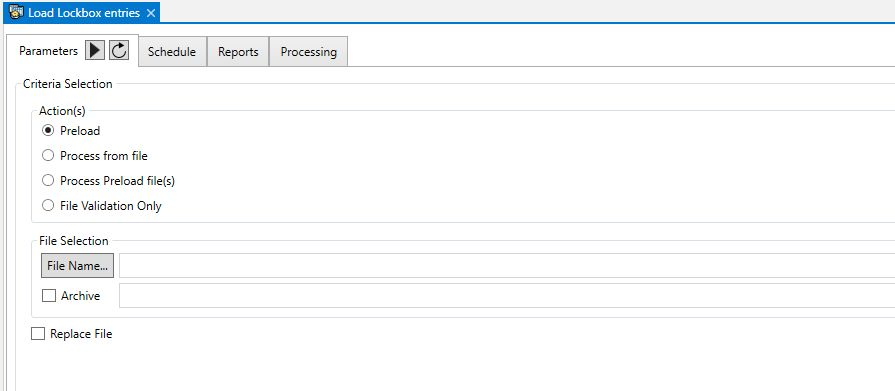
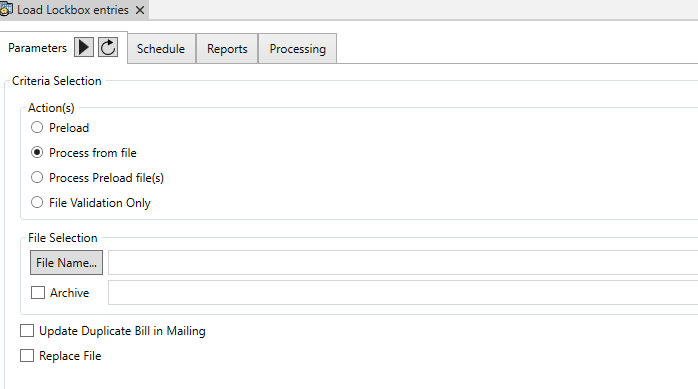
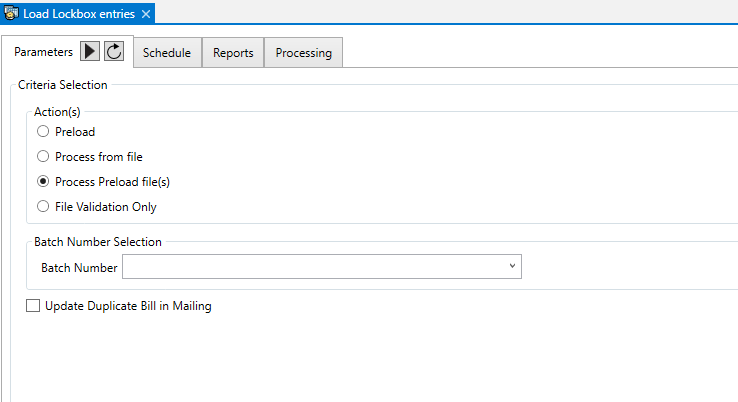
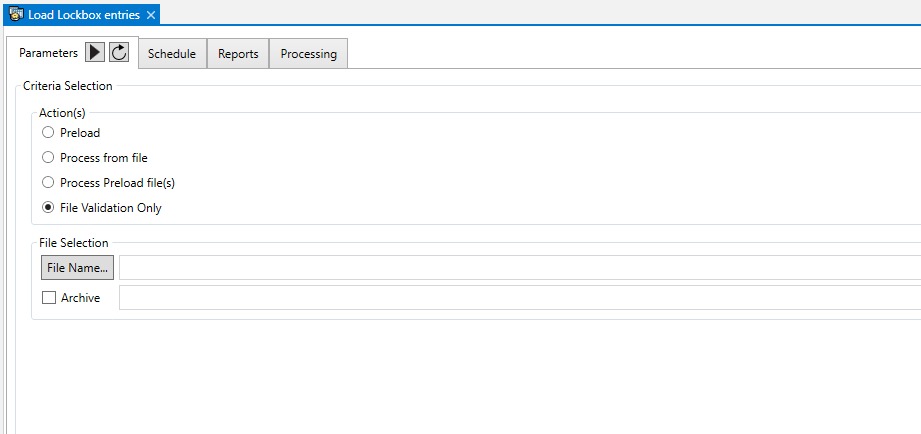
Load LockBox Entries batch process Parameters

Preload: Create a record in table AR_LOCKBOX_HEADER and load all records from selected file to table AR_LOCKBOX_DETAIL

  • Replace File: if the file already loaded, a message will show ” and won’t let you load the file. If you want to delete the previous file and reload it, you need to check this option.

Process From File: Preload the file to table and load the payments

  • Update Duplicate Bill in Mailing: after loading the payment, the field DUPLICATE_BILL will be updated to -1

Process Preload file(s): Load the payments from (Table: AR_LOCKBOX_DETAIL) from the selected batch number.


NOTE: The batch number is required.


File Validation Only: Select this option to go through all records from the file, simulate the load of payment and list all error(s).


Scheduler Configuration

To process a payment, the Accounts Receivable (AR) needs a department; when run in Govern the process will use the Profile department.

If the batch process is run through the Scheduler, there is no Department set. At the location indicated below, select a department configuration that the Lockbox will use when it is run in the Scheduler:


Applicable Business Rules


101-tx-bp-005


0 votes, average: 0.00 out of 50 votes, average: 0.00 out of 50 votes, average: 0.00 out of 50 votes, average: 0.00 out of 50 votes, average: 0.00 out of 5 (0 votes, average: 0.00 out of 5)
You need to be a registered member to rate this.
Loading...

MA – BP Taxroll Snapshot (101-ma-bp-012)

Mass Appraisal Taxroll Snapshot Batch Process

Release 6.1

Overview

The Mass Appraisal Taxroll Snapshot batch process is designed to make a snapshot (freeze/audit) of the CAMA & Tax data.

Documentation

To view this information in pdf format, click on the following link:

101-ma-bp-012_MATaxrollSnapshot.pdf

User Interface (UI)

The UI for the Taxroll Snapshot batch process is  similar to standard Govern batch processes.

Taxroll Snapshot batch process Parameters

Year: The Year that the snapshot will be made from.

Snapshot: The snapshot number that will be used as the FROZEN_ID. Values are taken from (Table: SNAPSHOT) System Validation table.

  • Selected from a snapshot value between -32500 and -32759

Parcels to snapshot (group)

All: When this option is selected, data is selected from all Parcels in (Table: PC_PARCEL).

Tax Map Number – Selecting this option will:

  • Only select data for Parcels included in the Tax Map Range
  • If selected, you must provide at least a From or a To tax map number
    • A partial Tax Map number can be used; the search will perform a LIKE ‘taxMapNumber%’

Saved Dataset – This option will select data only for Parcels included in the selected Dataset name

Delete destination data before snapshot – Select this option to delete the destination data for the selected Parcels before making the Snapshot.

Records by batch: Specify the number of parcels to include in each batch; system default is 50.

Business Rules for Obtaining Records

Getting Records

This process will select all distinct parcels from (Table: PC_PARCEL)

Running the Taxroll Snapshot Batch Process

This batch process can be run Synchronously or Asynchronously. Note that Asynchronous transactions are recommended for improved performance. The Transaction Mode is forced to CONTINUOUS.

Related Information

Refer to the Govern OpenForms Designer (OFD) documentation for details.
Refer to the Mass Appraisal General Information documentation for further details on frozen records.


101-ma-bp-012


0 votes, average: 0.00 out of 50 votes, average: 0.00 out of 50 votes, average: 0.00 out of 50 votes, average: 0.00 out of 50 votes, average: 0.00 out of 5 (0 votes, average: 0.00 out of 5)
You need to be a registered member to rate this.
Loading...

MB – Configuration

Miscellaneous Billing (MB) – Configuration

Overview

This page describes the administrative configuration for the Miscellaneous Billing module. It includes a checklist and detailed steps for further information.


Miscellaneous Billing Configuration Checklist

The following table lists all the applications, forms, and steps required for configuring the Miscellaneous Billing module in Govern OpenForms.


Read More...


Application

Form

Steps

Deploy EZ N/A Run Deploy EZ. Open the Reports folder in the root folder of your deployment. Ensure that all reports required for Miscellaneous Billing are added to the deployment. Miscellaneous Billing reports include the Miscellaneous Billing Invoice (101-rpt-003.rpt).
For details, see Miscellaneous Billing Report.
Govern Business Entity Designer (BED) Business Models The Miscellaneous Billing Model contains the following entities:

  • MB_Master: This is the Root entity.
  • MB_InvoicePosted
  • MB_InvoiceUnposted
  • MB_RecurringInvoice

Perform the following configuration if required:

  • On the Model: Allow use in the Govern Query Tool.
  • On the Entities: Set rules for auditing and central notes

For more information, see the Business Entity Designer.

GNA General Settings Editor Open the GNA > Parameters > General Settings Editor > Report and ensure that the report parameters are defined. These include the folders for the reports and the log file.
For details, see Miscellaneous Billing Report.
GNA Report Parameters Editor Open the GNA > Parameters > Report Parameters Editor. Ensure that all report parameters are added for the Miscellaneous Billing Reports.
GNA Batch Process Editor Open the GNA >Editors > Batch Process Editor form and ensure that all batch processes for Miscllaneous Billing are defined and configured. These include:
Miscellaneous Billing Recompute Sales Tax.
GNA Department Maintenance Open the GNA > Department Maintenance form for all departments that are using Miscllaneous Billing.
Ensure that Miscellaneous Billing is selected under A/R Subsystems Allowed
GNA Profile Editor Open the GNA > Profile Editor form for all profiles associated with the department.
Ensure that Miscellaneous Billing is selected or deselected under A/R Subsystems Allowed for all Profiles as required.
Ensure that the Miscellaneous Billing form is added to all required Profiles.
Ensure that all Miscellaneous Billing Batch Processes are added to all required Profiles.
Ensure that all Miscellaneous Billing tree view, V_TREEVIEW_MB, is added to all Profiles, as required. This is optional.
Ensure that the Miscellaneous Billing Search is added under Default eGroup for all Profiles, as required. This is optional.
GNA General Settings Editor Open the GNA > Parameters > General Settings Editor and specify the number of characters in the default Account Number.
GNA Accounts Receivable General Parameters Set up Accounts Receivable (A/R) General Parameters for Miscellaneous Billing.
Set up the A/R General Parameters for Misc. Billing
GNA A/R Class Codes Set up Accounts Receivable (A/R) Class Codes for Miscellaneous Billing. See
A/R Class Codes
GNA User Validation Table Editor Verify the validation codes for the Miscellaneous Billing user validation tables.
GNA Miscellaneous Billing General Parameters Set up the Miscellaneous Billing General Parameters.
Miscellaneous Billing General Parameters
GNA Miscellaneous Billing Items Set up the Miscellaneous Billing Items. See
Miscellaneous Billing Items
GNA Miscellaneous Billing Categories Set up the Miscellaneous Billing Categories.
Miscellaneous Billing Categories
GNA Miscellaneous Billing Recurring Batch Codes Set up the Miscellaneous Billing Recurring Batch Codes
Create schedules for Miscellaneous Billing Invoices that are billed on a regular basis.
See Miscellaneous Billing Recurring Batch Codes
Govern Security Manager (GSM) N/A Set up the security for the Miscellaneous Billing administrative and user forms under your deployment.
Govern OpenForms Designer (OFD) . Miscellaneous Billing (MB001) Open the Miscellaneous Billing (MB001) form and configure the Miscellaneous Billing action button for printing the Miscellaneous Billing Invoice from the Miscellaneous Billing > Invoices Posted form.
Customize the form by naming and positioning the fields as required by your organization.
Customize the Browse screen, the Record Description, if required.
Make any required modifications to the form, such as repositioning the fields and renaming the labels.
Note: If you are making modifications, it is recommended to create a copy of the form, so that your changes are not overwritten.
For more information, see the OpenForms Designer.
OFD Open the Miscellaneous Billing form in Security Mode. Assign security permissions for all items on the Miscellaneous Billing form.
Assign security permissions for the Name and Address controllers in order to create and search for a name and / or create, search for, or delete an address.
Govern Miscellaneous Billing Account Create Miscellaneous Billing Accounts for required names in your municipality or organization.
For more information, see Miscellaneous Billing Account.
Govern Miscellaneous Billing Recurring Invoices Create Miscellaneous Billing Recurring Invoices for required accounts in your municipality or organization.
For more information, see Miscellaneous Billing Recurring Invoices.
GNA Copy to Year Open the GNA > Miscellaneous Billing > Copy to Year form. Ensure that the Miscellaneous Billing parameters, including the general parameters, categories, and items are copied from a previous year to the required year (as required by Miscellaneous Billing.
See Copy to Year.
Initialize Next Year Open the GNA > Miscellaneous Billing > Initialize Next Year form. Ensure that the Miscellaneous Billing recurring invoices are copied from a previous year to the required year (as required by Miscellaneous Billing.
See Initialize Next Year.
Govern Scheduler Verify the scheduled batch processes for Miscellaneous Billing
Govern Query Tool N/A Ensure that you can run queries on the entities

Detailed Steps

Setting Up a Department for Miscellaneous Billing

Adding the Miscellaneous Billing A/R Subsystem to the Department

It is necessary to add Miscellaneous Billing under A/R Subsystems Allowed for all departments that are using Miscellaneous Billing.
To select this option:

  1. Launch GNA.
  2. Select Parameters > Department Maintenance.
  3. Select the Department you want to update from the tree view on the left.
  4. Select the General tab.
  5. Select Miscellaneous Billing under A/R Subsystems Allowed.
  6. Click Save.
  7. Repeat steps 3 to 6 for all departments that use Miscellaneous Billing.


101-mb-config


0 votes, average: 0.00 out of 50 votes, average: 0.00 out of 50 votes, average: 0.00 out of 50 votes, average: 0.00 out of 50 votes, average: 0.00 out of 5 (0 votes, average: 0.00 out of 5)
You need to be a registered member to rate this.
Loading...

MB – Posting of Invoices

Miscellaneous Billing (MB) – Posting of Invoices

Features and Specifications Overview

This process posts the invoices meeting the selection criteria to Accounts Receivables (AR) and creates the supporting General Ledger entries to support the new A/R transactions.

Invoices can be posted via:

  • An Action Button on the Miscellaneous Billing Form – Invoice Tab
  • A Batch Program configured for the Profile and accessed through the Batch Program Explorer Tool box
  • The Govern Scheduler (batch process definitions) to run periodically with preset user criteria

For more details see:


Read More...


Records to Process Criteria

Only the records meeting the following business rules will be considered in the batch process selection of invoice records to be posted.

Batch Program

  • Year
    • To verify
  • Department
    • To verify
  • Invoice is Ready to Post
    • Select this option when you are ready to post the record to the Accounts / Receivable sub-system. The record will be posted the next time a Miscellaneous Billing Posting is performed, in Govern Batch Processing.
    • This ensures that the invoice data is correct before it is posted. (MB_INVOICE.READY_TO_POST = -1)
  • Invoices are not already posted
    • (POSTED_FLAG = 0)

Action Button

  • None
    • When the user clicks on the current unposted invoice, it will be posted after confirmation by the user regardless if the Ready to Post field is checked


User Parameters

The following parameters can be set by the user on the execution of the batch program or as predefined parameters setup the the batch definition schedule to refine the records to be processed.

Selection Criteria

Year

  • Enter the A/R year. If the AR General Parameters have “A/R Master by Fiscal Year” checked for the MB Subsystem, then this year will determined which AR_ID is posted to for each invoice.
    • If the “A/R Master by Fiscal Year” is not checked, then this year is populated in the AR_DETAIL.YEAR_ID
    • The Year is used to determine the record in AR_PARM_CLASS to use and the associated GL’s

Invoice Number

  • Select the single invoice number to be posted.

Date Range

  • Enter the effective INVOICE DATE range of the invoices to be posted
    • From Date: Invoices on this date will be posted
    • To Date: Invoices on this date will be posted

Account Number Range

  • Enter the account range to be posted
    • From Account: Starts at this account
    • To Account: Up to this account. To account will be included in the selection.

Category

  • Invoice Category

Issuing Department

  • Department


Override Fields

The following parameters can be entered to override:
Effective Date (Invoice)

  • Overrides the Invoices effective date

Due Date (Invoice)

  • Overrides the Invoices due date


On Completion (Post Conditions)

Invoice Records

Batch / Reference No.

  • Enter the Miscellaneous Billing Batch or Reference Number from the Miscellaneous Billing Invoice form in Govern. This is the Reference field from the Invoice form.

A/R Class Code

  • Select the A/R class code from the drop-down list to process only the bills from a single class code. Otherwise, leave this field blank to process all the bills.
  • This will not be needed for Open Forms because the AR Class code on the Invoice will be removed.

From / To date

  • Enter the range of dates to process or leave these fields blank to process all bills.

From / To MB Account Number

  • Enter the range of account numbers to process or leave these fields blank to process all account numbers.

A/R Class Code

  • Select an A/R Class Code from the drop-down list, to process only the records for a specific class code, or leave this field blank to process all Miscellaneous Billing Recurring transactions.
  • This will not be needed for Open Forms because the AR Class code on the Recurring form will be removed.

Batch Name

  • Enter the batch name or number for the records you are processing or leave this field blank to process all transactions. This is for the Recurring Batch Process Only

Issuing Department

  • Enter the issuing department to process. This is optional.

By Saved Dataset

Override Due date

  • By default, the current date display, but unless the Override check box is selected, the Due date on each invoice will be posted to AR.
  • If the Override check box is selected, All invoices posted with that process will receive the due date in the Date field.

Batch Variables

Invoice Date

  • In this mandatory field, enter the date to appear on the invoice. This is for the Recurring Batch Process Only


Batch Execution

The batch program can be executed on demand or scheduled with Govern Scheduler.

During the execution, warning and error messages will be presented in the batch result grid. – to verify

  • On error, the parcel id will be displayed in the message
  • Double-click on the message to access the full text

Once completed, information will be displayed, that includes:

  • Parameters and Options used
  • Total number of records read
  • Total number of records processed


Batch Processing (technical)

Before Executing Subprocesses:

  • Select all MB_INV_ID

Execute Subprocess

  • For each batch process
  • This process will post to AR the MB Invoices based on selection criteria and then update the MB_INVOICE records with POSTED_FLAG = -1 and POSTED_DATE with current date

Error Reporting
In addition to the standard Batch Processing standard error reporting, the following will be validated:

What’s New

[6.0] Batch program created for OpenForms

Troubleshooting

The following is to help troubleshoot the batch process.

  • Turning on the Govern Diagnostic Tool
  • Turning on the SQL Profiler Tool (system administrator)


See Also

The following information might be of interest


101-mb-bp-001


0 votes, average: 0.00 out of 50 votes, average: 0.00 out of 50 votes, average: 0.00 out of 50 votes, average: 0.00 out of 50 votes, average: 0.00 out of 5 (0 votes, average: 0.00 out of 5)
You need to be a registered member to rate this.
Loading...

GNA – Batch Process Definition Editor

Batch Process Definition Editor

Version 6.x | Version 5 and less

Overview

The GNA Batch Process Definitions editor is used to define how you want your batch processes to appear and run in Govern. This includes setting up your batch processes, configuring each process, associating one or multiple reports, and synchronizing the batch process definitions and adding permissions. When complete, the batch processes are displayed in Govern.
This procedure has two major steps:

  • Configuring Batch Process Definitions
  • Adding Batch Processes Definition to Govern.
  • Configuring Sequential Batch Processes (101-std-fea-046)
  • Configuring Sequential Batch Processes (101-std-fea-046)


Read More...

Configuration

Configuring Batch Process Definitions

Configuring Batch Process Definitions describes the following topics; locate the appropriate sections on this page:

  • User Interface
  • Defining a Batch Process
  • Defining the Transaction Type
  • Defining the Transaction Mode
  • Adding a Report
  • Deleting a Batch Process Definition

Batch Process Definition – User Interface

This section provides a tour of the Batch Process Definitions UI. The interface is comprised of a treeview (left hand side), the definition form (main central area), and a secondary window for creating the menus and submenus or categories.
To access the Batch Process Definitions form:

  1. Launch Govern New Administration (GNA).
  2. Select Batch Process > Definitions.

Once you create menus and define batch processes, the selected items are listed in a treeview on the left of the form. You can display or hide the treeview according to your preference.

About Batch Process Definitions

You can view, add, or modify a batch process definition, as described later in this section.
To display or hide the English and French long and short descriptions, click on the arrow beside the text box at the top of the form.

About the Menu Manager

The Menu Manager form is used for creating the menus and submenus for organizing your batch process definitions in Govern.NET.
To access the Menu Manager

  1. Launch Govern New Administration (GNA).
  2. Select Batch Process > Definitions.
  3. Click the ellipsis button beside the Category text box.

If categories are already created, they are listed on the left. You can expand a category to view secondary levels if they exist. The name of selected menu is displayed on the right. You can expand the name to view the English and French short and long descriptions.

Defining a Batch Process

Use the following process to name the definition and to associate it with a Govern Batch process.

NOTE: You need to define the processes under the category to which they are assigned and will appear in Govern.

To define a Batch Process:

  1. Select the category where you are defining the process as described under Selecting a Category for the Batch Process. The batch processes already defined for the category are displayed in the treeview on the left.
  2. Click the New button.
  3. Enter a code for the new batch process definition. This is a required field.
  4. Select a Govern batch process from the Process drop-down list. This is a required field.
  5. Enter a name for the record in the text box at the top right. This is automatically added to the English Long Description field.
  6. Click the button to the left of the text box where you entered the name. This expands a menu with additional descriptions.
  7. Add an English Short Description and French Short and Long Description as required. These fields are optional.
  8. Click the Save button to add the category to the menu.
    If you click the New button without saving your modifications, a confirmation message appears:

Defining the Transaction Type
The Govern batch processes can be run synchronously or asynchronously. If they are run synchronously, they are run on the same server. If run asynchronously they are run on multiple servers at the same time.
Select Synch or Asynch as required. For processes with multiple transactions, it is recommended to use asynchronous processing as this spreads the load over multiple servers and makes for faster processing time.
Pool #: For Asynchronous processes only, enter the maximum number of transactions to be handled by the client servers at any one time.
This works as follows: If you are running asynchronous batch processing, there is one master server that manages all the transactions and is responsible for sending them to the client servers. The value In the Pool # field indicates the maximum number of transactions to send out by the master server at any one time.
Scenario: Running a Batch Process Asynchronously
The following scenario illustrates how asynchronous batch processing works.
The parameters are as follows:

  • Master server: one
  • Client servers: five
  • Transactions: 50,000
  • Pool #: 50

The master server sends out the first 50 transactions to the client servers. Each server is responsible for ten transactions. As soon as a server completes one transaction, the master server sends it another. This continues until all transactions have been processed. However, there are never more than 50 transactions being handled by the client servers at any given time.

Defining the Transaction Mode

Select one of the following transaction modes for the process.

  • Break If One Transaction Failed: the process terminates when the transaction fails.
  • Roll Back If One Transaction Failed: the process terminates when a transaction fails and all the transactions that were completed are cancelled. Computations are returned to the starting point.
  • Continue If One Transaction Failed: Continue to run the process even if a transaction fails.

Adding a Report

Use the following procedure to associate one or more reports with the selected batch process.
To add a report: to the batch process:

  1. Launch the Batch Process Definitions form.
  2. Select the category for the process as described under Selecting a Category for the Batch Process.
  3. Select the batch process from the treeview on the left.
  4. Click Add Reports.
  5. Select one or more reports from the Choose the Reports menu.
    TIP: You can select multiple reports using the left mouse button.
  6. Click Select Reports.

The selected reports are displayed in the List of Reports text box. The parameters for the report are displayed in the Report Parameters list box.
The List of Parameters text box displays the parameters that can be included in the report and that can be used to build an external report; for example, these could include Date To and Date From fields. The purpose is to give you the exact reference and wording of these fields.

Deleting a Batch Process Definition

To delete a batch process:

  1. Launch the Batch Process Definitions form.
  2. Select the category for the process as described under Selecting a Category for the Batch Process.
  3. Select the batch process from the treeview on the left.
  4. Click the Delete button.

Adding Batch Processes Definition to Govern

When you have defined your batch processes, you need to add them to Govern.NET. In order to do this, you need to launch the Govern Security Manager and synchronize your new processes between GNA and Govern. Then, you need to assign access permissions.

Synchronizing Batch Process Definitions

When you have synchronized your new batch process definitions, they appear on the Govern.NET menu.
To synchronize the new batch processes:

  1. Launch the MSGovern Security Manager (GSM).
  2. Select your database connection key.
  3. Right-click on Applications and select Synchronize menu from the dropdown list. A confirmation message appears.
  4. Click Yes on the confirmation message.

Permissions and Batch Processes

Use the following procedure to assign access permissions to the new batch process definitions. You can grant permissions by profiles and grant permissions to the Batch Process Editor application in Govern Administrator.

  1. Launch the MSGovern Security Manager (GSM).
  2. Select your database.
  3. Expand Applications > MSGovern.NET > Batch Process > Batch Process.
  4. Continue to expand the menus until you are the level where you want to grant permission.
  5. Right-click on the item that you want to secure.
  6. Define the permissions and exclusions as required and as described in the Govern Security Manager.

What’s New


Related Topics

Govern New Administration (GNA)
Batch Processing in OpenForms


103-ed-013


0 votes, average: 0.00 out of 50 votes, average: 0.00 out of 50 votes, average: 0.00 out of 50 votes, average: 0.00 out of 50 votes, average: 0.00 out of 5 (0 votes, average: 0.00 out of 5)
You need to be a registered member to rate this.
Loading...


Dataset Treeview Temporary Records

Dataset Treeview Feature – Temporary Records

Overview

The Dataset Treeview Panel contains a list of record keys that, when selected, will send the information to OpenForms which, in turn, will load records accordingly.

Temporary Records

Normally, a user simply searches for record keys and navigates through them to work but some features can load their keys internally without being linked to the Record Keys from the Tree View, for example AR Inquiry and Cash Collection forms. The side effect is that any information normally available outside the form are not refreshed because they are triggered only by a selection in the Tree View, this is the case with Tiles. In order to resolve this issue, these keys are sent to the Tree View but are flagged as “Temporary”. Only one of these keys can appear in the Tree View. The keys are replaced when a new one is introduced; this approach is used so as not to clutter the Tree View with keys that are not part of the user’s workload. In addition these keys can also quickly increase disproportionately. These keys are also not retained when the application is closed.

Business Rules

In order to trigger as many features as possible, the key will be filled with as many ID’s obtained from the database, based on available and missing ID’s from the Temporary Key.

  • First we check to see if we can find IDs from AR_MASTER based on an ordered list of specific ID Types that we get from the Temporary Key. These keys are the same that are needed to add to the Temporary Key afterwards from AR_MASTER.

    From AR_MASTER
    • The ordered ID types are: AR_ID, PP_ID, ST_ACCT_ID, UB_ID, MB_ID,  BR_ID, DC_ID, BT_ID, MV_ID, AC_ID, P_ID, NA_ID 
      • This means that as soon as one key returns records, we stop and take the most recent one.
  • If no AR_MASTER records are found directly, we try to find an AR_MASTER record linked to AR_DETAIL based on specific ordered field types from AR_DETAIL, noting that the IDs taken from AR_MASTER will still be the same as before.

    From AR_DETAIL Expand source
    • the ordered AR_DETAIL Field Types are: ST_ID, INVOICE_NO, PRJ_ID, PM_ID
      • This means that as soon as one key returns records, we stop and take the most recent one.
      • In version 6.1, the content of PM_ID will be a Workflow ID
  • If no NA_ID is found after that for the Real Estate Sub-System, we’ll try to get it from the primary NA_MAILING_INDEX if a P_ID was previously found.

    From NA_MAILING_INDEX

The Temporary Key will be inserted at the top of the Tree View with an Orange background. For example:

  • It is possible that the Temporary Key contains an ID that matches the Profile’s Key Type at this point, but its current Main ID Type is not the same. In that case, we will make this ID Type the main one so as to see the correct description in the Tree View.

Duplicate of an Existing Key

It is possible that after the work is done, the Temporary Key’s main ID exists in the Tree View. If that’s the case, it won’t be added to the Tree View like a Temporary Key, although the ID’s of both will be merged together, it will only be selected.

Context Menu

In the Dataset Treeview, a right click on an item will display and a menu with 3 options:

  1. Remove the current selected item
  2. Remove All items from the Dataset Treeview
  3. Remove All the items except the item where we did a right click on it

If we decide to right click on the panel, only 1 option will show up, allowing the removal of all items from the Dataset Treeview:

Remove

  • The item which we made a right click on will be removed from the Dataset Treeview.
  • If “Dirty”, a confirmation will show up asking you to save the data first.
    • Yes: Save the data and remove the item
      • If there is a validation error on saving, the item will not be removed and the item will remain “dirty”
    • No: Cancels the change and remove the item
    • Cancel: Not remove the item and the item is still “dirty”

Remove All

  • All the items will be removed from the Dataset Treeview.
  • If “Dirty”, a confirmation is displayed asking you to save the data first.
    • Yes: Save the data and remove all the items
      • If validation error on saving, the items will not be removed and the changed item remains “dirty”
    • No: Cancel the change and remove all the items
    • Cancel: Will not remove the items; the item is still “dirty”

DEV NOTE: Currently there is a bug in the techno and the message is displayed twice (2 times).

Remove All But This

  • All items will be removed except the item which we did a right click on in the Dataset Treeview.
  • If “Dirty”, a confirmation will show up asking you to save the data first.
    • Yes: Save the data and remove all the items except the item which we did a right click on it
      • If validation error on saving, the items will not be remove and the changed item is still dirty
    • No: Cancel the change and remove all the items except the item which we did a right click on it
    • Cancel: Will not remove the items and the item remains “dirty”

DEV NOTE: Currently there is a bug in the techno and the message is displayed twice (2 times).


Related Topics

Dataset Treeview

Forms Explorer
Reports Explorer


101-std-fea-049


0 votes, average: 0.00 out of 50 votes, average: 0.00 out of 50 votes, average: 0.00 out of 50 votes, average: 0.00 out of 50 votes, average: 0.00 out of 5 (0 votes, average: 0.00 out of 5)
You need to be a registered member to rate this.
Loading...


GNA – First Running of Database Verification

Verify Database Process

Running the Verify Database Process for the first time

Overview

As of version 6.0.1408, database tables, fields and views can be created using the Govern New Administration (GNA) Verify Database process. This will facilitate implementation while centralizing the information of tables and fields into one location (MSGDatabaseStructureMods.xml) with TFS source safe control.
In addition, all indexes created and used by the Govern applications will be identified as such and will start with the letters GV or PK when the index is a primary key. This will enable the application to manipulate these indexes when needed. Indexes created by the customer will not be modified or manipulated in any way.

Preliminary Steps

Prior to beginning the database creation process, decide on a name that reflects the current version of the Govern, i.e. DB_NAME60. The 60 is an indication of the Govern release version. This will prove helpful in a multiple database environment.

Main Steps

1. Create an Empty Database

Using an application like SQL Server Management Studio, create an empty database. During the database creation process, make sure that a default username and password has been created. In addition this default username and password should have db_owner access permissions.
Security > Users > “userName” (double-click)
Click Memberships to display DB role memberships
These credentials will be used during the creation of the connection key in DeployEZ.

2. Generate a Deployment with DeployEZ

NOTE: Always ensure that you are using the latest version of the DeployEZ application. Current versions can be located at http://deployez.msgovern.com/

Using the DeployEZ application, create a connection key (CK) to the database that was created in Step 1. Select the applications that you are licensed to use in your deployment. During the generation of the connection key, access to the database will be tested.

NOTE: Ensure that the Govern New Administration (GNA) and the Govern Security Manager (GSM) are two of the applications that are included in the deployment.

Before Running GNA Verify Database Script…

Prior to the running of the Verify Database process, Release 6.0.1408, depending on your requirements, custom scripts incorporating the changes to datatypes of columns key tables may be required to be run.

NOTE: The following is an example of the type of script that may be run on the database. As these scripts are often customized to meet specific user requirements it will be necessary to contact Govern Technical

– START –
ALTERTABLE MA_MRA
ALTERCOLUMN FINAL_ADJ_PERCENT REAL
ALTERTABLE MA_MISC_STRUCTURES
ALTERCOLUMN FINAL_ADJ_PERCENT REAL
ALTERTABLE MA_LD_INFO
ALTERCOLUMN FINAL_ADJ_PERCENT REAL
ALTERTABLE MA_BLDG_INFO
ALTERCOLUMN FINAL_ADJ_PERCENT REAL
– STOP –

3. Run GNA

Once creation of the deployment is complete, locate the deployment folder and install the Govern Net Administration (GNA) release 6.0.
Typical Location:
\\%System_Root%\DEPLOYMENTS\Deployments\DBName_60_ServerName_SQL\GNAA

Running the GNA for the first time…

When the GNA is run for the first time a “Reset to Default” process is initiated. This process consist of the following steps:

    • Any required tables are created and empty rows are initialized with NULL’s.
    • A comparison between the version of the launched application and the database is performed; this is done by looking at the value in the NET_DB_VERSION column of USR_KEY_MASTER, i.e. (Table: USR_KEY_MASTER.NET_DB_VERSION).

Prior to fully launching the application, a message box is displayed warning of an inconsistency between the application and the database. A click on Yes on the dialog box will launch a Database Verification Process. and the creation of a “Govern Super User” role and a security synchronization.

Tables & Fields

During the initial Verify Database process the following verification steps will occur:

  • “Govern Users” role exists, if not it is created
  • “govern” User exists, if not create it with the password govern
  • “govern” is in the “Govern Users” role
  • “Govern Users” role has full access to GSM AND GNA

Example – Verify Database Process (ref. 6.1)

During this process the Verify Database process will create all tables and fields listed in MSGDatabaseStuctureMods.xml, and not present in the database used by the Connection Key (CK).

  • Table info:
    • table name=”AC_AUDIT_INFO”
    • description=”Aircraft Audit Table”
    • action=”add” gnaaversion=”5.1.1304.0″ dbversion=”10.8″
    • neededbyesearch=”False”
  • Field(s) info:
    • column name=”AC_AUDIT_ID”
    • type=”int”
    • length=”0″
    • nonull=”false” <!– if true, do not accept NULL values… –>
    • identity=”true”
    • action=”add” gnaaversion=”5.1.1304.0″ dbversion=”10.8″
    • description=”Primary Key – TX_AUDIT in USR_KEY_MASTER”
    • description=”Default …

Deleting a Non-Govern Index (unique index)

  • The system will not allow the deletion of any Non-Govern indexes. Deletion can only be effected manually or through the Delete Indexes option in the Database Verification process in the Govern New Administration (GNA).

Manually Altered Data Types are not Changed

  • In the database, columns with data types that were changed manually will not be changed during a Verify Database process; these fields must be altered manually. A warning will be thrown

4. Run the GSM

When the GNA process has been completed, run the GSM in order to give rights to users and create any other required users.
Note that the initial default setting of the GSM are as follows:
Full access is set to ALL applications, i.e. GIS, QT, etc.


What’s New!

NOTE: Changes are presented in reverse chronological order; i.e. newer to older.

Addition of VB6 Fail safe Notification for Verify Database Process

[Release 6.1.1803] Users that are prompted with a notification when they are upgrading from Govern for Windows to OpenForms are prompted with a dual confirmation message. See Addition of VB6 Failsafe Notification for details.

[Release 6.1.1706.0418 and 6.1.1707.0537]
RE / PP Tax Conversion Script to add Cycle Codes to RE and PP – See RE/PP Tax Conversion Scripts in the What’s New! section.

[Release 6.0.1412]
The following will occur when a new database is created:

  • Make sure “Govern Users” role exists, if not create it
  • Make sure “govern” User exists, if not create it with the password govern
  • Make sure “govern” is in the “Govern Users” role
  • Make sure “Govern Users” role has full access to GSM AND GNA


TROUBLESHOOTING

The following section contains information regarding issues that may occur during this process.

Error Screen starting GNA

ISSUE: Error screen displayed when launching GNA. When an error screen is displayed after an attempt to run the GNA, thoroughly review the error messages. Note the lines in the Database Alteration Errors screen. There is a permission denied error, an indication that the user access credentials do not provide Read/Write access to the database.

RESOLUTION: verify that the log-in has db_owner access permissions.
TIP: Users that are re-initializing a previously converted dataset will need to ensure that the NET_DB_VERSION value is set to NULL or else any further operations with the database will fail.


Related Topics

Database Verification

User Key Dynamics

System Data Dictionary


[/expand]

What’s New!

NOTE: Changes are presented in reverse chronological order; i.e. newer to older.

Implementation of Clustered Indexes (Release 6.1.1811)

NEW! As of Release 6.1.1811, clustered indexes have been implemented on some system tables. These indexes will be recreated during the next Database Verification Process. Due to the nature of the procedure, a significant amount of time will be required to perform the process. The recommendation is that this procedure should be performed over a week-end, or a period of low activity. Although all applications are able to perform without the use of clustered indexes, the implementation of this new methodology can improve overall system performance.


Addition of VB6 Fail safe Notification for Verify Database Process

Users that are prompted with a notification when they are upgrading from Govern for Windows to OpenForms need to be made aware that upon running the Verify Database Process, their database will be irreversibly changed. This means that they will not be able to perform a rollback that will allow them to once again run Govern for Windows on their database. As a result of the impact of this action, they must be prompted with a dual confirmation message. The message will remind them of the importance of performing a full backup of their database prior to running the process. They must also confirm that they are about to proceed with an irreversible process. Suitable notification to this effect have been added. Now when the user clicks START [>], and the system performs a compatibility check, they will first be prompted with the following message:

Versions of the application and the database are not compatible.
You must run a Database Verification before continuing. This will update your database to <updateVersionNumber>

WARNING: Ensure that you have made a backup of this database. This action is irreversible. Do you want to proceed?
Their selection options are YES or NOUpon clicking on YES, they are presented with a confirmation message that reads as follows:WARNING: You have clicked on YES. After running this Verify Database process, you will not be able to perform a rollback, and you will no longer be able to run Govern for VB6 with this database. Click ‘YES’ to proceed.
A click on YES will initiate the process.

RE / PP Tax Conversion Scripts to add required “RE” Cycle Codes

In Govern for Windows a Cycle Code was not mandatory. As a result of the architectural change in Govern for .NET, a Cycle code in Real Property (RE) and Personal Property (PP) is mandatory. The default Cycle Code is “RE”. A script will need to be provided in order to create a Cycle code and change all existing Data to this cycle code. See document below for details on the scripts.
103-ut-005_DB_Verification-RE_PP_Tax_Conversion_Script.pdf

New Process for Addition of System Columns
[Pending validation of release versions] When system columns have been added to the database, during the GNA Verify Database process, after the columns have been added, the process must scan all entities, and add a new attribute in all entities that use tables with added columns.
These changes are available in the following releases:

  • 6.0.1608.x (6.0 Dev.)
  • 6.0.1606.x (6.0 Rel.)
  • 6.1.1608.x (6.1 Dev.)
  • 6.1.1606.x (6.1 Rel.)

Standardized Storage of Boolean Data Types in Govern

In all releases of Govern, Boolean datatypes were stored in the database with three possible values:
FALSE = 0
TRUE = 1 or -1 (dependent on the version of Govern)
Newer tables predominantly used 1, whereas older tables used -1. In accordance with Governs’ ongoing standardisation process henceforth Boolean datatypes will be stored, WITHOUT EXCEPTION, as follows:
FALSE = 0
TRUE = -1
This standard will be carried out for all tables. This standard will be effective as of the following versions:

    • 6.0.1608.0019 (6.0 Dev.)
    • 6.0.1606.0023 (6.0 Rel.)
    • 6.1.1608.0043 (6.1 Dev.)
    • 6.1.1606.0042 (6.1 Rel.)

BA’s and Developers please refer to Confluence for additional details.

New Process in Database Verification Process

[6.0 / 6.1 Multiple Versions]

During the Database Verification process, at the ‘Check Column’ subprocess the application will now manage the description of fields in (Table:SY_DICT_DESC). The process is as follows, the Database Verification process reads the MSGDatabaseStructMods.xml file and reviews the SY_DICT_DESC. Each column is checked in the table to see whether the (ENG / FRA) descriptions exist, and if it needs to create (add) or remove (drop) them. In situations when a complete removal of a table is required, the process will remove any descriptions that are not connected.
Only the following fields are updated

  • LANGUAGE
  • TABLE_NAME
  • FIELD_NAME
  • DESCRIPTION
    • Uses the property ‘description’ limited to 50 characters; all additional characters are truncated
  • DETAIL
    • Uses the property ‘description’

These changes are available in the following releases:

  • 6.0.1603.0410
  • 6.0.1606.0010
  • 6.0.1608.0006
  • 6.1.1603.0481
  • 6.1.1606.0021
  • 6.1.1608.0016

[Release 6.1.1509.117]

Need to perform a verify database process. This is to apply a correction made to change the NULL 0 in (Table: VT_SYSTEM) INVISIBLE.

[Release 6.0.1412]

The following will occur when a new database is created:
.Make sure “Govern Users” role exists, if not create it
.Make sure “govern” User exists, if not create it with the password govern
.Make sure “govern” is in the “Govern Users” role
.Make sure “Govern Users” role has full access to GSM AND GNA

Property to Re-create Indexes for Extended Tables

A new property called hasextendedtables has been added in the Tables section of the MSGDatabaseStructureMods.xml. This property is used to recreate indexes for extended tables like (Table: MA_BUILDINGS) that can support additional tables like MA_BUILDINGS_2 to MA_BUILDINGS_9.

Below is an example of the property in the MA_BUILDINGS table definition in the MSGDatabaseStructureMods.xml file.
<table name=”MA_BUILDINGS” description=”Mass Appraisal Building.” action=”add” gnaaversion=”4.7.3.0″ dbversion=”10.7″ hasextendedtables=True>

Currently this property has been added for the following tables:
· MA_BUILDINGS
· MA_LAND
· MA_MRA
· MA_INCOME PP_ASSESSMENT”

6.0 R and 6.1 R and in their development branches( 6.0 dev and 6.1 dev).
This new attribute is available in the following releases:

  • 6.0.1606.x
  • 6.0.1608.x
  • 6.1.1606.x
  • 6.1.1608.x


103-ut-005a


0 votes, average: 0.00 out of 50 votes, average: 0.00 out of 50 votes, average: 0.00 out of 50 votes, average: 0.00 out of 50 votes, average: 0.00 out of 5 (0 votes, average: 0.00 out of 5)
You need to be a registered member to rate this.
Loading...