Govern Quick Search

Govern Quick Search

Release 6.0.1707 | 6.1 1707

Overview

An alternate search interface is available to the Govern user. The Quick Search differs from the traditional search interface in the sense that it bears a closer similarity to the search and results interface that is often associated with search engines. When correctly configured, this search interface is available through the Govern ribbon. Note that this search is in addition to the KB Search that is also located in the upper right hand corner of the interface.

NOTE: This feature should not be confused with the Self Reported Business Tax (ST) Save and Search feature, that may also be referred to as a quick search.

User Interface

Keyboard Shortcuts

The Quick Search and other search interfaces are accessible through the following keyboard shortcuts:

  • Quick Search: F3
  • Advanced Search: Alt + F3
  • Saved Datasets: Ctrl + F3
  • Query Tool: Shift + F3

Available Search Type (Views)

Standard Views are available to the user; these are part of Governs ViewsScripts.xml resource files. Standard views include a Search for Property records (V_INDEX_PROPERTY), a Search for Self Reported Tax records (V_INDEX_SRT), and a Search for Name records (V_INDEX_NAMES)

Conditions for Functioning of Views

The Quick Search is a standard Govern Control. In order for this control to function correctly, the associated views must adhere to the following standard rules:

  • The nomenclature of the View must begin with by V_INDEX_ for standard views and VW_INDEX_ for custom views
  • There must be a unique ID column
  • The View must have a Title column
  • Although the search will still search in the column, the description will use any column not ending with _h

Search results will be presented on 2 rows, the first will be the Title, the second a Description.

Configuration

The first requirement for installing the Govern Quick Search is to install the Elastic Search Service.

Installation of ElasticSearch

Details about the Elastic Search service can be found at the following link: https://www.elastic.co/guide/en/elasticsearch/reference/current/install-elasticsearch.html#install-elasticsearch
When installing with the MSI package option, you may use the following:
1. Download the MSI package and run it.

NOTE: Java is required in order for Elastic Search to run. If not installed, the installer will give a notification. If not installed, you can download the offline Java installer from the following location: https://java.com/en/download/manual.jsp. Install Java and re-execute the Elastic Search installer. Governs’ implementation of Elastic Search will support versions 11 through 15 of Java.

2. Install ElasticSearch with the default directories and ensure you select the Install as a service option. You may reference the screen shots in the Elastic Search Install Screens that can be found in the docuementation; see below.
3. For the Cluster Name you can keep the suggested name or make another selection. Note down the selected HTTP port, as it will be required later; the default is port 9200.
4. Ensure that the Network host value is completed. This is the name of the server. Note that none of the Plugins options are required.
Once the installation is completed, open Services in windows and make sure Elastic Search is configured as Automatic, and start the service.

About Java Support

As stated, Java is required in order for Elastic Search to run. Governs’ implementation of Elastic Search will support versions 11 through 15 of Java.

Configuration in the Govern New Administration (GNA)

GNA – General Settings Editor

For the next step, additional configuration is required in GNA. Open the GNA application…

  1. Open the General Settings Editor.
  2. Select General as the Registry Filter, and in the Search section locate the Elastic Search URL key. Enter a value like http:servername:9200, where the servername is that of the server where the service is installed, 9200 is the port that was chosen during the installation; Step 3// above.

GNA – Profile Editor

Index Refresh Batch Process

In order to have access to the Quick Search, you will need to setup and run the Quick Search Refresh (101-std-bp-010) batch process. This batch process is used to rebuild indexes used by the quick search. If this batch process is not present in the list under the Batch Processes tab in Govern, it will need to be added to the profile. This is done through the GNA Profile Editor. Refer to the Profile Editor page for instructions on how to add a batch process.
In Govern, by default, after running the Verify Database Process, the batch definition and the schedule to run the batch process is generated. The batch process is scheduled to run once a day in Full Mode, and every 5 minutes in Refresh Mode.
The batch process will search for all views created in the database that begin with V_INDEX or VW_INDEX, and refreshing them using the buffer parameter. Alternatively the process will completely build, or if already existing, rebuild the indexes.

Search Parameters

There are three (3) Search parameters that are required to be configured in the GNA Profile Editor.

Configuration of Profile Editor Search group parameters

Default eStyle – Selecting an eStyle will remove the selected eGroup.
Default eGroup – When an eGroup is selected, it will remove the selected eStyle.
Quick Search Index Group – The Quick Search Group is used for the Quick Search of the Profile.
NOTE: Additional Quick Search Index groups can be created using the Quick Search Index Group Editor.
When saving the profile, at least one of the searches must be selected.

NOTE: When exporting and importing a profile, indexes from the Quick Search Group associated with a Profile will be automatically exported/imported.

Govern Security Manager (GSM)

In order to provide security parameters for this feature, there is a new node for the Quick Search in the Govern Security Manager (GSM).
To locate the node to secure in the GSM, in the left hand pane, select Applications > Govern > Menu > View > Data Sources > Quick Search. Refer to the GSM page for instructions on how to secure an application.
When security is not enabled, i.e. OFF, Govern users will not see the Quick Search icon in the View (tab) > Data Sources (group) section in the Govern ribbon. Users without permissions that attempt to access the Quick Search, will be presented with the standard Govern restricted access screen.

Using the Quick Search

Differences between Search All vs Specific Index

The Search All option allows a user to perform a search on ALL indexes associated with the Profile. If a specific index was selected then the search will be performed only on that selected index.

NOTE: Search All will use the boost specified to an index in GNA to order the Search Results. You will see a tag to indicate which index the Search Result came from in the Search All option.

Switching between indexes

In order to switch between indexes, you must click on the index name. The currently selected index will be underlined. The index name that is displayed is the name of the view without the prefix and underscores and title cased.
For example if you create a view named VW_INDEX_COMPANY_ONLY then the display name will be Company Only.

Search within a Specific Index

Searching within a specific index allows users to restrict search results to a specific index as well allowing them to search a specific column.

Column Specific syntax

The Column Specific Search enables a user to specify on which column a text string should be search.
Syntax – Field followed by “:” then by the text string to search for.
If the user selects a specific index all available fields will be available in the search box context menu. The context menu can be displayed with a Right-Click within the area of the Search field.
For Example: the following… street:freeway
This is an indication that the text string “freeway” must be located in the street field. Therefore, even if there was a record with an email like “freeway@example.com”, the record will not be returned if the text freeway is not found in the street field.

Using special options

In addition to a normal text search, special characters such as Boolean operators or wildcards may be used to further narrow search results. Listed below are options that are available.

Operators

AND – A search for the results containing the words CRYSTAL AND LAKES. This means that result must contains both the words CRYSTAL and LAKES.
OR – Searching for results containing the words CRYSTAL OR LAKES. This means that result must contains either word, CRYSTAL or LAKES.
* (Wildcard Character) – The wildcard characteris used for performing searches for partially defined strings, e.g. RIVE*. This means that all records containing words starting with RIVE will be returned, e.g. RIVER, or RIVEN.
~ (Fuzzy Character) – The Fuzzy Character tilde (~), allows the search to be more relaxed with its results. Searching for the following string with the tilde, CRYSTEL~, will result in all records containing a word the “sort of” looks like CRYSTEL with a one character difference allowance. The resulting records could contain the following words: CRYSTEL, CRYSTAL, CYRSTEL, CRESTEL, CRYSTEN, and so on.

Clicking on a Search Result

A click on a specific search result will add the ID to the Govern Dataset Treeview, and set all Govern IDs specified by the search result. In addition, if the search result contains a field named “form“, the form with this code will also be opened.

TIP: If you want to know the origin of the information displayed in the search result, i.e. the field it is taken from, place your mouse cursor over the value and the tooltip will indicate which field it corresponds to.

Troubleshooting

Typically issues that may arise with the Govern Quick Search may be related to the installed ElasticSearch service, or port configuration issues with the Windows Firewall.

NOTE: The following troubleshooting actions can only be accomplished by users with administrator level access.

Verify ElasticSearch Service

If the Govern Quick Search is not working after configuration, the first step is to verify that the installed ElasticSearch service is running. This is done through the Windows Services screen.

Additional Verification of Service

Issues with Java

Issues have been known to arise with the setting of the variable JAVA_HOME when installing Java 32bit or 64 bit. Ensure that the correct path is being used as some applications, when installing, may set a path for the JAVA_HOME variable that may not be consistent with other installed applications.

Verify the JAVA_HOME variable

In Windows 7 on a system that had Java 1.7 then upgraded to Oracle Java 1.8 SDK (jdk-8u45-windows-x64.exe) the system JAVA_HOME differed from the JAVA_HOME in the elasticsearch manager and as such a different version of java was in the path. As a result, the ElasticSearch service install failed because the system was unable to load Java 8.
Resolution required the setting of the system JAVA_HOME to the correct folder:

  1. Open Windows File Explorer.
  2. Right-click My Computer
  3. Select Advanced system settings
  4. Select Environment Variables
  5. Select JAVA_HOME
  6. Edit JAVA_HOME to change the value to the correct root folder e.g. C:Progra~1Javajre1.8.0_45
  7. OK twice

Check that JAVA_HOME is set and java works:

  • java -version
  • echo %JAVA_HOME%

If this fails then eleasticsearch-service install won’t work. To fix in a DOS prompt:

  • set JAVA_HOME=C:Progra~1Javajre1.8.0_45
  • path=C:Program FilesJavajdk1.8.0_45bin;%path%

Check the JAVA_PATH value in Elasticsearch manager and fix it if required. Open the manager program from a DOS prompt:

  1. Run elasticsearch-service.bat manager from a DOS prompt.
  2. Click on the Java tab
  3. Click the … button to the right of %JAVA_HOME%binserverjvm.dll
  4. Select the correct JRE folder if required or set the value manually, e.g. C:Program FilesJavajdk1.8.0_45jrebinserverjvm.dll
  5. Click Apply
  6. Select the General tab
  7. Click Start.
  8. Click OK to close the ElasticSearch manager

Removing and re-adding the ElasticSearch service may be needed:

  • elasticsearch-service.bat remove
  • elasticsearch-service.bat install

Browser Verification

Open ElasticSearch in a browser using the settings in configelasticsearch.yml to check that it is running. The URL could be https://MyServer:9200. For example https://localhost:9200/
…where, depending on your configuration, “localhost” would be substituted with the name of the server that the ElasticSearch is running on.

Issues with Windows Firewall

When there are issues with configuring the ElasticSearch, these issue may exist with the Windows Firewall.

  1. When the Firewall Screen is displayed, click Show/Hide Console Tree.
  2. On the left hand pane, right click Inbound Rules and select New Rule.
  3. In the New Inbound Rule Wizard form, select Port, click Next.
  4. At the Protocol and Ports step, select TCP; click on Specific local ports and enter 9200.
  5. Click Next.
  6. At the Action step, select Allow the connection; click Next.
  7. Set the rule to apply for Domain, Private, and Public by selecting the check boxes.
  8. Click Next.
  9. At the name screen, enter a descriptive name for the rule; click Finish.

Modifying a Preexisting Rule

If a rule has already been created and it needs to be modified you can go back to the Windows Firewall screen. Typically the modification involves adding an additional port number.

  1. Open Windows Firewall.
  2. On the left hand pane, click Inbound Rules.
  3. Under the Inbound Rules pane, locate ElasticSearch Rule. Note that this is the name that was given to the rule when it was first created.
  4. Right click ElasticSearch Rule and select Properties from the floating menu.
  5. Click on the Protocol and Ports tab.
  6. Configure the Protocol type as TCP.
  7. Add another port specified for the ElasticSearch in the Local port parameter; select Specific Ports, and add 9300 to the 9200, separated by a comma and space.
  8. Click OK.

Documentation

Click here to link to the documentation for this feature:

Related Topics

Govern Search
Quick Search Index Group Editor
Govern Search Technical Specifications

Dynamic Search Objects
Dynamic Search Styles
Dynamic Search Groups
Govern New Administration (GNA)


101-std-fea-034


0 votes, average: 0.00 out of 50 votes, average: 0.00 out of 50 votes, average: 0.00 out of 50 votes, average: 0.00 out of 50 votes, average: 0.00 out of 5 (0 votes, average: 0.00 out of 5)
You need to be a registered member to rate this.
Loading...

Govern – API and Services

Govern API & Services

Overview

Standard API Web Services

Govern’s standard API Web Services provide a communication and data exchange protocol to Govern Applications:

These services are distributed with a program called Mock-Up, to help the programmer test and make sure the correct information is received from the services.

Other Govern Web Services

Web services are used in OpenForms for:

Specification

In general:

  • Windows Communication Foundation (WCF) is an API in the .NET Framework.
  • Govern PC Web Services supports JavaScript Object Notation (JSON) serialization format to WCF.
  • Minimum System Requirements for IIS Servers and .NET Framework
  • IIS Server must be configured for each deployment (production, training, staging, tests…)
  • Govern Services are stand-alone programs that need to be installed separately.
  • API services downloads are zip files and a zip converter is required to install.
NOTE: Although the WCF PC Web Services supports (JSON), Harris Govern does not provide technical developer support for this type of implementation.

Configuration

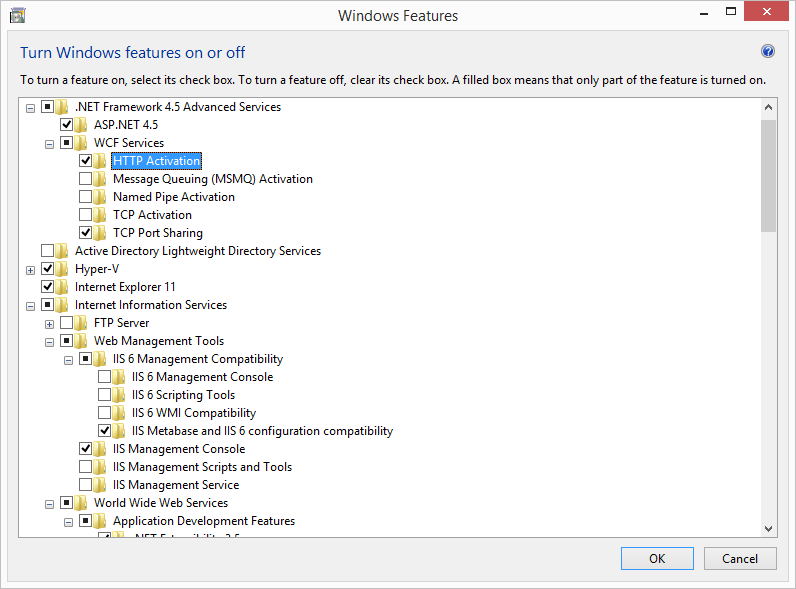
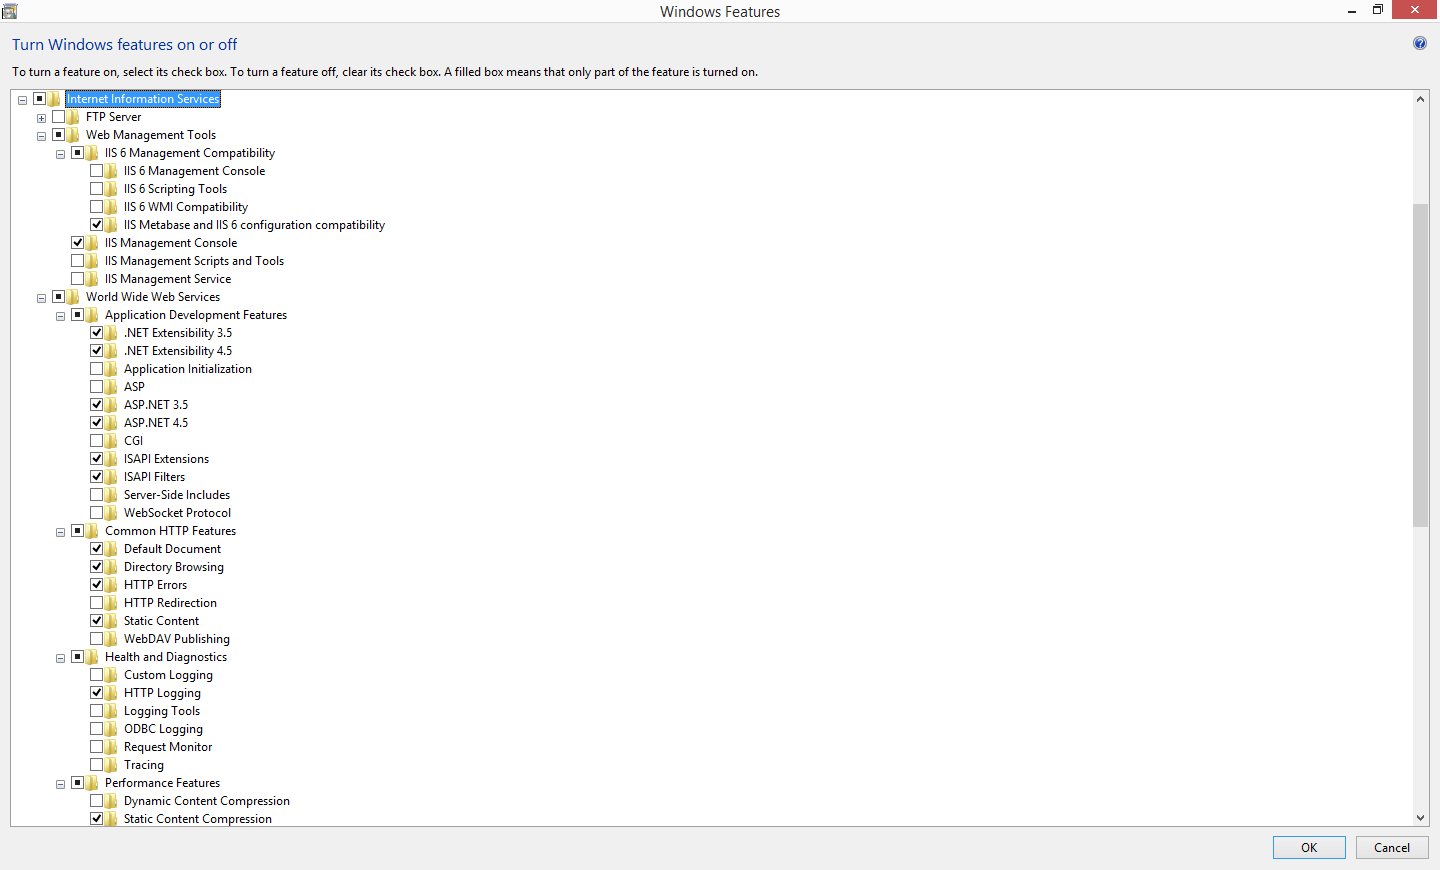
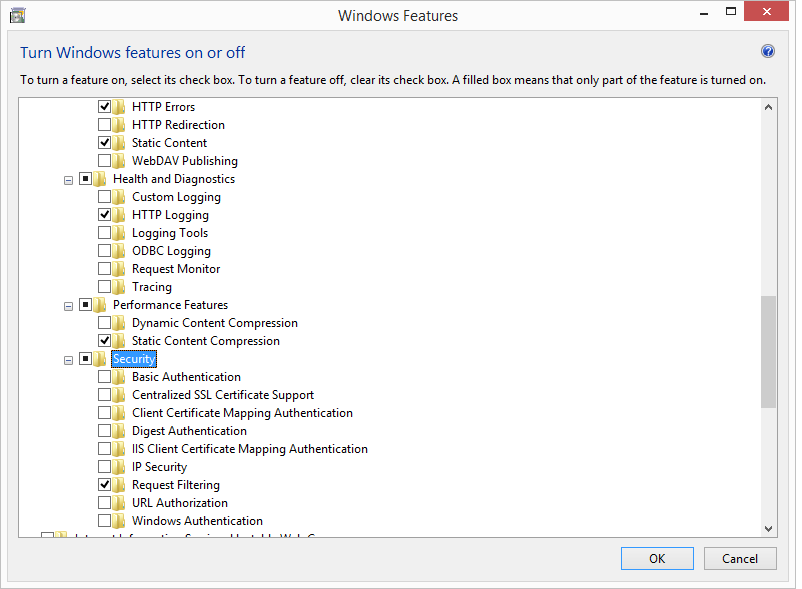
In the Windows setup screen “Turn Windows features on or off”, accessible from the Control Panel, there are some IIS options to activate:

1. NET Framework WCF Services HTTP Activation

IIS WCF Services HTTP Activation.png

2. Internet Information Services (IIS)

IIS Config 1.png

IIS Config 3.png

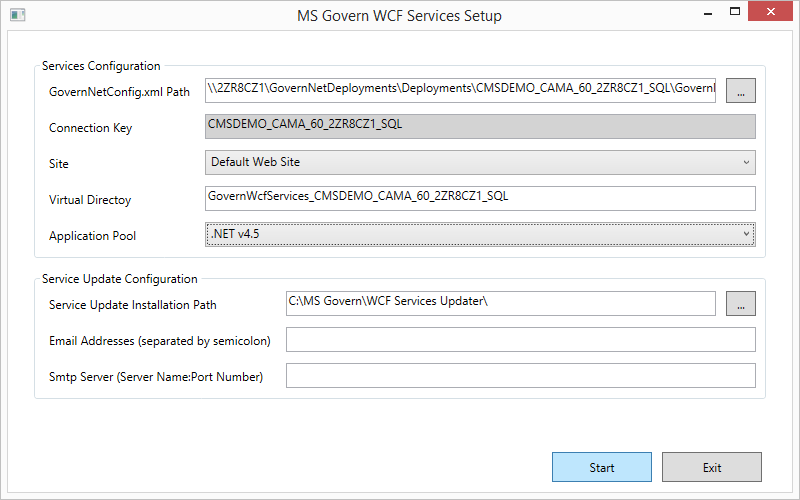
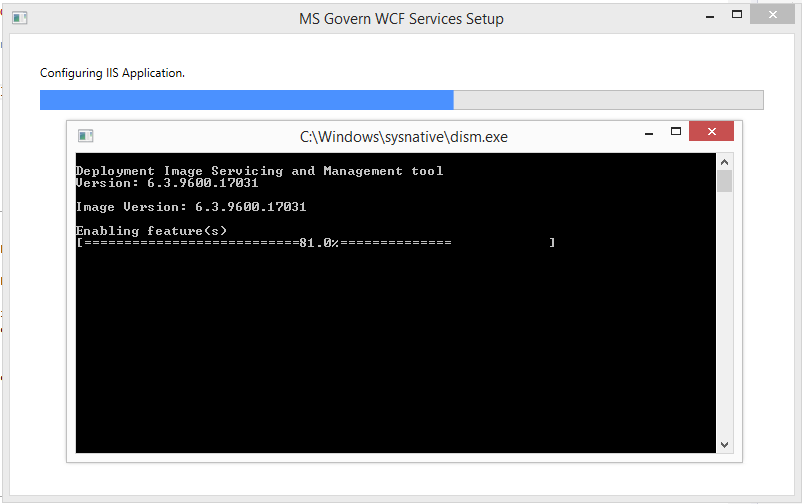
3. Next, run the Govern WcfServices exe:
X:Install Package6.1WCF Services Setup

MS Govern WCF Services Setup.png

MS Govern WCF Services Installation.png

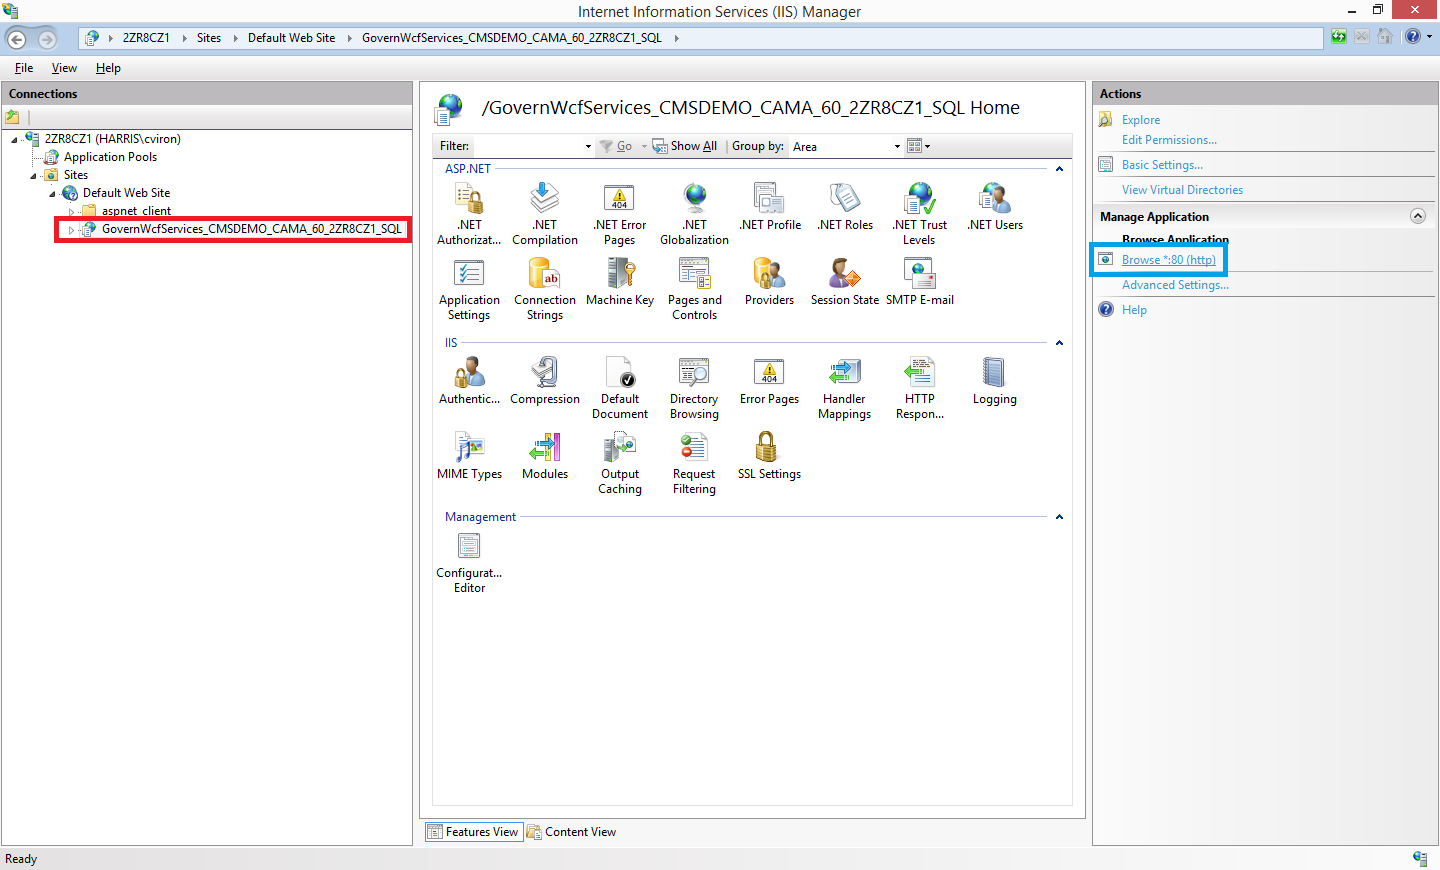
4. The IIS Application is installed and can be browsed:

IIS Browse.png

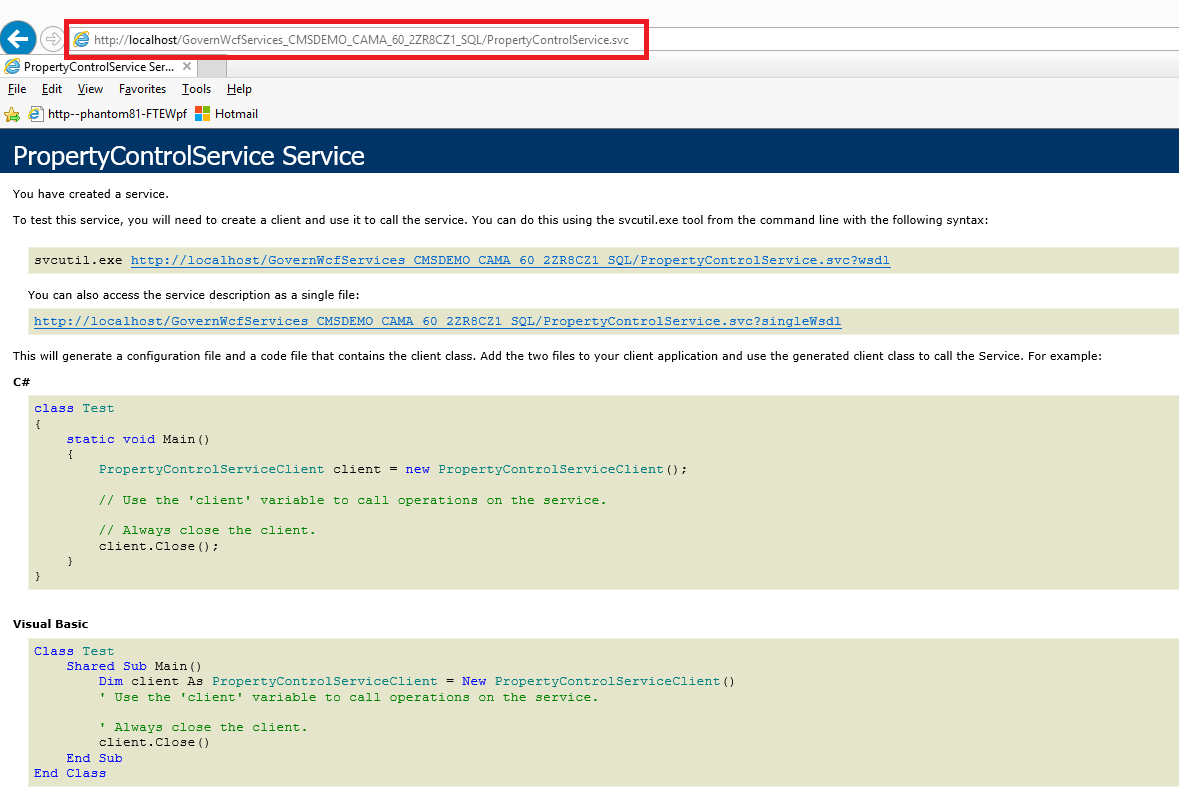
When clicking Browse, the service web page is open at the address:
https://localhost/GovernWcfServices_CMSDEMO_CAMA_60_2ZR8CZ1_SQL/

Click on the service name PropertyControlService.svc, you go to the service page. Copy-paste the link
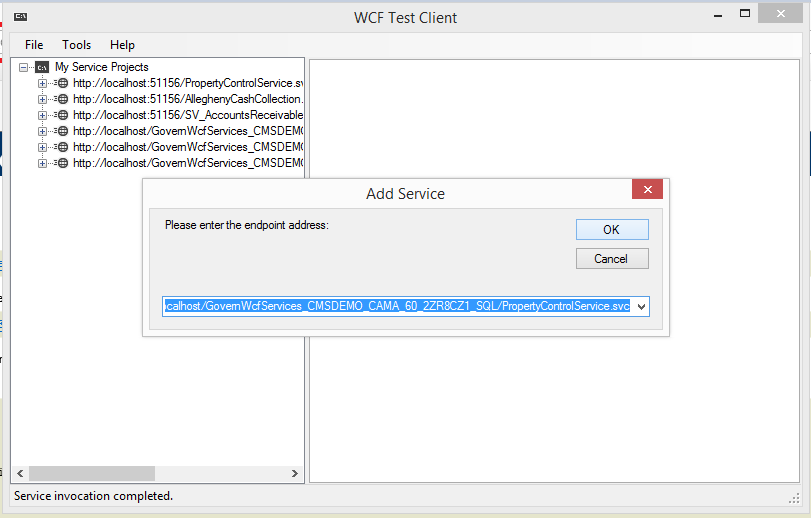
https://localhost/GovernWcfServices_CMSDEMO_CAMA_60_2ZR8CZ1_SQL/PropertyControlService.svc

IIS Service Hyperlink.png

inside the WCF Test Client, located at: C:Program Files (x86) Microsoft Visual Studio 14.0/Common 7/IDE/WcfTestClient.exe:

WCF Test Client.png

You can then test any method from the service contract by clicking on it and set its parameters up.

Download and Install

As of 6.0, Deploy-EZ, can be used to download the standard Govern API WCF bundle (PC&GIS, AR&CC) and the Govern Scheduler Service.

  • Download Binaries for the required release (4.7, 5.1, 6.0., 6.1…)
  • Install for each Deployment (Production, Test, Train, Stage…)

For Govern e-Government or other Custom Services

  • Contact Harris Govern for FTP download information

For Harris Govern Employees, packages are located in GOVERN’s DEPLOYMENT SERVER, in the INSTALL folder by version.

What’s New

  • [6.0] New Govern Batch Scheduler Service (403) installation and automatic Service stop and restart for updates.
  • [6.0] The PC/GIS (401) and AR/CC (402) web services installation package have been bundled together.
  • [6.0] The installation pack can be downloaded via DeployEZ.

PC & GIS Web Service (401)

This service is used to load or create information in property control. It also establishes communication between Govern and a GIS system.
Click here for more information.

A/R & CC Web Service (402)

This service is used when cash is collected via a third party software.
Click here for more information.

Batch Scheduler Services (403)

Govern OpenForms Scheduler uses the following services:

  • Batch Scheduling
  • Batch Execution (Windows Services)

Click here for more information.


400-api


0 votes, average: 0.00 out of 50 votes, average: 0.00 out of 50 votes, average: 0.00 out of 50 votes, average: 0.00 out of 50 votes, average: 0.00 out of 5 (0 votes, average: 0.00 out of 5)
You need to be a registered member to rate this.
Loading...

Govern Database Diagrams and Tables

Govern Database Diagrams and Tables

Govern for OpenForms Release 6.x

The following are the current database diagrams for Govern OpenForms modules. These files are presented in .PDF format for easy viewing.

Available Modules:

Read More...

Land Management 6.1

LandManagement61.pdf


UPDATED! Land Management 6.0

101-lm-LandManagement60.pdf


UPDATED! Workflow Management 6.1

101-wm-Workflow61.pdf


Mass Appraisal (MA)

101-ma-Mass Appraisal 61.pdf


Miscellaneous Billing (MB) 6.1

Miscellaneous Billing 61.pdf


Name & Address (NA) 6.1

Name and Address 61.pdf


Personal Property (PP) 6.1

Personal Property 61.pdf


Personal Property / Motor Vehicle / Business Tax

(Updated 2017.06.12)

101-tx-PP MV BT and AR 61.pdf


Accounts Receivable (PP / MV / BT / AR) 6.1

PP MV BT and AR 61.pdf


Property Control (PP) 6.1

(Updated 2016.12.06)

101-pc-Property Control 61.pdf


Security 6.1

Security61.pdf


Self Reported Tax and Accounts Receivable (ST & AR) 6.1

(Updated 2017.06.12)

101-st-Self Reported Tax 61.pdf


Tax and Accounts Receivable (Tax & AR) 6.1

(Updated 2017.06.12)

101-tx-Tax and AR 61.pdf


Utility Billing and Accounts Receivable (UB & AR) 6.1

(Updated 2017.06.12)

101-ub-UtilityBilling and AR 61.pdf


Workflow 6.1

(Updated 2017.08.01)

101-wm-Workflow Management 61.pdf


Audit

Audit.pdf


Delinquency (DC) 6.1

(Updated 2017.06.12)

101-DC-Delinquency and AR 61.pdf


NEW! OpenForms Designer (OFD) and Business Entity Designer (BED)

101-std-OFD and BED61.pdf


Govern for Windows (VB6)

The following are the current database diagrams for Govern for Windows (VB6) modules. These files are presented in .PDF format for easy viewing.

NOTE: For information only. Source 10.5 Govern for Windows.

Available Modules

Read More...

Land Management (LM)

101-wm-LandManagementVB6.pdf


Mass Appraisal (MA)

101-ma-MassAppraisal VB6.pdf


Property Control (PC)

101-pc-Property Control VB6.pdf


Self Reported Tax / Accounts Receivable (SRT & AR)

101-st-SRT and AR VB6.pdf


Personal Property / Motor Vehicle / Business Tax /
Accounts Receivable (PP / MV / BT / AR)

101-tx-PP MV BT and AR VB6.pdf


Tax and Accounts Receivable (Tax & AR)

101-tx-Tax and AR VB6.pdf


Utility Billing and Accounts Receivable (UB & AR)

101-UtilityBilling and AR VB6.pdf


Security

101-std-Security VB6.pdf


List of Changed Tables

UPDATED! The following is a list of tables that are present in each of the major releases of Govern, i.e. Govern for Windows (VB6), Govern for OpenForms Release 6.0 and 6.1. This .PDF file lists which tables have changed between the three (3) aforementioned releases.

Click to view the “GovernTableChanges_2020.08.27.pdf” document or download the document

NOTE: The above list is not exhaustive; it does not provide a complete breakdown of changed columns or their functionalities. Table details may be found through the GovernDB page in Confluence.


Videos

Webinar – Govern for Windows Dataflow (Internal Access)

Govern for Windows Dataflow Webinar Click to view the recording

(Recorded – Dec. 16, 2016)

Red_Play_Button

Related Topics


100-Database_Diagrams


0 votes, average: 0.00 out of 50 votes, average: 0.00 out of 50 votes, average: 0.00 out of 50 votes, average: 0.00 out of 50 votes, average: 0.00 out of 5 (0 votes, average: 0.00 out of 5)
You need to be a registered member to rate this.
Loading...


Govern Std. Navigation & User Interface

Standard Navigation & User Interface

Overview

The Govern user interface is designed to allow quick access to the required areas of the application. In the interface there is extensive use of tabbed forms, ribbons, and auto-hide windows. The main interface can be reconfigured through drag and drop actions. Once the interface has been configured, when the application is closed, the settings are saved. When the application is re-opened, the changes that were made become the new default until they are again changed by the user.

NOTE: As a result of the users ability to reconfigure the appearance of the interface, it should be noted that each users interface may differ in appearance. In addition, not all users will be able to see all aspects of the interface, nor will all features be present. This can be due to security restrictions; when a feature is not present, contact your administrator to verify that there are no restrictions in place.

Read More...

Mobile Users

Note: The current version of the mGovern is Release 6.0

mGovern – Your Mobile Solution provides a secure, user-friendly interface for: transferring property records from the office server to a mobile device; updating records in the field over a wireless connection or disconnected from the office server; and keeping records up-to-date and synchronized on both the mobile device and the office server. The mGovern UI provides the same user forms and features as Govern, such as the Govern Ribbon and Status Bar, Dataset tree view, forms, reports explorer, predefined searches. Plus, it has additional features to display connection status and information and error messages.

202-mGOV51_UI_ScrnCap001.png
mGovern 5.1 Ribbon Icons – Click image to open in new window.

For changes to the interface that are related to the Govern Mobile application, refer to the Govern Mobile release 6.0 user guide.

Interface Highlights

101-std-fea-001-GOV60-(UI Main-00)-[v6.0].png
Principal Areas of Govern 6.0 UI – Click image to open in new window.

As is standard for Govern applications, the version number and the name of the Connection Key that is used to access the database is located on the lower left hand side. On the lower right hand side is a status indicator for the Govern Global Message (E).

Principal Areas

The default interface consists of an application window that is divided into three (3) areas that are referred to as Panes (B,C,D), and a region called the Ribbon (A) that runs along the top.
Tabs indicating open Profiles (A) are found in the area below the Ribbon. Within Profile tabs are the workspace containing OpenForms (B), Tabbed Panes (D), and Auto-hide panes;
and Auto-hide panes (C); some auto-hide panes are referred to as Toolboxes.

101-std-fea-001-GOV60-(UI Main-PrinciplAreas01)-[v6.0].png
Principal Areas of Govern 6.0 UI – Click image to open in new window.

Tabbed Panes
In the interface, by default, a single pane can contain sub panes. The Forms Explorer, Reports Explorer, and the Dataset Treeview are panes, that by default, are accessed through tabs located at the bottom of the Explorer pane. The My Workload, and the Information and Predefined Queries panes, are by default accessed through tabs that are located below the ribbon. The Predefined Searches tab, is accessed through a tab that is located on the right hand side of the interface.
Auto-Hide Panes
Some tabbed panes are set to auto-hide, this means that they will appear when the mouse pointer is placed over them. If the pane is not selected and the mouse pointer is moved away from the vicinity of the pane, the window will recede back to the location of the tab.

NOTE: At times tabbed panes may not recede back to their original location when the mouse pointer is no longer in the vicinity of the tab. When this occurs, moving your mouse pointer over another tabbed pane will force the pane to recede.

The position of tabbed panes can be modified through a series of guides that are part of the interface. See The Explorer panes. The Ribbon can also be modified through floating menu options. See Pane Options Button for details on pane menus and buttons.
Registry Manager
The Registry Manager form contains User Registry parameters that are used to modify elements of the Govern user interface. Modifications include control of the maximum numbers of search records retrieved, and the behavior of Global Message notifications.

Common Features

Visual Notifications

In Govern there are visual cues that are presented to the user that indicate the status of their data. These cues appear in the form of colored dots or borders at various locations within the application. The grid below contains a list of the types of visual cues that are observed. Samples are observed after the table below.

Type Color Location Description
Dot Red On a form
tab
Error in a Validation or a Query on a
form. A modifications has occurred
Dot Blue End of form
field
The field is required.
Border Blue Form field This is an indication that this is the
current, active field.
Border Yellow Form field The field contains “Dirty” data; i.e. the
information has not been saved.”
Border Orange Form field Warning; unsaved change.
Border Red Form field Error in validation on query or form.

Modified Forms (Red Dots)
In the application, the red dots that appear on the tabs within a profile. An entity within the current form has been modified, but has not yet been saved. When changes to the form have been saved, the red dot indicators will disappear as confirmation.
Field Indicators
Modifications made to a field, e.g. a change to a value, cause the field in question to be highlighted with a yellow colored border. Note the fields that appear with a Red border. These fields are in an error state, either as a result of a validation or a query.
Date / Time Picker
In Govern, a Date /Time Picker is used to select a date and time. Click the Calendar icon that appears within a parameter to select a date from the drop-down menu (A). This displays the calendar; if the current date and time are required, click on the highlighted blue current date. To navigate to future or past dates, click the year at the top of the calendar (B). Alternatively, you may also use Forward and Backwards navigation arrows on the top of the calendar (C).

101-std-fea-001_GOV60-(UI DatePickr-01b)-[v6.0].png
Govern 6.0 Date / Time Picker – Click image to open in new window.


The Ribbon

The Govern Ribbon consists of menu tabs that allow you to configure the application through principal areas of the program.

  • Home – Access to applications settings, system clipboard, and system flags.
  • View – Display Govern panes and embedded applications.
  • Options – Control Query results and modify interface appearance.
  • Tools – Access MS Govern .NET applications and other configured external applications.
  • Batch Process – This menu tab will provide access to Govern batch processes.

Home tab

Global Information group

Fiscal Year – This is the Current Year (CurrentYear) or fiscal year that is used by the department. This is the Current Year as determined by a setting requested by the user; this value can be changed.
Each department within an organization may have to define and work in a different fiscal year. For example, Building Department profile users can work in the current calendar year when maintaining data on Permits and Licenses, Tax Collection department users work with data from the previous year, but Property Assessment department profile users may have to create appraisals for a future year.

NOTE: This field must be modified manually when the department changes to a new fiscal year. See Fiscal Year in the GNA guide.

The Fiscal Year parameter is found under the Home tab of the Ribbon; if not visible, the ribbon is probably minimized. Right click and select the Minimize Ribbon option. See Minimizing the Ribbon.

Change Fiscal Year (Current Year)

Unlike previous releases, the Fiscal Year can no longer be changed in the ribbon. The Fiscal Year can be changed in the History Panel.

Global Messages group

The Global Messages group allows the creation of Global or Department messages that will be displayed when a selected record is accessed. Previously the messaging system was based upon a PARCEL ID (P_ID). This current implementation of the messaging system is based upon both the USERID and the Parcel ID (P_ID) for greater flexibility. For example in the Self Reported Tax (ST) module, a notice of delinquency message can now be sent to the account holder by associating the message with the USERID.
This functionality replaces the Global or Department Flag.

Global Messages

Click Global Messages to create and attach a message to a current record or dataset. The message is created in the Global Message form. These messages can be assigned a priority and made private to a department or a primary key.

Explorer Panes

To work in Govern, you will need to open one or more profiles. The Explorer Pane is the area to view the contents, or OpenForms, of an open Profile. The Profile will contain OpenForms, Reports, and Datasets. For details about Profiles, see Profiles.

Govern Pane Buttons

Although the Forms Explorer is being used in the following examples, the procedures may also be applied to the Dataset Treeview and the Reports Explorer.
On the title bar of the Forms Explorer are buttons that allow you to change the appearance of the Govern Security Manager interface.

Pane Options Button

Click on the triangular icon of the Pane Options button, or right-click anywhere along the title bar of the pane to display menu options.
Some view options available in the Pane Options Menu can be achieved by dragging the pane title bar and dropping it on a Diamond Docking Guide.

Floating

Select this option to display the pane as a floating window.

Displays

Widescreen Displays and Dual Monitors

If your system is configured with a widescreen display or you are working with dual monitors. You can take advantage of your extended desktop setup by using the Floating option for some of your panes.
To restore a floating window to its last configuration, double-click on the title bar of the floating window.

Dockable:

This is the default option; select this option to keep the panes in a docked configuration.
Tabbed:
The tabbed option is not used in Govern and so cannot be selected.
Auto Hide:
Select the Auto Hide option to dock the pane to the left hand side of the interface. The pane can now be activated by hovering the mouse over the tab (A). To restore it to its previous view, when the pane is open, reselect the Auto Hide option.
Selecting Auto Hide is the same as selecting the “pin” button on the title bar of the pane. See The Pin Button.

  1. To restore the pane to the Dockable view when Auto Hide is selected…
  2. Hover your mouse pointer over the tab on the left hand side of the window to display the pane.
  3. Right-click on the title bar and select Auto Hide.

Hide:

This option will hide the Forms Explorer pane.

  1. To select the Hide option…
  2. Right-click on the Forms Explorer tab.
  3. On the floating menu, select Hide.

When the Forms Explorer is hidden, it can be restored with a click on Forms Explorer in the View section of the Ribbon (A).
The above procedure will also reopen the Object Explorer when it has been accidentally closed.
When the Auto Hide option is selected and the pane is open, you can make the pane recede back into the tab by performing the following action, click to activate the title bar of the open pane, then click anywhere within another open pane.

The Pin button

The pin button collapses a pane and attaches it to the bottom or the side of the interface. If selected, the pin icon will appear horizontal. When you click the pin button, the pane will take on the behavior of the Auto Hide option. See Auto-hide
for details. To restore the pane to its previous view, hover the mouse over the tab, when the pane opens, click the pin to turn off the option.

Dockable Windows

Reconfiguring Panes

Panes are re-configured by dragging their title bars from one location, and dropping to another. When you drag a title bar, you will observe a Pane Preview, i.e. a transparent representation of the window pane that is being dragged. In addition an overlay of icons appear, this overlay is referred to as a Diamond Docking Guide.
When dropping the Pane Preview on one of the icons of the Diamond Docking Guide, ensure that you position your pointer directly on top of the desired icon.

The Diamond Docking Guide

Dragging a Pane Preview to a location with a Diamond Docking Guide, the pane can be positioned in one of five (5) central icons, top, bottom, left, right, and center.
In addition, there are four (4) Periphery Icons within the application window that the pane preview can be dropped onto; they are located on the top, bottom, left, and right. When a pane preview is dropped on any one of these periphery icons, the dragged pane will be placed in a position that is relative to the entire application window.

Repositioning Panes

As you drag a pane to a new location, a Pane Preview and the Diamond Docking Guide can appear in various locations. When your application window has 2 or more panes, each time you move the pane preview over any one of the panes, a Diamond Docking Guide will appear. You will notice that the five (5) position central icon appears over the active pane, and the four (4) position periphery icons always appear relative to the application window.
Placing the Pane Preview over one of the five (5) central icons will reposition the window within the pane that the central icon is located in.

Repositioning a Pane within a Pane

To reposition the Reports Explorer pane within another pane…

  1. Drag the title bar of the Reports Explorer pane from its original location.
  2. While dragging the pane, the Diamond Docking Guide will appear (A) in the center of the interface.
  3. Place your pointer over the number “2” position, you will notice a dark preview that indicates where the new pane will be located; release the mouse button.

In some instances, should a pane preview be placed on the number “5” position of the central icons, then the repositioned pane will be tabbed with the existing pane.

The number 5 position has been disabled for Govern so a pane preview cannot be tabbed in the center pane. What will occur is the repositioned pane will become a floating window.
When a pane has been changed to a floating window, you can double-click on the new windows title bar to return it to its previous configuration.

Removing an Explorer Pane

As individual departments have specific tasks, they may not necessarily require the same configuration. Some departments may not require access to reports, and as a result they may simply want to remove the Reports Explorer to minimize clutter.
To remove the Reports Explorer pane in the View tab (A)…

  1. Click the tab that represents the Reports Explorer pane.
  2. When the pane appears, click the Close icon, the “X” in the upper right hand corner of the pane.

The Reports Explorer pane will remain closed until it is reopened, this includes closing and reopening the application.

Reopening Closed Explorer Panes

To reopen the Reports Explorer…

  1. On the Ribbon, click the Views tab.
  2. In the View group, click Reports Explorer.
  3. When reopened, the Reports Explorer will appear in the position it occupied before being closed.

The above steps may also be used to reopen the Forms Explorer and the Dataset Treeview panes.

Forms Explorer

To display the OpenForm in the Forms Explorer (A), double-click on the icon. The form will appear on the right hand side in the OpenForm area (B).
There may be a slight delay between the initial click on the icon and the appearance of the form. This delay is a function of your connection speed to your database, and/or network traffic.
To open an OpenForm…

  1. In an open profile, click to select the Forms Explorer tab along the bottom of the pane (A).
  2. In the Forms Explorer pane, you will see the OpenForms that are attached to this profile.
  3. Right-click on the OpenForm name or icon; select Open from the floating menu.

As with opening a Profile, there may be a slight delay between the initial click on the icon and the appearance of the OpenForm. This delay is a function of your connection speed to your database, and/or network traffic.

Tab Navigation Controls

When an OpenForm appears with multiple tabs and sub tabs, a new tab with navigational buttons will appear at the far right hand side of the active tab. See OpenForms Tab Navigation Control on page.

Reports Explorer

Depending on requirements, some Profiles may be configured with reports. For example, a Business Model designed for permitting could be configured with reports that can list owners, list expired permits, or generate renewal letters.
Reports that are available in the profile can be viewed in the Reports Explorer.

Viewing Available Reports

Reports are presented in a treeview format; most reports are seen at the top level. Occasionally you will see reports presented as report groups that can be expanded with a click on the [+] to expand and on the [-] to collapse.
To view the list of available Reports in an open Profile…

  1. Click to select the Reports Explorer tab.
  2. In the Reports Explorer pane, you will see the list of available reports.
    If the reports are in groups, click on the [+] to expand the group and view the report.

Profiles in Govern

The Profiles in Govern are the equivalent of a department in an office. Within this department are the tools for performing the job that is required of the department. The OpenForms and Reports that are displayed are the ones that have been assigned to the Profile in the Govern NetAdmin (GNA). For example a profile for the Building department might contain OpenForms for Building Permits, Complaints, General Permits, Grievances, Offences, Inspections, and Property Information. When this profile is being configured in GNA, the aforementioned OpenForms would be added. See Creating a New Profile in the Profile Editor section of the Govern Net Admin guide.

NOTE: Multiple profiles and multiple instance of a profile can be opened by a user, as long as they have been given access privileges to them.

Opening a Profile

To open a Profile or an instance of a Profile…

  1. Click the Govern Application Option button in the upper left hand corner of the application window.
  2. Select a Profile under the All Profiles list; for this example we will use a profile that is designed for maintaining parcel information – Parcel Maintenance.

When the profile is open, its name will appear on the tab preceded by a number; this is the Instance Number. When multiple instances of the same profile are open, each successive tab will bear a number that is incremented by one.

Closing a Profile

A Profile can be closed at two (2) locations, directly on the profile tab, or through the Govern Suite button.
To close a Profile…

  1. Locate the tab for the profile and click on the Close button “x”.
NOTE: When you have multiple instances of a Profile ensure that the profile that you are close is the correct instance

OR

  1. Click to select the Profile tab that you would like to close (B).
  2. Click on the Govern Suite button; select Close Profile.


Maximizing a Form

Users that have multiple profiles open, may periodically need to display one specific profile; ideally it is best to maximize this profile. This is accomplished by “undocking” the form. This option is available under the Options (tab).

To Maximize a form…
1. Click on tab of the profile that is to be maximized.
2. Select Options (tab) > Options group…
3. Click Maximize. (Alternatively click F11 on the keyboard).

To restore a Maximized form…
1. On the Upper Right Hand side of the window, click the triangular arrowhead to display the menu
2. Select the “Dock” option.
OR
1. Double click on the title bar of the Window.

To close a maximized OpenForm…
1. Click the X in the upper right hand corner of the window.

NOTE: Should you unintentionally close the profile form, you can re-open it from the Dataset Treeview pane. Expand the record with a click on the arrow beside the record. In the expanded list of forms, select the required form.

What’s New

Below is a list of new User Interface enhancements.

Enhancement to behavior of Maximize (F11)

Available in Release 6.0.1611.0141 / 6.0.1702.0191 / 6.1.1611.0124 / 6.1.1702.0332
In Govern, when a form is Maximized using the Maximize feature, Govern ribbon > Options (tab) > Maximize (F11), the active form is presented in full screen mode, all other forms are hidden, and the Toolbar and Ribbon are minimized. Users can encounter issues when the maximized form contains a link that will open another form. When the user clicks the link, the target form is not immediately accessible. The workaround has been to exit the Maximized screen, or minimize it in order to access the linked form. An enhancement has been implemented that will allow the user to quickly access screens that have been opened from a link with the F11 key.
Refer to the document below for details.
101-Techno_Access_Linked_Form_from_Maximized_Screen(Enhancement).pdf


101-std-fea-001


0 votes, average: 0.00 out of 50 votes, average: 0.00 out of 50 votes, average: 0.00 out of 50 votes, average: 0.00 out of 50 votes, average: 0.00 out of 5 (0 votes, average: 0.00 out of 5)
You need to be a registered member to rate this.
Loading...

Central Notes Feature

Central (Centralized) Notes

Overview

Central Notes are designed to allow users to enter and store notes in a centralized storage location. When used, Central Notes enables users to maintain, and review, any notes that are entered when an action is performed, or when a modification is made.

User prompts for a central note entry can be made to occur at the entity level, or at the field level of a profile. This means that a user can be prompted to make an entry when they either access and make a change anywhere in the profile, or in a specific parameter in the profile. These settings are made by an administrator in the Business Entity Designer (BED) release 5.1 or greater. in addition Central Notes can be applied on a dataset basis, i.e. all records of a search result could have a note applied to them collectively.

NOTE: Central Notes that are applied as a dataset are permanent, Notes applied to a dataset cannot be removed.


101-std-fea-009-(uiTN)-[v6.0].png
Centralized Notes Pane & Viewer

As an example, in the Parcel Linking profile if a new parcel link is created, or a modification is made to an existing Start Date or End Date, justification may be required for the action. This layer of security can be provided with the Central Notes System. When enabled, the user will not be able to complete the action unless an entry has been made in the Central Notes form. When entered and saved, the record of the username, change, and details is saved.
When a centralized note is entered, an optional flag can be assigned to it. A note can be entered with three (3) statuses. These statuses can be used as part of a search criteria. (Table: PC_CENTRAL_NOTES).

Locating the Central Notes pane

The Central Notes can be found by default as an Auto-Hide tab located on the left hand side of the Govern user interface. To display the note field, hover your pointer over the tab to display it. Refer to Auto-Hide Panes (std-fea-001).

Read More...

Enabling Central Notes

Creating an Entity Level Centralized Note requirement

At the entity level, when an entity is made or modified, the user will be required to enter a centralized note entry.

To set up an Entity level Central Notes entry request, you will need to make changes using the Business Entity Designer (BED) release 5.1 or greater. Refer to the BED release 5.1 guide for details about modifying Business Entities (BE’s)

  1. In the BED, under the Model Explorer pane, click on the Business Entity that will require a Centralized Note entry; for our example we will use Parcel Linking.
  2. Under the Properties pane on the right hand side under 1 – Basic Data Settings, set the Note is required on creation flag to True.
  3. Set the Note is required on modification flag to True.
  4. Click Save.

When the flags are set at this level, i.e. the Entity level, a Centralized Note entry will be required to create a new parcel link entry.
Creating an Attribute Level Centralized Note requirement
At the Attribute level, in order to enter a note, or when a modification is made to an attribute, i.e. field, a note entry will also be required to be made.
To set an attribute level Centralized Note entry request…

  1. In the BED release 5.1, under the Model Explorer pane, click on the Business Entity that will require a Centralized Note entry; for our example we will use Parcel Linking.
  2. In the central area under the List of Attributes pane, select an attribute that you want the user to be prompted with a Centralized Note entry request; for our example select the END_DATE attribute.
  3. On the right hand side, locate the Central Notes property, set both the Allow Notes, and the Note is required on modification flags to True.
  4. Repeat the above steps 2 and 3 for the FROM_DATE attribute.

About Entity / Attribute Level Centralized Note requests

Users that are enabling Central Notes for Entities and Attributes should note that the request for a Centralized Note entry by the system are separate. This means that if the flags are set at both the Entity and Attribute level, a separate prompt for a Centralized Note entry will be issued by the system.

Central Notes pane

The Central Notes pane is used to enter and display the notes that are related to the selected parcel. These tabs are used to enter and view the Central Notes, as well as controlling what notes are displayed after a search, through a series of user selectable filter fields.

Notes Viewer form

With a click on the Notes Viewer button in the Central Notes pane, the Notes Viewer form is displayed. This form contains two (2) tabs, one for defining your search parameters, and the other for displaying the search results.

NOTE: by default when the Notes Viewer button is clicked, the Notes Viewer form is displayed with the Notes Viewer Search Results tab.

Notes Viewer Search Criteria tab

In the Notes Viewer Search Criteria tab, you are able to search the Govern system for existing notes. The results of the query are filtered based upon your search parameters.

Central Notes Management tab

Notes Viewer Search Criteria tab – Command Button
Retrieve Notes:
Click Retrieve Notes to perform a search of the Centralized Note based upon the Filter options selected.

Notes Viewer Search Criteria tab – Parameters

The following is a description of the parameters that are found under the Notes Viewer Search Criteria tab.

Filters group

Dataset Filter group

Selections in the Dataset Filter group will restrict the display of notes to those within the current dataset.
All: Click All to display all notes in the current dataset.

Current Parcel: Select this option to display notes that are restricted to the current parcel.

Current Name: When Current Name is selected, only the Central Notes that were created on records that are linked to the current name account.

Author Filter group

All Authors: Select this filter option to display notes from all authors under the Author list. (TABLE: USR_USERFILE)

My Notes Only: When selected, this option will display only notes made by the current logged in user.

From Author: Click to select the From Author option; this will display the notes entered by the author that is selected from the drop down menu.

NOTE: The drop down menu list will not be active unless the option is selected. When this option is selected, but no author is selected, a warning will be displayed requesting that an author be selected from the list.

Subject Filter group

Entity Name: Click to select an Entity Name from the drop down list; the notes that are displayed are the ones that are related to the Entity.

Control / Attribute: Select the Control / Attribute option to filter for the Control or Attribute that is associated with the selected control or attribute

Table Name: Click to activate and filter Central Notes that are associated with the selected table name.

Column Name: After selecting a Table Name, you can further filter down and display Central Notes associated to a selected column name.
Date Filter group

Fiscal Year From / Fiscal Year To: Enter the Fiscal Year range of interest in the From and To fields.

Entry Date From / Entry Date To: Enter the date range of the Central Notes that you would like to view.

General Filter group

Note Priority: When a priority has been assigned to a Centralized Note, use this option to filter the search results for a specific priority. If no priority is selected, the all notes will be specified.

Exclude Private Notes: Select this option to exclude all notes that have been assigned with the Private Notes option.

Searching for Central Notes

Users with access to Central Notes can perform a search on all notes entered in the system. The search can be by parcel, name, or by author, for a given entity or attribute.
To perform a search for Central Notes that have been entered in the system:

  1. Click to display the Central Notes auto-hide pane.
  2. Select the Notes Viewer Search Criteria tab.
  3. In the Filters group, select each criteria required from each of the filter groups.
  4. If required select a priority note from the General Filter group.
  5. Click Retrieve Notes.

Notes Viewer Search Results

The search results will be displayed under the Notes Viewer Search Results tab.

Notes Viewer Search Results

As indicated earlier, the Notes Viewer Search Results tab displays the results of search queries based upon selected filters. The columns displayed can be re-arranged with a drag and drop action.

Grouping by Columns

The Central Notes drag and drop feature also allows for grouping by column heading. The space above the columns titled Drag a column header here to group by that column is referred to as the Grouping Area (A). This space expands to accommodate column names as they are added.

For example, if we have the following columns headings…:

  • Priority
  • Private
  • Entry Date
  • Relates To
  • Note
  • Author Name

We may want to view the entered notes grouped according to the Priority (A).

To group according to the Priority:

  1. Click and drag the Priority column into the Grouping Area above the columns; when empty this area is marked”Drag a column header here to group by that column”. Drop the column heading on the Grouping Area.
  2. You will note that the data has now been grouped according to the Priority column. You will see a heading that indicates the column grouping, the item that it is being displayed under, and the total number of items under that grouping. Click on the “^” beside the column grouping (A) to expand or contract the content listed.

Multiple columns or attributes can be grouped by dragging and dropping them into the Grouping Area above the column headings. Additional columns will appear as subgroups within the original group.

The order of the groups and subgroups can be changed with a drag and drop procedure.

To re-arrange subgroups:

  1. Click and hold the pointer on the subgroup title.
  2. Drag the title to its new location, noting the insertion point between the subgroups. The insertion is indicated by a bright vertical bar.
  3. Release the mouse button to complete the insertion.

Removing Column Groupings

To remove column groupings from the Grouping Area:

  1. Click and drag the grouped or sub-grouped title to an area outside of the Grouping Area.
  2. When an ‘X’ appears, release the mouse button to drop the object. The grouping or sub-grouping will be removed.

Viewing Central Notes Search Results

After result have been generated, there are two (2) options available to view the results; export results to an Microsoft Excel spreadsheet, Print with a preview.

Notes Viewer Search Criteria tab – Command Button

Export to Excel: When Export to Excel is selected, the current search result grid will be exported as an Microsoft Excel spreadsheet.

NOTE: The Excel export will not be affected by the sort order or grouping; the columns are output in the default order of the system.

Print Preview: Click Print Preview to display a preview of the current search result grid.

Behavior of Central Notes when enabled in Govern

When Central Notes are enabled, fields that have the Central Notes enabled through the Business Entity Designer (BED) will have icons that flag the state of the field.

Central Notes Status Icons

Central Notes fields are indicated with Notepad icons that lets the user know their status. Red icons indicate that note entries are required, i.e. mandatory; Gold icons are an indication that note entries are optional:

Allowed: The yellow icon indicates that entry of notes is optional for the user.

Required: This indicates that any changes to the field involves a mandatory note entry

Exists and Allowed: The yellow icon and magnifying glass indicates that notes exist in the system, but they are optional for the user.

Required and Exists: The red icon and magnifying glass indicates that a notes exist, but mandatory entry is required for changes by the user.

How to make a Centralized Note entry

Users that are attempting to save a record when the field is set as Required will be presented with the following error window: To resolve this situation…
1.Click OK to acknowledge the notification.
2.Locate the Central Notes auto-hide tab; place your pointer over the tab to display it.
3.Click Add a New Note.

NOTE: When a new note is created, the date, time, and user log-in name is displayed for reference.

4.Click in the note field and enter your note

5.When complete, click Save.

As long as the Centralized Note is created and the reason for the creation or change, i.e. “justification” is entered, the system will them allow a save.

Creating a Centralized Note for a Dataset

WARNING: A Centralized Note that is applied to a dataset cannot be modified or deleted. Take care when making your entry

Creating a Centralized Note for a Dataset, i.e. a group of records that are the result of a query, hand picked records, or appended list, is a similar procedure to applying one to an individual record.

NOTE: In order to be able to click on the Central Notes button, you will need to open a Profile, then perform a search.

To create a Centralized Note that will apply to a dataset…

  1. Perform a search; the resulting records will be the dataset.
  2. Load the dataset into the Dataset Treeview.
  3. If not selected, click the Home tab in the Govern Ribbon.
  4. In the Flags group, click to select Central Notes.
  5. In the Central Notes form, enter your notes that will apply to the dataset (1).
  6. Select a Priority status, and select the Private option if the note is to be set as private (2).
  7. Click Save (3) to create the note or Cancel (4) to stop the creation process.

Central Notes for Datasets are saved in the same table as the individual record notes, (Table: PC_CENTRALIZED_NOTES), the exception here is that these notes are permanent, i.e. they cannot be deleted.

Modifying a Centralized Note

Once a Centralized Note has been created, the author or creator of the note can modify their entry. In addition, with the correct security flags set in the Govern Security Manager (GSM), an author can modify all Centralized Note entries.

To modify a Centralized Note…

1.Display the Centralized Note pane.

2.Select the note and effect any required change.

To enable a Centralized Note author to be able to edit all notes…

1.In the GSM, ensure that the permissions flag for Update (U) has been set; refer to the Working with Central Notes section of the GSM 5.1 user guide.

NOTE: If the update flag has not been set, the author will only be able to change the notes that they created, and no others. Refer to the GSM release 5.1 for details on Working with Central Notes.


What’s New

[v6.0.1404]
  • The search panel is now dockable. Users can keep this window open while performing other tasks. Very handy for users with dual screens.
  • Collective notes can be recorded by dataset (permanent)
[v5.1]
  • Note Priorities
  • Private notes are used to flag notes that should not appear on the web

Specification

Product feature specification [v6.0] for centralized notes:
General

  • Recorded at the business entity level or at the field/attribute level
  • Recorded for the active parcel, name, building… or for the entire dataset or recordset results (permanent)
  • Metadata recorded along with the note (i.e. the author, date, dept. fiscal year, entity name, attribute/field name… is saved along with the note)
  • Additional security level based on authorship (my notes, other people notes)
  • Allowed or Required (on creation or on modification) Business Entity notes
  • Allowed or Required notes on Attributes
  • Priority status (3)
  • Private notes

User Interface

  • Auto-hide and dockable Note Pane synchronized with active form and ids
  • Notes are saved with the form
  • Centralized Notes Viewer with Search & Results (sort, group, print and export to xls)
  • Search Criteria:
    • Dataset: All, Current Dataset, Current Parcel
    • Author: All, Mine, Specific Author
    • Subject: Entity name, Attribute name, Table name, Column name
    • Date: Fiscal Year From and To, Entry Date From and To
    • General: Priority, Exclude or Include Private Notes
  • Visual representation (cues) of the note state on the form (required & missing, required and available … )
  • Notes can be deleted

Business Rules

  • Required Note Option to enable an additional layer of security to prevent a user from completing an action unless a note is created
  • Is dirty property is set to true on the form when a note is created or modified

Examples

  1. in a profile with Parcel Linking, if a new parcel link is created, or a modification is made to an existing Start Date or End Date, justification (note entry) may be required to complete the action (save or modify).

Setup (BED)

Setup in the Business Entities Designer as true or false properties for the Business Entity or for an Attribute (field).

Business Entity

  • A note is required on creation
  • A note is required on modification

Attribute

  • Allow notes
  • A note is required on modification

Security

In Govern Security Manager (GSM), there are 2 items that can be secured for notes; Entry & Viewer.
In addition, a distinction is made for Centralized Notes Entry between My Notes (notes entered by the user) and Other people’s Notes.

Expand ApplicationsGovernMenuViewViewCentral Notes to get the following:
Central Notes (change to Centralized Notes)

  • Central Notes Entry
    • My notes
    • Other notes
  • Central Notes viewer

For more information, see 102-Govern Security Manager (GSM) OpenForms System Suite

Technical Info

Tables

PC_CENTRAL_NOTES
PC_LK_CENTRAL_NOTES

[v6.0] New Govern Standard Attribute PC_CENTRAL_NOTES REQUIRED

Best Practices

  • Do not overuse (it is human nature to overdo it); this can be overwhelming when reviewing the information.
  • If Required Notes are not set properly, they can be a burden for users with data entry functions.


101-std-fea-009


0 votes, average: 0.00 out of 50 votes, average: 0.00 out of 50 votes, average: 0.00 out of 50 votes, average: 0.00 out of 50 votes, average: 0.00 out of 5 (0 votes, average: 0.00 out of 5)
You need to be a registered member to rate this.
Loading...

Govern Events

Govern Events

Overview

This page contains information that is related to Govern related events such as User Conferences, Workshops, and so on. These will include  past, current, and upcoming events. In the sections below, you will find information such as .PDF files of presentations that were given during the events.

Images & Presentations

The following links to presentations are presented in reverse chronological order, i.e. the most current presented first, followed by the next most recent, to the oldest at the bottom of the list.

2020 Harris Govern User Conference

The 2020 Harris Govern User Conference was held on March 9 – 11, 2020 at the Hilton Granite Park, Plano, TX.

The following are the Govern related presentations:


TOPIC Presentation Title & Date FILE TYPE
eGovern The New eGov Components (03/09/2020) * Adobe PDF
Expressions in OpenForms How to write Expressions in OpenForms (03/09/2020) * Adobe PDF
Fast Cash Collection Fast Cash Collection (03/10/2020) * Adobe PDF
How to Use SSRS How to use SSRS (03/10/2020) * Adobe PDF
New Technologies in OpenForm New Technology in Open Forms (03/10/2020) * Adobe PDF
OpenForms Design OpenForms Design (03/11/2020) * Adobe PDF

* Click on the required file type to view or download the file.


user_conferences


0 votes, average: 0.00 out of 50 votes, average: 0.00 out of 50 votes, average: 0.00 out of 50 votes, average: 0.00 out of 50 votes, average: 0.00 out of 5 (0 votes, average: 0.00 out of 5)
You need to be a registered member to rate this.
Loading...